A box is a necessary thing for every girl. After all, you can store a variety of jewelry and decorations in it. Of course, you can buy any option you like in the store, but we suggest trying to make it yourself. This box will meet all your requirements and will definitely become a stylish accent in the room.
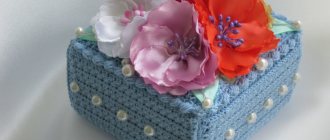
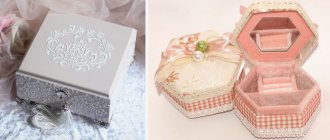
Shabby chic style box
This elegant small box is perfect for storing jewelry.
To create it you will need:
- box “Raffaello”;
- lace;
- beaded ribbon;
- textile;
- decorative elements;
- threads;
- glue;
- polystyrene foam or penoplex;
- paper;
- thick thread;
- sheet with a picture.
Cut a circle out of paper the size of the bottom of the box. We prepare a volumetric circle of the same size from polystyrene foam or penoplex. Glue a sheet of paper around the box with a design.
Cut out a circle of fabric slightly larger than the foam.
We place a circle of paper on top of the foam and cover it with fabric. This will be the lid of the box.
We connect the lid to the box.
We decorate the box with lace, beads, thick thread and other elements.
Option number 4. Product with concave lid
Drawing of a box with a concave lid
Casket with a concave lid Making a simple casket
Sawing out the curved lid Finishing the lid
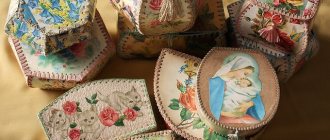
Boxes made of wooden bracelets
Stylish, bright, handmade boxes will definitely become a bright accent in your interior.
To make them, we will prepare the following materials:
- wooden bracelets or blanks of this shape;
- glue gun;
- polymer clay of different colors;
- tools for working with it;
- round cookie cutters;
- white marker;
- paints;
- brushes
Roll out a thin layer of polymer clay using a rolling pin.
We squeeze out a circle with the bracelet, which will be the bottom of the box. We bake it following the instructions provided by the clay manufacturer.
We paint the bracelet with yellow paint.
Using a white marker, draw a pattern on the bracelet. In this case, diamonds.
We insert the bottom inside the bracelet and glue it with special hot glue.
Take two cookie cutters. One of them should have the diameter of the bracelet, and the second should be slightly smaller.
Squeeze out circles from green polymer clay. We bake them and glue them together.
Using a knife, cut out leaves from a layer of polymer clay. We bake them and glue them to the lid of the box.
A bright, summer box is ready!
You can make other boxes using the same principle. Excellent examples in the photo.
Choosing the shape of the casket
The shape of the chest should be chosen so that it not only fits well into the interior, but also brings benefits.
You can choose between the following forms:
- Simple rectangular
- Square
- Round
- Triangular
- Heart shaped
Eggshell box
Anyone can make an unusual box with eggshell decor. It looks quite interesting, so it will definitely attract attention.
We will prepare the following materials:
- cardboard box;
- eggshell;
- paints;
- napkins;
- PVA glue;
- manicure sticks;
- brush.
Clean and smooth the box using sandpaper.
We coat a small area of the box with PVA glue and apply the shell to the surface.
Use a stick to poke it a little so that the shell cracks. Then we move the fragments apart to the required distance to form a mosaic.
When all the shells are laid out, treat the surface with PVA glue.
We cover the box with acrylic paint in several layers.
Let's start decorating. To do this, separate two layers from the napkin, leaving the one with the design on it. We coat the surface with a layer of PVA and immediately apply a napkin, after which we apply another layer of glue.
Let the box dry for several hours.
Master class on creating a box with drawers
You can make an excellent box with retractable drawers with your own hands from available resources, such as cardboard or matchboxes. Regular matchboxes will only hold tiny rings, but if you buy travel or fireplace matches, you can make a full-fledged box.
Required items to create a box:
- thick cardboard - for the frame;
- matchboxes for boxes;
- decorative buttons for handles;
- for decoration, adhesive-based film, wallpaper or leftover leather.
Formation will take very little time:
- matchboxes, without a layer of sulfur, glued together;
- Glue thick cardboard on the outside;
- surfaces that are visible to decorate with wallpaper or film;
- Secure decorative buttons onto fishing line or wire using an awl.
If desired, decorate with beads, drawings, bows.
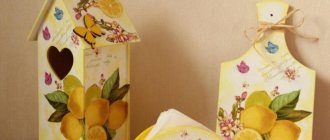
Milk packaging box
A small box is an excellent solution for various small items. That's why girls like her so much.
To work you will need the following:
- packaging for dairy products;
- textile;
- double-sided tape;
- scissors;
- ruler;
- ribbon;
- knife.
We cut out two identical containers from the packaging to create compartments for the box.
We connect them together with double-sided tape and cover the box with fabric. Don't forget to treat the bottom.
Cut out a rectangle from the packaging that will serve as the lid. We cover it with fabric using tape. Glue a ribbon so that you can tie the box.
We connect the base and lid with double-sided tape. A cute box for small items is ready!
New life for an old book
Another interesting way is to create a box from a book or an old diary. Such a thing is suitable not only for decorations. You will become the owner of a secret cache to store your deepest secrets.
For the manufacturing process you will need the following:
- A book or thick diary;
- Stationery knife and glue;
- Pencil;
- Materials for decoration (fabric, napkins for decoupage, colored paper - optional).
Let's look at the main features and stages of work!
- The cover of the book will act as the lid and bottom.
- The pages need to be cut out, leaving indentations from the edges.
- First, on the first page we draw the shape of the future box. It can be round or rectangular.
- Then, using a stationery knife, we cut through all the pages at once so that the cut line is even.
- We remove the pages; they will no longer be useful.
- Next, glue all the sheets together to form the walls.
- The final stage is decorating the box. Here everything depends on your desire. You can leave the appearance unchanged so that no one will guess about the new hiding place on the shelf. You can decorate the box using decoupage, paints, colored paper or fabric.
Box in mosaic technique
To make such a box with your own hands you will need:
- polymer clay;
- liquid plastic (fimo-gel);
- knife and scissors;
- tape reels;
- cardboard;
- glue;
- satin ribbon;
- texture sheets for clay;
- talc;
- plastic varnish;
- brush;
- roller for rolling out plastic.
Cut out two circles from cardboard that will be the bottom of the base and the top of the lid.
Glue the parts together using glue.
Polymer clay of any color can be used as decoration. But white is considered mandatory, since it can be used to create different shades.
Roll out a thin layer of clay to decorate the inside of the box.
We cut the clay a little wider than the bobbin.
We cut it into several parts, making cuts.
We prepare the bobbin by lubricating the walls and bottom joints with a special gel.
Place the clay on the prepared area and press well. It is very important that no air remains, as bubbles may appear later.
Use a knife to cut off the top edge.
We cover the bobbin with clay, working out the joints well.
Cut a circle out of clay, slightly smaller than the inner diameter of the base.
Lubricate the bottom and attach the circle.
To hide the joints, we make flagella of a contrasting color and lay them out.
We give the vertical joints a similarity to a decorative seam.
We decorate the second part of the box in the same way, after which we bake them in the oven. The temperature and duration are indicated by the manufacturer on the packaging.
In the meantime, we are preparing the design for the outer walls. To prevent the plastic from getting stuck in the pattern on the texture sheet, we use talc.
Using a roller for rolling out plastic, we form a variety of designs.
We cut them into squares for ease of use.
After the base has cooled, lubricate it with gel and lay out the mosaic. We alternate colors and designs to make the box original.
Leave one strip free to make a fastening.
Glue the satin ribbon to the base, and then lubricate it with gel to cover it with squares.
Cover the bottom of the box with a layer of clay and bake it in the oven.
After the lower part has cooled, decorate the upper part. Lay out the bottom row in squares, lubricating the base with gel. We leave one row empty to connect the two parts of the box.
We decorate the lid with triangular-shaped pieces of clay.
Press them tightly to the base.
Glue the second part of the satin ribbon to the lid.
We make a small loop from the ribbon.
We lift the mosaic pieces and glue the tape. Bake the finished product. Then we cover the box with white acrylic paint.
We wash off the paint from the convex patterns with a damp cloth. Cover with matte plastic varnish.
This unusual box is ready for use.
The most common materials for crafts
As for materials for creating a box, there are many options. It all depends on the ideas and available tools of the master. Below are the materials from which caskets are usually made, as well as master classes on the intricacies of making caskets from different materials. So, basically, boxes are made from:
- Cardboard
- Postcards
- Newspaper sticks
- Popsicle sticks
- Shoe box
- Plywood
- Matchboxes
Of course, the materials can be completely different, depending on what a person has at hand, but the above are the most common.
From newspaper sticks
In addition to newspaper, pages of old books or glossy magazines are suitable for twisting “straws”. First, you need to cut the material used into strips about 5 cm wide. Then you need to take a knitting needle and wind a sheet on it diagonally. In this case, the tip of the sheet must be glued with glue. You should have about 18-24 sticks on hand.
The sticks are painted with paint according to the needleworker's taste, and time is given for the paint to dry. Then you need to take a piece of cardboard of the shape that the casket is supposed to be and glue the painted tubes to it. After this, the entire contour of the bottom is first braided with one longer stick and the remaining tubes are glued onto it until the desired height is reached.
When the box reaches the desired height, you can bend and trim the ends of the tubes. Then you can start making a lid for the casket by gluing a textile bow or other decor onto it.
From popsicle sticks
Another idea is to make a box using popsicle sticks. In this case, you need about 30 of them. You will also need hot glue, a little corrugated cardboard, acrylic paints of two colors, scissors, a ruler, a pencil and satin ribbons.
It will look interesting if you paint 14 sticks one color and 15 another. From corrugated cardboard you need to cut 2 rectangular fragments with parameters 5.5 by 7 cm, 2 semicircular fragments with parameters 7 by 3 cm, then all these pieces must be painted.
To assemble the bottom you will need 7 sticks. Cardboard sides are glued to the bottom in a vertical position. The other two sides are lined up with 6 sticks each and attached to the sides of the cardboard sides. The semicircular fragments are connected to each other with 10 sticks, thus completing the lid. Tape is glued to the ends, and the lid is attached with two tapes.
From shoe boxes
One of the easiest options to make a beautiful and useful box is to use a shoe box. To create a casket, just cover the box with fabric or colored paper.
If you need a smaller box, you can use a box of tea, milk, etc. as a basis.
In the case of a milk carton, it will be enough to tip it on its side, make a slot in the shape of the letter “C” on top and bend this piece of cardboard. This will be the lid. Then the box needs to be covered with a beautiful fabric, after which the lid and bottom should be covered with two satin ribbon ties.
From plywood
Another fairly simple way to create a casket at home is to make an object from plywood. The only difficulty that may arise in the first step is preparing the required size plywood bars.
If you take a lid and a bottom of 10x10 cm, then the sides should be 10x8 cm. The sides of the casket are glued together at an angle of 45 degrees. The sides are pre-cut properly. Then the bottom is glued. To secure the lid, you need to install hinges using self-tapping screws. It is very important to chamfer the hinges on one of the sides and on the lid of the box. The outer part of the resulting box is decorated based on the imagination of the master.
From matchboxes
When making a chest from matchboxes, the craftsman expects some minor work. The crafter will need 10 boxes, thick cardboard, glue and various things for decoration: beautiful photos and fabrics for pasting, artificial flowers. First of all, you need to cut out a square frame from cardboard. Then you need to glue the matchboxes together. Usually they are glued together in 2 or 5 boxes, but the quantity can be absolutely any. The boxes in this case will serve as retractable chest of drawers.
The resulting chest of drawers must be glued to the frame so that the cardboard inserts are on all sides. The next step is decorating the box. You can use nails, small hooks, and decorative stones as handles for drawers.
In conclusion, it is worth noting that there are many options for making and decorating caskets at home.
The article provided listed the basic materials at hand and step-by-step instructions with the necessary actions for gluing the boxes. In addition to the above materials, boxes can be made from bamboo napkins, vinyl wallpaper, salt dough, sewer pipe, etc. There are many options and it all depends on the means at hand and the skill of the craftsman. Also, boxes can have unusual shapes and be decorated as much as your imagination and creativity allow.
Box out of the box
Every girl will love this stunning box. It won’t take a lot of time or money to make it, so we recommend giving it a try.
Necessary materials:
- scissors;
- disks;
- cardboard box;
- putty;
- glue.
We prepare the disks by cutting them into pieces. Then glue it onto a cardboard box. Leave the product for some time until completely dry.
We rub the seams between the pieces with putty.
We remove excess grout and process the corners and seams.
Required materials and tools
Components for manufacturing:
- Cardboard with a density of 260-280 g/m3.
- Several pieces of different materials.
- Glue (the more the better).
- Lots of fleece.
- Decoration materials (beads, seed beads, etc.).
- Paper tape.
- Office tools.
How to decorate with carvings
Carved boxes look much more original and interesting, but such work requires certain skills and knowledge. For beginners who decide to try their hand at wood carving, experienced craftsmen recommend starting with simple geometric shapes and large patterns. With a certain amount of patience, even a novice master will be able to cope with such a task.
The drawing is applied to the surface with a pencil, each line is well drawn. After this, the pattern is carefully cut out with an oblique knife or chisel in strict accordance with the applied markings. Small flaws and irregularities can be corrected with a file or fine sandpaper.
Drawings for making a travel bag
The first and most important stage of any master’s work is preparing a drawing. The diagram of the future casket can be found ready-made or sketched on a sheet of paper. The following points must be noted on the drawing:
- Dimensions of the accessory itself, including the height of the walls, width and length of the bottom. The lid is depicted as a separate element, since its width must exceed the dimensions of the base.
- In addition, the plan diagram should indicate what type of cover is planned to be made (folding or removable model).
- Don’t forget to display the shape of the decorative toiletry case.
The best solution would be a separate image of the accessory as a whole, and sketches of each detail.
painting
To paint a product, it is not necessary to have the talent of an artist. In addition, stencils can be used to decorate the box. You can choose absolutely any image, it all depends on your imagination and preferences. To work you will need:
- casket or box;
- primer;
- acrylic paints;
- brushes;
- stencil (you can make it yourself or buy it at a specialty store);
- masking tape;
- sandpaper.
Advice! It is better to pre-treat the box with sandpaper and varnish it.
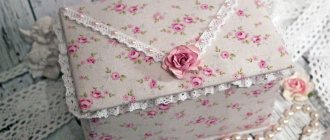
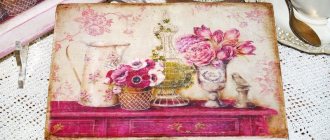
One of the features of the shabby chic style is floral motifs.
Standard mustard-colored box with ribbons - simple and beautiful
Stylish scale made using decoupage technique
The work includes several stages:
- Primer coating.
- Sanding.
- Tape the bottom corners with tape.
- Coating the product with light acrylic paint.
Important! Acrylic is applied evenly.
- After drying, the surface is treated with sandpaper and a layer of paint is applied a tone darker. This layer should be liquid so that you can then blot it with a sponge, giving the surface texture.
- Secure the base with varnish.
- Use masking tape to cover the parts of the box that will not be decorated.
- The selected stencil is fixed.
- The drawing is carefully painted over. The paint should be thick and water should be used in minimal quantities.
It is possible that after drying the drawing will have to be repainted, since the color will most likely be pale the first time. If the stencil is a small element of the composition, then the action will have to be repeated several times. After the painting has dried, the box is coated with varnish.
This master class allows you to create a product whose surface looks like fabric. This is achieved due to the fact that between the main layers the box is varnished, and the paint does not saturate the wood.
The box decorated with beads and leaves looks very beautiful
This type of decor for the box will be an excellent addition to the interior or an original gift.
See also Bottle decor for rooms in different styles