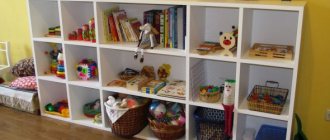
Not so long ago, shelves in rooms primarily served functional purposes and only to a small extent design purposes. The explanation for this phenomenon is simple - there was very little furniture, it was possible to buy an ordinary bedside table only through an acquaintance. There was nowhere to place household items, so wall shelves were used instead of shelves in closets.
There was a catastrophic lack of space for various trinkets; only the most experienced housewives managed to place a small number of beautiful objects on them. Another problem is the unsatisfactory appearance of the products; in those days, few manufacturers paid attention to such a trifle as appearance. It was necessary to fulfill the plan in terms of quantity, not quality.
Today the situation has changed dramatically; shelves are more decorative than functional. They are made from various materials and using the most modern technologies. Designers have developed a large selection of specific original solutions: shelves can be large or small, heavy or light, made of natural or artificial materials. Depending on the type, the issue of fasteners is also resolved.
DIY fasteners for shelves to the wall
Types of fasteners
The classification is made taking into account the location of fastening devices on the shelf.
Shelf fasteners differ not only in appearance, but also in location
Hidden
Due to hidden fixation, it is possible to save free space on the wall and fill it with other necessary elements. The hidden fastener is completely invisible, it is mounted on the back of the shelves, and can be installed on vertical or horizontal parts. There are hidden elements located inside the shelf frame; before installing them, it is necessary to carry out special preparatory work.
- Suspensions (hanging loops). Traditional fastening, used for shelves made of natural wood, OSB boards, plywood, chipboard, etc. Not suitable for glass, plastic and metal products. The hinges are fixed into specially made recesses, their dimensions do not protrude beyond the perimeter of the shelf, and after fastening they become invisible. Concealed hangers
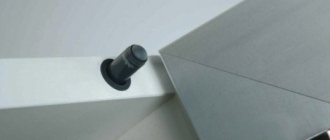
- Consoles (rods). A more modern type of shelf fixation, used for the same materials as hinged hinges. Secret holes are drilled in the shelf frame into which rods (consoles) are inserted. The fasteners are metal, the outer surfaces are covered with plastic, and in terms of strength and reliability it falls into the middle category. The fact is that as a result of drilling a hole, the thickness of the load-bearing element is reduced by two or more times, and this has a negative impact on mechanical stability.
Concealed fastener made of metal plate and rods
Concealed fastening with timber
Open
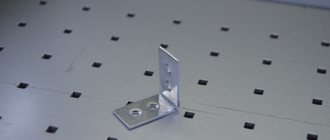
These elements are always noticeable; thanks to original engineering solutions, it is possible to redistribute the loads and increase the stability of the shelves. If in the above listed options for hidden fasteners, the loads act only on the dowel or console, and they are pulled out of the wall due to the moment of rotation, then the corners and brackets do not work that way. They remove most of the load from the dowels and transfer it to the wall due to the curved stop. The original design of the brackets becomes a real decoration of the interior; such fasteners can be used for all shelves without exception, including glass ones.
The brackets also perform a decorative function.
Types of fastenings used
I think you understand perfectly well that using shelf brackets in a kitchen, bookcase or closet is not the best solution, since they will only take up extra space.
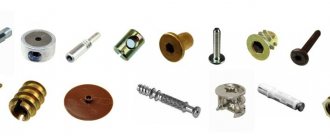
There are different methods of fastening, but the hidden one is rightly considered optimal for our situation. Let's focus on stationary shelves and fastenings for them. These will be:
- euroscrews;
- Rastexes;
- rafixes;
- dowels;
- corners;
- conical types of screeds;
- screw ties;
- shelf holders.
Each of them can be bought without any problems at a hardware store, in Leroy Merlin, or simply at the market in rows with accessories.
Now let's talk about each option separately
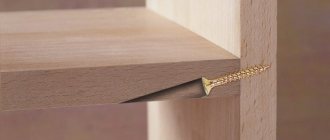
Euroscrews
Euroscrews, also known as confirmats, are currently widely used in modern furniture production.
They are used to connect chipboard elements together.
The standard element length is 50 mm with a diameter of 6.4 mm. To make a hole for a Euroscrew, you need to use a special drill called a countersink. Plus, you can use a jig, which will help make the hole as smooth and neat as possible. The drill should be slightly narrower than the screw itself. Due to its structure, the screw easily cuts into the material, and at the same time creates the most durable connection. A practical and functional option for attaching shelves made of chipboard. That is why fasteners have become so widespread.
But the Europrop has its drawbacks.
The caps remain visible, so they need to be covered with stickers or plastic plugs. Not everyone likes this option from an aesthetic point of view.
But what is considered even more important is that such fastening does not allow installing shelves with a partition on the same center line. Only in a run and vertically.
Rastexes
Quite interesting options that require their own instructions. The rasteks are based on a metal component in the form of an eccentric sleeve and a screw dowel.
The fastening is called an eccentric tie. Suitable for installation without visible fasteners.
Another name for Rastex is minifixes.
The point of installation is that there is a rotating sleeve that presses the dowel head. To install the shelf, you need to install a sleeve into the horizontal furniture plane from the bottom of the slab.
- a hole is drilled for the furniture eccentric;
- a special cutter is used for this;
- the distance should be about 34 mm from the edge of the element to the center point of the sleeve;
- excavation is made to a depth of about 13 mm;
- The eccentric is inserted into the inside with the cutout;
- a hole is made from the end to the opening, which was cut out with a milling cutter;
- a recess is made in the cabinet wall and partition for the existing bushing;
- a plastic furniture sleeve is driven in using a rubber hammer;
- next comes the dowel;
- the second end of the dowel enters the channel and is inserted up to the rotary sleeve;
- the bushing is rotated and the screw head is fixed.
I can’t say that it’s very easy to do this at home. But the mount is convenient and practical.
Good for shelves. But this is hardly the best solution for self-implementation if you are a beginner and don’t have special cutters.
Conical couplers
If you don’t know what to replace the rastexes with, use a conical screed. They are similar to each other in many ways.
As there, here the rod must be screwed into the dowel, which is located in the cabinet wall. Using a cutter, a seat for the bushing is made.
The difference is that the rotary cylinder has a through mounting hole. And at the end of the rod there is a recess of a regular circular shape. Through a special hole in the shelf, the rod is inserted directly into the sleeve. A cone-type screw is screwed on top. It promotes rigid fixation of the rod. As a result, we get a fairly strong, and at the same time hidden fastening. Again, in terms of independent implementation, it is not the best option for beginners. But in terms of quality and invisibility, it’s a very cool solution.
If you have used one of the presented mounts, be sure to write in the comments.
And we move on.
Screw ties
If you don't know how to strengthen or lengthen an existing shelf, you can use the screw tie method.
This fastening is actively used to make an additional hidden extension of an existing shelf due to an additional plane, or to connect two shelves at the same level. In the latter case, they should be located across the partition. This type of fastening includes a pair of semicircular brackets. A screw with a hexagonal fastening nut passes through the holes provided.
Just do not confuse it with an intersectional screed, since this is a slightly different type of fastener.
Rafixes
This version of the screed is also called VB.
This is a sleeve made of plastic or metal, complemented by a dowel-screw.
See also
Fronts for hinged cabinets: which ones to choose, where to buy
The installation process looks like this:
- a recess is cut out in the shelf using a cutter;
- a bushing is driven into the hole;
- a hole is made on the cabinet wall or on the partition for a furniture dowel;
- the dowel screw is screwed in;
- the shelf is laid on 4 dowels;
- tighten with a screwdriver.
The downside of the technology is that such a tie must be done in parallel with the use of dowels. Plus, the tightening must be done at an angle, which creates some inconvenience during the installation process. Plus this is an open type of fastener.
Shelf supports
For shelf supports in cabinets, it is necessary to make holes into which supports are driven.
The supports themselves come in the form of cylinders and may have their own small shelves. After inserting the holders, shelves are placed on them.
A classic installation option that allows you to easily remove the shelves if necessary. But rigid fixation is not provided here.
Furniture dowels
They're wooden dowels. Usually they have a length of 30 mm with a diameter of 8 mm.
Dowels are practically not used as an independent sole fastening, but are combined with other types of fittings.
Inserting the dowel is quite simple. You need to make a hole about 15 mm deep or more in the end of the stove and the cabinet wall. A few drops of PVA are added there, driven into the hole, and inserted into the counter hole.
Please note that in this case the shelves will have to be fastened on both sides at the same time. And this is not very convenient when assembling a cabinet. But it’s simple, the fastening is invisible.
Dependence of the mounting method on the wall material
The physical characteristics of building materials have a significant impact on the optimal technology for fastening shelves. Modern industry produces many options for fasteners for various types of partitions, the correct choice of which is an indispensable condition for ensuring stable fixation.
Table. Types of fasteners depending on the wall material.
| Wall material | Brief description of the features of shelf fixing technology |
| Concrete, brick | These are the most durable materials that can withstand maximum loads. The shelves are fixed to concrete and brick with plastic dowels or metal anchors. |
| In terms of strength, it ranks right after brick and concrete; such walls are suitable for hanging heavily loaded shelves. For fastening, ordinary nails or wood screws are used. The amount of work is minimal, reliability is guaranteed for many years of operation. |
| A modern building material with low thermal conductivity, used both for facade walls and internal partitions. Foam concrete has a porous structure and low mechanical strength. To hang shelves, you must use special plastic or chemical dowels. But even special fasteners cannot ensure reliable fixation; it is not recommended to heavily load the shelves. |
| Interior partitions are made from it or interior walls are lined. This material is respected by designers, but civil engineers have an extremely negative attitude towards it. The first ones really like the opportunity to create unique elements, the ease of work and the versatility of using the material. Engineers do not respect them due to their extremely low physical strength. Only decorative shelves with minimal weight can be hung on such slabs. Special dowels are used to attach hanging shelves. |
Hidden hidden fasteners for shelves to the wall
The effect of furniture floating, without floor supports, is also maintained in the design of wall shelves. At the same time, it must be “thick” so that hidden fasteners to the wall can be hidden inside the thickness. There are many options for hidden fastenings for shelves to the wall. Conventionally, they can be divided into two groups: “frames” and “pins”. In the first case, a flat frame structure serves as the basis for fastening the shelf, in the second - special hidden mensol holders, which are pins with wall mounting.
Inner frame
Invisible fasteners for shelves to the wall are placed inside the cavity of the shelf itself. It is a frame with partitions made of thin timber, plywood or metal. The thin lining of such a shelf is painted in the desired color.
In general, this option for hidden fasteners for a wall shelf is more of a decorative nature. It’s not worth putting something heavy on such a shelf.
Hidden mensolo holders
It is more reliable to attach a bookshelf to the wall using mensol holders, which combine an anchor and a pin in their design.
Another practical option for hidden shelf fastening is a plate on anchors with welded pins for “stringing” the shelf.
There are other types of hidden pin holders with the same installation principle. For fastening glass shelves, options are available with special rubberized rings to prevent the glass surface from sliding on the metal. True, such shelf fastening cannot be called hidden - after all, it “lies” on top.
Step-by-step instructions for attaching a shelf to hinges
A traditional and reliable method of hanging shelves, it can be used on all types of walls, but with the above-mentioned weight restrictions.
Step 1. Determine the exact location of the shelf on the wall. For clarity, it is better to apply it and move it to different places, so you can choose the optimal placement.
Select the optimal shelf position
Step 2. Carefully mark the selected location on the wall. Do this with a thin ordinary pencil; using felt-tip pens is not recommended.
Mark the attachment points with a pencil
Practical advice. Place the marks so that they are not visible after attaching the shelf.
There are two ways to hide them:
- draw on the bottom or on the closed sides;
- during precise marking, raise the position of the shelf a few millimeters above the line, the horizontal elements of the product will cover it.
Step 3. Place the shelf on the table and accurately measure the distance between the hinge holes. This is a very important operation, make no mistake, measure only along the axis of symmetry of the element.
Measure the exact distance between the holes of the fastening loops
Step 4: Use a bubble level to mark the wall. Check all dimensions again.
Check the location of the level marks
Step 5: Start drilling holes. This must be done with a drill in hammer drill mode with a drill bit tipped. The diameter of the drill must match the diameter of the plastic part of the dowel.
Carefully drill holes in the wall
Practical advice. To reduce the amount of dust, it is recommended to secure a paper bag with tape near the hole. Place it as close to the drill as possible, due to this all the dust will fall into the bag and not onto the floor.
The depth of the hole should be 1–2 cm greater than the length of the dowel. The fact is that it is impossible to completely remove construction dust from it; it will not allow the plastic element of the dowel to be completely installed. Hammering it with great force is not recommended for two reasons. Firstly, with a high degree of probability he will still not sit down. Secondly, it is very difficult to get a deformed plastic element later. You have to increase the diameter of the hole, and then take special measures to reduce it.
The depth of the hole in the wall should always be slightly greater than the length of the dowel
Step 6. Insert the plastic parts of the dowels into the wall and screw the screws into them. Leave a gap between the cap of approximately 5 mm, it is necessary for the passage of the hinged loop.
Insert the dowel and screw in the self-tapping screw
All that remains is to hang the shelf in place and the work is completed. As mentioned above, this method is used for all types of shelves except glass.
Installation of shelves on corners
Types of shelf holders
First, you need to decide on the type of product. You can start from the characteristics of the material from which the shelf holders are made - it can be plastic, metal or a combined element. The reliability of the load-bearing fastener and, of course, its service life depend on this.
If you care more about aesthetic qualities than technical ones, consider prettier options. For example, a pelican shelf holder (with a top clamp) or some wrought iron frames not only provide stability to the crossbar, but also look great paired with it.
Finally, you can choose not only open bases, but also concealed mounting supports, as well as folding models. This is especially true in rooms that are oriented toward the “minimalism” style. If you need qualified help, contact the online manager on the site and he will tell you about a particular product.
How to install shelves with hidden mounts
This method appeared relatively recently and is used only for shelves made of thick and durable materials: natural wood, OSB boards, plywood, etc. The shelf is hung on metal pins fixed to the wall. You need to have a wood drill and a pobedit-tipped drill for drilling holes in the wall. Hanging is only possible on brick or concrete walls. Even hollow bricks create difficulties; in such cases, it is necessary to use chemical compounds to fix the elements in the voids. It is not recommended to fix it to foam concrete walls, and it is prohibited to fix it to plasterboard walls.
Step 1: Prepare your tools. You will need a hammer, open-end or adjustable wrench, drill with hammer drill mode and measuring tools.
You will need very few tools
Step 2. Mark the location of the holes on the shelf. In our example, the wall of the shelf is thick, glued together from two laminated OSB boards. Due to this, the strength and thickness of the product have significantly increased; a hidden fastener Ø 12 mm can be used. How to correctly mark drilling locations?
- But on a flat surface, place the shelf on its edge, with the side attached to the wall facing up.
- Using a construction square, draw lines perpendicular to the plane on both sides of the shelf. The distance from the edges is approximately 10 cm, specific values may vary slightly depending on the width of the shelf.
Draw perpendicular lines at the end of the shelf - Make marks for the center of the hole with a slight offset from the gluing line. Keep in mind that the maximum load is on the top plane, if possible leave it wider.
- Place a level along the edge of the shelf and make marks along the edges of the shelf and on the front side. The second marks indicate the location of the holes.
Mark drilling points on the lines
Step 3. Choose a place to fix the shelf on the wall, always take into account the existing interior of the room and the characteristics of the objects placed on it. If these are flowers, then you need to monitor the lighting; for books, the amount of light does not matter. Using a pencil, very carefully place dots on the wall along the edges of the shelf. You can draw thin lines, but then when drilling holes, you need to lift the shelf a little and cover the marks.
Determine shelf location
Step 4. Place a level against the wall and find a horizontal position. Transfer the location of the mounting holes to the wall.
Using a level, mark drilling locations for fasteners
Important. Check the position several times, then correcting mistakes is very difficult.
If the actual location of the hole is very different from the required one, you will have to drill it again. At the same time, it is not so easy to properly seal an old hole; an experienced builder will always see a defect.
Step 5. Drill two holes in the shelf for the fastening rods. First find out their length, make the holes a little deeper. Be sure to keep the drill in a strictly vertical position. If it goes slightly at an angle, then it will be impossible to insert long rods into the bar. The greater the depth, the more the hole deviates to the side, and the rods are made of steel; they cannot be bent. This is a very unpleasant situation; you will need to move the holes in the wall and shelf, and start all the work over again.
Holes are drilled in the shelf strictly at right angles to the surface.
Step 6: Drill holes in the wall. The algorithm of work is the same.
Drilling holes in the wall
Practical advice. To reduce the amount of dust, you can use a household vacuum cleaner. Remove the nozzle and place the pipe as close as possible to the hole to be drilled. Turn on the drill only when the vacuum cleaner is running. It is inconvenient to hold a drill and a pipe at the same time on your own; you need to use the services of an assistant.
Step 7. Insert the fastener into the holes and tighten it tightly; if the elements do not fit in completely, then hammer into the end. When screwed, the plastic parts increase in diameter and provide a secure fit. You need to use keys; it is impossible to create the necessary torque with your hands.
Screwing rods into the wall
Step 8. Place the shelf on the pegs and check its position using a bubble level. If it is in a horizontal position - great, if not - correct the defect. The task is long, nervous and thankless. There are several practical tips on how to fix a marriage with minimal loss of time and nerve cells.
Secure the shelf and check its horizontalness
- Carefully inspect the position of the shelf, make a preliminary plan for eliminating the defect. Decide where it is better to make new holes: in the wall or shelf. Think about what this will give you and how it will affect the arrangement of elements.
- Choose the option that will not only correct the position of the shelf, but will also be least noticeable. Now there is no need to reckon with time, the main thing is that the new holes are hidden.
The situation can only be corrected by drilling new holes - in the wall or shelf.
The final solution depends on the geometric appearance and size of the shelf, but most often it is necessary to drill new holes and shift the distance between them. Arrange them in such a way that the old ones are covered by the back elements of the shelf.
Old holes will have to be filled with putty and the shelf hung so as to hide the defect
Hidden installation is considered more labor-intensive, but the shelves look much more impressive. The main thing is to do everything with the utmost care so that no marks remain on the wall.
Wooden shelf with hidden fastening
Hidden fastening has two significant disadvantages: low strength and the likelihood of the shelf being pulled out by children or awkward movements. The first problem can be solved simply - increase the number of rods. And the second requires the use of special hanging technology. Which one?
Choosing accessories for fastening shelves
The choice of one or another fitting depends on the level of workload of the structure and the aesthetic requirements for a given shelf, but first, let’s figure out what shelves in cabinets are made of in general.
Types of materials used to make shelves
| Illustrations | Recommendations |
| Tree . Shelves made of natural wood are considered a symbol of environmental purity; they are strong and durable. But type-setting wooden panels are quite bulky. In addition to their direct purpose, such shelves in open shelving also carry a serious decorative load. | |
| laminated chipboard. Laminated chipboards are the most affordable material for making furniture. The minimum thickness of laminated chipboard furniture boards is 16 mm. Typically, the width of a solid shelf made of chipboard does not exceed 70 cm. The strength of the material is not high, so it is not recommended to install holders with internal inserts, since the sheet delaminates when the vertical load increases. | |
| MDF . Environmentally friendly and durable material. The thickness of furniture MDF starts from 16 mm. The strength of these boards is higher than that of their chipboard counterparts. | |
| Plywood . Glued wood veneer is highly durable. Shelves in cabinets up to 60 cm in size can be made from 8 mm thick plywood. But plywood is installed only on supporting fasteners; cutting into the end of the sheet is not advisable. | |
| Furniture board . The furniture panel is assembled from wooden planks, after which the slab is covered with veneer. Visually, the product resembles a natural wooden board. The material is universal, any mount can be mounted under it. | |
| Metal. Metal shelves are the most durable. Solid sheet metal for the manufacture of such structures is used only when assembling iron cabinets for technical needs. In household furniture, mesh shelves are made from metal, for example, for shoes. | |
| Glass. The load-bearing capacity of the glass leaves much to be desired, but the appearance is quite original. Most often, racks for dishes are made of glass, but again, the dishes should not be heavy; the maximum that a glass shelf can support are saucers, cups, or thin-walled glasses. In addition, glass is popular when arranging display cabinets; it is transparent and does not interfere with the view of the items on the display. By the way, when installing glass shelves, the doors in the cabinet are also made of glass or with glass inserts. |
Types of shelves depending on the method of their fastening
There are 3 main groups of cabinet shelves:
- Stationary shelves - in this niche there are overhead planes and panels firmly attached to the base. During operation, the structure does not move.
There are stationary shelves in all cabinets.
- Drawer designs are essentially the same drawers, only without side walls. They are convenient to use, but such accessories are expensive.
Retractable structures appeared relatively recently.
- Rotating designs - round shelves mounted on a central rotating stand are quite convenient, but a specific round design is not suitable for every cabinet; too much useful space is wasted.
Rotating shelves are easy to use and have an original appearance.
Accessories for stationary shelves
All types of fittings described above, namely, eccentrics, conical holders, corners, etc. originally developed for arranging stationary shelves. In addition to them, there are also so-called overhead holders. There are hundreds of models of such holders, but the meaning is the same - the stops are attached to the walls of the cabinet and a shield is placed on them.
Overhead holders are considered the simplest designs.
Installation of overhead shelf holders
In theory, there is nothing complicated in installing overhead shelf holders. You need to use a level to mark the side racks of the cabinet, screw the stops to them and place the shield on these stops. Most often, overhead brackets are attached with self-tapping screws.
Overhead shelf holders are firmly attached to the cabinet walls.
Installation of mortise shelf holders
If you do not take into account the eccentrics, as well as screw and conical couplers, then the easiest installation method will be to insert a regular pin into a pre-drilled blind hole. The stop can be metal or plastic. Some home craftsmen insert wooden dowels as stops.
Installation diagram of a hidden mortise shelf holder.
Accessories for pull-out shelves
As already mentioned, the same fittings are used here as for the drawers. There are 2 types of structures:
- Roller mechanism - in such designs, plastic rollers are used as the main sliding element. In this case, reliability depends on the manufacturer’s brand.
Roller guides have an affordable price.
- Steel hinges - steel balls are used as the main sliding element in such guides. Compared to the previous version, ball guides are much more reliable, but more expensive.
The service life of guides with steel balls reaches up to 50 years.
Installation of retractable fittings
| Illustrations | Recommendations |
| Stage 1. We screw the guides to the end of the retractable shield.
| |
| Stage 2 . We mark and also screw the counter strips of the sliding mechanisms to the side walls of the cabinet with self-tapping screws. | |
| Stage 3 . We insert the shelf into the guides and use it. |
Accessories for rotating shelves
Despite the relatively large dimensions and original appearance, such designs are extremely simple. They are sold as a set, which includes:
- A central rack with shelves or baskets installed on it; by the way, baskets and shelves can be removable.
- Two flanges are hinge mechanisms, between which a rack with shelves is mounted; the flanges are designed to hold and ensure rotation of the structure.
All rotating shelves are sold as a set.
Installation of a rotating shelf
There is nothing complicated in installing a rotating structure, the algorithm is as follows:
- Find the center of the niche and screw the top flange onto the screws.
- Using a plumb line, mark the mounting point of the lower flange and also screw it in with self-tapping screws.
- Insert a rack with shelves between the flanges and secure it with fasteners.
The rotating shelf is mounted using 2 flanges.
Original alternative shelf mounting
For hanging, you need to buy eccentric ties; they are often used for assembling furniture.
Eccentric installation diagram
Step 1. Mark the location of the eccentric couplers. The circles have standard sizes, the diameter of the elements is 15 mm, the length of the rod is 34 mm.
The locations of fasteners are marked on the shelf
Step 2. Using a Fortsner drill, drill out the seat. This tool makes a perfectly even technological hole, which allows you to fit the eccentric without side gaps and increase the strength of the connection.
Drill holes according to the markings
Important. Carefully control the depth, do not damage the front surface of the shelf.
A minimum of two elements are required per product. But in practice, this quantity is not enough; experienced furniture makers recommend increasing it to three or four.
Finished holes
Step 3. Make markings for drilling holes for the rod; they should be located in the center of the seats.
Mark the location of the rod with a pencil
Step 4. Drill holes, the axes of symmetry should be parallel to the side surfaces of the shelf. Insert the eccentrics into place; they will fit into the correct holes with a slight tension and will not fall out.
Insert eccentrics into the holes on the shelf
Step 5: Make marks on the wall. If the shelf has several horizontal parts placed at different levels, then this makes the process much more complicated. Taking all measurements using only a tape measure and a level is very time-consuming and difficult. In hardware stores there are special devices - pins, metal elements: one part is inserted and centered in the hole of the shelf, and the sharp end makes marks on the wall. Install them on the shelf, decide on the location of fixation and lightly hit the outer edges with a hammer to make marks on the wall. It is strongly recommended to use these devices in all cases where it becomes necessary to drill several perfectly coaxial holes in two adjacent planes. Their use virtually eliminates the possibility of error and saves a lot of time.
With the help of furniture tattoos it is convenient to make marks for holes on any surfaces
Step 6. Prepare holes in the wall and insert metal rods into them.
The rods are inserted into the holes in the wall
Step 7. Remove the marking cones (pins) from the shelf holes, insert the shelf and firmly tighten the eccentrics. If the shelf is large and there will be a lot of heavy objects on it, then the number of fixation points must be increased.
The shelf is firmly held, and the fasteners are completely invisible
Preparing shelves before installation
- When preparing shelves, first of all, it is necessary to take into account the weight that the structure must support.
- The second factor is visibility. You need to decide whether you are satisfied with overhead fasteners or need hidden ones. By the way, overhead fasteners are considered more durable.
- The aesthetic component plays an important role; the ends of the shelves must be finished, and the fasteners must be installed accurately and accurately.
Shelves can be either stationary or retractable.
What material to buy
In this case we are talking about fastening structures. The choice here is small; shelf fasteners come in steel, plastic and wood.
- Steel fasteners provide the structure with reliability and durability, so prefabricated systems are made exclusively from metal. If we talk about the disadvantages, then steel fasteners are an order of magnitude more expensive than all others.
- Plastic models occupy the budget sector; they are inexpensive and quite reliable. For cabinets designed to store clothes, plastic is perfect, but in loaded structures, for example, a tool cabinet, it is better to avoid plastic.
- The only wooden fasteners used to support shelves are dowels, but we’ll talk about them in more detail a little later.
Steel fasteners provide guaranteed strength.
Veneer edge band
Edge tapes are used for finishing the ends of laminated chipboard and MDF. There is a polymer version of the tape and a tape made of natural wood veneer. Both models are glued to the end of the slab using a heat press; only the types of glue differ.
At home, the tape can be glued using a regular iron, but this method is of poor quality, such edges often peel off over time, so it is better to entrust this procedure to professionals from the nearest custom-made furniture manufacturing company.
It is advisable to glue edgebanding tape made of natural veneer using professional equipment.
Corner screed
Furniture corners are considered the simplest and at the same time one of the most reliable fasteners. There are metal and plastic corners, both options are highly durable; the choice depends on the personal preferences of the owner and the design load on the structure. There are 2 ways to attach a furniture corner:
- In the simplest version, the corner is screwed directly with self-tapping screws. The entry points of the self-tapping screws are marked with an awl, after which the self-tapping screws are screwed into them.
Step-by-step instructions for fixing a furniture corner with self-tapping screws.
- The second method is more complex; here, after marking, a blind hole is drilled. A special plastic or metal plug with a thread for a screw inside is inserted into this hole, and the corner itself is screwed to the base with screws. Such models are convenient because they can be easily disassembled and reassembled.
Fasteners with plastic plugs for screws are considered more practical.
Screw tie
The screw method refers to hidden fasteners. The diagram below shows the principle of arranging a screw tie. Initially, a through horizontal hole is made through the side vertical wall into the end of the shelf. At the end point of this hole, another hole is drilled perpendicularly.
The threaded cylinder is inserted into the second vertical hole and adjusted so that the screw fits freely into the thread. The screw is inserted through the side wall and, having reached the “barrel”, is screwed into the thread.
Scheme of a screw coupler with hidden installation.
The disadvantage of a screw tie is the visibility of the screw on the front wall of the cabinet. Of course, the screw can be covered with a plug, but the plug is also visible and it only smoothes out the negative effect.
It is better for home craftsmen not to undertake the installation of a screw tie; the process involves very precise marking and drilling of holes, which can be a problem in home-made conditions.
Dowel
Dowels with full responsibility can be called one of the oldest types of fastening. The product is a round wooden rod with longitudinal notches.
Dowels are made from hard wood. Blind holes are drilled in adjacent parts, the diameter of which should be slightly less than the diameter of the dowel. Thanks to the longitudinal notches, the dowel fits tightly into the holes and holds the structural parts.
The main purpose of dowels is to insure parts against displacement. Dowels are rarely used as the main fastener; more often they are used as an auxiliary, backup fastener.
Wooden dowels are considered the simplest and most inexpensive type of fastener.
Euroscrew
Among professionals, Euroscrews are called confirmats. Such a screw can be called an improved furniture screw. The technology is simple: a hole is drilled through the side wall at the end of the shelf, after which the confirmat is screwed into it. The head is made to fit a hexagon and is subsequently covered with a plug.
Typically, such fasteners are used to assemble economy class furniture. It is not advisable to screw in and unscrew the confirms too often, since with each disassembly the thread destroys the structure of the chipboard or MDF, as a result of which the adhesion weakens.
To install the confirmat yourself, it is advisable for the master to acquire a special confirmat drill. Using this device, the hole is immediately drilled and countersunk to fit the head.
To install the confirmat, a special confirmat drill is used.
Conical coupler
This model refers to hidden prefabricated structures. A conical tie is somewhat reminiscent of a screw tie, but the design is a little more complicated.
- The central horizontal rod is screwed into the side vertical panel of the cabinet, while the hole for the rod is made blind, which means that the front side of the cabinet does not deteriorate.
- A metal barrel is installed in the horizontal shield of the shelf, designed to catch and fix the rod.
- The rod is fixed using a conical screw, which is screwed into the barrel and fits into a special recess on the rod.
Arranging a conical screed requires skill.
Eccentric coupler
Eccentrics, or minifixes as they are also called, are considered one of the most popular types of connecting fittings; almost every modern cabinet contains eccentrics.
The design consists of a stand, an eccentric head and a fitting (rotary nut). Compared to its competitors, the minifix operating scheme is more complex:
- As in the case of a conical tie, the stand is screwed into a blind hole in the vertical wall of the cabinet. The opposite end of the rack is equipped with a head.
- The eccentric with the foot is mounted in such a way that the head of the rack barely fits into the structure.
- After the head has entered, the eccentric rotates and, creating a lateral force, pulls the rack into itself.
Most modern cabinets are equipped with eccentric tie rod units.
Fastening glass shelves
This is a separate type of furniture, has its own differences and requires completely different fasteners. The main disadvantage of glass is fragility. Fastening elements must provide reliable fixation and at the same time minimize the forces on the glass. We will not consider the design differences of glass shelves; they do not have any effect on the fastening technology; it is recommended to use the same fasteners for all.
The design of glass shelves does not affect the choice of fixtures
The fasteners must meet the general requirements - eliminate point loads. The glass is inserted into special horizontal slots in the brackets, the clamp is made with small bolts. The bolts themselves have sharp ends; with slight pressure the glass cracks. To prevent such phenomena, special elements are used.
- Plastic insert. The dimensions correspond to the parameters of the brackets, fits into the technological slot and is adjacent to the glass on both sides. The main task of the insert is to increase friction between glass and metal and increase the reliability of fastening the glass shelf. There are plastic inserts inside the holders that protect the glass from damage.
- Metal plate. Placed between the bolt and the plastic insert, it evenly distributes the point load over the entire mounting area.
The metal plate takes the main load
The fastener is fixed to the wall under a level; the technology is no different from that described above. Plastic spacers are placed on the end of the glass, in this position the shelf is carefully inserted into the bracket installed on the wall.
Shelf holders are screwed to the wall with self-tapping screws
Important. During installation, the tightening bolts must be loosened. Unscrew them until the end is level with the plane of the fastener.
First, unscrew the tightening bolts on the brackets.
Next, you need to lift the shelf up a little, a gap will appear at the bottom. This is where the metal plates are inserted and the bolts rest on them. While tightening, they lift the plate up and it presses against the plastic inserts. And they, in turn, clamp down on the glass shelf.
The holders are screwed to the wall, the glass is inserted and the fasteners are clamped.
This mount, by the way, has one unique advantage - you can change the position of the shelf, move it slightly left/right. To do this, you just need to loosen the clamping screws a little, install the shelf in a new place and tighten them again.
Video - Do-it-yourself fastening for shelves to the wall
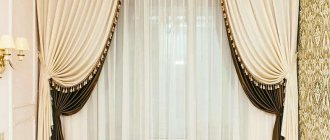
Shelves on the walls are always needed at bar counters. They are used not only as one of the furniture attributes for glasses, tea or coffee. These are important elements of the decor of the bar area, emphasizing the individuality and design. You must be able to professionally and reliably hang them on interior partitions made of various building materials. How to make a bar stool with your own hands so that it fits harmoniously into an existing style? There is an excellent article on our website with detailed recommendations.
Decorative fastening for shelves to the wall
In almost any hypermarket or construction market that sells finishing materials, you can buy fasteners for shelves to the wall - from the simplest consoles to decorative holders of interesting shapes. Shelf mounts are also found in various online stores, chains such as Leroy, Ikea, etc.
Consoles and brackets
The simplest and cheapest console shelf holders are a metal “corner” bracket, which can be equipped with a plastic cover. Consoles are selected according to the depth of the wall shelf. For a shallow shelf on which you plan to place some light small items, you can choose the smallest brackets, with a shoulder of 100-150mm. If you intend to attach the shelf to the wall of a workshop or dressing room with a large load, you should choose a “more powerful” option.
There are interesting cantilever brackets with decorative designs, coated with matte and stainless steel, ferrous metal, gold, brass, bronze, nickel, etc. The choice is large and there is always the opportunity to choose fasteners for shelves to the wall of the desired color and design to match the interior.
For many brackets for fastening open shelves, the manufacturer specifies the load-bearing capacity - when choosing, you can focus on this characteristic. It is also worth considering the length of the shelf. To prevent a wall shelf made of chipboard or wood from sagging, I recommend installing fasteners every 600-700mm. That is, if the shelf is longer than 800mm, then it makes sense to attach it to the wall using three cantilever brackets.
Pelicans (toucans)
The principle of console and bracket type holders is based on creating a stop in the form of a shoulder under the surface of the wall shelf. Pelicans or, as they are also called, toucans, use a different method of fastening - they “grasp” the shelf in thickness. Actually, the name came from the similarity of the shape of the fastener with the beak of a toucan and pelican.
Pelican (toucan) type holders are mainly designed for attaching glass shelves to the wall, since they extend to a limited thickness - on average 4-10mm, no more. This is ideal for securing a glass shelf to the wall, but not sufficient for most wooden shelves. There are also special gaskets inside the “beak” to prevent damage to the glass surface during the process of adjusting the fasteners.
Pelican holders of greater thickness, about 16-18mm, are quite large and cost more than consoles and brackets. But they look neat and provide a fairly reliable attachment to the wall. They are also selected according to the manufacturer’s characteristics; each “toucan” size is designed for a certain holding weight and shelf depth.
Pegboards and holds
This type of fastener for open wall shelves is more suitable for installation in dressing rooms, pantries, workshops, etc. But with the trend of using industrial styles in home and kitchen interiors, pegboards and hooks are also gaining popularity.
A pegboard is a perforated panel on which hooks and holders for shelves and containers are installed in random order. It is quite suitable for installing bookshelves above a desk in a nursery or personal office. It can be found in the interior design of the kitchen and living room, it looks quite original.
The principle of attaching shelving shelves to hooks is taken from warehouse and retail equipment. In variations for dressing rooms, it is a vertical rail with holes for installing consoles. And shelves are already attached to these consoles.
Just like in pegboards, you can rearrange the shelves and add other accessories and holders as needed.