- Preparing for work
- Assembling a cardboard shelf
- Master class on decor
Cardboard shelves are an indispensable furniture option if you can’t buy a new set.
A children's room or a summer house, a corridor or a kitchen - any room will be transformed if you place a convenient and practical shelf there. By doing it yourself, you can not only enjoy your skills, but also save some money. One of the cheapest and easiest materials to work with is cardboard. You can borrow it from any store, but to make a shelf it is better to go to a furniture store. The cardboard used there is quite durable and consists of 5 layers. Its thickness ranges from 5 to 10 mm - these are the optimal parameters for comfortable work.
In order to make any piece of furniture from cardboard with your own hands: a shelf, a bedside table, a decorative fireplace, you will need a number of tools and means to make the work easier. In addition to the main material, prepare:
- pencil, ruler, construction knife;
- a special surface for work, for example, a sheet of plywood;
- glue gun;
- glue "Moment";
- putty;
- wallpaper or self-adhesive for external decor.
Preparing for work
First you need to calculate the size of the shelf and the amount of material needed for it. The parameters will depend on its future location and your wishes. For our option, a project of 5 sections was chosen. The optimal height of the shelf is about 110 cm on the side with three sections, on the side with two - 69 cm. The width of the sections will be square, each side 30 cm.
The dimensions are known, you can start cutting the blanks. In total, you will need 2 blanks for each part, which are glued together:
- 4 parts with three sections;
- 8 pieces with two;
- 2 pieces from one.
By drawing out the details, you can calculate the size of the required sheet of cardboard. Do not forget to make all drawings in pencil, and make cuts with a construction knife. For convenient and high-quality work, use a thick, non-wooden ruler, as well as a good working surface that you won’t mind spoiling. She may be injured as a result of working with a knife.
After cutting, you will get separate cardboard shelves - parts that need to be assembled together. Before starting assembly, strengthen the structure with special stiffeners, which will add volume to the walls. To do this, you need strips of cardboard of arbitrary width (about 3-4 cm), which are placed around the perimeter of the part in a zigzag pattern.
Return to contents
Shelf for children's room
To make shelves for books or toys in a children's room, come up with an interesting cut for sheets of corrugated cardboard. Our next sample uses the outline of an apple. The back wall is a whole apple, and the inner partition is a thin strip, 10 cm wide and contours that follow the outer part of the cutting.
The front panel already conveys all the details of the shelves and external parts of the rack. The bottom bar is made wider so that the shelf acquires structural rigidity. It can be strengthened with several layers of cardboard, gluing them together. The same goal is pursued by short stiffening ribs that are attached between the three main parts of the apple structure. They are all glued parallel to each other and have the same size.
Further work is done on the actual shelves of the apple-shaped rack. Make sure that all corners are straight and cut exactly to size. You can cover the rack with colored paper or wallpaper to match the color of the room walls.
Assembling a cardboard shelf
First, you need to glue all the parts and stiffeners with wood glue, since it does not deform the cardboard. Don't forget about the details placed around the perimeter. After careful gluing, place the blanks under the press. At home, they can be books or an overturned stool. When assembling, we connect all the parts in the cut out places, as if hooking them together.
Afterwards, you need to level the entire surface with putty, make the corners even, cover up holes or other manufacturing defects. This is necessary to obtain a flat surface, which will be easier to decorate later. Leave the shelves in a dry place for about 24 hours. After complete drying, make the product original, matching the style of your room.
You can make it out of cardboard with your own hands for a summer house or for a children's room.
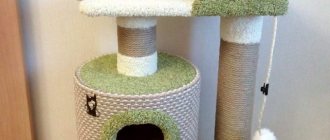
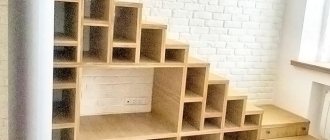
In fact, I did not make this shelving unit from scratch, but on the basis of an old bedside table. However, if necessary, it can be made entirely from cardboard from absolute scratch.
In addition to the technique of making furniture from cardboard, I also used the technique of artificial aging and decoupage technique.
As promised, I’m sharing my experience step by step.
So, at the start I had this simple old bedside table from Soviet times:
The bedside table was completely covered with veneer and varnish, which adhered to it very firmly.
In such cases, it is recommended to remove the entire layer of decorative coating, but I must admit that this feat has never been possible for me. Therefore, I ignored this recommendation and simply laid all layers of paint and varnish on top. However, before painting, I cleaned and degreased the surface of the bedside table with white spirit, which can be purchased at any hardware or hardware store.
To make the rest of the rack, I used regular cardboard from regular cardboard boxes:
At first, like probably everyone else, I was tormented by the question, where will I get so many boxes? However, in practice, the mission turned out to be quite feasible.
As it turned out, cardboard boxes in stores are simply thrown away, so there are no obstacles to agreeing on their disposal. Especially good boxes are available in furniture and household appliance stores.
Well, of course, all my relatives and friends began to leave their empty cardboard boxes for me.
There are different technologies for making cardboard furniture walls of the required thickness and strength.
If the product is supposed to have thick walls, then it is best to fill the space between two sheets of cardboard with strips of cardboard of the appropriate width, gluing them perpendicular to the side sheets of cardboard.
However, in this case, I did not intend to make the walls of the rack too thick, so I used another method: simply glue several layers of cardboard together.
It must be said that cardboard comes in 3 and 5 layers. Three-layer cardboard has a wavy strip glued between two cardboard sheets, while five-layer cardboard has two wavy strips and three cardboard sheets.
Thus, if I came across sheets of five-layer cardboard, then I made four layers of cardboard for one part, and if I came across sheets of three-layer cardboard, then I made 6 such layers.
First, you need to cut out and cut out all the necessary parts of the future product in as many copies as will be required for further gluing of the layers in order to obtain the required thickness of each part.
In other words, I cut out six or four copies of each piece based on the thickness of the cardboard I had.
It is best to cut out parts with a sharp knife.
Each part needs to be signed so as not to get confused later, and it’s better to start working after all the parts have been cut out.
The next stage is gluing the parts. It is necessary to glue all layers of parts together to obtain the desired thickness of the product.
At the same time, I want to note that it is rarely possible to cut parts of the required size from a single piece of cardboard, but this is not scary. You can generally glue separate pieces of cardboard into the inner layers and try to make only the outer layers whole.
If this doesn’t work out, then that’s okay too. You can glue them from separate fragments and then prime the seams and cracks for further processing.
It is best to glue the layers with PVA glue.
It is best to lay the glued parts on the floor so that the cardboard does not sag from the glue and the parts are not deformed, and evenly press down on top with a weight and leave to dry for a day.
When I glued the layers of the side walls of the rack, I made only the outer layer solid, and glued the inner layers from separate parts, leaving grooves in place of future shelves:
When the side walls were ready, I drove the shelves into the grooves, securing them in the grooves with glue, and also, putting a weight on them, left them to dry for a day:
To strengthen the shelves in the grooves, it is best to use super PVA glue. He literally tightly glues the parts together:
When the shelves were firmly glued to the side walls, I glued the top of the shelf to the bedside table, also using super PVA glue, and left the structure to dry under a load for a day:
To ensure the strength of the shelves, it is advisable not to make them longer than 60 cm. But since my bedside table was 90 cm wide, I strengthened the shelves by gluing an internal partition into the middle of each:
In order to make the side cuts of the shelves and walls of the rack even and to disguise the cuts of the layers of cardboard inside them, I used strips of cardboard with factory folds.
All boxes have such folds, from toothpaste to cake boxes:
If you paste them over the side sections, they will look even and neat:
I covered all the places where I came across uneven cardboard with thin, even cardboard. Such cardboard can be found on binders, for example.
The fact is that before painting, it is recommended to cover the finished structure with craft paper (thick wrapping paper) or plain paper. I did so.
However, apparently because I use water-based acrylic paints, both craft and plain paper wrinkled and dried out in waves. In addition, even on smooth areas, its joints clearly showed through the paint, and the look turned out to be completely bad.
So next time I will try to avoid this stage, which I captured in the bottom photo. However, this time I did exactly this:
To fix this defect, I had to first paint the entire rack with nitro enamel to isolate the paper covering from subsequent painting.
I then covered the shelving with concrete contact. Concrete contact forms a rough coating and promotes good adhesion of the putty to the glossy surface.
Then I filled in all the unevenness with white gypsum putty and sanded it after drying with sandpaper.
I really liked the result that I got after using gypsum putty. I was unable to sand the surface perfectly evenly, and the resulting potholes created the effect of scratches and gouges that form on furniture during its natural aging.
The result is this:
I needed to get the effect of a cabinet that had been repeatedly painted with different colors, and which had become worn in different places over time.
In addition, I also wanted to get the effect of the Provence style, which is characterized by rough, even clumsy coloring of furniture pieces. This effect is created by painting furniture in two contrasting colors.
First a layer of dark color is applied, and then a layer of light color is applied on top of it, and between the strokes of light color the dark layer of “old” paint begins to show through.
I like to use gold or bronze paint as a dark layer. Firstly, they are suitable for any color of furniture, and secondly, they give the furniture a noble shimmer of antiquity.
So I painted the rack first with a layer of gold paint:
On it I put a layer of acrylic paint the color of baked milk so that a layer of gold paint was visible between the strokes:
Then I carefully painted the shelf one more time with light acrylic paint:
In order to consolidate the aging effect, you need to carefully go over all corners and folds with a sponge dipped in gold paint. Just before doing this, you need to make a few test touches with a sponge on paper or cardboard to remove excess paint.
And you will get aged corners like this:
These are the paints that I used: white acrylic enamel, which I tinted with acrylic paint, gold paint and aqualac:
After painting, I decoupaged the cornice and shelving doors.
At the very end, I installed new hinges and handles on the doors, and the rack is ready.
The photo is slightly distorted in color. In fact, my shelving unit has a very rich warm baked milk color.
When it comes to cardboard furniture, many people are usually interested in its durability. I deliberately put weights with a total weight of 10 kg on the shelf. As you can see, the shelf can withstand it completely calmly:
OK it's all over Now. I wish you all success in your work.
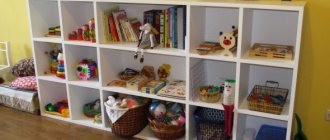
Self-assembled cardboard shelves will be useful in everyday life for those who have a lot of things, but it is difficult to store them compactly due to the lack of a closet with the proper number of shelves. Cardboard shelves can be arranged as you wish and placed in large cabinet niches. The details of making shelves from scrap materials are described in detail in the step-by-step instructions.
Materials
To work you will need to prepare:
- cardboard boxes of the same size;
- level;
- ruler;
- sharp knife;
- brushes;
- water;
- carpentry glue.
Step 1
. You need to carefully disassemble the prepared boxes. In the future, they should be cut to glue together into cardboard cubes. You can see the principle of assembling shelves in the following schematic drawings.
Step 2
. After cutting the boxes into component parts, apply the markings shown in the photo to each of them.
Step 3
. According to the markings, cut out the blanks to create a shelf.
Step 4
. Using glue and a brush, glue the cardboard blanks together. Coat the parts along the outer edge with glue and apply a little adhesive material in the central part of the elements. Please note that if the glue is too thick, it can be diluted a little with water.
Step 5
. After gluing each element, send the resulting material under the press. As a last resort, you can use a thick piece of plywood or foam plastic, on which you will need to stand with your feet. Let the glue set and glue the next layer of cardboard. A total of four to six such layers will be needed, which depends on the initial thickness of the cardboard boxes.
Step 6
. In places where the grooves for fastenings will be located, there is no need to lubricate the cardboard with glue. This will make it much easier for you to cut them out after gluing.
Furniture made from cardboard is an original, affordable way to transform unnecessary material into an unusual, charming thing. In appearance, it is almost no different from furniture bought in a store, but it will cost much less. If you have cardboard boxes, you will only have to purchase paint and glue. By following certain rules for processing the material, cardboard interior items will be very durable and will not bend under the load of objects.
Furniture made from cardboard is an original, affordable way to transform unnecessary material into an unusual, charming thing.
By following certain rules for processing the material, cardboard interior items will be very durable and will not bend under the load of objects.
On the eve of the first steps of work, you need to decide on the design and construction of a cardboard shelf; it can have a classic shape, be in the form of a rack or some kind of figure (elephant, bear, other animals or images) - it all depends on your imagination and abilities. The simplest option available to everyone is a classic or shelf-rack, since its creation requires a minimum of skills. They require a creative approach, in most cases the ability to draw, and require more time to create.
Elegant design - you design the item yourself, relying on personal preferences.
Note!
You should not use cardboard racks in places of high humidity (bathroom, street), as they will quickly lose their original appearance and become unusable. It is also necessary to protect furniture from fire, it is very flammable.
Practicality - you will only need to spend money on purchasing the necessary tools.
It is best to fasten cardboard products together with special plastic clips, rather than gluing them together. In this case, it can be easily disassembled.
Cardboard furniture can be disassembled and reassembled at any time, which is very convenient when moving or during renovations.
In order to increase strength, place a second, slightly smaller one in a box made of thick corrugated cardboard. Then the structure will acquire sufficient rigidity and will be able to withstand serious loads.
You don’t have to waste time searching for a practical, something you like that will fit perfectly into your interior.
Cardboard furniture does not contain harmful, toxic or other hazardous substances.
By showing your imagination and creativity to the fullest, you will create a unique interior masterpiece that will be admired by your family and guests at your home.
Pros and cons of cardboard shelves
Like products made from any material, cardboard shelves have advantages and disadvantages. Let's start with the pros:
- Individual design, limited only by your imagination. No matter what kind of bookcase you make, no one has exactly the same one.
- Saving. Minimum investment.
- Easy to disassemble, assemble and transport (especially when fastened not with glue, but with plastic clips).
- Environmentally friendly, safe for health. The material does not contain toxic substances and does not cause allergies.
And, of course, the main plus is the satisfaction of doing it yourself. Not a single thing bought in a store can give you so many positive emotions.
In appearance, it is almost no different from furniture bought in a store, but it will cost much less.
There are also disadvantages:
- Insufficient fire resistance. Keep away from heating devices, heating pipes and open flames!
- Sensitivity to moisture. You cannot place furniture made from cardboard boxes in the garden, on the open veranda, in the bathroom or in the kitchen.
- Less strength than more traditional materials.
Cardboard furniture can be disassembled and reassembled at any time, which is very convenient when moving or during renovations.
Important! Cardboard structures are resistant to water and high temperatures. It is highly not recommended to place them in places with high humidity and near heating devices and open fire.
Necessary materials and tools
- Cardboard. You should understand that the thicker the material, the stronger the furniture will be. There is an opinion that the dark color of cardboard indicates its high density and vice versa - light cardboard is thinner. However, do not rush to get rid of the thin material; it will be useful for gluing joints. Or glue thin cardboard together, thus obtaining thick cardboard. If you use this method, glue the waves of each subsequent layer perpendicular to the previous one.
- Scotch tape and glue. It is acceptable to use any type, but the best option would be Moment glue. Thanks to its properties, the cardboard does not get wet, all the necessary parts are quickly and securely fixed.
- Kraft paper is used to reinforce the edges of furniture; thin cardboard can be used instead.
- White paper or tracing paper. Stick it on the entire surface for easy decoration. Please note: before applying tracing paper or kraft paper, it must be torn, not cut.
- Stationery knife or jigsaw. Keep an eye on the sharpness of the tool; the accuracy and quality of cutting depends on it. Replace the cutting parts of the device more often. Using a jigsaw you can cut several layers of cardboard.
- To dry the glue faster, use a simple or hair dryer.
Durability - the service life of cardboard furniture will be long if it has not been exposed to dampness and was correctly processed during creation.
Rack made of metal profile
Metal profile structures are becoming increasingly popular. This material has a number of advantages and is therefore used for assembling home shelving. The positive characteristics of a metal profile are:
- Structural strength.
- Ability to withstand heavy loads.
- Metal doesn't rot.
- Does not burn.
- Not susceptible to fungus.
Scheme of a metal rack from build-with-your-hands.rf
| Frame posts | Metal profile 3.5 cm. It is possible to use profiled pipes 2.5 cm |
| Shelf mount | Metal perforated profile 2.5 cm |
| Shelf | More often, a 2.5 cm board is used. Before installation, the wood must be treated with drying oil. It is possible to install shelves made of sheet metal. |
As for the footage of the materials used, it depends on the overall size of the structure and is established during the development of the project.
Before you begin assembling a metal rack, you need to develop a design for the future structure. And draw a drawing that shows the exact dimensions of the rack parts. When everything is ready, we begin assembly.
- So, let's start with the markup. To do this, use a tape measure with which you need to mark the profile.
- The next stage is cutting the necessary parts from the profile (pipe). A grinder is used for this. If the owner does not have the opportunity to use a grinder. You can purchase pre-cut parts. Typically, this service is provided at the point of sale of the profile.
- All received parts are connected to each other in exact accordance with the drawing. Welding is used for this. If there is no device, then a bolted connection is used.
- As the structure is assembled, it should be periodically checked using a level. This is an important point, because if you allow the frame to become curvature, it will be difficult to correct it in the future.
- When the first (main) part of the frame is assembled, you need to start assembling the frame for the shelves. Moreover, first you need to assemble the lower shelves.
- Before fastening both types of frames, you need to make precise markings and indicate the location where the shelves will be attached.
- After the shelf frame is ready, it is fastened to the main structure. You need to start from the bottom and check the horizon with a level.
- When the overall structure is assembled, it must be treated with special anti-corrosion compounds, then primed and painted.
The frame is ready, now you can start working on making the shelves. They can be made from a variety of materials, from sheet metal to chipboard. The shelf is cut so that it can be installed in the frame. After it has taken its place, it is screwed on with self-tapping screws.
Guide to Making Cardboard Shelving
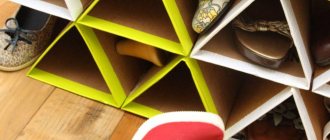
Idea No. 1. Shoe shelf
- You will need sheets of cardboard measuring 21x24 cm. Distribute them into 3 equal strips.
- Using a dull knife, you need to carefully push the strips so that they bend. Then you can glue the long sides of the sheet with colored tape. Next, make triangular oblong shapes from the sheets, secure them with tape.
- Thus, make the number of triangles you need. To fix such shelves, you need to glue the resulting triangles to whole sheets of cardboard with double-sided tape or glue. You choose the required number of rows and sections at your discretion.
- Instead of triangular sections, you can create oval ones by connecting them together as well. Calculate the required diameter for your shoes and glue the rectangular strips of cardboard so that they form an ellipse.
On the eve of the first steps of work, it is necessary to decide on the design and construction of the cardboard shelf; it can have a classic shape, be in the form of a rack or some kind of figure.
The dimensions of the desired shelf and the amount of materials depend on personal wishes.
Idea No. 2. Hanging shoe rack
- You will need several large sheets of cardboard. Based on the size of your shoes, draw the cardboard into equal rectangles and cut them out.
- Divide each of the rectangles into three parts and bend them. Bend the two sides obliquely and connect them together so that you get a pocket that is wide at the top and narrow at the bottom.
- The bottom of each pocket must be attached with glue or double-sided tape to the top of the previous one from the inside, leaving space for shoes.
- Such a shelf can be mounted on the door itself or on the wall near it - in any case, such an original solution takes up little space.
The simplest option available to everyone is a classic or shelf-rack, since its creation requires a minimum of skills.
Idea No. 3. Bookshelf
- The dimensions of the desired shelf and the amount of materials depend on personal wishes. The best option is a rack with five sections, 110 centimeters high on the side of three sections and 69 centimeters high on two sections. Each section will be square, the sides will measure 30 centimeters.
- For each part you need two blanks that need to be glued together. In total you should get 4 with three, 8 with two, 2 parts with one section.
- Make all drawings with a ruler, cut parts using a knife and a thick ruler. If you will be cutting on the floor or on a table, first ensure that the surfaces are protected from cuts.
- Before starting assembly, create additional stiffening ribs for the structure; they will create additional volume and strength for the walls. To do this, make strips of cardboard approximately 4 centimeters wide, glue them sideways in a wavy pattern around the perimeter of one part of the part, then attach the second part.
- Next, for good fixation, the workpiece needs to be put under the press. You can use stacks of heavy books or a stool as a press.
- After carefully gluing the parts, you can begin assembling the shelf; to do this, connect all the parts together in the cut out places, interlocking them with each other. Then level the surface with putty, smooth out the corners and hide all other imperfections. It will take a day for the shelves to dry completely. This will allow you to get a perfectly flat surface for easier decoration.
- Design the finished shelving to your liking.
Unusual, figured shelves are more difficult to manufacture.
Sandpaper is useful for sanding cuts.
Step-by-step instruction
Making metal shelving with your own hands is not a particularly difficult process if you do everything correctly and follow the instructions exactly.
Frame assembly
The frame comes in two types: collapsible (bolted) and made by welding. As examples, consider the assembly of racks from a profile pipe and a perforated corner. The main requirement when using a profile pipe is the presence of a grinder and a welding machine. If you have such tools at hand, you can safely get to work.
Based on the drawing made earlier, we measure and mark the required size for racks, shelves and connections.
The corner product is easy to assemble and is well suited for installation on a balcony due to its light weight. You need a minimum of tools for assembly in the form of a wrench, a set of fasteners, screws, bolts and an angle grinder. Instead of a grinder, you can use a hacksaw.
- Based on the drawing prepared in advance, we mark the material.
- We cut off the required length for the posts and connections.
- We fasten the racks and lintels together using special fasteners and bolts. We twist it by hand, leaving the structure a little movable.
- We level all connections. When there is no doubt about the unevenness of the rack, you can thoroughly tighten the bolts with a wrench until the end.
- We install thrust bearings at the ends of the posts. Such parts are sold in construction stores. They will protect the surface from scratches when moving and operating the sections.
Finishing
The final stage of assembly is finishing, painting and installing shelves. To paint the body, use a paint brush and metal paint.
According to the previously applied markings, saw the prepared wooden sheets. This can be done with a jigsaw or saw. After the structure has completely dried, secure the finished shelves with self-tapping screws to the prepared fasteners.
The final stage is decoration
You can decorate cardboard products with your own hands from any materials, it all depends on your wishes and fantasies - there are many options. The simplest ones are wallpaper, film, paint.
Cover the entire surface of the product with old pieces of wallpaper, or just the inside, and paint the outside in your favorite color. You can completely paint the shelves, or use stencils or create unique patterns or designs yourself.
The simplest way is to use self-adhesive film. It has an attractive appearance, quickly and reliably sticks to the surface, unlike wallpaper, it can be washed. If defects appear on the film or you want to change the design, just purchase and stick another one.
Unusual, figured shelves are more difficult to manufacture.
Simple rules for arranging shelves
When placing flower shelves, take into account the illumination that is necessary for plants. Shelves are installed further from the window for shade-tolerant plants, and those that love bright light are placed in well-lit places, but not in direct sunlight.
Some plants cannot tolerate drafts, especially when ventilated during the cold season. When arranging shelves, it is important to create a healthy environment for all plants.
All designs in color and shape must fit harmoniously into the interior of the room.
Master class: decorating a product using pages of glossy magazines
You will need:
- any paper for the base, newspapers can be used;
- glossy magazines;
- universal or PVA glue;
- acrylic lacquer.
It is also necessary to protect furniture from fire, it is very flammable.
Pencil, tape measure for measuring and drawing details.
Cut magazine pages into strips 1-2 centimeters wide, and twist them into tubes using a thin pencil or knitting needle. Glue the resulting glossy straws in a row onto the paper used as a basis. Then cut the canvas from the tubes into a suitable width corresponding to the location of the decoration and place it on glue. When the surface is dry, coat it with acrylic varnish.
The process is very long and tedious, but the effect is amazing.
It is best to fasten cardboard products together with special plastic clips, rather than gluing them together.
Modern flower stands
Recently, popular interiors are increasingly looking for geometrically simple and laconic forms. And we like them for their simplicity. But not everyone is ready to give up plants. The good news is that even laconic techno styles can adapt to plants.
Their form should also be concise and strict. And also a floor stand. Look at yourself. Stands can be made of metal and wood in any style. Also for high-tech or minimalism style. And it’s not even worth talking about loft or rustic. There are many interesting ideas.
To get the maximum effect, you need to choose the right plant shape.
Master class: surface decoupage
You will need:
- napkins with drawings;
- acrylic paints, acrylic varnish and brushes;
- scissors;
- iron.
In order to increase strength, place a second, slightly smaller one in a box made of thick corrugated cardboard.
Materials for decorating the finished product - paints, wallpaper, fabric and everything else your imagination desires.
Cover the surface of the rack with several layers of paint, let each layer dry, then apply another. Do not dry the very last layer completely; it should remain sticky. Remove the top layer from the napkin, run an iron over it and place it on the surface of the product. Place a clean sheet of paper on top of the napkin and iron it with an iron heated at low power.
Instead of paint, you can use wallpaper or fabric.
The napkin should completely stick to the surface, but if not, add a little paint under it with a brush and let it dry. Do not rush to the next step; the decoupage must dry thoroughly, otherwise the design will be deformed.
You should understand that the thicker the material, the stronger the furniture will be.
Please note: before applying tracing paper or kraft paper, it must be torn, not cut.
When the surface is completely dry, coat it with acrylic varnish.
However, do not rush to get rid of the thin material; it will be useful for gluing joints.
By showing your imagination and creativity to the fullest, you will create a unique interior masterpiece that will be admired by your family and guests at your home. Don’t be afraid to experiment, keep up with the times, because cardboard furniture is not only affordable, but also an original option for creating comfort and a unique atmosphere.
When buying a refrigerator, TV or other household appliances for your home, do not rush to throw away the cardboard packaging. With just a little effort and time, you can turn boxes into beautiful, functional and original furniture. For example, make a rack for storing shoes, shelves for books or a laptop stand.
What can be done
At first glance, you might think that cardboard is a fragile material that requires special handling. On the one hand, this is correct, on the other hand, having chosen the desired type of cardboard, you don’t have to worry about its further use. Cardboard furniture will be durable and practical if you follow the sequence of work and recommendations for using tools.
To choose an option for making a furniture product yourself, you need to consider several proposals:
- Toy furniture made of cardboard - it is profitable and creative to make your own furniture for dolls. If children require the purchase of a new house for Barbie with all the accompanying accessories, the solution would be to produce this option with your own hands;
- Book shelves are considered one of the simplest cardboard products. They don’t take much time to make, and the books don’t put much stress on the cardboard;
- The original table will not be a dining table on which dishes are constantly located, but a small coffee or coffee table. A child can perform developmental tasks on such a piece of furniture, because it is designed for a light load;
- Chest of drawers - this kind of furniture is convenient for storing documents or papers; children’s accessories will also fit here. It is easier to make a chest of drawers from cardboard boxes from large appliances, such as a refrigerator;
- Shoe rack - an original shoe stand in the form of triangular cells will fit comfortably into any hallway. Entering the room, all guests will be surprised at how convenient and practical the rack turned out to be;
- A small chair for children - since cardboard is not intended for heavy loads, furniture for children is what you need. A small chair for your baby will become his favorite object, where he can draw or play.
As you can see, furniture made of cardboard is easy to make. To make it you need the simplest material and a minimum of tools.
Table Shoe rack Chair
Dresser Shelves Toy
What materials and tools will be useful in your work?
To make a rack or shelf from cardboard you will need:
- The main material is cardboard. It is best to take a dense one, the strength of the furniture will depend on this. It is believed that the denser the cardboard, the darker it is. However, thin sheets should not be thrown away either. They can be used for gluing joints.
- Any glue will do, but it’s better to use Moment. It doesn't make the paper wet.
- A stationery knife - the sharper it is, the more accurate the cutting will be.
- Sharp scissors.
- Dull knife.
- Roulette.
- Sandpaper.
- Kraft paper.
- Pencil, eraser.
- Dye.
- Remains of wallpaper.
- Colored tape.
Forged metal shelf
Products made by artistic forging create a classic, luxurious environment. Such shelves can be made only of metal or combined with wood or glass. The results are very impressive interior details.
Most of these shelves are made to be floor-mounted due to their heavy weight. Forged shelves for flowers on the wall are made in small and medium sizes, and special fasteners with increased strength are installed for them. The walls must also be strong enough to support this weight.
Master class No. 1
We recommend starting work by making a shelving unit yourself from cardboard. By strictly following the instructions, even a novice master can cope with the task.
- Divide sheets of cardboard measuring 21x24 cm into three even parts. Press the joints with a dull knife (the sheets should bend freely).
- Cover the long sides of the sheet with colored tape.
- Fold the sheets into triangles and secure with tape. You can make any number of triangles, depending on how many pairs of shoes you plan to store in the shelf.
- Assemble the rack. To do this, simply glue the triangles together. Place a flat sheet of cardboard on top. It will serve as a stand for high boots.
Disadvantages and advantages
Coffee table made of unusually shaped cardboard
Like any furniture, this one has its pros and cons. Let us introduce you to these subtleties. What to expect from cardboard items and what advantages they have. There are many more positive aspects in using this type of headset. Let's start with them.
- The ability to create a stylish design. You craft with your own hands, so you can make your most unusual dreams come true. The material lends itself well to decorative processing, imagine and create.
- Economical option. If you want to update your decor at the lowest cost, use old boxes or unnecessary industrial cardboard. Ordering compressed material from the base will be cheaper than buying a new wooden set.
- Ease of transportation. Such products are often collapsible or simply lightweight, so they won’t cause any problems when moving. You should be careful, as the material used is fragile.
- Strength. Strange, but this quality applies to furniture made from cardboard. With correct calculations, selection of good fastening elements, and high-quality assembly, these products will last a long time, even with constant use.
- Environmentally friendly raw materials. Cardboard is an environmentally friendly material. After disposal, it can be processed and used as secondary raw materials. The decomposition period of cardboard is much shorter, because it is made from a natural, environmentally friendly base.
And now about the shortcomings. The only drawback is that such furniture does not tolerate dampness. It requires special care to prevent moisture from reaching the surface. If assembled incorrectly, it can quickly break and lead to injury. If a professional takes on the matter, there will be no difficulties. We will touch on the topic of care below, and you will see that it is not difficult.
Master class No. 2
From sheets of cardboard you can make not only a shoe rack, but also hanging shelves. They will be a real find for owners of apartments with a small hallway, in which every centimeter of space counts.
How to make cardboard shelves with your own hands:
- Divide two large sheets of cardboard into rectangles (the size of your shoes) and cut them.
- Roll each rectangle into a pocket and secure with tape.
- Insert the pockets into each other, leaving space between them for shoes. Secure with tape.
The stages of work are clearly presented in the photo below.
- Attach the structure to the door. A functional and inexpensive rack is ready. If you wish, you can cover it with the remnants of old wallpaper or paint it with paint.
Rack with side walls
In almost every apartment there are places that are not used in any way. Such places include a small space on opposite sides of the door, where there is usually nothing standing. If desired, it can be used rationally by placing a small rack in which you can store books, shoes or other items. The peculiarity of this design is that it should be covered with walls on the sides. You can make a rack yourself if you follow all the rules and recommendations.
Rack with side walls
Tools and materials
The list of tools and materials for making a compact shelving unit is practically no different from the list mentioned above. Prepare the following for work:
- chipboard (chipboard);
- thick sheet of plywood;
Plywood sheets of different thicknesses
- boards for the frame of the structure;
- set of self-tapping screws;
- glue for working with wood;
- impregnation (stain);
- router or electric jigsaw;
- roulette;
- paint brush and work gloves.
What you need for work
Master class No. 3
Today, almost everyone in the house has a laptop. In order not to store the gadget on the table, you can make a stand for it from cardboard. You will need the following in your work:
- thick cardboard,
- yardstick,
- several sheets of thin paper for a stencil,
- long ruler
- pencil,
- scissors,
- sharp stationery knife.
Having prepared the necessary tools and materials, begin making the rack.
- First of all, make a layout of the promenade. Take a sheet of paper and spread it on a flat surface. Measure the width of the laptop with a tape measure. Mark exactly half of the resulting value on paper and draw a line. This will be 1/2 of the base of the leg.
- From the ends of the drawn line, measure up 4 and 7 cm, connect. You will end up with a rectangle.
- Visually divide the figure into three parts. The first is a straight line at a distance of 4 cm. The second is a curved line drawn to the 7 cm line (angle 45 degrees). The third part is a line from the right end of the segment to the 7 cm line at an angle of 45 degrees. The layout of the leg is clearly shown in the figure below.
- Let's start making the shelf legs. In the previous photo this is part No. 2. Transfer the parameters from the photo to your template. Separately, stop at drawing the clove, which will later keep your laptop from falling. In height, it should be at least a third of the thickness of the gadget. The slot in the leg for fastening the parts should not be in the middle, but at a distance of 1/3 from the edge, about 3 cm in height, 3–5 mm in width.
- Cut out the resulting paper templates.
- Let's make a leg. To do this, attach the paper template to the cardboard and carefully trace it with a pencil. Flip the template over to the other side and trace again. In the end, you will end up with one symmetrical piece. Cut it out with a utility knife.
- Let's make the legs. Attach the paper template of the second part to the cardboard, trace, cut. The planned model of the rack assumes the presence of two legs. Therefore, make the second leg in the same way as the first. The main thing is that they turn out the same.
- We combine the cardboard parts along the slots and secure them with glue.
You will get such a neat rack.
Drawings and dimensions
First of all, it is worth mentioning the collapsible frame options. Such models are very mobile. Their parts are connected with bolts. The storage can be easily moved to the desired location. But there are also non-demountable frame racks.
To join their parts use:
- welded joints;
- self-tapping screws;
- nails (this is determined by dimensions and material).
When large in size, such assemblies are virtually stationary. It is not only impossible to take them out through a door or window, but even to disassemble them. It will only be possible to break it, so dismantling is fraught with many difficulties.
As for the console versions, such racks do not have sidewalls. But it provides for attaching the shelves to the solid rear wall.
As for folding models, they are closer to a stepladder. The dimensions are relatively small, and you can’t count on decent capacity. However, the mobility is even higher than that of the collapsible versions, and this largely compensates for the low capacity.
As for the shape, rectangular and triangular types of shelving are optimal for both the pantry and other rooms. A rectangle is generally a classic shape. You just need to choose whether to install square legs or extend the supports to support the entire structure at once
When drawing up a diagram, you should pay attention not only to the geometry, but also to the dimensions of the storage unit itself.
The height is mainly limited to 2 m. In this case, even most people of average height, without stepladders or stools, can reach the top shelf. As for the depth, it is entirely determined by the size of the objects laid out.
Hanging or protruding things are not very good, but a huge half-empty space is unlikely to be a rational choice. To store books, magazines, and flowers, you need shelves 0.3 m wide and 1 m long.
For garages and sheds, for garden tools, for wallpaper and for illuminated seedlings, it is recommended to use shelves 0.4-0.5 m wide. They can also be used to stack:
- tires;
- canisters;
- spare parts for cars and garden equipment;
- metalworking, carpentry and entrenching tools;
- fasteners;
- various clothes.
Particular attention should be paid to the shelving in the bathhouse. All of them must be mounted not only on the floor, but also on the wall, because otherwise it is impossible to ensure reliability
It is unlikely that anyone will like falling from a shelf to the floor. All such products must be made of wood and carefully polished.
This is what a rack cabinet looks like with a height of 1716 mm, a rear wall width of 1038 mm and a single section width of 324 mm. But this is a homemade budget class shelving unit. The depth of the shelves reaches 500 mm. Their length is 1550 mm. For work, plywood with a thickness of 1.5 cm and pipes measuring 2.5x2.5x0.2 cm are used.
How to make furniture durable?
Many people fear that shelves made of cardboard will not be strong enough, and deprive themselves of the pleasure of having such original and useful interior items in their home. In vain! The following tips will help you make furniture out of cardboard with your own hands, which will not be inferior in strength to those made from other common materials.
- Open the finished pieces of furniture with parquet varnish.
- Give preference to symmetrical parts; they are stronger than irregularly shaped elements.
- The more cross parts a product has, the more stable it is.
- Use dark cardboard in your work; it is stronger than light cardboard.
Another trick will help give the furniture more density. When making all furniture elements, use two layers of cardboard, one with horizontal waves, the other with vertical ones.
You can make many original and useful interior items from cardboard. And you won’t have to spend extra money on this. Almost everything you might need for work is in everyone's home.
Creative shelves for children's books
When thinking about making a bookshelf with your own hands for children, consider cardboard as the main material. In addition to the fact that it is environmentally friendly, products made from it are lightweight, which minimizes the risk of injury to a child when a shelf falls.
In order for the shelves to carry a developmental load, we will make them in the form of funny animals. The child's delight begins from the moment the structure is assembled, where he takes an active part. With such a creative book shelf, your baby will quickly learn order. Now the books will have their own funny children's shelves, which will be a pleasure to put in order. It will be difficult to draw up a diagram of a puzzle shelf in the shape of an animal yourself if you are not familiar with drawing programs, and even with drawing itself. You will have to look for the diagram, which is not very difficult.
Then everything is simple. We decide on the size, enlarge the patterns, which we then cut out, transfer to cardboard and then cut out the blanks. When cutting out the legs - the elements that hold the entire structure, we place the corrugations vertically. This will provide additional reliability and stability of the shelf. If there is no thick cardboard available, and there are doubts about the reliability of the unusual shelf, we cut out 2-3 times more cardboard parts, glue together identical elements, and dry them under a press. Remember, the thicker the cardboard, the wider the grooves for attaching parts should be. In this case, the joint must be reliable, strong, the movement of elements is unacceptable. All that remains is to assemble the structure and, if desired, paint or decorate it. Having made various blanks of several types, the designs can be changed periodically, which will not let your baby get bored.
Rules for working with cardboard
15 ideas for arranging a small kitchen (70+ photo examples)
In order for furniture made with your own hands at home to turn out not only beautiful, but durable, a number of rules must be followed. They will help you make high-quality products that will appeal to all household members:
Gluing layers - when working with single-layer cardboard or to strengthen furniture, it is necessary to glue the material. When gluing cardboard together, try to place the layers perpendicular to each other - this is how they give increased rigidity; Choice of glue - people who have already made furniture from this material recommend using Moment glue. It does not get wet after application and instantly holds product parts together. You can also purchase a glue gun and thermal sticks, which melt when heated, creating a glue trail; Why do you need kraft paper? Kraft paper is used to cover the edges and joints of furniture. With this move, the furniture looks neater. Before gluing, the joints are cleaned with sandpaper. It must be remembered that the paper cannot be cut - it must be torn with your hands. This way the layers will become smooth, without transitions; Features of cutting - during the manufacture of cardboard furniture, special attention is paid to cutting the material
Usually a stationery knife is used - it is important that it is always sharp, because the accuracy of the parts depends on this. If thick cardboard cannot be cut, you can use a jigsaw.
Using a jigsaw, the work goes much faster
It is important to carefully cut the parts and avoid mistakes, because the tool is too powerful for cardboard
Cut cardboard with a knife
Select the type of cardboard you need
Use kraft paper
Choose your glue carefully
How to make a folding bed
Surprisingly, you can even make a folding bed structure out of cardboard. It is made from corrugated sheets using the accordion principle. This sleeping place can be easily folded and stored in a closet, box or suitcase.
The headboard of the bed can be patterned.
This option will be a convenient solution for those who often have to move, or if the room in which you live is small and you need to free up as much space as possible. A folding bed made of cardboard is a fairly reliable design.
A cardboard bed can be transformed.
You don’t have to worry about the sleeper ending up on the floor or the cardboard tearing. Thanks to the good fixation of the bed base at the beginning and end, the accordion bends will not be able to tear or press through. This bed can even be used as a permanent sleeping place.
Modern people will always find a way to save money.
It can be supplemented with an orthopedic mattress, which will make your sleep even more comfortable. If this design is a temporary solution for you, then use thin roll mattresses for sleeping.
DIY making
In order to cut parts and gluing and assembling elements, you will need a fairly large free area.
The approximate dimensions of the cabinet (they depend on the size of the cardboard boxes) are 900 mm * 450 mm * 1500 mm (width, depth, height).
It is better to use a solid base for the cabinet. If you have a large refrigerator box at hand, you can use it as a frame into which individual elements will be inserted. Otherwise, each part of the cabinet will be connected to the other using glue.
To ensure the stability of the structure, as well as to make the cabinet walls more dense and reminiscent of standard furniture, it is better to glue two sheets of cardboard together.
Cutting parts from cardboard boxes
Use a utility knife to cut parts for the rack. The cabinet is roughly divided into three compartments: upper open shelves, a middle part with drawers and lower open shelves. The product has a symmetrical structure, so the upper and lower parts are allocated an equal number of centimeters in height - 650 mm, and 200 mm are allocated to the middle part.
Important. The thickness of the walls and partitions should also be taken into account when marking the rack
In these instructions, the dimensions are given taking into account these values, but the net size of the shelf depends on the thickness of the cardboard, which ranges from 5 to 10 mm!
To assemble the cabinet you will need the following parts:
- double body of the product;
- four horizontal internal shelves;
- three vertical internal partitions (one of them serves as a divider for drawers);
- two fronts (internal!) for drawers with rounded slots instead of handles;
- four barrels of drawers;
- two rear walls for sliding parts.
For better fastening, drawers must be made internal, as if recessed into the walls of the rack. This part must be made with the tightest possible fit so that they do not fall out of the cabinet.
Gluing
Each part must be cut out in two copies, which are then glued together.
The trick that will allow you to quickly assemble the structure is to ensure that the internal parts of each element are 5-10 mm (i.e. the thickness of the cardboard) smaller than the external part.
For example, parts are attached to the cabinet body from the inside, the distance between them in height is 10 mm. They also glue the parts symmetrically onto the transverse wall of the rack, which divides it into two equal parts. This creates grooves into which shelves can be easily inserted directly. This option does not require special furniture corners or other fastening methods.
Advice. The glued elements must be allowed to dry. It is better to dry some parts under a press and in a ventilated dry room.
After all the parts are securely glued, the edges must be sanded so that small nicks do not interfere with the subsequent connection.
Assembly
After gluing the main parts, you should get the elements of an almost finished cabinet. On the inside of the body, five parts should be glued vertically, between which horizontal shelves are inserted.
On the upper and lower inner parts there are two elements each where vertical shelves will be placed.
In its principle, a cardboard cabinet is reminiscent of a construction set that many probably had in childhood, where each part serves as a support for the other.
Before driving each individual part of the rack into the groove, the edges must be coated with an even layer of glue. The same applies to the assembly of boxes - the edges of the side elements are glued together, and the bottom, attached after, reliably fastens the parts together.
Advice. To make the edges and corners of the structure look neater, they can be covered with thin paper. It is also better to glue the joints between the longitudinal and transverse shelves with paper for better stability of all elements.
Which cardboard is more reliable?
Depending on what kind of furniture you are going to create with your own hands, you may need different cardboard. There are several types of raw materials that differ in the number of layers - 1, 2 or 3; they consist of small waves that can be observed in the cut. The thickness of the material directly depends on the layering. Before you start creating furniture, you should determine the sides:
- Smooth, front side (often with a pattern);
- Rough - the wrong side.
When choosing a material for the manufacture of interior items, you need to consider the following nuances:
- Single-layer material should only be used when creating curved partitions inside products, as it takes any shape well;
- Two-layer material is used to create vertical walls in cabinets or chests of drawers, which will not be subject to heavy load;
- Three-layer material is used to make the frame and external walls of furniture; it is also worth considering that dark cardboard is more durable;
- Five-layer cardboard can be used for walls, tabletops, and shelves on which there is a significant load;
- Cellular or honeycomb material appeared on the market not so long ago. This cardboard was previously used only in the aircraft industry, but at the moment it is used for soundproofing interior doors and insulating entrance structures. Currently, this material is used by designers to make beautiful and durable cardboard furniture.
Five-layer
Single layer
Double layer
Three-layer
Cellular
The cellular material is a sandwich - between two layers of cardboard there is a honeycomb filler, which in turn consists of thin
corrugated cardboard glued together with hexagonal cells.
It is also worth mentioning the kraft paper used for gluing the joints and the finished structure. Sometimes craftsmen use tracing paper to paste cardboard furniture, but this is not entirely correct. The fact is that using kraft paper the walls of the product are smoother. When pasting finished furniture, the paper should not be cut with scissors, but rather torn by hand.
Cardboard must be strengthened regardless of the purpose of the item that is supposed to be made from it. You can do this in several ways:
- You can strengthen the material with parquet varnish; it will protect the cardboard from moisture. The composition must be applied to the finished and decorated product;
- Carry out symmetrical structures, as they are much more stable and stronger than curved, as well as irregularly shaped structures;
- When creating asymmetrical products, a large number of supports should be used to ensure their stability. This is especially true if you want to make a chair or bed out of cardboard;
- The cross members that are used to create structures provide stability and strength, so there must be the right amount of them. Don't skimp on material;
- Gluing cardboard in several layers will also help increase the strength of the structure; you just need to remember that if in the first layer the waves go vertically, then in the second they should be horizontal. To glue layers of cardboard to each other, it is better to use PVA construction adhesive;
- To create a furniture frame, use only dark cardboard, as it is much stronger than white.
If you take into account all these nuances, the furniture will be durable, high quality and beautiful. Prepare cardboard, the necessary tools and get creative with the whole family. This will not only help you get closer to your children, but will also teach them to take care of what they have made with their own hands.