Today we will make movable “real estate”, a house for children from cardboard with our own hands . If kids take part in the construction process, that’s great! I will definitely mention the advantages of each craft. But such a characteristic as the availability of the main material is common to all “buildings”.
Master class on making a large house for a child
By building a toy house in the middle of a children's room, a little more than a meter high, you can keep a child or even two children, aged from one to six years, occupied for a long time. The design imitates a multi-story building, a village hut. It is carried out according to sketches and patterns or, more simply, from a large box of large household appliances. Suitable dimensions of the structure are 120 by 80 by 80 cm. Some stores sell “moving boxes,” but if you can’t find similar ones, buy sheets of corrugated cardboard—you will need at least two or three of them.
If you combine two or three or more cardboard boxes of various sizes, you will get a “multi-room” play complex in which several children can play at the same time.
Materials, tools
Tools and materials you will need:
- corrugated cardboard;
- sharp scissors or a stationery knife;
- PVA glue;
- wide tape;
- long ruler;
- remnants of wallpaper or colored paper, fabric;
- markers, pencils;
- glue gun.
First you need to draw a diagram and determine what the details will be.
Manufacturing process
For work, separate pieces of cardboard or one or two large boxes from a washing machine, refrigerator, etc. are used. The structure must have four walls and a gable roof, the ends of which are left open to allow air to flow. The parts are connected with tape and glue. On one side, a door is made of such a size that a child can climb into the house. The windows are covered with tulle and transparent film, the walls are painted and covered with paper. A more interesting option is made using ready-made patterns downloaded from the Internet. The picture is enlarged to the required size, the details are cut out, glued onto corrugated cardboard, assembled - the result is a house already decorated on the outside. It is also easy to find suitable patterns for interior decor.
A soft rug is placed in the playhouse so that the baby does not feel cold when playing in it.
Form and ideas
The shape of the house depends only on the wishes of your baby. Cardboard allows you to make any design, even round ones. You just need to stock up on hot glue, tape and a utility knife. And how easy it is to dispose of the toy later! I burned it and that’s it, there’s no trash in the house!
Another simple MK with step-by-step photos:
Construction of a cardboard castle
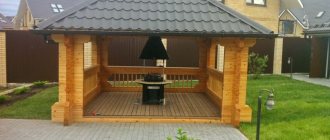
A real “princess castle” made of cardboard will not leave any girl indifferent. Boys will also love it as a full-fledged “defensive structure.” A lot of cardboard will be needed here - two or four towers with a jagged edge, connected by the same lintel walls with teeth on top. If desired, the turrets are decorated with cone-shaped tops with flags. Small windows and an acceptable size entrance are also necessary. You can also make a miniature table lock - it is made from ordinary colored cardboard. Any number of turrets are made here, including round ones. Windows and doors are drawn with a marker. The structure can be placed on an “island” and equipped with a folding bridge-gate equipped with ropes for quick lifting – in case of an enemy attack. Sometimes the castle is a full-fledged model of a famous structure.
Decoration, house decoration
The finished house is decorated by hand - each brick is drawn, covered with colored paper, painted with acrylic, ink, and gouache. Children over six or seven years old are able to decorate a toy house on their own. The roof is decorated with tiles - semicircular “scales” are cut out of cardboard or fabric according to a template, which are glued step by step, from bottom to top, onto the side slopes. Each fragment can be painted with its own color. When the “building” has interior decoration, it is made of fabric and paper. The inside of the house is sometimes painted - the outlines of furniture and various interior items are drawn, and the mirrors are made of foil. They also make lighting inside - a battery-powered night light or LED strip are suitable for this.
Connecting ceilings to floors
The ceiling of one floor is the floor of the next. To prevent peeling and sagging, the interfloor ceiling is secured to a support.
- For accuracy, it is recommended to draw a line along the perimeter of the frame at the level of the upper boundaries of the internal walls parallel to the floor of the floor.
- Cut long strips of cardboard no more than 1 cm wide. If the thickness of the material is insufficient, the strips can be cut twice as large and glued together.
- Glue the resulting parts with the wide side around the perimeter of the house, aligning with the control line. There should be a uniform protrusion that encircles the outer walls from the inside.
- Apply glue to the sections of all the parts on which the ceiling will lie, as well as the sections of the ceiling itself.
- Lay the ceiling piece, making sure the internal walls are perpendicular.
- Apply masking tape to the joints of the walls and floor of the upper floor, making sure that the tape goes all the way to the corner without deforming it.
Instructions for making a folding cardboard house
There are several options for folding houses. The simplest one, for example, a large children's one, consists of a roof with side walls in which there are slots, and two pentagonal ends with several cardboard protrusions. The tabs are inserted into the slots and the house is assembled, requiring only a few movements to disassemble it. To create a small mock-up house you will need thin cardboard. The product is made using the origami technique. How to do this step by step:
- take a square with a side of 20 cm, both sides of which are different colors, for example, red and yellow,
- it is folded in half, red outwards;
- then again - perpendicular to the previous fold;
- now the left and right sides are folded towards the middle;
- bend back, bend the corners;
- straighten the edges in different directions;
- The result is a house with a red roof; windows and doors are painted on it. It’s easy to create an entire village from such “structures.”
Bedroom
So, room number 1 is the bedroom . There is a lot of furniture in it, and the first thing we'll start with is the bed. It is quite easy to glue it together, just look at photo 4.
I covered the cardboard blank with acrylic paint, after the paint had dried, I varnished it, glued on a soft mattress, added several soft pillows and a blanket.
The next pieces of furniture are a chest of drawers and a bedside table (photos 5 and 6).
The principle of their manufacture is the same - a small cardboard box to which false drawers are glued. There was also a place in the bedroom for a comfortable rocking chair (photo 7).
A large and spacious closet also found its place (photo 8).
In photo 9 the whole room is in color.
You can also watch how to make a bed for dolls (and other furniture) on the “Homemade” channel:
DIY cardboard dollhouse
Buying a house for a Barbie doll is expensive, so they often make it themselves. When “constructing”, you should take into account the doll’s height - it should fit freely through the doors. The house will have one or several rooms; for the convenience of play, the roof or the largest wall must be removed. The doll will also need furniture - from the remains of corrugated cardboard, matchboxes, tea boxes, colored paper, a sofa, chairs, dressing table, and wardrobe are created. A piece of linen or felt fabric is placed on the floor - this will be a carpet. Use pencils or felt-tip pens to draw wallpaper on the walls.
The simplest house is made from two pieces of cardboard inserted crosswise into each other. This results in four rooms with two open walls in each.
Kitchen
Room No. 4 is the kitchen , it is small but roomy. The kitchen set is a large cabinet in the shape of the letter L (photo 18).
The sink is a small plastic jam container, the faucet is made from modeling clay, and there is a small hanging cabinet:
The stove is electric with 4 burners (photo 20), its door opens.
In the kitchen we have 2 chairs (photo 21) and a table (photo 22).
Dishes were also made from small items (photo 23).
Photo 24 shows our kitchen after applying paint and varnish.
On the top floor we have a children's room and a toilet room.
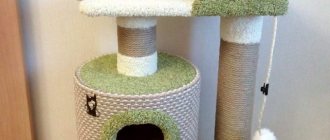
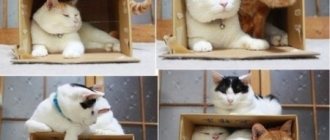
Cat's house
A cat house will delight your pet by creating a cozy place for him to sleep. For the simplest “construction” you will need a box, slightly larger than a standard shoe box - the cat should not be cramped in there. When two or more cats live in an apartment, it makes sense to make a larger house - many cats like to share a home with a neighbor, especially in the cold season. The building is decorated with a roof - its sides are made open. The door is made “according to the size of the cat” - the animal should crawl through it freely, but a completely missing wall is not desirable. Windows are also necessary - old, visually impaired animals are sometimes afraid of completely enclosed spaces. A mattress is placed inside the house, and the outside is covered with fabric or wallpaper so that the item fits well into the interior. A more complex structure, costly in terms of time and materials, takes the form of a yurt or a beehive. A lot of corrugated cardboard will be needed here, but the house will turn out strong and durable. For the base, two circles or ovals of suitable size are cut out and firmly glued together. Afterwards, three more blanks of the same size are made, but in the middle, four to five cm away from the edge, an oval or round fragment is cut out. Three more parts correspond to the previous ones in size, but are made C-shaped. Next, another 12-15 C-shaped elements are made, gluing them layer by layer, but after every two layers the parts are reduced by five to seven mm. At the very end, two layers of the roof are made, the product is dried and ready for use.
Features of material selection
The choice of materials for building a house with your own hands should coincide with financial capabilities, the amount of free time and the level of skill.
- Paper . Scrapbooking paper is suitable for these purposes: it is thick, does not fade, and has a wide selection of textures and prints. Ready-made diagrams can be printed on regular office paper.
- Cardboard . Ideal options would be binding, beer, corrugated three-layer. The latter is more difficult to cut, but more affordable (for example, household appliances or weighted candies are usually packaged in it). The rigidity of cardboard allows you to add more floors to the project.
- Boxes . Their characteristics do not differ from the previous material. One large or several medium-sized ones, always whole boxes, are suitable for work.
- Plywood . It is distinguished by its availability, ease of processing, the ability to implement complex projects, and its price-quality ratio. At the same time, it requires certain skills in working with sawing tools and precise design. The recommended plywood thickness is at least 6-7 mm. You should definitely pay attention to the E0 marking - its presence confirms the low formaldehyde content.
- Tree . The material is more expensive and difficult to work with, requiring expensive tools. Suitable for making large-sized multifunctional shelving houses.
Comparative characteristics of materials:
| Material | Price | Durability | Complexity |
| Paper house | Very cheap | Low | Very easy |
| Cardboard house | Cheap | Low | Easy but requires patience |
| House made of boxes | Very cheap | Low | Very easy |
| Plywood house | Moderately expensive | High | Medium difficulty, requires tool skills |
| Wooden house | More expensive than average, but cheaper than store bought | Very high | Complex, cutting on professional equipment is desirable |
DIY decorative New Year's houses
Small New Year's houses will decorate a kindergarten group, a school classroom, or a home environment. To decorate the holiday, both a candy box-house and a more solid structure housing dolls dressed as Father Frost and the Snow Maiden live. The “building” is constructed from:
- corrugated cardboard;
- ordinary thin cardboard;
- toilet paper rolls;
- old postcards;
- boxes of tea, juice, milk.
Houses made of sleeves, paper
A pyramid house is made from toilet paper rolls - you will need ten pieces. They need to be glued together and the “residents” from Kinder Surprises placed there. If desired, you can minimally decorate the interior by cutting out cardboard circles and depicting the decor on them. The outer part is covered with “snow” made of white felt, cotton wool, padding polyester, or painted with silver spray paint. If there are more than three hubs, an entire night metropolis is built. To do this, the parts are painted with dark paint, leaving only light rectangles of the windows. Windows can also be cut out of foil or painted with shiny paint. To make a candlestick house, windows are cut through so that the flame can be seen. An equally interesting idea is an elven town. The upper parts of the bushings are bent with two fingers to form an angle, the structure is slightly flattened. From a square folded in half twice, a bright, almost flat roof is made, which is placed on a base made of a sleeve. The house is decorated with a window, a door, and snow on the roof.
The New Year's city will be guarded by “winter” characters - Santa Claus, deer, hares, snowmen, also made from cardboard sleeves.
House made of cardboard and polyurethane foam
If you have a can of polyurethane foam at home, along with cardboard, it will be an excellent material for creating a New Year's hut. How it's done:
- first you need to build a strong base from corrugated or regular cardboard - it can be made of any convenient size;
- then, starting from the bottom up, the logs of the winter hut are “drawn” with a balloon of foam;
- each side is performed separately, not forgetting to leave space for doors and windows;
- the roof is decorated last;
- Almost any paint is suitable for decoration - the walls are partially or completely painted brown, bluish fragments are drawn on the white snow-covered roof for greater plausibility;
- Nearby, also from foam, they construct Christmas trees, snowdrifts, and other elements.
Houses with lighting
Decorating a cardboard “building” with LEDs will create a real “magical” design; such a structure looks especially interesting in the evening. If the structure is large, such as a children's play structure, the easiest way to illuminate it is with a lamp on a clothespin or an LED strip plugged into an outlet. It is only important to place the device so that the likelihood of touching and breaking it is minimal. The winter dollhouse is also illuminated, and the light is directed into each room. To create lighting, pieces of LED strip and a power supply are used. On the back wall of the house there are switches that allow you to illuminate each room separately. It’s even more interesting to build an entire magical city. To work you will need:
- a stand is a simple thick cardboard that is placed on a table, bedside table, window sill, or any other surface where the composition will be placed;
- preparations for houses - boxes of tea, milk, juices, shoes, etc.;
- paints – acrylic, gouache, watercolor;
- paper – white and several bright colors;
- snow - it is made from polystyrene foam, cotton wool, padding polyester, paper napkins, or you can buy dry imitation in bags, liquid imitation - in cylinders;
- the lighting itself is a strip of LEDs, a Christmas tree garland, individual colored light bulbs with stands, powered by batteries;
- residents of the town - appropriately sized figures of animals, men, snowmen, the Snow Maiden, and Father Frost.
In the city, they sometimes make lanterns along the paths, illuminated signs, etc.
Ways to decorate New Year's houses
The New Year's house is usually painted by hand - it imitates a log hut or a brick building. The roof is decorated with snow made of cotton wool, padding polyester, and white felt. The clearing base on which the house stands is made of the same material. A house made of simple corrugated cardboard looks interesting, on the roof of which the contours of doors, windows, and tiles are drawn with white paint. If the house is planned to be an element of a winter composition, the environment for it is sculpted from polymer clay, salt dough, and paper. Here you can sculpt or cut out Christmas trees, a doghouse, and figurines of forest dwellers. Since the “picture” is winter, white or silver paint in a can will come in handy for decorating many details.
Children's room
In the children's room, the main place is occupied by a bunk bed (photo 25).
She has soft mattresses and pillows. In the room there is a small table (photo 26) and a chair (photo 27).
There is also a cabinet for toys (photo 28).
In this room I did not cut a window, but simply glued a cardboard one to the side wall. The room is decorated with a colorful alphabet (cut from paper packaging from a children's toy). Photo 29 shows a children's room in color.
Almost all the chandeliers in our house are glued together from disposable containers, beads, cockerel sticks and braid.
Only one, which is in the music room, is made of beads, wire and bead fittings.
I also glued a ladder to the house, but we have it attached for now, because I am afraid that if it is glued, it will interfere with two children playing at the same time.
Features of working with plywood
Dollhouses made of plywood are lightweight, environmentally friendly, and relatively low in cost. But, unlike houses made from boxes, plywood houses are stronger , can withstand heavy loads and will last longer. When choosing this material, it is necessary to take into account the features of its processing.
- The tool for cutting parts must be very sharp and selected in accordance with the thickness of the sheet: up to 1.5 mm - can be cut with a knife, 1.5-6 mm - with a hand jigsaw, over 6 mm - with a jigsaw.
- It is advisable to saw the sheet along the grain. In the case of a transverse direction, it is recommended to make several cuts along the entire length of the future cut, which will reduce the likelihood of cracks and chips.
- Finished parts should be carefully sanded.
- It is better to connect parts using wood glue. The connection will be stronger if the fibers of the bonded surfaces are in the same direction.
- For nails and screws, you need to pre-drill holes and place washers under the heads.
Compliance with these rules will make the work easier and protect against unnecessary consumption of material.
Glossy box pasting
It is worth a separate discussion, since not every glue will lie on top. Although gloss differs from gloss: even thick PVA can stick to some surfaces, while others will only be taken by a gun.
You can cover it with white A4 paper, and then you won’t need primer for the decoupage, and moisture from PVA diluted with water won’t be a problem.
Photo: Instagram decupazh_j
The easiest way to decorate glossy things is with self-adhesive. It is not advisable to decorate ordinary cardboard with it, because if there is a need to tear it off and correct it, the Velcro will most likely take the top layer with it.
Film with tiny patterns is not easy to find (this is sometimes available in craft stores). You will probably have to use it either on larger models, or buy a one-color one.
Preparing to create an apartment for a doll
Before you start working, decide what exactly you will create. The box itself already has “walls”. All that remains is to make them look like their place of residence. The size of the house can be different: it can be two-story or one-story, with one or several rooms; furnished with homemade or purchased furniture.
What materials and tools will be needed for the work:
- Cardboard boxes;
- Glue;
- Colored paper;
- Scissors;
- Pencil;
- Ruler.
When everything you need is collected, you can start tinkering.
Let there be light!
A house for dolls with lighting is aerobatics. Moreover, there is no need to fence the system with wires, converters, light bulbs and other electrical “stuffing”. There is a very simple and effective solution. Any more or less large lighting store has small LED lamps that run on batteries. Moreover, they are mounted with Velcro. Each lamp is equipped with its own switch and operates on a voltage of several volts. In general, a very good solution.
These are non-volatile LED lamps
If you still want to make real light in a dollhouse, you need a 220/12 V converter or a battery with the appropriate voltage. You will also need light bulbs or an LED strip of the appropriate value, and a bunch of wires. In general, this path is much more difficult and requires much more time, but it is also a possible option.