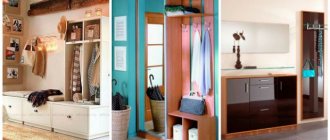
The hallway creates the first impression of the apartment and the people who live in it. The beautifully designed entrance area communicates the homeliness and hospitality of the owners.
If the room is well planned, there is enough space in it to comfortably dress and put on shoes, help a lady take off her coat, put bags and shopping. Let's take a step-by-step look at how to make a hallway with your own hands.
Material selection
The materials differ in appearance and technical parameters.
What to consider when choosing
- Moisture resistance - parts should not lose their properties when in contact with a wet raincoat or umbrella. Special requirements are placed on feet that come into contact with puddles from outdoor shoes, because in winter, when snow gets into the raised sole, it is not always possible to remove it by tapping the shoe on the floor. Shelves on which things are constantly placed quickly get dirty and have to be wiped frequently with a wet cloth. It is desirable that their outer layer is completely impervious to water - otherwise it will begin to warp and the inner base will collapse.
- Abrasion resistance. Doors and shelves are constantly used. They place bags with metal fasteners and decorations, and heavy bags of groceries. A sharp buckle may cause scratches on the surface. To prevent this from happening, the coating must be highly resistant to mechanical damage.
- Durability - often not only clothes are stored on shelves, but also metal tools, or spare parts from a car are left, so they should not bend. If marks remain on the outer covering when pressed lightly, it is best used for clothing or items that do not create stress.
- Resistance to aggressive environments - shoe sprays, cleaning products and other household chemicals are often stored in the hallway. When they get on the surface, they should not corrode the outer coating or leave permanent stains on it. Shelves and walls should be made of materials that can withstand cleaning using chemicals.
Optimal sizes and colors
Having dealt with the necessary materials, you can draw up drawings and dimensions of future pieces of furniture.
Even if the corridor cannot boast of a spacious area, it should have enough space to install the following elements :
- Niche for placing clothes and shoes.
- Seat for changing shoes.
- Shelves for household small items.
- Storage system for hats, umbrellas, bags and other accessories.
You can combine different functions in one piece of furniture, which will allow you to achieve maximum space savings. If the lack of space becomes critical, you will have to limit yourself to a small floor or wall corner hanger, which is connected to a niche for shoes and a small seat. When installing the cabinet, you need to make sure that its depth is at least 40 centimeters. Corner models should have a length and width of 0.9 meters and a height of 2.5 meters. The last indicator is selected taking into account the ceiling height.
The most important element in the design of the hallway is the coloring of the furniture. Designers recommend choosing colors taking into account the following points :
- Wall color.
- Color properties of other rooms.
- Total area of the room.
Light shades are characterized by their ability to visually expand space and create a feeling of airiness. When arranging a narrow corridor that is elongated in length, under no circumstances should you use brown or heavy colors. This approach will create the impression of being in a dark tunnel with an unpleasant atmosphere. The same applies to a spacious hallway, in which white colors are undesirable.
Material options
- Natural solid wood - blanks do not have good performance characteristics. Their advantage is their appearance, but it is perfectly imitated by veneer. Natural pine or beech is used only when it is a matter of principle. The array is characterized by low resistance to temperature and humidity deformations. Large parts bend and shrink even under normal conditions. This is due to the fact that the moisture content in their fibers changes, evaporating in hot, dry weather, or absorbing from the atmosphere saturated with steam. The fibers are susceptible to rotting. They must be dried for several days, and then impregnated with antiseptics and covered with a layer of varnish that protects them from damp air and direct contact with water.
Unlike factory products, natural ones have many defects. The quality is affected by the presence of knots and resin stains. To assemble a hallway with your own hands from wood, it is better to use ready-made panels that have undergone the necessary processing.
- Chipboard - boards made of glue and sawdust. They do not have defects characteristic of an array. The products do not change their shape with changes in temperature and humidity and do not differ in strength from natural ones. They are inferior in durability and hardness to oak and wenge, but such varieties are rarely used. Products covered with veneer or melamine paper are of good quality. They are not afraid of dampness and are resistant to chemically active substances. The blanks do not require additional processing.
- LDSP – chipboards with a laminated coating. They are distinguished by higher performance characteristics. They are often used to decorate walls, floors and ceilings in wet areas. Laminate is a paper-polymer film. It provides a high level of protection against moisture and abrasion.
- MDF - panels made of finely dried sawdust and a binder. They are laid in layers and formed by hot pressing. The products are stronger than their analogues. They are more resistant to stress and dampness, but they are much more difficult to process. Cutting the workpiece will require much more effort and time. The blanks are covered with melamine paper and veneer.
- Fibreboard (hardboard) - thin sheets for back walls that do not experience mechanical stress. It is easy to cut and adjust to the desired size. It tolerates wet cleaning well, and if it gets wet it does not lose its properties. Appearance does not matter when creating an interior design. The back walls are usually hidden from view.
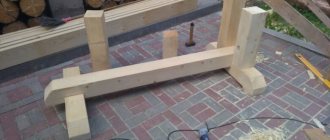
Step-by-step instructions for manufacturing and installation
Assembling and installing a corner cabinet is quite simple. The main thing is to follow the drawings and not deviate from the instructions.
Hand sketch of the future product, based on the place where it will stand
Furniture drawings should be prepared taking into account the location.
Control measurement
During control measurements, it is necessary to check the compliance of the actual parameters with the design documentation. In case of errors, it is necessary to correct the drawings.
Creating a project in PRO-100 or hiring a designer
You can use specialized software for designing furniture and developing interior designs, or order a similar service from a professional designer. Which option to choose is up to you.
Receiving a cutting map
A cutting map is necessary for competent cutting of materials that will be required during the assembly process.
Tool preparation
To design a corner cabinet yourself, you need to prepare the following tools:
- Basic materials.
- Suspensions.
- Frame profiles.
- Glue.
- Self-tapping screws.
- Accessories.
- Sheathing material.
- Hammer or drill.
- Bulgarian.
- Screwdriver.
- Construction level and tape measure.
- Stationery knife.
- Hammer.
Purchase of laminated chipboard and cutting of material
The biggest costs in a project involve purchasing and cutting materials. If you choose a standard model, you will need 2-3 sheets (it is also important to take into account the number of shelves and facades, as well as their configuration - closed or open).
It is better to order the cutting service in a specialized workshop.
Purchasing the necessary accessories
The list of necessary accessories includes guides, hinges, locks, door handles and other elements, depending on the features of the model. It is better to buy components from trusted suppliers with a good reputation in the market.
Delivery of already ignited materials to the site - cargo taxi service
After cutting the materials, it is important to deliver them home safe and sound. This can be done using courier services that deliver large cargo.
How to mark cabinet parts for drilling
Assembling the cabinet will be as simple as possible if you correctly mark and drill the elements. The principle of the procedure is quite simple:
- Furniture needs to be assembled and secured to confirmations.
- The parts should be drilled into the end and from the front side.
- The distance between the edges of the front part must be kept the same.
After arranging the fasteners, you need to number the parts. If there are elements of the same size, then additional markings (a, b, etc.) should be used.
Jigs for drilling laminated chipboard and MDF
There are special devices for convenient drilling of parts into laminated chipboard and MDF boards. Among them are conductors. You can purchase such a device in a specialized store at an affordable price.
Assembling the frame and filling
Having completed the markings, you need to begin installing the frame:
- First of all, you should connect the wiring to the lamps (if they are provided for in the design of the corner cabinet).
- Next, you should glue the rubber insulation to the guide profiles. This layer is placed on the side of the base of the furniture.
- At the next stage, you need to secure the guides along the marking line. To make the fixation as reliable as possible, you need to use dowels.
- Next you need to secure the direct hangers and install fasteners for them.
- You can then insert the posts into the vertical guides. They are fixed using hangers.
- After this, it is necessary to install stiffeners between the rack profiles.
Interior arrangement - installation of pantograph, pipes, drawers
To make the operation of the closet as efficient and convenient as possible, you need to provide free access to things. To do this, you should install shelves, pantographs, retractable containers and partitions between things inside. You can also divide the furniture into functional areas.
Door assembly
In most cases, cabinets are equipped with hinged doors. For them, two types of fasteners are selected - at the top and bottom. If the doors are heavy, additional fasteners can be used. The main thing is that their number does not exceed 5 units.
Door installation
When installing doors, special care should be taken so as not to damage the furniture set.
Chipboard finishing options
- Laminating is a varnished paper coating glued to a chipboard base. It quickly becomes unusable in rooms with high humidity. Does not tolerate mechanical loads well.
- Melamine paper (artificial veneer) - it is placed under a layer of transparent melamine resin, through which the design on the outside is clearly visible. The resin tolerates moisture and chemically active substances well. It is highly resistant to abrasion and is perfect for creating furniture.
- Lamination is the application of a film of melamine resins, which increases wear resistance several times. There are two classes of coatings. Class CPL - smooth surface, class HPL - imitation of natural stone or wood fibers.
- Postforming – finishing with multilayer plastic. Often used for walls and countertops with rounded corners. Essentially it is lamination in several layers.
- Veneering is gluing a thin sheet cut from solid wood onto the surface of a panel. The products do not differ in appearance from their natural analogues, while they are devoid of their main disadvantages. They are not susceptible to mold and retain their shape in any environment.
Design solutions
When decorating a small-sized Khrushchev apartment, you need to use minimalist furniture, but without extremely small details. Closed storage systems are more promising due to the lack of a feeling of space overcrowding or bad taste.
In the smallest corridors you will have to make do with an open hanger and abandon the closet. An important requirement for the design of a compact hallway is the visual softening of corners and achieving highly smooth lines.
Despite the special elegance of natural stone or relief panels, it is better to abandon them, since they absorb useful space and create a not entirely pleasant feeling when you are in a confined space. Also, large patterns should not be used.
When finishing furniture and wall structures, it is important to choose high-quality materials and manufacturing technologies that will preserve the aesthetic appeal of the room over a long period of time.
Advantages and disadvantages
Nowadays, almost anyone can independently design a hallway. You can purchase a ready-made set of materials in stores, which you just need to assemble yourself at home. It is also possible to order the production of the necessary parts according to individual sizes and preferences. And if you have the opportunity and the necessary tools, then it is possible to make all the components yourself.
In any case, if you take on making furniture with your own hands, there are both pros and cons.
The advantages include:
- original design;
- compliance of furniture with the required dimensions with minimal error;
- the cost of homemade furniture is several times less than ready-made furniture;
- an exciting pastime.
The disadvantages of such design solutions are the following nuances:
- in the end, the product may not be as perfect as one bought in a store;
- making furniture will take a lot of time and effort;
- During the work, a lot of dirt and dust will appear, so the best option for the rest of the household is to be in a separate room at this time.
What is important to consider when designing a hallway
When deciding on a design, you need to take several points into account.
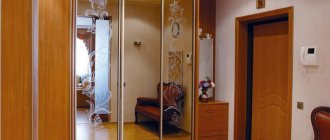
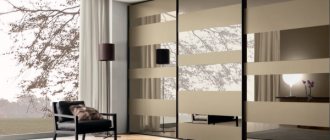
Sliding wardrobes in the hallway
- Furniture should not clutter up the space. This is especially important for narrow hallways.
- You need to think about the cabinet model: which design will be more functional in the existing room.
- The hallway needs good lighting. Since there are no window openings, when designing the environment it is necessary to take into account the placement of artificial light sources. They should be installed in such a way that the space is well illuminated and it is possible to use the mirror without interference.
- In addition to wardrobes, you should not forget about other interior items: a place to store shoes or a seat on which you can comfortably put on your shoes, or a chest of drawers for things. It is better to build the seat into the hallway so as not to clutter the area with unnecessary details.
Stylish, modern modular hallway
Among other things, the type of furniture installed in the hallway is not least determined by the taste preferences of the homeowners.
Built-in furniture in the hallway
Types of hallways
Based on the appearance of the “entrance” room, all your guests and even just casual visitors will form an impression of the home as a whole. Carefully think through the concept, the main idea of the entire room. And then only start working when you are sure that the idea is practical, and its implementation will lead to the optimal result.
A hallway made with your own hands is, in any case, more unique than something made to order.
But having freed yourself from the “tutelage” of designers and engineers of the furniture industry, you will have to independently understand all the nuances. The main types of these rooms are corner, open, compartment and hinged; depending on the specific type, the requirements for furniture differ.
In a corner room, absolutely everything is subordinated to the idea of maximizing the use of space, or rather, an empty corner. Open shelves can be placed on the sides of the wardrobe; in other places, cabinets and hangers of a classic look can be placed. You can additionally save corridor space if the cabinet doors are mirrored.
The open type of hallway contains the bare minimum of furniture - there will obviously be no upholstered furniture, and sometimes there won’t even be a closet to be found.
If there is one, it is relatively small; hooks and hangers are used for hanging clothes, visible to everyone. The opposite is a room in a compartment format, in which wardrobes of the same type are invariably placed. It easily accommodates the personal belongings of everyone who lives in the apartment; sometimes you don’t even have to look for a place for clothes for different seasons.
What furniture is needed for the hallway
The main rule for furniture in the hallway is that it should be roomy, compact, and have a neat appearance. There is no need to decorate it excessively.
In addition to decoration, it has the function of storing things. You should carefully consider the size, the presence of drawers and cabinets.
It’s better if there are more of them, but you need to start from the area of the corridor; there’s no need to overload.
The unusually shaped hooks on the wall, plus the shoe rack, look beautiful.
In the presence of a large hallway, a wooden bench looks original; it will add zest to the interior. A win-win wardrobe option, it will fit into any interior. And a wardrobe, if space permits, is an ideal solution; it is comfortable and roomy.
For small sizes, it is worth using:
- built-in wardrobes - take up minimal space,
- mirrors and light finishes will visually expand the space.
DIY wardrobe
A home craftsman can independently make the main element of the hallway - a wardrobe. First, you should draw a sketch and plan where outerwear will hang, shoes will stand, and where hats will be placed.
The dimensions of all elements are determined in the drawing. To work you will need:
- furniture panels;
- plywood;
- furniture fittings;
- screwdriver;
- self-tapping screws.
- Blanks from furniture panels are cut out according to given dimensions: side strips, base and shelves. A sheet of plywood is used as the back wall. The top cover must be overlapped. The entire structure is assembled using self-tapping screws, and wood glue is used for reliability.
- Mark the location of the clothes rail. It should be located 4-5 cm below the top shelf. Now you need to screw the holders and insert the bar itself.
- The doors are cut out of panels and each is hung on three hinges. Finally, the handles are attached and all surfaces are tinted with varnish.
What elements can a hallway consist of?
Depending on the needs of the owners and the size of the room, the following elements can be installed:
- shelf for hats;
- shoe cabinet;
- sitting.
- console with shelves (most often attached to the main cabinet);
- chest of drawers with removable drawers;
- a hanger with hooks for clothes (most often made in the form of a stand);
- mirror;
- wardrobe;
All internal elements can be assembled into a single structure or installed in separate modules.
Corner wardrobe with three doors in the hallway
If the dimensions of the hallway do not allow you to place a full set of furniture, then you can limit yourself to flooring or an open hanger.
Wall hanger
DIY cabinet in the hallway
A cabinet is made in a similar way, which can be adapted as a shoe rack or used to store various small items. The side parts are connected to the base and back wall using wood glue and self-tapping screws.
For drawers, ready-made guides are attached to the side strips. The boxes are assembled and inserted inside the cabinet, and then the top cover is attached.
The top of the cabinet can be designed as a seat. To do this, glue a piece of furniture foam rubber onto the top cover. On top it should be wrapped with padding polyester, and on top with beautiful furniture fabric. The fabric is attached to the lid from the bottom side with a furniture stapler. As an option, the seat can be made folding by attaching hinges to the lid and to the back wall.
The composition will be complemented by a mirror in a wooden frame, a stand for umbrellas and bags.
Tips for working with carriage screed technology
Before you start finishing a particular surface using the capitone technology, it is recommended to listen to the advice of experienced craftsmen. So, you should start upholstery by drawing up a detailed diagram with indicated dimensions. This point is fundamental, otherwise it will be difficult to do quality work.
Recommendations from experts will help you avoid mistakes in your work
If you do not have any experience in finishing furniture using this technique, it is recommended to first practice on small pieces of material. This will prevent you from spoiling the whole canvas. The foam rubber is connected to the base using special glue. It is sold in bulk cans and spray bottles. It is advisable to opt for the second option, because it is much more convenient. It is necessary to make cuts in foam rubber and wood only after the glue has hardened. In order not to make a mistake when marking the foam rubber, you must first mark it on thick cardboard of the appropriate size.
Marking foam before work
As we said earlier, usually buttons covered with the same material as the base are used to decorate the carriage tie, but this is not a mandatory step. For such purposes, you can purchase decorative nails with rhinestone-shaped heads.
Important. Some craftsmen prefer to make structures with a more pronounced relief. To do this, you will need to use polyethylene in the form of foam, onto which a dense layer of padding polyester (about 5 centimeters) is fixed using the same glue. Before you start fixing the fabric, you need to straighten it and smooth out all the folds. As a result, there should be no skewed areas.
An example of a neat design using the capito technique
Buttons or decorative nails must be placed at exactly the same depth. Otherwise, you will get a crooked drawing. The threads for attaching buttons must be very strong, otherwise they will quickly break during use of the product (especially if it is upholstered furniture). If you can’t make an even pattern on a test piece of material, then it’s better not to do the finishing yourself - this could ruin the expensive fabric. In this case, it is recommended to use the services of an experienced technician.
Cost of labor and materials
DIY corner hallway: instructions, diagrams and drawings
The problem that arises when creating a corner hallway is that careful calculations are required; the slightest mistake can cost a whole sheet of material. First you need to take measurements and check the walls. If the surface of the walls is curved, then you cannot do without a common frame.
Otherwise, the walls themselves can serve as a base to which you can screw shelves. The second option is more economical and simpler, but we will consider a separate cabinet, since perfectly smooth walls are very rare.
Choose the appropriate drawing based on the size of the room, the length of the walls and the proximity of the doorways. Consider the interior of the cabinet. According to the selected dimensions, make six main body elements:
- lower and upper bars,
- back walls (2 pcs),
- side walls (you can do without them, but the functionality of the cabinet will decrease).
Once you have the frame assembled, you can begin installing interior shelves, baskets and drawers, as well as hooks and rods.
The corner hallway can be equipped with doors on rollers, turning the structure into a corner wardrobe. But budget swing doors will also look good.
How to make a furniture project in the hallway
Before you start work, you need to draw up a furniture layout plan and calculate its parameters. It is better to draw up a design project with color visualization and a technical part, which will contain information about dimensions, content and materials.
Calculations
The room is measured and its plan is drawn to scale. You will need an image of the floor and walls. In the diagram, cabinets, shelves, cabinets, wall furniture, and wall mirrors are drawn using a ruler.
Expert opinion
Mikhailov Ivan Maksimovich
Furniture maker. Work experience 3 years.
The filling is chosen after zoning. You can make shelves and drawers yourself. Metal parts - hooks, rods, nets - are bought or made to order.
You should consider the location and power supply of cabinet furniture spotlights. They must have switches. When laying wiring, it is forbidden to tap load-bearing walls and ceilings. Channels may be laid in finishing.
Layout options
The arrangement and dimensions of the elements depend on the area and shape of the room. As a rule, the hallway includes a wardrobe, a shoe cabinet, a seat - it is often combined with a cabinet, shelves and hangers, table tops or a chest of drawers.
The basis is the cabinet. The remaining elements only complement it. They can be moved and repositioned, but the huge enclosure is designed for a specific location where it will most likely remain forever.
Wardrobes can be linear and corner, hinged, compartment and open. The latter option is suitable for small rooms; in such models there are no doors or housing.
The filling is fixed on the back panel. Clothes are stored on shelves and hangers - floor or wall.
At the bottom you can make a tabletop, under it there are drawers or drawers. The mirror is hung on the wall or placed above a chest of drawers or a table.
Wardrobes allow you to save space - you don’t need to clear the passage to open the doors. On their front side there can be wide mirrors that visually expand the room, but now such a move is not entirely relevant.
If there is little space, you can put one narrow column, taking up the remaining meters with hooks, shelves and cabinets. This is exactly the solution we will now consider.
DIY wardrobe: instructions, diagrams and drawings
Making a wardrobe is much easier than it might seem. But first you need to decide on the exact meaning of this term. “Sliding wardrobe” involves a special design of doors that move on runners along the cabinet body. It can be either built-in or free-standing.
If you wish, you can make the cabinet body from plasterboard and thus hide it in the false wall. But we will look at the classic design of a sliding wardrobe with side walls.
This model with dimensions 2020x625x2320 consists of several main parts.
- The side racks should be 2288x625 mm high (these calculations take into account the thickness of the sheets of the upper and lower strips - 32mm).
- Also large parts are the lower and upper strips: 2020×625 mm.
- The middle vertical posts are inextricably linked to the clothes rail. As a rule, it is mounted at a height of 1900 mm, so the standard size for them is height 1900 mm, width 525 mm. The remaining 100 mm is a margin for the normal functioning of sliding doors.
The filling of the cabinet can be anything. It all depends on your desires and preferences, but remember that there should be room inside to accommodate mounting systems.
It is best to order all parts from a carpentry workshop. Even an experienced craftsman will not always be able to cut out elements of the desired shape at home.
After this, you can begin assembling the cabinet. For installation, we recommend using not only screws and dowels, but also furniture corners. The rails are installed inside the cabinet in a specially designated area (those 100mm that we left when preparing the parts). After this, you can put the door back in place and use the cabinet.
What you need for work
Having chosen a model and made a drawing, you should prepare everything that is needed for the work: material, fittings, tools.
Depending on the type of furniture, different fittings are needed:
- wardrobe - guides for drawers, rails for the sliding system;
- cabinet with hinged doors - hinges, handles, locks;
- hooks for clothes.
Tools
You should stock up on the following tools:
- saw or jigsaw;
- screwdriver or screwdriver;
- sandpaper;
- with a knife;
- screws;
- tape measure;
- corners;
- loops;
- plugs;
- special wooden fasteners;
- with a pipe pipe
This is a basic set that can be useful in making furniture.
Technology for making a wall hanger for the hallway with your own hands
For work you will need wooden boards of the same length. The structure will consist of several blocks.
To make a hallway hanger with your own hands, you need to follow these steps:
- Place the boards on the surface so that there is free space between them.
- A rail is attached to the upper part at the same level where the clothes hooks will be fixed.
- At the bottom of the boards, they are connected using a batten.
- A shelf for hats is made and attached to the hanger above the hooks using self-tapping screws. The length of this element must correspond to the width of the hanger.
- Hooks for clothes are installed symmetrically in the upper part.
- The finished hanger is fixed to the wall.
Helpful advice! To prevent hats from falling, ribs should be installed on the sides of the shelf.
Choosing a hallway depending on the type of room
When developing the design of the hallway, you need to take into account the characteristics of the room and the number of household members. You should decide on the functional accessories of the hallway so that it is practical and comfortable.
With a small area, the beauty of the wardrobe will not be visible and it will look bulky. It is better to choose a corner hallway option.
In addition, there should be enough shelves and hooks for all family members.
The right solution is to install furniture along a long wall.
Regular hallway: instructions, diagrams and drawings
Making a simple hallway yourself is not difficult. It includes: a hanger, a shoe rack, a small pencil case or a chest of drawers with a mirror.
For this you will need:
- loops;
- furniture board;
- plywood;
- tongue and groove boards;
- three-dimensional strip.;
- pens.
The first thing you need to start with is a pencil case. To do this, planks of the required size, a cover for the top (with an overlap) and shelves are cut out of the shield.
Assembly is not difficult - the strips are attached to the lid using self-tapping screws, and the shelves are installed in the same way. For structural strength, corners are cut out of plywood and fixed in the corners.
A door is made from the shield, which is mounted on 3 hinges.
Now we make the cabinets. If desired, you can make only one cabinet.
To make it, you need 2 sidewalls of the same size and a bottom that will connect them to each other. The lid should be made smaller than the bottom.
All parts are fixed with glue and screws. Doors are cut out of the shield and attached to hinges.
If you have a drawer, you will need runners. You can make them yourself from plywood, but it’s better to buy them (the box will roll out easily).
The second cabinet is made according to the same principle as the first.
Now, the whole structure is assembled. The prepared boards are attached to the edge of the pencil case and to the cabinet - this will be the base of the hanger. The boards are connected at the top with a lath for strength. Hooks for clothes are attached to the slats, and a shelf for hats is screwed on top.
The final stage is the installation of handles and varnishing.
Corner option: instructions, diagrams and drawings
Expert opinion
Mikhailov Ivan Maksimovich
Furniture maker. Work experience 3 years.
It’s easy to make a corner hallway yourself, but to make it stable, you need to use solid material: chipboard, plywood. The module consists of 2 parts that are connected at right angles.
In addition, you should decide whether there will be a frame or the walls themselves will become the base. If the walls are smooth, then you can do without a frame; attach the shelves directly to the walls - this will be economical.
- a drawing is made according to dimensions, areas for attaching shelves are marked;
- Chipboard is cut with a jigsaw;
- holes are drilled for dowels on the front side of one panel and at the end of the other, holes are made for confirmations;
- the dowels are lubricated with glue and the sidewalls are assembled;
- The shelves are attached to confirmations and clothes hooks.
If necessary, you can attach a mirror to the door or make sliding doors, thereby creating a corner wardrobe.
Custom hallway with your own hands: drawings and diagrams
If you have a non-standard corridor, into which the wardrobe or hallways sold in the store will not fit, you can resort to an original and simple solution. For example, the presence of a bedside table or shoe rack, plus a hanger and a mirror.
You should start with the bedside table. 2 sidewalls of the same size, a base and a lid are cut out of a furniture panel. If there are skirting boards, then the corners are cut off from the sides (on one side). The back wall is made of plywood. All parts are fastened with self-tapping screws. Runners for drawers and fastenings for shelves are made inside. The doors are screwed on hinges.
A hanger in the hallway is an element you can’t do without. It’s not difficult to make and you can give free rein to your imagination. For lovers of eco-style and everything natural, tree branches are suitable instead of a hanger. Those who prefer country style need a vintage option.
Wardrobe capabilities: instructions, diagrams and drawings
A sliding wardrobe is an excellent choice for a hallway, it can be built-in or separate. If there is a niche, shelves are mounted in it and it is equipped with a sliding system.
The process of making a cabinet with side walls:
- A wooden frame is made.
- A place for the closet is determined. Holes are made on the walls, floor, and ceiling to fix the frame.
- The front frame is attached to the wall and ceiling with dowels, and then the side frames.
- The slats for the shelves are mounted inside. The shelves themselves are cut out of plywood.
- The sides are sheathed with plasterboard, then pasted over or painted as desired.
- Guides are mounted on the floor and ceiling.
- The doors are installed - first in the upper tire, and then in the lower one. The doors must move freely, their position is adjusted with screws.
You can make a wardrobe in different sizes and models, depending on your preferences and area of the room.
You can really make furniture for the hallway yourself. The models are quite simple and small in size. And if you have imagination, you can turn an ordinary hanger into a one-piece and unique thing.
Making a hallway with your own hands using someone else’s drawings and diagrams, photos and videos is quite risky. Even in typical apartments, the length and width of the room, ceiling height, and the distance between corners and openings may differ.
The reason is the layout features and finishing, which take away or add a few centimeters on each side. In small apartments, a screed, a suspended ceiling and a thick layer of plaster can significantly change the proportions of the corridor.
More significant changes occur during reconstruction and redevelopment. Before starting work, it is necessary to take measurements.
You may have to develop your own scheme, taking into account the characteristics of the room. These features do not always make it possible to successfully fit standard furniture, which is assembled from ready-made parts.
The body and its contents can be made to order according to your dimensions or assembled yourself.
Cabinet with one door
To begin with, take a canvas measuring 1700x400x18. The side part is cut out of it according to the markings. Then they make the bottom and the front part, which will be attached under the bottom.
The further sequence of actions is as follows:
- Cut out holes for dowels. Mark the places for cutting.
- To make the door, the material from which the frame is made is used. Cut out recesses for the hinges.
- The dowels and holes are lubricated with glue. Wooden fasteners are inserted into the recesses and the frame is glued together. When all the parts are assembled, they must be strengthened with self-tapping screws. Then the door is installed.
- For drawers, you need to make runners and attach them inside where the bottom of the drawer is located.
- Moving on to creating the drawer itself:
- Cut out the sides and back wall from the boards.
- Screw them to the bottom with self-tapping screws.
- Cut out the lid and attach it to the body with edges.
What is a carriage screed and what types are there?
Carriage screed is a finishing technique that is also commonly called “capitone”. It appeared back in the 18th century; it was used in France to decorate carriages, and such design was considered a sign of luxury. In those days, not only vehicles, but also interior items in the homes of aristocrats were decorated with such equipment.
Despite the fact that the carriage screed has lost its former popularity for some time, the technique is now actively used by designers in their projects. That is why it can be found in many modern apartments. Furniture decorated in this way looks very elegant.
Interior with elements of carriage screed
It is worth noting that over several centuries, “capitone” has undergone significant changes - new unusual ways of using this technique began to appear.
Table No. 1. Types of carriage screed
| View, illustration | Description |
| Diamond-shaped | The pattern is a repetition of diamonds of the same size. Beginners in this business are recommended to opt for the standard version of rhombuses, because creating figures with sharp ends requires some experience from the master. |
| Square | In this case, the design looks like a square. It should be noted that this form is most optimal for beginners in this business, because working with straight lines is much easier. |
| Unusual geometric shapes | Professional craftsmen make screeds of various shapes, create curly headboards and rounded patterns. You should not immediately choose such a design; it is better to start learning the craft with a simpler ornament. |
To fix the material in this technique, buttons of various diameters and nails with voluminous heads are used. They will first need to be covered with the same material or purchased to match the main material.
Decorating furniture with a carriage tie has the same principle, but there are still some differences in the execution technology. It is necessary to choose the most convenient option, because here it is the outcome that is important.
Finishing using carriage screed technology is carried out in two directions:
- the workpiece is covered with material exactly according to its size, and only then an ornament is formed on the surface;
- The upholstery of the base is done using small pieces of textile or leather of the required size.
Methods for fixing material based on
Advantages of carriage screed
The popularity of "capiton" for several centuries is due to the following advantages:
- A headboard or chair designed using this technique will be very soft and therefore comfortable.
You can read more about how to make a soft headboard with your own hands in our article.
- Such a surface does not require any special care, even if textiles rather than smooth leather are used for upholstery. You only need to periodically use a vacuum cleaner to remove dirt from the product.
- Even after many years of use, a high-quality carriage screed does not lose its original appearance.
- If over time there is a desire to replace the coating (the fabric is outdated, greasy marks have appeared), then this can be done while maintaining the integrity of the soft base. In addition, if necessary, you can restore the panel by adding only a piece of material in a certain place.
- This technique can be used to decorate almost any surface, giving it an unusual decorative look.
- Pieces of furniture with such upholstery are suitable for decorating both respectable interiors and small apartments, that is, they are completely universal.
- This is an excellent opportunity to insulate the wall and improve the level of sound insulation.
- The walls that are supposed to be decorated with a carriage screed can be leveled strictly to the level.
An example of upholstering a headboard using this technique
Wooden double-leaf cabinet
The manufacture of a double-leaf bedside table and a single-leaf one are similar. They make a frame, mark it and cut it out. Cut out a plank from plywood for the shelf. Dimensions are the same as a bedside table with one door.
One compartment occupies a fourth of the structure in width and the entire space in height. The second compartment is divided into 2 parts by a horizontal shelf and occupies all the remaining free space.
How to properly arrange a corridor
Additional elements can be placed in the hallway. For example, if the size of the room allows, you can put a small bench, which will make the design more interesting and practical.
If the hallway is very small, then there are several methods with which you can visually expand the room:
- Light-colored trim and elements;
- Built-in structures;
- The furnishings are in a minimalist style;
- Availability of mirrors.
It is in the corridor that our hallway will be located, and therefore its decoration is important. If desired, its walls can be decorated with brick, which will give the room some mystery and similarity to the medieval style, or you can put washable wallpaper on it. This will be a big plus, since it is in this room that the surface gets dirty the fastest. It is better to decorate the room using light colors and shades. After all, the lighting of the room will depend only on lamps and fixtures, and dark colors will visually reduce the size of the room.
You should avoid carpeting, since dirt accumulates there first, and cleaning is quite difficult. You can give preference to linoleum or waterproof parquet. Such coatings will be easy to clean, but the cost is much higher. Ceilings can be decorated using a small amount of gloss, this will further expand the size of the room.
Pencil case
The production of a pencil case is simple:
- To assemble the frame, you need to lubricate the dowels and holes with furniture glue. Then they are put in place and the structure is strengthened with self-tapping screws.
- Two doors are cut out from a piece of canvas, and holes are made in each for hinges.
- Fastenings for the shelves are made at the same level from the inside.
- The shelves are cut out and installed, and the doors are attached.
We decorate the ceiling. Ideas for hallway lighting
Choose only light tones or as close to them as possible. This will allow you to properly diffuse the light throughout the lighting. The easiest way to paint ceilings is with acrylic enamel, but before doing this you should perfectly level it. To make the ceiling more expressive, it is permissible to use plasterboard inserts, as was done in the example from the photo below.
The expressive relief of plasterboard ceilings captivates many owners.
In order to emphasize any element in your hallway, it is advisable to use additional lighting resources.
Not only spectacular, but also quite useful in any hallway - a plasterboard shelf exactly above the wardrobe with LED lamps. This way you will always have a good view of what is hidden behind its doors.
When planning to renovate a hallway in a small apartment, many for some reason put off the issue of building proper lighting for later.
However, it is important to think through all the nuances in advance, because good lighting is a powerful tool for creating a positive atmosphere in any room
Sometimes you can incredibly successfully beat even such a seemingly banal element in the hallway as the front door. With the help of small lamps, of course.
If you have a matte stretch ceiling, then you can safely use additional lamps on the walls, especially when you use artificial stone as a finishing material. Be careful if there is a glossy material on the ceiling. There is a risk of oversaturating the space with different light sources.
Repair always implies certain changes, and hallway renovation is no exception. Have you decided to change your dull wallpaper to an expressive stone texture? Indicate its volume correctly - with the help of well-focused lighting.
Another option that might interest you. Spotlight in the hallway - why not?
Requirements for decorating a hallway
Following just a few simple rules will allow you to decorate the hallway in accordance with the latest design trends and reduce the cost of unscheduled repairs:
- All materials used for interior decoration must be resistant to moisture.
- The safety of finishing materials, the absence of toxic emissions and resins, plays an important role.
- To create the optimal interior of a hallway in a private house, you should make maximum use of all available surfaces: wall niches, window sills, mezzanines, space under the stairs to the second floor.
- To maintain order and organization, it is better to equip the corridor with a dressing room or a sufficiently voluminous closet.
Do not forget about choosing the optimal design of the hallway in a private house, because the room can act as an original recreation area (with a panoramic window, with a reading chair).