The ceiling, located between floors, under the roof, is not only a partition that limits the height of the room, it is an important part of the interior of the room and serves as the basis for placing lighting fixtures. The lower part of the ceiling occupies a considerable area. Surface design is approached responsibly, as it is one of the main visual elements of the interior space.
There are several types of ceilings: plaster, hemmed, suspended, suspended. Their design depends on the material used for finishing and the method of its installation. The construction market offers a huge selection of options and means for decorating the surface of a room. Among the variety presented, one can highlight a universal building material - plasterboard. This raw material is in great demand, it is easy to work with, and it allows you to realize various design fantasies.
Advantages and disadvantages of plasterboard ceilings
The material is used as cladding and cladding of the surfaces of dry rooms. It consists of two layers of cardboard, between which there is hardened plaster. It is environmentally friendly, not subject to burning or rotting. Plasterboard, like any building material, has positive qualities, but is also not without its drawbacks. Let's consider the advantages inherent in the design:
- Allows you to level uneven surfaces without much effort;
- Differs in moderate weight of sheets;
- Easy to install, a person with minimal construction skills can handle it;
- Inside the frame used for fastening plasterboard sheets, communications (wires, pipes, air ducts) are hidden inconspicuously;
- Allows you to play with shapes, create complex, multi-level ceiling structures;
- An additional thermal insulation layer and sound insulation can be installed in the frame;
- Serves as a good base for lighting elements;
- The plasterboard surface can be painted, wallpapered, or covered with ceramic tiles.
Unfortunately, the material is not without certain disadvantages:
- When using it, the height of the room is significantly reduced, which makes its use unacceptable in a room with a low ceiling;
- To prevent the sheet from losing its original appearance, it is prohibited to store it or install it in unheated rooms with high humidity;
- If the installation technology is violated, cracks may appear.
What types of structures are there?
Drywall is an ideal material if you want to quickly create a beautiful ceiling.
It is fireproof, great for leveling and for creating any volumetric shapes. The physical flexibility of plaster makes it possible to cut out any shapes you like, drill any holes, without fear of cracks, chips, or scratches. Individual elements are attached with self-tapping screws or special hangers to a metal frame, in which it is very easy to hide (and, if necessary, replace) electrical wiring. Depending on the complexity of the forms, plasterboard ceilings can be single-level, multi-level or figured.
Two-level plasterboard ceilings
More complex two-level designs are the highest priority. They don't take up much space like multi-level plasterboard ceilings and can look very impressive. The levels can be painted in different colors, decorated with stretched matte or glossy canvases, 3D wallpaper and beautiful lighting can be organized using a variety of lamps.
Two-level plasterboard ceilings with various reliefs will perfectly decorate spacious living rooms, children's rooms, bedrooms and other rooms. With their help, you can successfully implement zoning of space.
Single-level plasterboard suspended ceilings
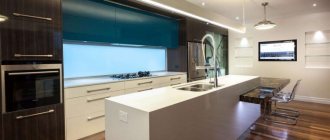
If the room is low, you should opt for a single-level design. As shown in the photo, plasterboard ceilings are often decorated with stretch glossy film, which will create a mirroring effect and can visually enlarge the space. Beautiful design is also possible with the use of spotlights.
When installing, it is worth considering one nuance: the gap from the “original” ceiling to the plasterboard surface must be such that the lamp fits freely. Single-level suspended ceilings made of plasterboard can be painted: if the room is not large, the optimal solution would be white or other light shades (blue, beige, etc.).
Decorative plasterboard ceilings
These are multi-level ceilings of complex configuration. For example, frames with steps, diagonal, zonal, curvilinear, asymmetrical, with curly convex elements, “floating” structures, etc. Decorative plasterboard ceilings are always an individual, unique solution.
Multi-level (three-level or more) ceiling
Allows you to visually divide the room into zones and create a sense of spatial depth in it. With the help of such complex designs in several levels, you can easily decorate any interior. The photo shows the interior of a living room with a multi-level plasterboard ceiling.
Diagonal suspended plasterboard ceilings
Beautiful design can be achieved if the border of one tier runs from corner to corner diagonally. Moreover, it can be either straight or winding, zigzag or wavy. In the photo below, see diagonal suspended plasterboard ceilings.
Suspended plasterboard ceilings in various designs
The design of suspended structures occurs in different ways. They can display existing lines in the interior, repeat the floor outlines of the division into zones, carry decorative elements, etc. Depending on this, the design of plasterboard ceilings can be varied.
Types of plasterboard sheets
Products that are a mineral composition held on both sides by paper layers differ in certain parameters and structure. Characteristics define and divide products into several types, each of which has its own abbreviation:
- GKL is a standard sheet of drywall. It is used in heated rooms with minimal humidity (up to 60%). The color of the coating is grey-brown. The inner layer consists of gypsum containing few additional additives.
- GKLO (fire-resistant) – intended for rooms with increased fire hazard (kitchen, attic, boiler room). Red and pink markings. The core consists of gypsum with inclusions of fire-resistant mineral fibers (fiberglass, clay). Able to withstand open fire for up to one hour.
- GKLV (moisture resistant) – designed for rooms with high humidity (more than 60%). Installed in kitchens, bathrooms, swimming pools. Has a green color. Treated with antiseptics and antifungal impregnations. Silicone granules are added to the core.
- GKLVO (water-, fire-resistant) - used in places with high humidity where there is a fire danger. Includes characteristics of both previous types.
- GVL is an improved version of gypsum board. Gypsum fiber board is a homogeneous material without a cardboard covering. Made from gypsum, which is reinforced with cellulose waste paper and special additives. It is distinguished by its heavy weight and cost.
- Arched - characterized by low thickness, bends well, used in the construction of arches, wave-like structures, and domes. Product bending work is carried out in two ways: wet, dry.
- Facade - yellow in color, resistant to weather conditions, used for finishing facades.
- With insulation – it is a standard sheet, a panel with a layer of insulation glued to the back side. During installation, it requires calculations of room humidity, and installation of natural ventilation between the base and the building material.
- Vinyl coated – laminated panels have a thin film coating. Fade resistant and retain their original appearance for a long time. Thanks to the coating of the front surface, they do not require additional finishing.
Advantages and disadvantages of using drywall
Let's look at the main advantages and disadvantages of using a plasterboard ceiling.
Advantages:
- The prevalence of the material – the advantages include the popularity of drywall. GCR is not difficult to find in the required quantity, and a large number of craftsmen have experience working with this material.
- The ability to do the work yourself - working with drywall is quite easy on your own. Sheets are cut using a regular knife. For example, it will be difficult to make a suspended ceiling without many years of experience.
- Environmental friendliness - drywall consists of a gypsum core and thick cardboard. These components do not have a negative effect on the human body.
- The ability to produce complex shapes - the material is well suited for the production of complex multi-level suspended ceilings. GKL will allow you to create bends, which cannot be done with other sheet materials (OSB, plywood, etc.)
- Relative strength - plasterboard coating cannot be called durable, but compared to stretch ceilings, the material is more resistant to mechanical stress.
- High maintainability - you can patch holes in drywall even without the involvement of a professional.
- Fire resistance - the material and all frame elements are non-combustible materials.
- A hidden method of installing communications - the material hides communications. True, the wiring is installed in a hidden way, so it will be more difficult to access it in the future.
Flaws:
- Poor resistance to mechanical shock loads - plasterboard on the ceiling can be easily broken when rearranging furniture or cleaning.
Don’t be surprised that the strength characteristic is included in both the pros and cons. This is a relative parameter and it depends on what material you are comparing with.
- Destruction due to contact with moisture - drywall will not be able to protect against leaks from the upper floors. When it comes into contact with moisture, the plaster swells and cracks - the suspended ceiling will need repair.
- Long-term installation - construction work will take 2-4 days. In this case, the installation of a suspended ceiling must be carried out at the stage of rough work. During the work, a large amount of dust and debris is generated.
- Installation does not tolerate errors - this can be said about many materials, but this applies especially to drywall. Violation of technology leads to the appearance of cracks and destruction of the finish. As a result, it will be necessary to eliminate errors and then restore the finishing layer.
Read about errors when installing the frame and when attaching sheets in the articles at the link “”.
Variety of ceilings in shape and levels
The building material used for leveling and finishing the ceiling is in demand among the masses. Various designs are created from a standard sheet. There are also many shapes that can be given to the ceiling surface, consider them:
- Rectangular. Standard option. It hides all the irregularities and visually expands the space of the room.
- Square. It is identical to the rectangular shape. Found in rooms with equal-length walls. May have a multi-level design.
- Round. Used to highlight the center of the room and goes well with the objects installed there (sofa, table).
- Oval or curved. Gives the room an original look and allows for unobtrusive zoning.
- Abstract or geometric. May have a patterned or curly shape. Allows you to decorate your living space.
Plasterboard ceilings differ not only in the type of sheets used, shapes, but also in design. There are three main types:
- Single-level. They are a ready-made element of the interior. They can serve as the basis for multi-level structures. Installation work can be carried out by a person with little construction experience. They consist of a frame, leveled, with plasterboard sheets attached to it.
- Two-, three-level. The main rule is that each subsequent level is smaller in area than the previous one. Subsequent rows are mounted on the frame of the higher ones. Multi-level ceilings, in turn, are divided into: - frame - the structure has one or a pair of steps located along all walls; - diagonal - subsequent to the first level are located in one half of the room, and the dividing line (straight, curved) connects the two corners of the room diagonally; - zonal - the second, third levels are used as the boundary of a zone for a specific purpose (dining, working, recreation area).
- Complex. The design is identical to the previous ones. The difference lies in the presence of non-standard shapes, elements, and patterns.
The number of levels of a plasterboard ceiling directly depends on its height. For example, frame structures can go down half a meter.
Examples of curved ceilings
Photo of the original ceiling design.
Waves
They not only decorate the room, but also visually divide it into certain zones. Smooth wave-like transitions give the room a more elegant look. Decorative waves can be located along the entire perimeter of the space or partially, and may differ in size or length.
The photo shows a turquoise figured stretch fabric with a wave-like shape.
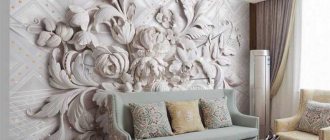
Flowers, leaves and other vegetation
Exclusive chic floral figures, leaves or petals on the ceiling always look extravagant and bold. They form a harmonious and beautiful design, and bring a great positive mood to the atmosphere.
The photo shows a figured combined ceiling in the shape of a flower.
Butterflies
They transform and enliven the atmosphere, fill it with lightness and make it much more comfortable.
Custom patterns
They exceed all expectations and are the most common design, which is most often preferred. A blot, a spiral or other abstractions create intricate designs and make the interior truly unique and original.
Unusual figures
Non-standard figures in the form of a heart, stars or clouds will undoubtedly become the most beautiful and individual design solution that will cause admiration.
Cone shaped
Such volumetric tensile structures attract the eye and change spatial perception. Models in the shape of a cone or pyramid are more suitable for spacious and high rooms, since they will not look bulky there.
Design features for gypsum plasterboard ceilings
There are only two ways to attach a plasterboard structure to the ceiling - hemmed or suspended. There are slight differences between them. The first is used on flat surfaces. If the difference between the highest and lowest places is more than 2 cm, then the structure cannot be installed, in which case the second option is used. Let's take a closer look at each type of installation:
Methods for connecting profiles for drywall
Hemmed. The frame is assembled from a ceiling metal profile; wooden slats are very rarely used. The lathing is attached directly to the ceiling surface, and the distance to the drywall is minimal, equal to the width of the material used for the frame.
Suspension. The profile is not directly connected to the upper partition. The frame is attached to the surface of the walls, and fixed to the ceiling using vertical hangers. The lathing secured in this way hangs on the ceiling. This is where it got its name. In this design, you can change the inter-ceiling space.
DIY two-level plasterboard ceiling. Video and step-by-step guide
- The first step is to eliminate any unevenness and roundness between the wall and the ceiling. It is very important that the corners are even.
- Markings are being made for installing the ceiling frame. To do this, two people, using a water level, mark on each wall the height of the frame at least 2.5 centimeters. Marking is done using a special device with blue ink - a chokeline.
Marking is an important stage in the installation of suspended ceilings
- The profile or wooden slats are screwed so that their lower border is exactly on the marking line.
- Markings are made - a profile should be installed every half meter. After the markings are completed, the U-shaped fasteners are screwed to the ceiling, the guides are threaded through them and installed in the profile on the wall.
The frame will serve as the basis for the ceiling, guaranteeing its strength and durability
- According to the drawing, wiring is placed in the places where the lamps will be.
- Plasterboard sheets are installed using self-tapping screws, of which there should be about 60 pieces per sheet. This must be done very carefully, as this material is very easy to damage.
- The joints of the sheets must be puttied. The tool for this step will be a narrow spatula.
This is what the finished plasterboard sheathing looks like
Related article:
Drywall: sheet sizes, thickness and price. From a separate publication you will learn about the types and production of gypsum boards, technical characteristics, prices and manufacturers.
Ceiling design and style
There are an unlimited number of options for designing and decorating the ceiling. At the same time, plasterboard allows you to construct multi-level ceilings, which, with the right finishing, in combination with lighting fixtures, will help create a unique interior of the room. The use of building materials is permissible in almost any room, be it a living room, bedroom or hall.
The design of the ceiling is very important; it must be magnificent, while being combined with the overall style of the interior. A huge selection of building materials allows you to combine the appearance with any direction. Let's look at some styles:
- Minimalism. Single-tier ceilings that have a fairly simple appearance, without unnecessary decorative elements, are suitable. For lighting, preference should be given to LED strips and spotlights.
- High tech. A small number of decorative elements are welcome here. The color scheme can be done in both white and dark colors. Glossy finishes are well suited for finishing.
- Classic. You can use multi-level structures, complex arched, figured ceilings. A chandelier will fit well in the center of the room.
- Modern. Light shades are most often used. Direct luminaires can be used. There are no strict rules when designing an interior.
- Loft. The joints between plasterboard sheets are deliberately not sealed with putty. They do not withstand a perfectly flat surface. When painting, stains and roughness. Communications are left open.
Design ideas
The most popular design ideas.
With photo printing
A patterned photo print, located in a circle, in a rhombus or in any other geometric or arbitrary shape, radically changes the usual appearance of the ceiling space and adds brightness to it. Thematic drawings combine decorative elements with each other and give the interior logical completeness.
Two-color
They create a unique and atmospheric design. With the help of two-color products you can bring any design idea to life.
Backlit
Curly tension or suspended structures with lighting inside provide an excellent opportunity to create original and comfortable lighting with a scattering or flickering effect.
The photo shows a beige plasterboard figured structure with internal lighting.
Combined ceilings
Due to the contrast of various materials, textures and colors, these combined ceilings look very impressive and stylish.
We are drawing up a project for the future ceiling
Simple ceiling finishing (painting, wallpapering) does not require drawings. Drywall is used to create complex design elements, so in this case a project is indispensable. It includes a graphical representation, calculation and cost of the required building materials, and stages of work. When compiling it, the following points are taken into account: the style of the room; design and parameters of a furniture set; the height of the ceiling, its area; finishing of walls and flooring.
What should a ceiling project include?
- Sketch (preliminary sketch). A good drawing can be done by a person with drawing skills. It allows you to visually see what the ceiling being constructed will look like and assess its compatibility with the overall interior of the room.
- Drawing. It determines the design of the future product. May consist of several sheets. Includes all components, views, sections, sections of elements, their interaction, and an explanation of the principle of operation. Takes into account the way the product is combined with existing elements on the ceiling (electrical wiring, pipes).
- Calculation of materials. The developed project will allow you to calculate their number, thereby saving the budget. When purchasing, you should take 10% -15% more consumable building materials, this is due to the fact that some of the products will have to be cut, and accordingly their size and quantity will decrease.
Photos in the interior of the rooms
Figured products are perfectly combined with various interior elements, so they can be safely used to decorate almost any room.
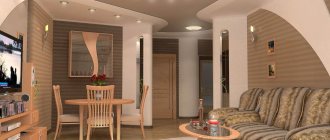
Living room or hall
If you correctly take into account the features of the living room, you can create a unique design that will be the most important element of the entire room. Curvilinear tension or hanging models will give the room a specific style and make the interior harmonious, original and interesting.
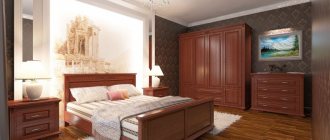
Bedroom
Not too massive models located above the bed, around a chandelier or near a window will emphasize and complement the overall style of the bedroom. Streamlined and smooth shapes will not irritate the eye or interfere with comfortable rest.
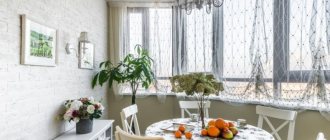
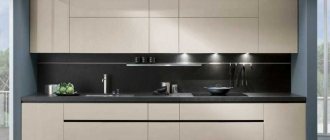
Kitchen
Triangular, round or oval products with a glossy surface will add interest and uniqueness to the kitchen, and various geometric shapes will create guaranteed comfort and coziness in the room.
The photo shows a white and beige glossy stretch ceiling in the kitchen.
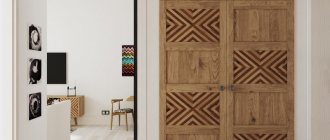
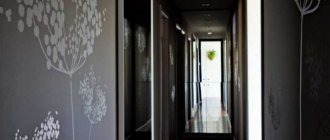
Corridor
Designs with smooth curves or stepped options in the form of a ladder will add lightness and additional space to the corridor, and will not create excessive load on the ceiling plane.
The photo shows a wavy figured stretch ceiling in the hallway.
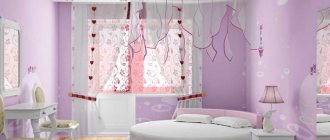
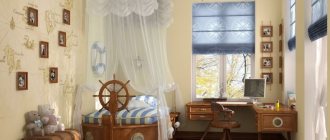
Children's
With the help of various original configurations, you can significantly transform the interior of a nursery and give it a special style and mood. Multi-level models attract attention, create an incredible effect in space and delight any child.
We calculate the required material
After drawing up the design documentation, they proceed to calculations. All elements and consumables are taken into account here. For clarity, let’s calculate the necessary materials using the example of a rectangular room 6 x 3 meters:
- Work begins with determining the perimeter of the room. To do this, we will use the standard formula P = (a+b)*2, where P is the perimeter, a, b is the length of the walls. In our case, (6+3)*2 = 18. This figure is equal to the number of meters of the UD guide profile, which is mounted on all walls under the ceiling.
- The next step is to calculate the length of the supporting profiles. Standard placement requires a fastening step of 40 - 50 cm. For the first case, 600:40 = 15 pieces of 3 meters (45 meters), for the second, 600:50 = 12 strips (36 meters).
- We count the number of hangers needed. The distance between them is 60 cm. Based on previous calculations, we find that for a fastening step of 40 cm this figure will be 45:0.6 = 75 pieces, in turn, for a step of 50 cm - 36:0.6 = 60 pieces .
- The number of cross-shaped elements used to fix the structure (crabs) is calculated by multiplying the supporting profiles by two. That is, for the calculations performed in the second paragraph, 30 and 24 pieces will be required, respectively.
- At the final stage, it remains to count the number of sheets of drywall. As a sample, let's take a standard sheet measuring 1.2 x 2.5 meters. First, we determine the area of the room and the covering used. S room = a*b = 3*6 = 18 m², it coincides with the perimeter. S gypsum = 1.2*2.5 = 3 m². By doing a simple calculation 18:3 = 6 sheets.
Assembling a frame from a profile
When installing the base of a structure under drywall, the following types of steel products are used as the material for this:
- Ceiling profile (PP) CD with a height and width of 60 and 27 millimeters is the main element of the frame and lintels.
- The UD profile with parameters of 28 and 27 millimeters serves as a guide for ceiling profiles around the perimeter of the room.
- An arched profile with a height and width of 60 and 27 millimeters is necessary for the construction of curved elements.
- The guide profile, having dimensions of 28 and 27 millimeters, has shelf cuts; it is used in the same way as arched products.
All types of profiles that are used to create figured plasterboard ceilings with your own hands have a length of 2.75; 3.4 or 4.5 meters.
In addition to the profile, you will need:
- short screws;
- crab connector;
- long screws with dowels;
- U-shaped hangers;
- corner and multi-level connectors.
Tools you need to prepare:
- perforator;
- level;
- screwdriver;
- roulette;
- saw - grinder;
- stepladder
The frame is assembled in a certain sequence:
- Using the marks made on the walls and ceiling, holes are made for fixing the guide profile and hangers. Then dowels are inserted into them.
- Guide profiles are installed along the horizontal lines for all tiers of the figured ceiling. They are connected to each other using corner connectors.
- The ends of the U-shaped suspension need to be bent, and the suspensions for the upper level are installed according to the marks.
- Straight ceiling profiles of the upper level are inserted into the guides. To connect to the hangers, short self-tapping screws are used, they are also called “bugs” and “seeds”.
- Jumpers are mounted on the left and right sides of the profiles and connected to the main PP “crab” connector.
- One straight profile is cut into small pieces. They will become vertical posts for the transition from the upper to the lower level of the figured ceiling structure. They are attached to the frame of the upper tier with a multi-level connector.
- Now we have to install the lower level border. When a round or curved shape is needed, take a guide profile and use a grinder saw to make cuts on its shelves at equal intervals from one another. Then the product is bent using them and the required configuration is obtained.
- The already curved guide profile is attached to the vertical posts using connectors.
- A CD profile is inserted between it and the lower level NP attached to the wall. In order to make it more reliable, it can be mounted on hangers that are mounted on the frame elements of the upper tier.
- The assembly work is completed by the process of installing connectors on the lower level frame.
In some cases, when creating figured suspended ceilings using plasterboard sheets, the frame is assembled exclusively for the lower tier. Then the function of the upper level will be performed by a high-quality prepared and plastered and then painted ceiling.
After completing the frame assembly, it is necessary to lay out the electrical wiring, internal parts of lighting fixtures and utilities.
Step-by-step installation of a gypsum board ceiling
The building material is economical and reliable; it can be used to create single-level, two-level, and complex ceiling structures. It allows you to implement any design solutions. Many people choose plasterboard ceilings for their abode. At the same time, some of them use the services of specialists, others build the structure with their own hands. But it will be useful for all of them to familiarize themselves with the step-by-step instructions, reflecting all the moments and subtleties of finishing.
How to prepare the ceiling
Before installation begins, preparatory work is carried out in the room, which includes the following steps:
- Cleaning the room. It is necessary to remove all furniture from it, remove curtain rods, and household items that interfere with events.
- If available, the old finish is removed from the ceiling and the surface is cleaned of stains.
- The joints of the slabs and cracks are covered with a layer of putty, after which the entire surface is covered with a primer, which contains antiseptics.
- After the primer has dried, turn off the power to the room and begin work on installing the frame.
Equipment and materials
Any work begins with preparing the tools used to complete it, counting and purchasing the necessary materials. After all, if there is a lack of consumables, a pencil, or a level at hand, the work will have to be interrupted in search of the missing component. So, to carry out the activity you will need:
- hammer drill, screwdriver, jigsaw;
- measuring instruments (tape measure, level), pencil, marker;
- hammer, metal scissors, construction knife;
- consumables, screws, dowels, anchors;
- main guide ceiling profiles;
- hangers, connectors;
- heat-insulating, waterproofing, sound-proofing building materials;
- sealing tapes;
- gypsum board sheets;
- Decoration Materials.
Marking the ceiling and assembling the frame
The work begins by determining the lowest angle in the room. A laser level is ideal for this; if you don’t have one, use a regular tape measure. The first mark is placed at this point. Depending on the presence of built-in lighting elements, the distance from the ceiling will be 5 mm if they are absent, 9 mm when placed.
Points in other corners located at the same height are marked by level. After that, a level in the form of a string is pulled between the marks, or a line is drawn connecting all the marked points. Next, according to the markings, the UD guide profile is installed. To do this, use a drill to drill holes into which dowels are driven. The joining seams are further strengthened; a piece of tin or plywood is inserted between the two profiles on either side of the joint.
After installing and securing the guide profile, proceed to the installation of the main one. Considering the dimensions of a standard gypsum board sheet of 1.2 x 2.5 m, markings on the ceiling should be made in parallel lines with a step of 40 cm, perpendicular - 250 mm. This will allow you to secure each edge of the sheet. When crossing, the joints of the main profiles are connected to each other by crabs.
The next step is to secure the hangers. They are connected to the ceiling using anchors. The distance between hanging fasteners is made within 50-60 cm. The first one is installed, retreating 25 cm from the wall. After connecting the hangers with the profile, a finished frame is obtained.
Insulation - which one to choose and why it is needed
The construction market offers a huge range of plasterboard sheets. They have an additional layer of insulation, such as a standard sheet of foam. Products are protected from moisture and fire. Multilayer partitions themselves become a soundproofing layer.
Depending on the floor material, insulation suitable for a particular structure is selected. If you take a wooden ceiling, then you cannot do without a layer of vapor and waterproofing. Moisture penetrating through the gaps can lead to rotting of the wooden, profile frame, and swelling of drywall.
For concrete slabs and monolithic floors, additional thermal insulation is required. Most often, mineral wool and polystyrene foam are chosen. Empty areas of the frame are filled with insulation. This takes into account the presence of built-in lighting lamps. Overheating of the wiring may cause a fire.
If necessary, additional sound insulation can be installed. Mineral wool, slabs, polyurethane foam, cork, coconut fiber, and others are used as such protection.
Electrical wiring
Installation of electrical wiring begins with the development of a diagram where all the key elements are indicated, from the distribution box to each switch and light bulb. The work is carried out before the installation of drywall sheets.
After laying the cable from the junction box to the electrical points, the wires are connected to the end element, if one has not yet been installed, the contacts are insulated. The connection of the cores is carried out only through terminal blocks. It is forbidden to lay wires in bundles near metal pipes.
Covering the frame with plasterboard slabs
The building material is sensitive to changes in humidity and temperature fluctuations. Therefore, it must be brought into the room where it will be installed and given a couple of days to adapt. Afterwards you can start covering. Installation begins with installing the sheet in one of the corners. Having retreated 10 cm from the beginning of the profile, the first screw is screwed in, the distance between them is 20 cm.
The head of the screw is recessed into the sheet. On panels running parallel to each other, the screws should not be on the same vertical line.
Next, the subsequent sheets are attached, with each edge being screwed to the frame. For places where a solid panel does not fit, the sheets are cut off.
Ceiling finishing
Having completed the main work, they begin the finishing work. The first thing you need to do is level the resulting plane. To do this, joints and gaps are puttied and the surface is primed. The following materials are chosen for decorative finishing:
- Water-based paint. It is resistant to moisture, does not wipe off, and has no odor. For small surface defects left after puttying, use a matte base to mask them. Glossy paint, on the contrary, will highlight all the roughness.
- Wallpaper. Classic option. The choice is unlimited, depending on the preferences of the owner. Their shade should be taken into account. Light colors will visually increase the height, dark colors will reduce it.
- Plaster. You should choose acrylic-based raw materials. You can choose any type of plaster (thin, small, medium texture, coarse). At the same time, take into account the fact that thin fillers are not able to disguise an uneven surface.
- Tile. The materials mainly used are polystyrene and polyurethane. Ceramic products are rarely used and require additional surface treatment and a reinforced frame.
Combined ceilings look very interesting. For example, a combination of a tensile structure with a plasterboard curtain.
Types of texture
Thanks to a certain type of texture, the figured product takes on a more complete and thoughtful look.
- Matte. They look simple and elegant. Curly matte models can be used to decorate almost any room.
- Glossy. Perfectly reflects light and creates interesting highlights. Glossy stretch fabrics make the room visually larger and deeper.
- Satin. Has soft reflection and light play of light. Depending on the light intensity, the satin surface is visually perceived differently.
The photo shows a glossy figured stretch ceiling in black and white colors.
Lighting and ceiling lighting
Lighting plays an important role in the entire design. In addition to the main one, it also performs a decorative function. Depends on the correct choice of each lamp, LED. It can emphasize the ceiling, or make it unsightly and tasteless. Lighting for plasterboard ceilings can be: open, closed, combined.
The following types of lamps are chosen as the main lighting:
- hanging chandeliers;
- overhead lamps;
- fluorescent lamps, as well as daylight;
- LED strips;
- built-in spotlights;
- combined lighting.
To further decorate the room, lighting is used, which is not independent lighting. This can be done using different sources. The most popular of them are diode (strips, duralight) lighting, neon tubes, and fluorescent lamps.
Plasterboard ceiling with lighting in a small bedroom
Even if you have a very small bedroom, you can make it more spacious with the help of correctly selected ceiling colors. The standard option is ceilings painted white. But you don’t have to repeat this at all! After all, you can dream up and display something incredible, your own. For example, there may be a soft blue ceiling, which will visually enlarge the room.
Glossy surfaces will also help expand the room. But not in the bedroom! Matte ceilings would be more appropriate here!
Do not clutter the room using very complex shapes or structures with many levels. After all, this is only permissible for the design of different zones.
Tips for shaping drywall
When working with material, the sheet must be cut to a certain size. To do this, markings are made on the panel with a pencil, after which the cardboard covering is cut using a construction knife. Then the sheet is placed on a table or flat surface and broken according to the markings.
To ensure a smooth surface, it is necessary to mask the joints and seams between the slabs. To do this, chamfers are removed at the ends of the sheet. Their angle of inclination directly depends on the putty method. For this you need a special plane.
In addition to cutting and sealing seams, plasterboard sheets can be bent, giving them wavy, curved shapes, for example, an arch, an oval, a circle, a winding diagonal line. To bend sheets, use a dry or wet method. Along with the sheet, the guide profile is also bent, on which cuts are made on the sides using metal scissors.
Pros and cons of ceilings with plasterboard figures: photos
The advantages include the following:
- plasterboard is an inexpensive and convenient material; in addition, it is quite easy to care for, as a result of which there will be no hassle with such ceilings;
- You can easily install lighting fixtures in figured ceilings; if necessary, you can choose several types of lamps that differ in style;
- thanks to such designs, it is possible to visually increase the height of the room or divide the room into several zones;
- thanks to the use of this material, it is possible to hide existing irregularities and cracks; if necessary, the material can be given any shade;
- under the shaped structure it is possible to hide communications, for example, electrical wires, a ventilation system.
Among the shortcomings are noted:
- the finished structure is quite heavy, resulting in 1 sq. m can have a weight of up to 20-25 kg;
- the material has a low level of resistance to flooding, which is why if water gets in, the ceiling can be deformed;
- the finished structure cannot be disassembled in the future.
Before proceeding with installation, it is recommended to determine in advance where the lighting fixtures will be located.