The harvest season is in full swing. Fruits, vegetables - there’s just so much to be found in summer cottages. You need to eat it on both cheeks and, of course, preserve it for the winter - on cozy winter evenings the whole family will thank you very much for the crispy pickles and fragrant raspberry jam for tea.
But would you like to figure out how to store numerous jars? After all, city residents do not have cellars, and their apartments are often quite small. Well, why not build “orderly rows” along the walls? Of course not! There are better ideas.
Wardrobe pantry
Naturally, we are not talking about a full-fledged storage room. Rarely do anyone have these, and their owners are not puzzled by such questions. No, a closet-pantry is a narrow closet that you can organize yourself inside the apartment. For example, if there is a small protrusion in the wall. Or a free corner in the hallway or kitchen. In this case, it is enough to make a box from plasterboard, MDF or plywood. It can be very small, with a depth of 20 cm. But high - up to the ceiling. You just place shelves there and carefully place your treasures. Advice: the easiest way to create such a structure is at the renovation stage. Thus, the design will look exactly like its own.
What can you grow on a windowsill?
Cabinet layout for cans.
- We cut the necessary parts in a furniture workshop.
- Using an iron, we trim the visible parts of the chipboard with a paper edge.
- We drill through holes with a Ø30mm pen in three shelves, because the pipe for my cabinet will be intact.
You can cut the pipe into parts, but this way the rigidity is lost. - We attach the flanges under the pipe.
- In the chipboard support (700×370 mm) we drill Ø15 mm holes for the eccentric of the minifixes. And at the same time we screw in the minifix rods in the dividing shelf (817x470 mm) between the top and bottom of the cabinet.
- We mark and drill holes with a universal drill for confirmations for fastening the side parts (2318×470 mm) with the top and bottom (850×470 mm), as well as the shelves.
The counter holes in the shelves and the top and bottom can be drilled using a jig - this will be faster and more accurate.
Kitchen
The first and most obvious option for placing prepared food products is, of course, the kitchen, where cabinets become the main storage space. However, before you start filling all the free space with glass jars, you should do some preparation.
First, check the strength of the shelves to make sure that they can withstand the entire load of tomato and cucumber “responsibility” that has fallen on them. For wall cabinets, it would be a good idea to check the fastenings.
Secondly, measure the height of the shelves and evaluate how rational their current arrangement is. Some of them may need to be raised slightly to allow you to place the jars higher.
People who have been canning products for more than one year often complain that storing products on shelves is not very convenient. Cabinets with drawers will help make it easier to find the right cans. However, the use of such mechanisms imposes a certain inconvenience, since their design is poorly suited for storing large cans, which it may simply not support.
If you prefer to use jars with a capacity of no more than 1 liter for preparing food, then in this case you simply cannot do without roll-out boxes.
Never place cans of seaming in cabinets that are located near the stove or radiator!
Mezzanine
Previously, mezzanines, i.e. wall cabinets and shelves under the ceiling could be found in almost every apartment. However, the fashion for expanding space took its toll, and people began to gradually get rid of these structures, citing the fact that the mezzanines “ate” the entire height, and it was extremely inconvenient to get things from them.
Meanwhile, it is the mezzanines that can become a help for storing seams. The main thing is that the design is reliable enough to accommodate the number of cans you need.
Assembling a cabinet for cans.
- We fasten one side with the shelves with confirmations.
- Then the second side.
- We install a chipboard support.
- We fasten the bottom.
- We install support legs.
- We insert the pipe through the shelves.
- We fasten the top.
- We fill the back wall with fiberboard.
- We hang the doors.
- Attach the handles.
The closet is ready. Please note that the dimensions of the cabinet can change as you wish, but preferably in proportion.
By the way, I have plans for an article about furniture on the balcony, so subscribe to site updates - it’s free.
If you have any questions, please contact us via the “Contacts” page or through the feedback form (blue button on the left). You can also contact us through comments. I'm always in touch. And further. While I'm writing the next post, you can read past articles. Good luck to all! Sincerely, Yuri Filippov.
Bonus: trends and anti-trends
In addition to functionality, it is important to consider design and compliance with the interior. We have compiled a list of trends and anti-trends and share tips on how to choose the color of the cabinet in the hallway, what should be avoided so as not to harm the interior.
What's relevant
- As in the past, this year everything in fashion is as natural and natural as possible. Therefore, you can’t go wrong with furniture in all possible shades of beige.
- The smooth matte wood front always looks stylish and definitely won’t get boring. A special highlight of this design is the preservation of the natural grain of the wood.
- Wooden inserts on coupe doors are still in fashion.
- Doors matched to the floor covering look no less interesting in the interior.
- The trend for joyful pastel shades has not yet passed - mint green, dusty pink, light yellow, muted aquamarine. Despite its neutrality, furniture in these colors can become an accent.
- Pale white Scandi furniture has already become a modern classic; such a wardrobe, even of the most impressive size, will look elegant.
Instagram @asi.design
Instagram @mera_in_art
Instagram @bodes_studio
Instagram @alexey_volkov_ab⠀⠀
Instagram @mihail_kurnosov
Instagram @andesign.studio
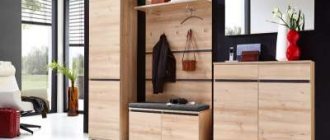
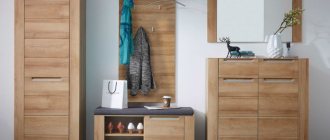
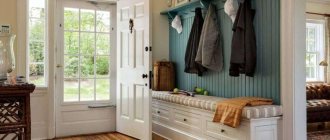
Hallway
The dimensions of domestic hallways are rarely of a palace scale, but even in such cramped conditions it is usually possible to install at least a small closet.
If you are the happy owner of a two- or three-door “storage system for winter things,” then with a rational approach to the distribution of free space, finding a shelf or two for cans will not be difficult.
Before storing cans, make sure there is no mold and, if necessary, treat the cabinet with antifungal treatment.
- Mold and mildew in a wooden house: what causes it and how to get rid of it
What to do if a wooden house begins to gradually collapse and rot?
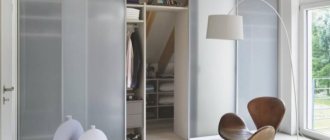
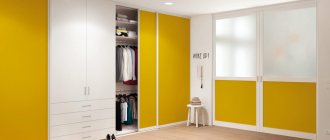
Lumber room
In the closet you can store not only your winter wardrobe and rarely used items. Install a rack in it or think over a system of shelves - and the issue of storing preserved food will disappear on its own. At the same time, you’ll put things in order!
When arranging a place to store workpieces in a closet, you should be guided by the following principles: reliability of fastenings, ease of use and rationality in dividing the space. The latter is especially important, since usually the closet is used not only for seaming, but also for many other things. Finding a shelf for the “extra” five or six jars of jam is much easier than finding a place for a vacuum cleaner or a children’s scooter.
- How to get rid of mice forever in your house, apartment and country house
What to do if there are mice in the house? Find out now.
Loggia
A loggia can be an excellent option for placing seams. It differs from a balcony in that at least two of its sides are adjacent to the walls of the house or neighboring loggias. And yet, not every one of them is suitable for storing workpieces.
Firstly, the room temperature should not fall below 0°C. Otherwise, the contents of the jars will simply freeze.
Secondly, the loggia should not be too damp. If you use it to dry clothes, try to ventilate the room as often as possible to reduce the humidity level.
Thirdly, lockers must be installed on the loggia. If the jars are left in the sun, their contents will deteriorate very quickly.
Before you start insulating the loggia, you should definitely study the technical side of the issue. It may turn out that the design features of the room do not allow the installation of heavy window structures on the loggia.
- 10 ideas on how to arrange places to store seams on a loggia or balcony
Ideas available to everyone that you can implement this year!