On the eve of the holidays, you often have to think about gifts that can surprise you with their elegance. One of these souvenirs can be a decorative box for storing all kinds of small items. However, a truly unique gift is a handmade box, the patterns of which are quite simple for beginners. If you wish, you can draw up sketches yourself or use ready-made designs provided by professionals. To get an idea of how to do this, here are some helpful tips to consider.
Creating a pattern
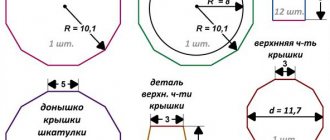
When making boxes from wood or plywood, they follow a certain pattern, using a drawing on paper indicating the exact dimensions of each component. Cardboard boxes are made using the same principle. First, select the template you like, and then print it out in the required scale. You can create your own sketch by taking parameters from a finished sample or implementing personal design solutions.
To make an original box, the patterns of all the parts must fit each other perfectly. If the parameters do not match, it will be impossible to assemble the product.
Schemes and blanks for cardboard boxes can take different shapes and be of different sizes. However, they are all created according to two basic principles:
- A model with a common base, the configuration of which is cut from a single sheet. In this case, it is assembled by bending the segments along the contour lines and gluing them at the closure points. This method is good for linear structures.
- The second option involves assembling individual elements into a common whole using stitching. Using this method, you can take a configuration of any complexity.
When making a box using the first method, to ensure clear contours of the bent lines, you should mark the bend points using a sharpened rod. This procedure will ensure smooth corner borders even when using thick cardboard. In addition, when drawing up the drawing, connection points should be marked. Indentations for gluing should be left at each joining point.
When using the second method, the parts are connected with colored threads. In order for the seams to acquire a decorative appearance, it is necessary to first mark the entry points of the thread into the cardboard. The marks should be placed at equal distances from the edge and from each other. Using an awl, neat holes are pierced along the finished lines and the segments are sewn together with a needle. To finish the interior of the box, various seals are often used, which are installed under the fabric. Cotton wool, foam rubber or synthetic fiber are suitable for this purpose.
The material is attached to the cardboard with glue or sewn with thread.
With a common base From separate parts
Transferring the template to plywood
In order to start cutting, you need to transfer the drawing to the workpiece, for this: Print the template in the required scale. Using tracing paper and a ballpoint pen to transfer the diagram onto the plywood. For convenience, secure the template with tape, buttons, or just your hand. Consider how best to arrange the elements of the towel shelf in order to save lumber. Take your time, your future product depends on the correctness and accuracy of the translation.
You might be interested in the article: Quick transfer of a drawing.
Required materials and tools
Homemade boxes are made from various available materials, selecting them in accordance with the chosen model of the craft. For the most ordinary boxes, it is enough to have postcards of the required size or colored cardboard on hand. In addition, it is necessary to prepare paper for making templates for repeating elements.
When using the kanzashi technique, a more complex selection of specific materials is required. Typically, for this purpose, blanks are required according to the following list:
- cardboard;
- a round box or a piece of cardboard tube (internal diameter from 10 to 15 cm);
- satin ribbons;
- decorative fabric;
- felt.
Creating a box using patterns is a complex and painstaking process. In this case, you need to have on hand a tool suitable for the relevant materials. The list of necessary devices for each specific case is different. For example, when working with plywood, the following list will come in handy.
| Name | Purpose |
| Jigsaw | Cutting plywood |
| Hammer | Correction of fasteners |
| Files | Edge processing |
| Screwdriver | Installation work |
| Sandpaper | Surface treatment |
| Rollers | Coating |
| Brushes | Finishing coating in hard-to-reach places |
| Varnish | Creating a decorative layer |
To make a plywood box, you need to prepare chipboard sheets of the required thickness (about 1 cm), hinges to connect the lid to the body, a lock and a decorative handle (if necessary).
For cardboard, the list of tools is slightly different.
| Name | Purpose |
| Scissors | Cutting elements according to the drawing |
| Pencil | Marking |
| Ruler | Transferring dimensions and correcting straight lines |
| Eraser | Making amendments to markup |
| Sharpened rod | Preparing fold lines |
| Glue | Fixing elements |
| Needle | Stitching edges |
For the kanzashi technique, in addition to scissors, you will additionally need glue to fix the elements and a syringe for its precise dosage.
Cardboard
Round box Satin ribbons
Decorative fabric
Felt Tools for working with plywood
Tools for working with cardboard
How to put a lock
An interesting solution is a mortise lock, which will be opened with a small key, but such work is difficult to do even for an experienced specialist. Therefore, it is better to limit yourself to a padlock or a decorative hook.
To install a padlock, loops are placed in the central part of the side wall and lid, which are screwed with small screws. The location of the hinges must be calculated in advance: even a slight displacement will break the symmetry, and the box will lose its attractiveness.
Manufacturing stages
To create a beautiful gift with your own hands, you need to familiarize yourself with the technique of making boxes from the presented materials. Master classes that determine the sequence of actions for different execution options will help you cope with this task. The first step is to decide from which raw material it is preferable to make your model; only after that do you select a sketch and prepare the necessary tools.
From postcards
This material involves, first of all, making a pattern from rough cardboard, which will allow you to display all the rounded lines of the box. After a pattern has been made for each element, individual parts are cut out from it. In this case, each part is cut out twice, to decorate the back and front sides.
According to ready-made diagrams, all components are transferred to the surface of the postcards, cut out and trimmed along the edges. Next, all elements are connected in accordance with the dimensions. This means that the front and back sides of the blanks must be attached to the long part of the bottom, and the side fragments to the short part. In this case, the lid should be sheathed using a loop stitch.
After this, the convex components of the base are prepared using a pattern. Then they are transferred to the surface of the postcards and trimmed along the edges with thread. In the same way, the front, side and back parts are fixed to the base. It is important to observe the correct arrangement of elements.
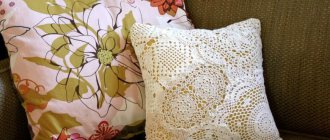
Boxes made from this material are not intended for long-term use. Such a gift can only be presented as a model of applied art or a souvenir for a little girl.
Pattern diagram
From cardboard
Thick cardboard is the most common material for making a homemade box. This design involves the use of masking tape for the purpose of pre-assembling the components. The handicraft is then decorated using scrapbooking. The rigid design allows the use of any decorative materials in finishing.
First of all, it is necessary to prepare all the components and glue the lower part of the box, applying the adhesive composition to the ends of the blanks. The cover is attached to masking tape, maintaining a gap of 2 mm, this will allow free movement. Next, all the edges of the box are tied with masking tape, giving the structure stability. After this, all surfaces are covered with paper intended for scrapbooking. It is important to start from the outside and end on the inside. It is best to use a magnetic clasp to secure the lid. The finishing method of the product is chosen based on personal preferences.
Parts made of cardboard and paper Cut cardboard parts Place the part on the fabric and cut out a rectangle with a margin
Carefully seal the edges to the other side. Repeat with all details
You can make any decor on the blank
Lay out the paper parts on the fleece and glue to it
“Strengthen” the structure with masking tape Cut out
Cover parts with fabric
Future fold lines can be stitched. Fold the workpiece into a box and secure with tape.
Duplicate the remaining cardboard parts with fleece
Cover parts with fabric
Glue them to the outside of the assembled workpiece
Leave the box to dry Cover the part with fabric only on the short sides Glue it to the cover Cover the last part with fabric
You can decorate the lid with an original tag
Glue the bottom by inserting a rubber band
Finished box
Using the kanzashi technique
A box made using this method is distinguished by its rich finish. Such models look quite expensive and are not at all like simple hand-made boxes. To do something like this, no special preparation is required. However, you must have enviable perseverance and the ability to think creatively.
In order to make a box using this method, it is best to prepare a cardboard tube by cutting it to a size that matches the height of the product. Next, the workpiece is placed on thick paper and traced along the contour, outlining the boundaries of the bottom and lid. If the cardboard is not too dense, you can use it in several layers by gluing together identical elements. Next, cut out felt blanks commensurate with the bottom and lid. After this, the inside of the pipe is covered with fabric and the base is secured.
The outer part of the bottom and the top of the box are covered with decorative fabric. A loop of tape is glued to the inside of the lid, and a felt blank is attached to the top. The second workpiece is fixed to the bottom. After this, the decor is collected from the tape. They are cut into even squares in length and width and pasted over the outer surface of the box in the manner of petals. In this case, the ends are brought to the bottom and covered with braid. Do the same with the lid, placing the petals around the circumference in the form of a bud. You can insert a bright button into the center.
Materials for work
Cardboard and fabric blanks
Cover the walls with white fabric and secure with glue. Cover the bottom with black cloth
Cut 11 black squares from 5cm wide ribbon
Fold 1 square in half. You get a triangle
Fold this triangle in half again. Taking the edges of the folded triangle, fold them towards the center, it should look like in the photo. This is an acute petal
Glue the base of the petal with a glue gun. Cut off the excess part of the petal with scissors at an angle of 30–45 degrees.
By analogy, make 11 acute-angled petals, which will be used to paste one row of the side of the box
Light a candle and bring the bottom of each petal to the fire. Singe the edge, removing excess threads
Collect 56 petals from black ribbon for the lid and second row
Make 34 sharp-angled petals from blue ribbon. Alternating the petals, cover the side of the box. Finished box.
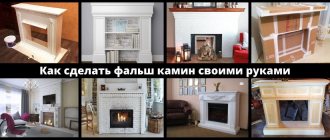
From plywood
Making a box from plywood takes much more time and requires experience in handling special tools. The complexity of the design and the intricacy of the design depend solely on the level of training of the master. Without having the skills to work with a jigsaw, you can count on making a model of the simplest shape with a simple linear pattern.
In this case, they begin by transferring the contours of the elements to the surface of the plywood using patterns. Next, all the blanks are cut out with a jigsaw according to the intended markings. The resulting edges undergo preliminary grinding of surfaces and ends. After this, the sketches of the patterns are transferred and cut out with a jigsaw, and the holes are drilled with a drill. The structure is assembled from the side; the elements can be connected with glue or using various fasteners. The finished model is polished and varnished.
Scheme
Cut out parts using a regular or jigsaw
Finished elements must be processed using a cutter set at 45 degrees
Sand all parts with sandpaper
Assemble and glue the structure
Putty the product to eliminate any gaps and cracks
After the putty has dried, carefully sand the product again.
Using a cutter, make indentations on the box and lid, adjust the holes if necessary. Install screws
Finished box
Decorate the box with a pattern
Or artificially age using a gas burner
Decor options
Any available means are suitable for the visual design of the box. What is important here is imagination and the ability to compose compositions. For example, the kanzashi method involves the use of voluminous decorations made of satin ribbons. Another technique called quilling uses twisted strips of colored paper for decoration.
Decorative elements can even be made from eggshells by selecting fragments of the desired size, as well as suitable paints. Boxes lined with fabric and decorated with a bead pattern give an attractive look. An applique made of cardboard or a simple ornament applied with oil paint is also quite suitable. Another option is to decorate the box in a nautical style using shells of different sizes. Buttons of different colors and sizes are also suitable for this purpose. Sequins and glitter of various shades are popular today - these decorative options are attached to the surface of the box with glue. You can choose many options for decorating the box, the main thing is to find the necessary notes for inspiration, and then build a harmonious composition in your imagination.
Sawing out a jewelry box
Basic rules that should be followed when cutting:
- The position of the jigsaw in relation to the workpiece should be perpendicular (90 degrees).
- Make sure you move smoothly up and down - do not jerk and take your time.
- Use the “Sawing Table”
- First of all, cut out the internal elements, then proceed directly to the outline of the product.
If you suddenly leave the cutting line, don’t be upset. It is possible to correct the lines using needle files or sandpaper directly during assembly.