The practicality and functionality of sliding systems is beyond doubt; the only disadvantage of this design of door panels is considered to be high cost. Significant cost savings are achieved when making a wardrobe door with your own hands, based on ready-made or independently drawn up drawings. This type of work is of medium complexity and requires careful planning. The main difficulties arise when selecting components and detailing; if you lack experience at this stage, you should use the help of professionals. All other steps, including assembly or installation, can be done on your own.
Where to start
The first stage of any work is careful planning, since making and installing wardrobe doors with your own hands is not the easiest task and you can only cope with it if you are well prepared.
The first thing you need is to know exactly the dimensions of the opening, because the quantity and type of profile you will need to buy depends on this.
Secondly , you need to decide on the material from which the sliding doors will be made, it can be almost any durable sheet material, such as glass, mirror, chipboard, chipboard, you can even use wood or plywood when working.
You should also decide on the opening system. Do not be afraid that you will have to make the elements yourself, since furniture manufacturers do not use special equipment. A set of rollers and profiles can be easily purchased at a furniture fittings store. This set allows you to make doors that will not differ from the options that you purchase from a furniture manufacturer.
You also need to prepare all the tools necessary for the job, so that when you start making cabinet doors, you don’t experience any delays. Only after you have purchased all the materials and prepared the tools can you start making cabinet doors.
An interesting option for making guides for sliding wardrobe doors - watch the video:
Size calculation
When assembling a sliding wardrobe door yourself, there are two options. The first is to measure the opening, think about how many doors you want to have and contact a door manufacturing company with this information. Just make sure they sell the parts without paying for assembly. The manager himself will count all the necessary materials for you, give you the dimensions and announce the amount. It's simple. But you will have to purchase everything from this office, i.e. choose from what is available.
The second way is to calculate everything yourself and look for the necessary components from different companies. It’s more complicated and more expensive, but there’s a wider choice. For those who do not like simple paths, we will describe the calculation of the components.
Doors
Calculate the width of the doors so that when closed, only one handle is visible, but it should not cover the door leaf itself. For a sliding door with two leaves, you calculate it like this: measure the width of the opening, add the width of the profile and divide in half. This will be the width of the sash.
For example, the opening is 1600 mm, the width of the handle profile is 26 mm. We get 1600 mm + 23 mm / 2 = 811.5 mm. Please note that the width of the handle profile is taken arbitrarily. It can be different in shape and, naturally, in width. When making calculations, substitute the width of your chosen structure.
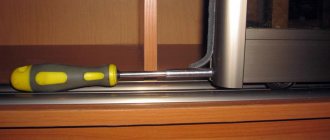
Profiles may be different, so they must be measured individually
To calculate a tricuspid one, you will need to add twice the profile width and divide by 3.
Example: opening 2100 mm, handle width is the same - 26 mm. We count: 2100 mm + 2*26 mm / 3 = 717 mm.
Everything is easier with height. Subtract 40-45 mm from the height of the cabinet and obtain the required height of the sash, as well as the length of the side profiles. That's all about the dimensions of the sashes.
Filling
Since the filling is in a frame of profiles, we subtract twice the profile width from the total width of the sash. We do the same with the height - subtract the height of the lower and upper profile.
Measuring the width of profiles
So, the width of our sash is 811.5 mm. The measured width of the handle profile is 18 mm. Since the handles are placed on both sides, we double this figure. We get 36 mm. Total filling width 811.5 mm - 36 mm = 775.5 mm.
We also calculate the height: let the initial one be 2350 mm, the width of the upper profile 12 mm, the lower one 48 mm. Total filling height 2350 mm - 12 mm - 48 mm = 2290 mm. This is if the filling is solid and it is laminated chipboard, which does not require a silicone seal. If the sash is a solid mirror or glass, the thickness of the sealing rubber must be subtracted from the found height. It is 1 mm, but since it is put on around the perimeter, it takes up 2 mm in total from above and below. In this case, the filling height is 2290 mm - 2 mm = 2288 mm.
If the sash filling consists of fragments, the thickness of the connecting profile is also subtracted. It is also approximately 1 mm.
Profiles
The height of the vertical profiles of the frames is equal to the total height of the sash. The width of all horizontal ones is calculated depending on the width of the handle: from the width of the sash we subtract twice the width of the handle (there are two of them).
How to measure handle width
Let the handle width be 26 mm. We get the width of the vertical profiles: 811.5 mm - 26 mm*2 = 759.2 mm.
Door dimensions and surface leveling
If you are just making doors in a niche, then you should carefully check its walls. Most importantly, they must be vertical and level, since the side guide profile will be attached to the walls. The bottom and top parts must also be level, because this is the basis for the profiles along which the rollers will ride. And of course, do not forget that all corners must be right, otherwise the doors will not adjoin the side profile and a gap will form at the top or bottom.
If the opening does not meet these requirements, then you can simply put a box in it. You just need to install the frame before you start measuring the doors or making them, because the frame will reduce the size of the opening, and, accordingly, the size of the doors. Of course, there are cases when you have already bought a profile, and only after that you have installed the box, but do not worry, since cutting them is not difficult, it is just a small additional cost (the profile is sold by the meter).
Let's start making the frame
To assemble the frame you will need:
- 2 wheel bolts;
- 4 screws for fastening horizontal and vertical profiles;
- 2 supports for installing the door in the upper guide profile;
- 2 support wheels designed for installation in the lower guide profile.
Step 1. Cut the vertical profile to the required length (closet handles). In total you need to make 4 segments (2 handles on the right and left).
Helpful advice: buy a profile wrapped in plastic film. There is no need to remove it right away; cut directly along the film. This will protect your handles from accidental scratches.
Step 2. Cut the horizontal profiles - 4 pieces, 75.5 cm each rail.
Step 3. Mark on the vertical profiles places for drilling holes for self-tapping screws intended for fastening the upper horizontal profile. You need to measure the distance from the end of the profile to the middle of the hole for the fastener and transfer it to the vertical profile. Repeat the marking procedure with the vertical profile on the other side of the whip for the holes for fastening the lower horizontal profile.
Step 4. Determine where to attach the support wheels. To do this, you can take the mechanism with the support wheel and measure the distance from the end to the middle of the mounting hole of the block, and then transfer this indicator to the vertical bar.
Step 5. Drill mounting holes for self-tapping screws at all measured points (diameter 5 mm, in the outer strip - 8 mm).
Installation of system elements
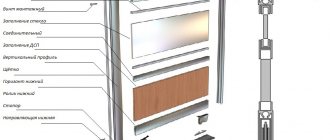
The door opening system mainly consists of the following elements:
- Profiles for frame
- Top and bottom rollers
- Top and bottom guides
- Side guides
- Seals and decorative elements
- Handles and other accessories
At the first stage of installation, your sliding doors will simply look like a pile of spare parts from which you will need to put together a door system. But do not be afraid, since each set of materials for sliding doors comes with an installation diagram. Therefore, assembling them will be no more difficult than Lego.
There is no strict recommendation on where to start making wardrobe doors with your own hands. Some start by assembling the frame, others by installing the guides. A more practical option is to start by installing a top guide, especially if you don't have a laser level or a full-fledged alternative to it.
With this technique, the lower guide is simply cut to size and is not attached to the surface, since it will need to be adjusted at a later stage of work. But it must be carried out immediately before installing the doors.
Next, the door frame itself is assembled; its assembly process may differ depending on what type of profiles you have chosen and what material you are going to use for the door leaf. When assembling, be sure to use a corner to prevent the door from being warped. Even if you just want to make a wooden cabinet on the balcony, the doors should be level to avoid problems during future use.
Once the frame is ready and the rollers are installed on it, you can begin adjusting the bottom guide. The adjustment is as follows: a frame is placed on the installed lower profile and fixed in the upper one; in simple words, you just need to put the frame in place. Then, using a regular building level, you simply need to level the doors, while adjusting the lower profile. What is important is that if you have more than two sashes, it is not necessary to install all of them. It is enough to hang two side flaps and align the guide with them. When the guide is in place, simply draw a line, which will be the mark for its fastening.
At this stage of work, it is important to maintain maximum accuracy, since how you adjust the profile determines how the sashes will work in the future.
Once the top and bottom rails are installed and adjusted, you can install the side rails.
Assembling the door frame
- Connect the right vertical rail to the top horizontal rail by inserting the locking support into the top rail.
Repeat the procedure for the other side, connecting the left vertical and top horizontal strips.
- Pull the bottom horizontal with the left and right vertical strips.
- Insert the support wheel into the lower horizontal profile on the left side. Tighten the bolt to secure the wheel in one place.
The bolt does not need to be screwed in deeply. It will be enough if it comes out 1-2 mm from the bar. Using this bolt, you will then move and fix the sliding mechanism on the lower rail. Repeat the installation procedure for the support wheel on the right side. Since the design of the built-in wardrobe requires two doors, make the second frame in the same way.
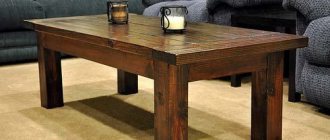
Door leaf material
If you are making a cabinet with your own hands, then you should remember that the main element on which its appearance will depend is the door leaf. You can even make it from clapboard, since any material that has sufficient strength can be used in the frame. Therefore, before making wardrobe doors with your own hands, it is recommended to think carefully about this aspect, since by making the canvas from ugly materials, you risk simply ruining the appearance of the apartment.
Of course, if you don’t like the result, the compartment mechanism allows you to replace the canvas in the future, but this is naturally an extra expense. In addition, it is worth remembering that when making a canvas from lining, you need to protect it well with impregnations. After all, even at room temperature and humidity, wood can warp, and accordingly it will lose its beautiful, original appearance.
But it is also worth remembering that frequent removal and hanging, and even more so replacement of the canvas, do not benefit sliding systems. After all, with such work, you can simply damage the door or its mechanisms.
Materials and tools
To make a door for a wardrobe, you will need (for example, a frame hinge):
- Padding: wood panels, frosted glass or mirror with a thickness of at least 4 mm, protected with film.
- Top and bottom guides (double-track with standard gate installation scheme).
- Side profile C for open handles, H for closed handles.
- Door frame frames, of which the top one has a channel for screwing in mounting screws, the bottom one has the same channel but with a higher shelf, and the central one, are used to assemble doors from different materials or individual parts.
- Upper roller, selected according to the type of side profile of the handle, 2 pieces for each door.
- Support roller mechanism, 2 pcs.
- Self-tapping screws.
- Silicone gasket is used in the production of sliding doors made of glass or mirrors.
- Schlegel is a sealing tape that is glued at the owner’s request into special grooves in the side profile of the handle to soften the impact of the sash and protect it from dust.
Accessories include plugs, door closers, plugs or locks. These components are purchased in accordance with the capabilities and wishes of the owners and are not mandatory. The same applies to straight and shaped stops used when assembling wardrobe doors from laminated chipboard with your own hands.
Due to the requirements for high dimensional accuracy, all panel materials will be opened using special equipment upon purchase. If this is not possible, a jigsaw is used to cut chipboard. The same tool is used when cutting profiles and frames (an alternative is a hacksaw), provided that a special saw is installed. To drill holes in the profile, you will need a drill or a drill bit; to clean its edges, you will need a file with a fine notch. Installation and screwing in of self-tapping screws and door adjustment are done using a screwdriver, hex keys and 6mm bits. Level, plumb line and other measuring instruments are used at all stages of cabinet assembly.
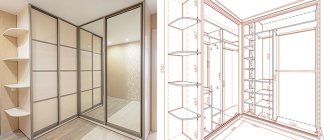
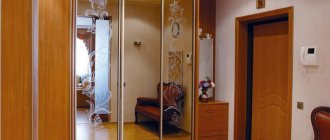
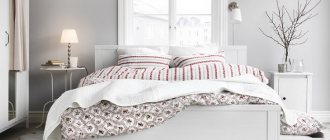
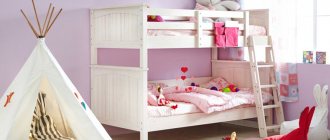
Options for using a white wardrobe inside different rooms
Sliding system design
Chipboard
Colored glass
Frosted glass
Mirror
How to start making homemade wardrobes
Most novice carpenters do not start with a cabinet with their own hands in the apartment, but make a rough version of the furniture. After all, even making a simple built-in wardrobe for a loggia yourself is quite difficult. Therefore, if you start with a simple cabinet on a loggia, balcony or cottage, you have an excellent opportunity to gain experience. In addition, such a piece of furniture will be very useful as an additional place to store things that are not afraid of the cold, and if the loggia is insulated, then you can easily store items.
It is much more difficult to make a cabinet on a balcony or loggia, since its design is different. But if you succeed, then after that you can safely begin improving your apartment. After all, making a cabinet with your own hands will be a simple task for you. Therefore, all beginners are advised to start by making cabinets for the balcony, as they may have some flaws, but they will not be noticeable.
In addition, you can build a door in the country if you do not want to spoil the interior of your balcony, since a small storage room with sliding doors will always be of minimal use to you to store garden tools.
Don't expect to do everything perfectly the first time. Making even a simple stool so that it looks beautiful is not as easy as it seems at first glance. Firstly, you need to have experience in carpentry, and secondly, you need to try so that everything works out for you. And for a do-it-yourself cabinet, you will also have to show a lot of ingenuity, since the door mechanism is quite unique, and installing it is a rather labor-intensive task.
Create a drawing
The production of sliding doors for furniture begins with the choice of their dimensions. At this stage, you can use ready-made sketches (provided that the dimensions of the room and the design of the cabinet are completely the same), the calculation results of online calculators, or you can create drawings yourself. The initial data are the dimensions of the door, the number and location of the leaves, the type of system chosen and the width of the guides. Parts that take into account the exact dimensions of the components used help to avoid errors.
The height of the door, as well as the length of the side profile, is calculated simply: 40–45 mm is subtracted from the height of the cabinet opening (the exact value depends on the type of profile). When calculating the width, several factors are taken into account, including:
- The need for a sufficiently tight connection of the sash: with the doors closed, only one handle should be visible, without overlapping the adjacent leaves.
- Correct placement of doors - doors should not overlap shelves and drawers. With the right approach, the width of the doors is selected taking into account the internal structure of the cabinet.
- Maintain an optimal width ratio ranging from ½ the height of the door. Ignoring this requirement has a negative impact on the stability and reliability of the sash fastening.
The optimal door width is calculated by the formula: (cabinet opening width + number of overlaps × handle profile width): number of doors.
For the installation of a sliding system, at least 100 mm is allocated into the depth of the cabinet; the exact value of this parameter depends on the type of guides, the number of doors and their location. Particular attention is paid to the installation method of the bottom guide; In insertion systems, the door height is calculated differently; simply subtracting the height of the guides is no longer sufficient. The same applies to prefabricated structures; the height of their individual elements is calculated minus the dimensions of the connecting profile.
Parameters to measure
size table
Possible placement options for sliding doors
Types of sliding systems
To decide on the design of the door block, you need to know the main differences between sliding systems. There are four groups of them:
- Coupe. The simplest type of mechanism. Easy to do yourself without complicated tools.
- Radius. It is impossible to assemble such a structure without experience and specialized tools.
- Cascade. The complexity of the system is not inferior to the radius.
- Harmonic. The simplest hinged door, sliding on top rollers. The disadvantage is poor vapor and sound insulation.
All sliding systems are based on rollers and a guide profile, but differ in the way the sash moves :
- Along the wall. The best option is to make compartment doors yourself. Disadvantage: free space is required on the wall adjacent to the opening.
- Driving inside the partition. It is more difficult to make such a design. The advantage is saving space along the wall.
- Retractable. The principle of operation is similar to a system where the sash moves along the wall, but special fittings allow it to change its position. Disadvantage: it’s difficult to make and expensive.
Any sliding system consists of a set of rollers, guides, and rails. The mechanism differs in the material of manufacture :
- Steel. For an interior door, a system made of this durable material is chosen. The mechanism is designed for heavy loads. Disadvantage: loud noise.
- Aluminum. Guides from this material are chosen if you need to make a lightweight sliding partition from polycarbonate, plastic, or glass. Advantage: quiet operation.
- There is even a plastic mechanism . It is usually used on accordion folding doors. The frameless device is attached to the frame of the doorway. The sash moves on the upper rollers.
An aluminum guide and steel rollers are often used. This mechanism is inexpensive, but long-lasting.
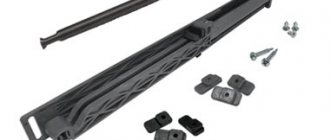
Steel
Durable and reliable material. Costs less than aluminum. What's the catch? The difficulty of installing steel structures. It is problematic to cut steel guides to fit the required size, and the rollers, moving along the steel guide, emit a characteristic noise.
The best option would be to install aluminum guides in combination with steel rollers. This way, a balance will be maintained between the lightness of the structure, its strength and low noise level when opening and closing the door.
Steel guide
Rules for assembling furniture
It is already clear that the most difficult part of assembling a wardrobe will remain the process of assembling its doors itself. Everything else is done simply and clearly. However, before we talk about working with doors, it is worth remembering the general rules of work during the assembly of cabinet furniture.
- If the furniture was purchased in a store, it usually comes in several boxes. Each of them will have parts for a specific part of the same cabinet. First, you should always read the instructions, and then unpack. You need to unpack the boxes in stages - you don’t need to do everything at once, otherwise you can get confused in the details.
Self-assembly of a wardrobe - You should immediately see that all the necessary fittings are in place. It also happens that the manufacturer miscalculated and something is missing. Likewise, you need to make sure of the amount of fittings when creating a cabinet yourself - it’s inconvenient to run to the store in the middle of the assembly process if something is missing.
- You need to assemble the cabinets section by section - first one part, then the other. Moreover, if the cabinet is a cabinet, then it is worth assembling the cabinet itself first, and only after that move directly to the doors.
Fastening the sliding system for doors - If the cabinet has a mirror, then it should be fixed to the wall or door last, in order to reduce the risk of damage to the mirror surface.
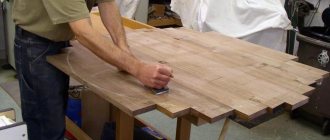
Making cabinet parts in a workshop
The next step is to make the cabinet parts in the workshop. So that in the workshop you don’t have to explain “on your fingers” what you need, just print out the specifications of all the elements and their drawings in advance and give them to the craftsmen. In addition, Basis can also make a cutting map, for which the workshop requires a separate fee.
To do this, you just need to use the Basis-Cutting module, specifying the dimensions of the original chipboard sheets. This card is a pattern according to which structural elements will be cut from a sheet of a certain size, taking into account indentations, thickness of cutting materials and other subtleties. True, some nuances still need to be coordinated with furniture makers, so it is better to entrust the cutting map to them - they have a better understanding of these issues, and when cutting they will take into account the tools they have.
As an example, let's consider the manufacture of a wardrobe with a height of 2.5 m, a width of 1.2 m, a depth of 0.4 m. According to calculations, it turns out that for its manufacture you will need two sheets of chipboard with an area of 4.08 m2 and a sheet of fiberboard with an area of 4. 67 m2.
What should you pay attention to when making a wardrobe?
When choosing a color, you should not rely on names like “Milanese walnut”, etc. Each manufacturer has its own understanding of what this very nut looks like, and there are no uniform standards. So it’s best to go and choose the color of the material yourself, based on its type, and not on its name.
After all the elements of the cabinet are cut out in the furniture shop, you may be offered to take with you the scraps of the sheets from which they were cut, because you bought a whole sheet, which means the scraps are yours.
If you don’t need them, furniture makers will keep them and give you a small discount. This solution seems more attractive to many. It seems like we got rid of garbage and also saved money. But it is not so. During the assembly process, some elements may become damaged, and you can use the scraps to replace them.
If you order a separate part from a workshop that is not made from your own material, you can overpay up to 25% of the cost.
One more nuance. You need to pay not for the manufacture of each individual part, but for cutting the sheet. At first glance it seems that these are one and the same thing, but in fact this is not entirely true. Therefore, when calculating the amount of starting material, you need to clearly determine the number of sheets and send them for cutting.
Programs like Basis will help you decide on the issue of material consumption quickly and accurately. Manual calculations often give inaccurate results, especially if there are a lot of parts.
A separate expense item is the production of shaped elements, for example, side shelves with a rounded corner or baseboards. The cost of such cuts is higher than cuts of a simple rectangular shape, which must be taken into account and agreed upon in advance, so that later there are no misunderstandings when paying.
Let's summarize. The costs of making parts in a workshop consist of:
- drawing up a cutting map (it’s still better to entrust this to the craftsmen);
- cutting laminated chipboard and LDVP sheets;
- making plinths;
- production of rounded elements.
Rear mount
This stage can be considered the final one. The rear wall of the cabinet is usually made of HDF, the thickness of which is from 3 to 4 millimeters. It is fastened with the help of furniture nails, already supplied with the purchase of the cabinet, or special screws of small sizes 4*16 and lining corners. Of course, a more reliable and stronger option is screws with backing corners; they will securely fix the back wall and will not allow it to fail, unlike furniture nails. Therefore, when purchasing a cabinet, you will immediately be sure which components are included in the furniture assembly.
We attach HDF along the entire back of the cabinet body, to its internal partitions and tightly fixed shelves, this will give the back wall greater protection.
You can assemble the back part in the early stages, when the cabinet is still lying down, but it is best to leave it at this stage so as not to spoil the thin wall.