Materials and tools
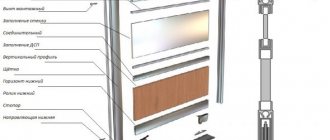
To make a door for a wardrobe, you will need (for example, a frame hinge):
- Padding: wood panels, frosted glass or mirror with a thickness of at least 4 mm, protected with film.
- Top and bottom guides (double-track with standard gate installation scheme).
- Side profile C for open handles, H for closed handles.
- Door frame frames, of which the top one has a channel for screwing in mounting screws, the bottom one has the same channel but with a higher shelf, and the central one, are used to assemble doors from different materials or individual parts.
- Upper roller, selected according to the type of side profile of the handle, 2 pieces for each door.
- Support roller mechanism, 2 pcs.
- Self-tapping screws.
- Silicone gasket is used in the production of sliding doors made of glass or mirrors.
- Schlegel is a sealing tape that is glued at the owner’s request into special grooves in the side profile of the handle to soften the impact of the sash and protect it from dust.
Accessories include plugs, door closers, plugs or locks. These components are purchased in accordance with the capabilities and wishes of the owners and are not mandatory. The same applies to straight and shaped stops used when assembling wardrobe doors from laminated chipboard with your own hands.
Due to the requirements for high dimensional accuracy, all panel materials will be opened using special equipment upon purchase. If this is not possible, a jigsaw is used to cut chipboard. The same tool is used when cutting profiles and frames (an alternative is a hacksaw), provided that a special saw is installed. To drill holes in the profile, you will need a drill or a drill bit; to clean its edges, you will need a file with a fine notch. Installation and screwing in of self-tapping screws and door adjustment are done using a screwdriver, hex keys and 6mm bits. Level, plumb line and other measuring instruments are used at all stages of cabinet assembly.
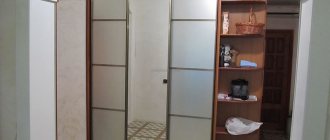
Options for using a white wardrobe inside different rooms
Sliding system design
Chipboard
Colored glass
Frosted glass
Mirror
Nuances of installing the structure
Fixing the gate begins with carefully moving the previously installed gates into the fence opening. First, the far leaves are inserted and placed on the rear guides, and then, after checking their movement, the near leaves are installed. When installing rail systems, the work is performed according to a simple scheme:
- The upper part of the sash with pre-installed rollers is located in the grooves of the upper profile.
- The door leaf rises so that the rollers finally fit into the groove.
- The wheels of the lower rollers are lightly pressed with your fingers.
- The sash rises again and is fixed in the lower profile, the roller mechanism is released and finally fixed. Then repeat the operation with the second lower corner.
Installation of roller cabinet doors is completed with adjustment. This is done by using a hex wrench to turn the adjustment screw. By turning it clockwise, the roller comes out and raises the door leaf, and counterclockwise lowers it. Properly installed doors are aligned with the bottom rail. It is also important to ensure that there is no skewing or vertical movement of the side rails.
On the one hand, it is easier to install a hanging system: at least 2 double rollers are fixed in the upper part of a special profile (such doors are more reliable and can withstand more weight), after which the door easily moves in the desired direction. When the number of leaves is more than 2, it is necessary to install a cap - a plastic corner cap attached to the inside of the outer door to control the width of the door opening.
Regardless of the type and configuration of the sliding system, before installing the cabinet door, it is worth checking the geometry of the door opening. . Any deviation from level must be corrected before fixing the rails. This rule should not be neglected, since the denser the cabinet itself, the longer the structure will last.
Component manufacturers
It is not difficult to purchase components for assembling a cabinet door today. Just look at the price list of any specialized store.
Range of profiles
Inexpensive but good component options include Slider-Volkhovets products, complemented by Italian accessories, as well as guides, rollers and other wardrobe parts from Herkules and Rollan. Take a closer look at Framir products - they are quite durable and made of aluminum profiles of the correct geometry.
The leading manufacturers of accessories for sliding wardrobes include the following companies:
- Absolute: provide consumers with lightweight and high-strength structures; There are four types of profiles with different shapes and finishes; another significant advantage of such products is ease of installation;
- Divendoor - fairly inexpensive and elegant steel components for bronze, silver, gold, wood;
- Stanley - reliable products with almost ideal performance characteristics;
- Raumplus: German quality at affordable prices; The warranty covers all components down to the last screw;
- Komandor: another successful tandem of quality and reliability; warranty up to 30 years;
- Ramtrack: In the global market, products from Canada are the standard of quality; This company was no exception; their steel products with durable anti-corrosion coating can be called a quality standard in all respects
Components for sliding wardrobes are less known on the Russian market, but this does not affect their quality in any way:
- Geze Rollan: silent wheels, durable profile, long warranty; but these products, unfortunately, are expensive
- Ducase: the manufacturer claims that their components can last up to 27 years, 100,000 opening-closing cycles; however, these products only have a 12 month warranty
- Laredo: Value for money is almost perfect and they look very decent
Create a drawing
The production of sliding doors for furniture begins with the choice of their dimensions. At this stage, you can use ready-made sketches (provided that the dimensions of the room and the design of the cabinet are completely the same), the calculation results of online calculators, or you can create drawings yourself. The initial data are the dimensions of the door, the number and location of the leaves, the type of system chosen and the width of the guides. Parts that take into account the exact dimensions of the components used help to avoid errors.
The height of the door, as well as the length of the side profile, is calculated simply: 40–45 mm is subtracted from the height of the cabinet opening (the exact value depends on the type of profile). When calculating the width, several factors are taken into account, including:
- The need for a sufficiently tight connection of the sash: with the doors closed, only one handle should be visible, without overlapping the adjacent leaves.
- Correct placement of doors - doors should not overlap shelves and drawers. With the right approach, the width of the doors is selected taking into account the internal structure of the cabinet.
- Maintain an optimal width ratio ranging from ½ the height of the door. Ignoring this requirement has a negative impact on the stability and reliability of the sash fastening.
The optimal door width is calculated by the formula: (cabinet opening width + number of overlaps × handle profile width): number of doors.
For the installation of a sliding system, at least 100 mm is allocated into the depth of the cabinet; the exact value of this parameter depends on the type of guides, the number of doors and their location. Particular attention is paid to the installation method of the bottom guide; In insertion systems, the door height is calculated differently; simply subtracting the height of the guides is no longer sufficient. The same applies to prefabricated structures; the height of their individual elements is calculated minus the dimensions of the connecting profile.
Parameters to measure
Size table Possible placement options for sliding doors
Installation of system elements
The door opening system mainly consists of the following elements:
- Frame profile
- Top and bottom rollers
- Top and bottom guides
- Side guides
- Seals and decorative elements
- Handles and other accessories
At the first stage of installation, your sliding doors will look like just a pile of spare parts from which you will need to put together a door system. But fear not, as each sliding door kit comes with an installation diagram. Therefore, assembling them will be no more difficult than Lego.
There are no strict recommendations on where to start making cabinet doors with your own hands. Some start by assembling the frame, others by installing the guides. A more practical option is to start with an excellent guide, especially if you don't have a laser level or a full-fledged alternative.
With this technique, the bottom guide is simply cut to size and is not attached to the surface, as it will need to be adjusted at a later stage in the job. But this must be done immediately before installing the doors.
In addition, the door frame itself is assembled; its assembly process may differ depending on the type of profiles you choose and the material you will use for the door leaf. When assembling, be sure to use an angle to prevent the door from tilting. Even if you just want to make wooden furniture on the balcony, the doors should be straight to avoid problems with further use.
Once the frame is ready and the rollers are installed on it, you can begin adjusting the bottom rail. The adjustment is made as follows: a frame is installed on the lower profile and secured in the upper one; in simple words, it is enough to place the frame. Then, using a regular builder's level, you simply need to level the doors while adjusting the bottom profile. What's important is that if you have more than two ports, they are all optional. Simply hang the two side tabs and align the guide with them. Once the guide is in place, a line is simply drawn to act as a mark for attaching it.
At this stage of work, it is important to be extremely careful, since the method of adjusting the profile depends on how the shutters will work in the future.
Once you have installed and adjusted the top and bottom rails, you can also install the side rails.
Doors for sliding wardrobes: recommended sizes
If we talk about strict restrictions on the size of cabinet doors, then there are none. You can make any length and width. But there are recommended parameters determined based on operating experience:
- The minimum width is 50 cm. Nothing will stop you from narrowing the track, but it will tilt as you move and may even jump off the rails as a result.
- The maximum door width is 110 cm. This requires considerable effort to move it.
- The optimal width is 60-90 cm.
- The profiles are 5.5 m high from the factory, but they are usually cut in half in the workshop. Thus, there is a real possibility of manufacturing cabinet doors of the required height. If the height is high, you just need to pay attention to the rigidity of the handle profile.
- Select the number of sliding doors depending on the optimal width. Choose them so that they do not block access to the contents of the cabinet. Almost no size restrictions
Manufacturing stages
The standard step-by-step instructions for making doors for a sliding wardrobe with your own hands consists of three main stages:
- preparation of parts taking into account the selected dimensions;
- assembly of the cabinet itself and door panels;
- installation of all profile elements, fastening of roller mechanisms.
When installing large panels in a cabinet, work must be carried out in one room to place stationary furniture. In any case, cutting or drilling a metal profile is carried out on a flat and stable base.
Preparing parts
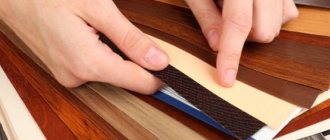
This stage begins with the preparation of door panels, i.e. sawing panel materials and processing the ends:
- Chipboard elements are glued with a special tape using an iron or a hair dryer; those made from natural solid wood are sanded with sandpaper and painted.
- Glass or mirror parts are covered with a film over the entire area with mandatory protection of the edges with a silicone gasket. Properly fixed material should cover the fragile inserts around the entire perimeter and retreat from the edges of the frame by 2-3 mm; during assembly, the excess is cut off.
- Cutting a profile using guides is often carried out after carefully drawing perpendicular lines, exclusively from the back side, without removing the protective film (if any).
- Accidentally damaged edges are carefully cleaned with a file with a fine notch.
- Holes with a diameter of 3 mm are drilled in the horizontal guides fixed inside the cabinet, every 25-35 cm from each other.
- Recesses for final fixation of the frame are made in the vertical section of the handle profile with an offset of 8 mm at the top, 8 and 42 mm at the bottom.
The recommended hole diameter is 5.5mm inside and 10mm outside. Therefore, to obtain them in the first pass, drills with a diameter of 5 mm are used. From the outside, a hole is made with a larger diameter nozzle.
When cutting parts, it is recommended to check the parameters of parallel sections. According to the rules, they must completely match. The cut profile must be laid on the ground or level to check its dimensions, mark the drilling points and determine the correct rotation of the handles (important when working with the C-profile).
Review of modern cabinets, classification of models, selection tips
Fixing the guides
Particular attention is paid to installing the guides directly into the cabinet. These elements are fixed with plumb lines and aligned vertically with an accuracy of one millimeter. First, the upper horizontal guides are fixed, after checking their uniformity, the lower ones. How they are located depends on the type of side profile. When installing doors with an asymmetrical C-profile, the lower guide is shifted from the line of the facade until it coincides with the internal sheathing of the upper guide. When using profile H, all horizontal guides are in the same plane and coincide with each other.
Frame and profile assembly
The sash assembly scheme depends on its type. When using glass inserts, the silicone gasket is installed first on the end. Subsequently, all elements of the canvas are connected by central frames. Unlike a gasket, which is easily tightened with your fingers, difficulties may arise at this stage; in particularly difficult cases, tap the putty with a rubber hammer (which is not always possible when working with a mirror or glass). The upper and lower profiles of the frame are fixed on the already assembled canvas with the same forces.
The side profile is installed last, starting from the top:
- To secure the frame, carefully insert the screw into the pre-drilled hole so that the pointed tip protrudes 10-15mm.
- The bit is inserted into the groove of the upper profile of the frame and tightened with a hex key to a gap of 3-4 mm.
- The cap of the upper support roller is inserted into the resulting gap, after which the screw is tightened until it stops.
- The process of assembling the cabinet door is completed by securing the lower part of the frame at a distance of 42 mm from the edge and fixing the support roller (similarly, but without careful tightening).
Tips for choosing guides for sliding wardrobes, installation features
Some craftsmen approach the assembly process differently: first they fix the door frame without putty, after checking the work, they partially unscrew this structure and fill it with double-glazed windows or chipboard. A description of this method can be easily found on thematic resources; the basic rules for assembling and fixing the profile remain unchanged. To avoid mistakes, it is worth assembling the wardrobe doors, as recommended by the manufacturer of the sliding systems, and clarifying this point in advance.
Guides for sliding doors
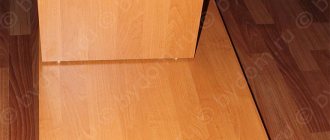
As you can see, fascia isn't everything. You need guides along which the doors will move. There are two of them: upper and lower. They differ significantly in appearance.
Top rail for cabinet doors
Metal bottom rail
When installing the gate, first push it firmly into the top track, lift the gate until it stops and insert the lower rollers into the corresponding groove. The entire structure is shown in the following photo.
Installation diagram
Bottom rollers
Then move to the bottom edge of the piece. The fasteners are screwed into the top hole. In this case, they are simply tightened on both sides until they stop. The rollers are installed. The pressure plate is first inserted into the groove and then pressed down.
Hold the spring and push the roller housing inward. Insert the screw into the hole and tighten it with a hexagon. But not so far, because during installation of the door, this element will adjust the position of the door. When adjusting the system, its angle is raised or lowered.
Filling
After this preparation, begin assembling the fillers. Most often you order door filler. However, sections can be made with your own hands. In this case, the work must be completed flawlessly. The accuracy of marking, observance of right angles, and uniform cutting are extremely important. Otherwise, there will be no guarantee that the elements will fit the finished frame. Incorrectly cut blanks can deform it. Another necessary step is chamfering (depth and width - 2-3 mm).
If the design includes glass or mirror parts, first place a rubber seal around the perimeter. It is placed by pressing a finger into the end of the element. The ends of the sealant are located opposite each other, leaving no overlap. To avoid injury if the element breaks, the protection is glued to the back of the mirror. An ordinary self-adhesive film is suitable for this role. A door consisting of several fragments is assembled using intersecting profiles.
Sometimes it may take considerable force to insert the upholstery. In such cases, the material that will not come out is forced to tap on the back of the hand or with light, gentle blows with a rubber mallet. After the sash is assembled, the final blade profiles are installed equally at the top and bottom.
Preparing parts
To save money, many are interested in whether it is possible to do without the help of experienced furniture manufacturers and how to make wardrobe doors with their own hands. First, the parts are prepared for installation. Having chosen the most relevant material (chipboard, MDF or natural wood), purchased fittings, you can get to work. You will need to make a reliable frame from pre-prepared parts:
- two side walls;
- lid;
- lower.
In the future, shelves and storage systems will be installed inside the structure.
A sheet of selected material is cut out on special equipment, which cuts out the described details of the future cabinet with high precision. If there are no special tools for this, you can order cutting of the material from professionals. After cutting, the parts are machined and covered with end plates to make them more aesthetically pleasing. Next, we will tell you how to assemble the doors and get a finished piece of furniture at minimal cost.
Door design without filling
Profiles may be different, so they must be measured individually
Size calculation
When assembling a wardrobe door yourself, there are two options. The first is to measure the opening, think about how many doors you need, and communicate that information to the door manufacturer. Just make sure they sell the parts without the assembly fee. The manager will calculate all the necessary materials for you, name the dimensions and announce the amount. It's simple. But you will have to buy everything in this office, that is, choose from what is there.
The second way is to calculate everything yourself and select the necessary components for different companies. More complicated and more expensive, but the choice is wider. For those who do not like simple methods, we will describe the calculation of the components.
Doors
Calculate the width of the doors so that when closing only one handle is visible, but it should not cover the door itself. For a double-leaf sliding door, calculate as follows: measure the width of the opening, add the width of the profile and divide it in half. This will be the width of the door.
For example, the opening is 1600 mm, the width of the handle profile is 26 mm. We get 1600mm + 23mm / 2 = 811.5mm. Please note that the width of the handle profile is arbitrary. It can be different in shape and, of course, in width. In the calculation, replace the width of the structure you choose.
Profiles may be different, so they must be measured individually
To calculate a tri-leaf, you will need to add twice the profile width and divide by 3.
Example: opening 2100 mm, handle width is the same - 26 mm. We count: 2100 mm + 2 * 26 mm / 3 = 717 mm.
Everything is easier with height. 40-45 mm is subtracted from the height of the cabinet and the desired door height is obtained, in addition to the length of the side profiles. Everything about the valve size.
Filling
Since the filling is in a frame of profiles, we subtract double the width of the profile from the total width of the sash. We do the same with height: subtract the height of the lower and upper profiles.
Measuring the width of profiles
Thus, the width of our door is 811.5 mm. The measured width of the handle profile is 18 mm. Since the handles are located on both sides, we double this figure. We get 36 mm. Total filling width 811.5 mm - 36 mm = 775.5 mm.
We also take into account the height: both the original one is 2350 mm, the width of the upper profile is 12 mm, and the width of the lower one is 48 mm. Total filling height 2350 mm - 12 mm - 48 mm = 2290 mm. This is if the filling is solid and is chipboard, which does not require a silicone gasket. If the sash is a solid mirror or glass, the thickness of the sealing rubber must be subtracted from the found height. It is 1mm, but since it is worn around the perimeter, 2mm is required overall - top and bottom. In this case, the filling height is 2290 mm - 2 mm = 2288 mm.
If the sash filling consists of fragments, the thickness of the connecting profile is also subtracted. This is also about 1 mm.
Profiles
The height of the vertical frame profiles is equal to the total height of the sash. The width of all horizontal ones is calculated based on the width of the handle: from the width of the door we subtract twice the width of the handle (there are two of them).
How to measure handle width
The width of the handle should be 26 mm. We get the width of the vertical profiles: 811.5mm - 26mm * 2 = 759.2mm.
Sources
- https://mebel-sovet.ru/shkafy/kupe/616-dveri-svoimi-rukami
- https://krrot.net/dveri-dlya-shkafa-kupe-svoimi-rukami/
- https://1PoMebeli.ru/spalnya/prostye-dveri-dlya-shkafa-kupe-svoimi-rukami.html
- https://legkovmeste.ru/remont-i-izgotovlenie-mebeli/shkaf-kupe-svoimi-rukami.html
- https://infomebli.ru/spalnya/shkafy/kupe-dvercy-svoimi-rukami.html
- https://stroyday.com/dveri-dlya-shkafa-kupe-svoimi-rukami/
- https://VseMe.ru/svoimi-rukami/dveri-dlya-shkafa-kupe
- https://delairukami.ru/mebel/schkaf_kupe_svoimi_rukami/
- https://mblx.ru/shifoner/razdvizhnye/434-dveri-dlya-shkafa-kupe-svoimi-rukami.html
- https://stroychik.ru/mebel/dveri-dlya-shkafa-kupe-svoimi-rukami
Types of drawer guides
Any retractable mechanism of cabinet furniture is based on the operation of roller or ball guides.
Ball guides are also called “telescopic” or “telescopes” due to the principle of extending the inner part of the runners from the outer housing. They are slightly more expensive than roller ones.
ball (telescopic) guides for drawers
| Size range of ball guides, mm | ||||||
| 250 | 300 | 350 | 400 | 450 | 500 | 550 |
Roller guides are the simplest and cheapest extension mechanism: two plastic rollers slide along the slides, and when lifted into a small diagonal, they are easily removed from each other.
roller guides for drawers
| Dimensions of roller guides, mm | ||||||
| 250 | 300 | 350 | 400 | 450 | 500 | 550 |
Each of the two main types of guides has many varieties.
Retractable systems based on roller guides
For example, so-called metaboxes work on roller guides - retractable systems, which are metal sidewalls for drawers of different heights.
Metaboxes are also called metalboxes, samboxes. They can be equipped with longitudinal and transverse rails, expanded with blind and perforated inserts, and also supplemented with closers.
Most pull-out shelves and baskets for wall-mounted wardrobes and walk-in closets also roll out using a roller guide built into the hanging frame.
Retractable systems based on ball (telescopic) guides
There are also many varieties of telescopic retractable systems.
Ball guides for drawers are distinguished according to the installation method. There are overhead and mortise ones, as well as with hidden installation - in this case, the retractable mechanism is “hidden” under the bottom of the drawer box.
The system of moving the roller guides does not allow a closer to be built inside the mechanism - it can only be installed as a separate capsule and “slow down” the movement of the drawer. But ball guides with a built-in closer are implemented in a single mechanism.
Also, all roll-out baskets, cargo and other mesh storage systems with closers that ensure smooth “retraction” of the mechanism “work” due to ball guides.
Separately, it is worth highlighting the so-called tandemboxes - retractable systems with double-walled metal sides, inside of which there is a built-in ball guide with an additional “upgrade” that ensures silent smooth closing with a closer.
Tandem boxes are designed for increased load capacity; there are models with dynamic loads of up to 70-80 kg. For comparison, the load-bearing capacity of metaboxes on roller guides is about 20-30 kg.