A sliding wardrobe is one of the most convenient and compact ways to store things. It has small shelves for light items of clothing, and large ones for bulkier items, there are compartments for storing skis, a compartment equipped with a rod for placing outerwear, etc.
The compactness of the closet is made possible by sliding doors, which do not require space to swing open; they move on special rollers located inside the structure of the door itself. Even a person inexperienced in such matters can assemble such a cabinet, since the assembly principle is quite simple and does not require the use of special tools.
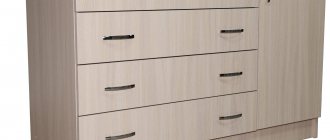
It's no more difficult than assembling a chest of drawers.
Installing internal partitions
At the lower end of the partitions there are holes into which dowels must be inserted before installation.
A dowel (chopik) is a small piece of round rod used to strengthen wooden joints.
There are blind holes in the bottom plate, which are intended for such dowels. Having aligned the dowels and holes, we install the vertical partitions in their place (an assistant will be needed here).
What can break
The main element that needs frequent replacement is the rollers on which the sash rides in the lower guide. If the door begins to open poorly (not smoothly, tightly), they need to be replaced.
For this:
- Remove the sash that is causing problems.
- Lay her down on the floor. Since the sash is heavy and tall, this must be done carefully so as not to drop it on furniture or the wall.
- Remove damaged rollers.
- Take 1 damaged roller and go to any furniture store to buy new ones. The approximate cost of a set of 2 simple rollers is 300-400 rubles.
- Screw on new ones.
- Reinstall the sash.
We install the side racks and the top cover
Now the final part of assembling the frame is the installation of the side posts and the top cover. All three elements must be installed simultaneously.
Although this action depends on the design features and location of the fastening points on these parts. First, we install the sidewalls, fastening them at the bottom with the base with confirmations.
Then we put the lid on top, align the holes in all the parts and also tighten the fasteners. Here you need to leave a little free play, since you will need to level the entire frame.
Installation of hardware
Responsible furniture manufacturers prepare all holes for hardware during production.
On the bottom bar, you need to pre-drill several holes and insert anchors on which the rack bars will be attached.
The specific set depends on the model and manufacturer, but for most cabinets you need to have hex keys and a set of screwdrivers, including ones for Eurobolts.
The first step is to install the side planks; if there is a middle post, it is installed after.
The top bar is fastened with corners and self-tapping screws or confirmations.
Advice. It is better to assemble the cabinet in a standing position, since fitting the parts while lying down is problematic. To install the roof, a minimum of 10 cm must be left.
Each hardware has its own technical parameters and requires special fixation technology.
Aligning the structure
The alignment process consists of the following steps. It is necessary to use a tape measure to first measure one diagonal, then the second and, based on the difference in values, determine in which direction you need to “press” (move) the top of the cabinet so that its corners are perfectly straight.
Now you can wrap the confirmations to the end with force.
We nail chipboard sheets
The next assembly step is to nail the fiberboard sheets to the back of the cabinet.
These sheets will not only serve as a back wall, but will also reliably keep the structure from loosening throughout the entire period of operation.
As a rule, the canvases have a decorative treatment on the front side in the form of a laminated colored surface. The sheets are fastened using small nails, which must be driven into the ends of all cabinet elements (racks, partitions, shelves).
Here it is important to guess the place of nailing, because the cabinet parts are not visible from the back side, and damage resulting from the wrong choice negatively affects the appearance of the product.
Types of wardrobes
Under one general name “sliding wardrobes” there are two main types of this furniture. Each of them has its own advantages and disadvantages.
Table. Types of wardrobes.
| Type | Advantages, disadvantages, description |
| Hull | Such a cabinet must have its own body - the same as a regular cabinet, that is, with walls, bottom and top. It’s just that its doors are not ordinary, but of the “coupe” type. The advantage of such a cabinet is the ability to rearrange it anywhere. This is relevant if you plan to make rearrangements or change the interior in the future. When moving to another house, you can take the wardrobe with you. The disadvantages of use are the following - it takes up more usable space than the built-in type. It also costs more, and the presence of walls will not always be a plus. It may not be high enough to reach the ceiling of the apartment, which means that the space above it will either disappear or become cluttered. |
| Built-in | This cabinet is usually made from wall to wall, from floor to ceiling, it allows you to make the most of the available space in the room. Shelves in it can be made to cover the entire height of the cabinet, so not a single centimeter of space will be wasted. If you choose the right place for installation and make the cabinet well and beautifully, then it can become an interior decoration. The main disadvantage of this variation is the inability to move the cabinet to another place if necessary, and it is also not always possible to take it with you to a new home when moving. |
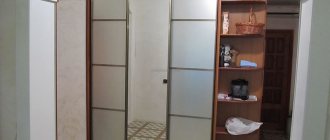
Built-in wardrobes will help you achieve maximum functionality without wasting space
Also, sliding wardrobes can be divided into the following subtypes.
- Straight , which have a straight, even facade. This is a classic option and will suit any interior style.
- Corner ones that can fit in any room and do not take up much space, remaining roomy and spacious. But their shape is no longer simple, and making such a cabinet yourself is more difficult. And the costs of materials are increasing.
- Radius cabinets have appeared quite recently; they have a non-standard shape and can become a real highlight of the room. They look beautiful, remain as functional as other models, but will cost a pretty penny. Such cabinets are made either independently or ordered from craftsmen.
Corner wardrobe in the hallway
We place the rails - guides
Now the most crucial moment is the installation of the lower and upper rails for the doors. The bottom rail has two grooves for the movement of rollers:
And the top is divided into two sections:
In both, you must first drill holes for screws to attach them to the base and cover.
The holes must be chamfered to allow the screw to be screwed in flush.
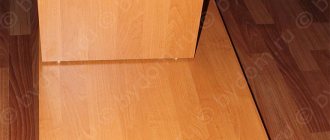
It is enough to make 4 holes in each plank. We fasten the bottom rail first, marking the corresponding fastening points.
The distance from the edge of the base to the leading edge of the rail should be 2.5 cm.
To ensure that the doors do not jam and they move evenly, it is necessary to install the cabinet strictly horizontally, which can be done using a regular building level.
The longer the level, the more accurate the horizontal indicators will be.
The top rail is attached in a similar way with the only difference being that you need to drill holes in a checkerboard pattern in both compartments.
Screws from the set supplied with the cabinet are used as fasteners.
From the front end of the top cover to the beginning of the edge of the rail, the distance should be 2 mm.
Assembly steps
To know where to start, it’s worth familiarizing yourself with its stages. Most sliding wardrobes are assembled according to the following algorithm:
- base;
- frame;
- installation of the rear wall;
- installation of shelves and guides;
- installation of compartment doors.
After the completed stages, the implementation of internal additional elements is carried out. These include pull-out baskets, drawers, rods, hanging hooks and pantographs. Let's consider the installation of each cabinet element separately.
Assembly steps
Base
The assembly of sliding wardrobes, the video of which is presented below, begins from the bottom part, which bears the entire load during operation. We find a part that will perform this function and place it in front of us. In order for the process to proceed correctly, we use tools such as screwdrivers or a screwdriver, a hexagon, a pencil and a tape measure for marking. Also check the package for the presence of self-tapping screws and special masking plugs.
The algorithm of actions looks like this:
- on the part for the bottom, the place for installing the base is marked;
- sometimes, instead of base strips, adjustable legs are used, the place for which also needs to be marked;
- drill holes for fasteners;
- we attach the bottom to the slats using confirmata (corners) - for this we use self-tapping screws and a screwdriver;
- We assemble the transverse supports of the plinth, designed for stability.
Some products, such as the Phoenix coupe model, require installation using adjustable legs. This is easy to do: the plastic plugs are cut off with a knife, and the legs themselves are screwed into holes prepared at the bottom with a diameter of 10 mm.
Depending on the size of the assembled wardrobe, the number of legs will be adjusted. So, for large planes more than 6 support elements will be required.
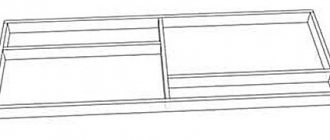
Preliminary marking of the cabinet base
The easiest way to assemble the base is on furniture metal corners
Installing the legs Finished plinth with legs
Frame
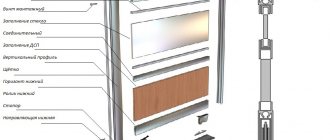
Before disassembling and assembling sliding wardrobes from scratch, it is important to familiarize yourself with the general structure of the existing product. Study the diagram carefully, because assembling the housing must ensure safe operation of the cabinet. The stability of the internal elements will depend on how securely it is installed.
In order for the furniture assembly to be accurate, you should additionally check the floor surface for evenness. Use a building level: if there are differences on the floor, tighten the adjustable legs. Only after this assemble the product box.
To ensure quality installation of the housing, follow these steps:
- It is better to assemble the product while standing, because it is very difficult to install a perfectly fitted cabinet in a lying position. But it is important to remember that for complete assembly it is necessary to leave at least 100 mm for the installation of the roof;
- in the part that is responsible for the bottom, you must first drill several holes and insert anchors. Rack strips will be mounted on the installed fasteners;
- Installation of stand-up panels is carried out by two people: in order not to get confused, you can view the instructions for assembling the sliding wardrobe presented in the video. The left side panel is inserted first, one person holds it while the second person inserts the right side panel;
- at the next stage, the middle stand is installed, if present. After its installation, the roof is installed. If the cabinet is assembled in a standing position, then this part will be properly secured to the corners or confirmations.
It is a little more difficult to assemble a maestro model sliding wardrobe, which has many functions. Its installation is carried out slowly, preferably by several people.
Fastening occurs using euroscrews
Installing the side and interior walls of the cabinet
The base is connected to the body using confirmat corners
Rear wall installation
To assemble the coupe yourself, in particular to attach the back wall of the product, you need to wisely select consumables - fasteners. Often, assemblers use incorrectly selected consumables, which is why, over time, the fiberboard panel comes away from the furniture product. In Soviet times, hardboard was assembled onto the back wall using nails, which is undesirable to do today.
For greater reliability, attach the fiberboard wall to the cabinet using self-tapping screws. This is how the product will not be damaged during operation.
When assembling furniture for yourself, it is important to carry out high-quality assembly of the sliding wardrobe with your own hands: the video presented below clearly shows all the complex nuances. Perform the following manipulations:
- place a hardboard panel behind the cabinet;
- Holding the sheet with your hands, use short self-tapping screws and use a screwdriver or screwdriver to screw them in at a distance of 10-20 cm.
If the cabinet has several back walls at once, they must be secured end-to-end. Use special tightening fasteners, and then screw the screws into the back of the middle bar.
Fiberboard
Rear wall mounting
Installation of shelves and guides
To avoid having to disassemble the product and redo your work, check the reliability and stability of the frame, and then proceed to fill it with internal elements: shelves, rods, drawers and guides. You can independently assemble a wardrobe using the video at the bottom of the article. It clearly provides information about all the important points of the process.
You should pay attention to the following nuances:
- The shelves can be secured using corners and self-tapping screws. To do this, the parts themselves already have drilled holes. First, we note the distance between the shelves and attach them to the sidewalls and the central stand bar;
- First, the upper door rails are installed, after which the lower rails are installed. It is worth emphasizing that the installation of these elements must be carried out strictly in a straight line - the correct movement of the doors will depend on this;
- The rod is installed on special flanges that come with it. If necessary, the length of the pipe is cut with a hacksaw. If you are assembling a Fortune model cabinet, you should pay attention to a large number of elements and not confuse them;
- drawers and pull-out baskets are inserted into the product after attaching the mechanisms for their operation.
Before installing the internal contents yourself, check the availability of all fittings and consumables.
Guide sliding system
Preparing holes on the guides
Before installing the guides, the stopper must be positioned correctly
Door installation
Installation of compartment doors is considered the final stage of work. A correctly assembled cabinet assumes that the upper rails are fixed level with the front edge of the sidewalls, and the lower rails are slightly 8-15 mm away from them.
Answering the question of how to assemble a sliding wardrobe with your own hands, an important place is devoted to the installation of doors. First, the sash that will run on the rear rail is installed. Please note that a mirror door is expensive and will be unpleasant if it falls out due to improper installation.
The end is the installation of stoppers for the door, which do not allow it to jump off the sliding system. Dismantling a sliding wardrobe is possible if you plan to move or transport furniture. Then the wardrobe is dismantled: the product can be disassembled and assembled according to the instructions specified in the article.
Door with rollers
Brush bumper for wardrobe
We install rods and fittings
The final construction stage will be the installation of a bar to accommodate outerwear.
First you need to mark the attachment points for one holder (it is secured with 3 screws), drill holes and tighten the screws.
Then install the second holder on the rod, pressing it with a screw.
The assembled structure must first be tried on, aligned horizontally, and then outlined and attached with the same screws.
We hang the doors
Before this stage, you need to check the gutters in the lower bar for the absence of debris that will interfere with the movement of the rollers, once again make sure that the planes are horizontal and check all connections for rigidity.
The door is first inserted into the top rail.
And then the end rollers need to be placed in the groove of the lower rail.
All 4 doors are installed in this way (the main thing is not to confuse the picture).
In principle, there is nothing complicated in installing a wardrobe. You just need to take a responsible approach to all stages of its assembly, and then you will not only improve your skills as a home craftsman, but also probably be grateful for preserving the family budget.