A sliding wardrobe is one of the most convenient and compact ways to store things. It has small shelves for light items of clothing, and large ones for bulkier items, there are compartments for storing skis, a compartment equipped with a rod for placing outerwear, etc.
The compactness of the closet is made possible by sliding doors, which do not require space to swing open; they move on special rollers located inside the structure of the door itself. Even a person inexperienced in such matters can assemble such a cabinet, since the assembly principle is quite simple and does not require the use of special tools.
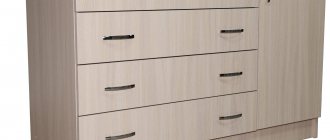
It's no more difficult than assembling a chest of drawers.
Installing internal partitions
At the lower end of the partitions there are holes into which dowels must be inserted before installation.
A dowel (chopik) is a small piece of round rod used to strengthen wooden joints.
There are blind holes in the bottom plate, which are intended for such dowels. Having aligned the dowels and holes, we install the vertical partitions in their place (an assistant will be needed here).
Common mistakes when assembling yourself
- The doors are confused. . A very common mistake if the fronts are made in the same style. Additionally, they are generally identical in width, with the exception of the three door systems. If one door gets caught on the other and has trouble moving, it means they are tangled. The only way to solve the problem is to reinstall the doors.
- The stopper is not positioned correctly on the inner belt . Stops help prevent injuries when using the wardrobe. When the mechanism is installed correctly, the facade is motionless and motionless. If an error occurs during installation, the profile cannot be folded back. Reposition the stopper as instructed to correct the error.
- The back wall of the compartment does not accommodate . Some models are attached to the wall using self-tapping screws to prevent them from falling and protect themselves. This ensures that the sliding door system works correctly.
- Incorrect screwing of parts . Not all screws and bolts are tightened to the maximum limit, only those on which the integrity of the product directly depends. For example, the method of screwing a screw into a profile depends on the level of fit and the smooth movement of the blade. Caution. The materials from which furniture is made (MDF and chipboard) do not withstand rough processing - they can crack and crumble. Therefore, drilling additional holes in the parts is not allowed.
- door trim . The optimal value is 25-30 mm. It's easy to see that this value is overstated: the wheels on the front panel in mirrored models are reflected in the door located close to the back of the cabinet.
We install the side racks and the top cover
Now the final part of assembling the frame is the installation of the side posts and the top cover. All three elements must be installed simultaneously.
Although this action depends on the design features and location of the fastening points on these parts. First, we install the sidewalls, fastening them at the bottom with the base with confirmations.
Then we put the lid on top, align the holes in all the parts and also tighten the fasteners. Here you need to leave a little free play, since you will need to level the entire frame.
Furniture assembly
Make sure all parts are present before assembly
Before you begin assembling the structure at home, make sure that the couriers have delivered all the required elements and have not damaged them during transportation. The package must have several boxes with boards (box and internal filling). Their number depends on the ordered design and is indicated in the manual. In addition to the boards, there must be hardware and a minimum set of fasteners.
Aligning the structure
The alignment process consists of the following steps. It is necessary to use a tape measure to first measure one diagonal, then the second and, based on the difference in values, determine in which direction you need to “press” (move) the top of the cabinet so that its corners are perfectly straight.
Now you can wrap the confirmations to the end with force.
We nail chipboard sheets
The next assembly step is to nail the fiberboard sheets to the back of the cabinet.
These sheets will not only serve as a back wall, but will also reliably keep the structure from loosening throughout the entire period of operation.
As a rule, the canvases have a decorative treatment on the front side in the form of a laminated colored surface. The sheets are fastened using small nails, which must be driven into the ends of all cabinet elements (racks, partitions, shelves).
Here it is important to guess the place of nailing, because the cabinet parts are not visible from the back side, and damage resulting from the wrong choice negatively affects the appearance of the product.
Tools and materials
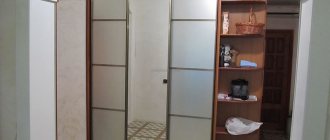
Among all types of clothing storage products, the leading place today is occupied by the wardrobe. It is multifunctional, spacious, comes in different shapes and sizes, and does not require additional space to open the doors. That is why most people, when choosing between a wardrobe and a sliding wardrobe, prefer the latter option.
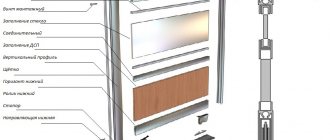
Assembling a sliding wardrobe with your own hands in the video presented is not at all difficult - all you need to do is have the necessary tools in your apartment and be familiar with the design of the product. Often, when ordering a cabinet without the services of assemblers, the company sends a document that contains a drawing of the product. This also lists all the component parts, which are numbered in order. By looking at the drawing and comparing the elements of the cabinet, you can intuitively assemble the product.
To work according to the sliding wardrobe assembly diagram, you will need the following tools:
- building level - to check the levelness of the installation parallel to the floor;
- corner;
- rubber and regular hammer;
- straight and Phillips screwdriver;
- roulette;
- pencil and ruler;
- screwdriver;
- wood drill - to make holes;
- metal drill – for installing an aluminum base.
Additional tools for assembling furniture yourself include a jigsaw, drill and sandpaper. It is also necessary to prepare all the details of the cabinet, which means checking the diagram to ensure that the number of items matches. Pay attention to the fittings and mechanisms: if there are drawers in the closet, ball guides should be included.
Doors for the product are often supplied ready-made. They are pre-installed with rollers and a strip of soft material. The door must be installed in the final phase.
Tools
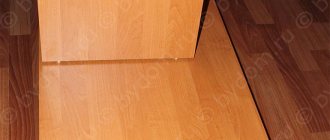
We place the rails - guides
Now the most crucial moment is the installation of the lower and upper rails for the doors. The bottom rail has two grooves for the movement of rollers:
And the top is divided into two sections:
In both, you must first drill holes for screws to attach them to the base and cover.
The holes must be chamfered to allow the screw to be screwed in flush.
It is enough to make 4 holes in each plank. We fasten the bottom rail first, marking the corresponding fastening points.
The distance from the edge of the base to the leading edge of the rail should be 2.5 cm.
To ensure that the doors do not jam and they move evenly, it is necessary to install the cabinet strictly horizontally, which can be done using a regular building level.
The longer the level, the more accurate the horizontal indicators will be.
The top rail is attached in a similar way with the only difference being that you need to drill holes in a checkerboard pattern in both compartments.
Screws from the set supplied with the cabinet are used as fasteners.
From the front end of the top cover to the beginning of the edge of the rail, the distance should be 2 mm.
Assembling the closet
For furniture to last a long time, it is important not only the quality of the material used, but also the quality of the assembly itself. How to assemble a cabinet correctly? You need to approach the matter responsibly and step by step.
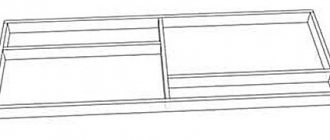
We begin to assemble the base
This is the lower part that holds the entire structure. We find the details of this part of the structure. Using a pencil and tape measure, we make markings and in these places we fasten the base using a screwdriver or screwdriver. Step by step steps:
- At the bottom we make markings for the base.
- If the package includes legs instead of a base, mark them.
- We make holes.
- Using confirmations, self-tapping screws and a screwdriver, we fasten the bottom with the slats.
- We fasten the supporting parts, they are needed to increase stability.
Next, let's move on to the box.
Check out the diagram. Place the plinth in the place where the finished structure will be placed. Use a spirit level to adjust the plinth positions, using shims if necessary. We assemble the box while standing, not forgetting to leave 10 centimeters for the top part. We make holes in the “bottom” into which the anchors will be installed, and the side posts are attached to them.
For convenience, installation of the side walls is carried out by two people. One holds the board in the desired position, the other secures it. The next stage is the installation of the middle part, if there is one. And only after that we install the “roof”. Fastening occurs using metal corners and confirmations.
Assembling the “Maestro” models and other multifunctional cabinets is a little more complicated, but if you do everything gradually and do not rush, everything will turn out no worse than that of specialists.
Back wall
Often the package includes the minimum required for attaching the back sheet of chipboard. If you have small nails, the fasteners will be more reliable and the wall will fall off over time.
We attach nails or screws at a distance of 100-200 millimeters from each other, depending on their number. We start fastening from the bottom up and make sure that the sheet does not extend beyond the edges.
Shelves and guides
Before proceeding with this stage, check the stability of the structure and its level position. If instability is noticeable after assembling the interior, the cabinet will have to be disassembled and reassembled from the very beginning, otherwise it will not last long.
What should you pay attention to when filling?
- Shelves can be installed using corners and screws.
- We start filling from top to bottom.
- When installing the guides, do not forget that the upper lines are attached first, then the lower ones. The correct course of the facade depends on the accuracy of the line, do this with a level and ruler.
- We fasten the flanges opposite each other, measuring the distance in advance, otherwise things along the bar will roll to one side.
- For drawers, we install the mechanisms and only then the elements themselves.
- Before installing the “internals”, check the presence of all fasteners and other fittings.
Facade
Installation of the front part is the final stage in furniture assembly. Correct assembly ensures that the upper rails are mounted flush with the front side panel, and the lower one has an indentation of up to 1.5 centimeters.
We start by installing the door on the rear rail (the one closest to the inside of the cabinet). Then - the outer part. We insert the upper part of the door frame into the upper rail, then “press” the lower part.
And the very last stage - stoppers
Stoppers for wardrobes
They are needed for the sliding system to close smoothly and safely. This is not necessary on a two-door design, but a three-door cabinet without stops will be difficult to close properly.
If you are planning to move, the question is “how to disassemble and assemble a sliding wardrobe?” The most common. After reading the instructions, you will know how to assemble the cabinet, and its disassembly occurs in the reverse order.
We install rods and fittings
The final construction stage will be the installation of a bar to accommodate outerwear.
First you need to mark the attachment points for one holder (it is secured with 3 screws), drill holes and tighten the screws.
Then install the second holder on the rod, pressing it with a screw.
The assembled structure must first be tried on, aligned horizontally, and then outlined and attached with the same screws.
We hang the doors
Before this stage, you need to check the gutters in the lower bar for the absence of debris that will interfere with the movement of the rollers, once again make sure that the planes are horizontal and check all connections for rigidity.
The door is first inserted into the top rail.
And then the end rollers need to be placed in the groove of the lower rail.
All 4 doors are installed in this way (the main thing is not to confuse the picture).
In principle, there is nothing complicated in installing a wardrobe. You just need to take a responsible approach to all stages of its assembly, and then you will not only improve your skills as a home craftsman, but also probably be grateful for preserving the family budget.
General rules for assembling a sliding wardrobe
Follow the instructions provided by the supplier to assemble the cabinet you purchase..
There are a number of principles you can follow to get everything together quickly and efficiently:
- There is no need to unpack everything at once and mix parts from several packages.
- I do everything in order.
- Read the manual carefully so that the error does not become a problem.
- Make sure all materials and fittings are included.
- Collect sequentially, from bottom to side.
- Remove components from bags and arrange tools.
- Install the mirror elements on the end, otherwise they may be scratched or broken.
Tools for assembling a built-in wardrobe
- Screwdriver, drill.
- Roulette, construction level.
- Set of screwdrivers, including hex.
You may also need a bolt cutter and a hacksaw if you need to correct mistakes made in calculations on the fly. This set of tools is enough to assemble a wall cabinet with your own hands according to the diagram.