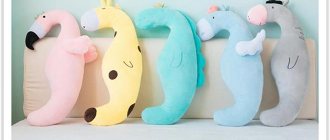
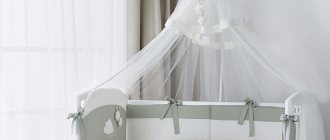
To ensure the safety of a newborn, they resort to a variety of methods, not least of which are special bumpers for cribs.
These are soft products that are placed around the entire perimeter of the bed to protect against impacts. The designs are designed for children under 3 years of age. Now the market offers parents a huge number of bumpers of various models.
However, if you want to be absolutely sure of the safety and reliability of protective barriers, it is more logical to create your own products according to an individual project.
Types of bumpers for cribs
- 1. Pillows. The main advantage is the ease of sewing and operation. They can be made very quickly, even without a pattern and experience. We recommend learning to sew from them.
- 2. Toys. A complicated version of the first type. This will require skill or preliminary preparation. But this accessory also looks much more impressive; your baby will definitely like it.
- 3. Bombon. Beautiful and unique mini-squares in which you can realize your fantasies. This is a more labor-intensive and complex, but quite realistic task.
- 4. Braids. Unusual and multifunctional fencing. Initially, they can serve you as a comfortable pillow for pregnant women. But sewing such beauty yourself is not a job for a beginner.
Ready-made pattern diagrams for protective edges
At the last stage, when all the exact calculations have been made and the necessary material has been purchased, you need to make patterns for future bumpers. You can do them yourself or use our options.
Practical master class on sewing cushion borders
In this practical lesson, we will learn how to make pillow boots. This is one of the most popular types of protection for a children's bed.
1 — The first stage is preparation. We buy everything in advance at the store. To create 12 pieces of “pads”, you will need:
- natural fabric 205 cm;
- satin ribbon 2.88 m;
- hypoallergenic filler;
- scissors;
- ruler.
2 — Using a ruler, carefully cut 12 identical cuts. We will get blanks 68 cm long and 34 cm wide. And cut ribbons 60 cm long for each corner of the pillow.
3 — Fold the cuts in half and sew them together, leaving an opening for turning the product inside out. We sew ribbons at the corners that will secure our accessories to the cradle.
4 “Then we turn the product inside out and stuff it with our filling. Typically, holofiber (synthetic fluff) is used for this. We try to distribute everything evenly.
5 — After we filled the pillows, we sew up the remaining holes. We try to do this as carefully as possible.
6 - We admire the beauty that we have!
[MASTER CLASS] Simple and quick sewing of square bumpers
To make a square bumper, prepare:
- 2 types of fabric;
- scissors;
- sewing machine;
- needles or pins;
- filler.
Step by step process:
| 1 | First you need to prepare a pattern measuring 32*32 cm. To do this, you can glue 4 A4 sheets together with tape. | |
| 2 | Then cut the sheets to size, leaving small gaps of 1 - 2 cm on each side for seams. | |
| 3 | Prepare the fabric for the sides, iron it well and fold it in half. Next, attach the pattern to it, with the fold positioned at the top, carefully trace and cut out the part. | |
| 4 | Do the same with the white fabric, which will act as a permanent pillowcase for the border. This detail will help keep the filling in the pillow. | |
| 5 | Then you need to make ties - 4 pieces for the 1st side. To do this, prepare 1 layer of main fabric, measure the length (70 cm) and width (3 cm) for each ribbon, draw and cut. Make marks in the middle of each piece. | |
| 6 | After this, fold each product in half along the long side and make a stitch, departing from the edges about 5 mm. In the center of each tape, leave a small indent of 2 - 3 cm from the mark. Then cut off a little fabric at all corners of the ties (as shown in the photo), leaving 2 - 3 mm before the seam. | |
| 7 | Turn the pieces right side out through the center hole. Then iron each tie well and sew up the indentations. | |
| 8 | Next, start assembling the side. To do this, fold the prepared fabric with the pattern inward and place it in a white “pillowcase”. | |
| 9 | Then unfold the piece and place the ties inside it, folding each in half. Using a pin or needle, secure one end of the tape in one of the corners of the fabric, retreating 2 - 3 cm, and the other in the middle. This must be done with the remaining ties. | |
| 10 | Next, cover this half of the fabric with the other, smooth it out and pin it together. | |
| 11 | Sew all sides of the border, leaving one small hole (about 8 cm) for filling the pillow. And carefully cut the corners, retreating 3 - 4 mm from the seam. | |
| 12 | Then turn the piece right side out, place the filling inside and carefully sew up the hole. | |
| 13 | Follow the same steps to sew the remaining pillows. |
Useful tips
- Make several different protective accessories. After all, they will definitely get dirty. It is not only practical, but also very beautiful. The baby will be happy with such variety.
- The colorful drawings that the baby will see will be an excellent means of developing attention, focus and concentration. But you shouldn’t overdo it; too many details in front of your eyes will not do any good.
- When choosing fabrics, focus on natural cotton. This is the same satin, calico, cotton, knitwear, chintz, etc.
- As a filler, choose only hypoallergenic materials; wool and fluff can cause allergies in a child.
- Be sure to sew one set of pillows in calm, pastel colors. This will have a beneficial effect on the baby’s emotional state and help him improve the quality of his sleep.
- It is not necessary to traditionally choose blue for boys and pink for girls. Coffee, milk, lilac and azure shades will look very impressive and positive.
- To prevent the material from slipping, use pins when sewing accessories.
Following the photo instructions and our tips, you can easily sew bumpers for a children's bed with your own hands .
Babies often stick their arms or legs between the slats of the crib or accidentally hit the walls. To prevent the child from harming himself, special protective braids or bumpers are placed in the cradle. Bed bumpers are a simple, affordable way to protect your baby and ensure a comfortable sleep.
Sizes and measurements
With measurements of linen everything is simple, as for adults; for children there is a classification of linen into single, single and double. It is sewn in two standards: European and Russian. Children's bedding should be sewn based on their height and their own preferences. In general, the standard defines the following sizes for children:
- Duvet cover - 110 - 120 centimeters by 140-150 centimeters;
- Sheet - 100-120 centimeters by 138-160 centimeters;
- Pillowcases - 40 by 60 centimeters.
Important! A children's set differs from an adult's not only in size, but also sometimes in its contents. One of the features is the presence of elastic bands that secure the sheet to the mattress. This prevents the sheets from becoming wrinkled in the morning and ensures better quality sleep for your baby, who often tosses and turns at night.
size table
Why do you need bumpers for a crib?
Some children hardly move and do not wake up in their sleep from colliding with the slats of the cradle. In this case, it is not necessary to place a soft bumper around the perimeter of the crib.
There are also fidgets who show unusual activity at an early age, so it is important for parents to protect their baby from injury. For this purpose, bumpers are used - soft fabric pads in the form of braids or interconnected pillows that are attached to the inside of the cradle.
The clear advantages of protective edges include the following:
- the baby is protected from damage if it collides with a rigid frame while sleeping or awake;
- the baby is protected from drafts when airing the room or in cold weather;
- a beautiful do-it-yourself braid for a newborn’s crib, in bright or pastel shades, will decorate the room and support the style of the nursery, creating a cozy atmosphere for the baby;
- Direct sunlight does not penetrate into the cradle, in case it is located near a window.
Expert opinion
Zakharov Igor Vyacheslavovich
Consultant at a furniture store. 5 years of experience.
There is some controversy surrounding this gadget, as well as other baby accessories, but new parents definitely need to pay attention to this item for their newborn.
Rules for caring for sides
The sides should be looked after as carefully as other things in the children's room. Removable bumper covers (if equipped) must be washed on a delicate cycle every 5 to 7 days.
To do this, use baby detergents that do not cause allergies. It is better to give preference to powders in liquid form, the particles of which do not remain on the surface of the material.
If soft fences do not have removable covers, they should be hand washed and dried in a horizontal position so that the pillow does not lose its shape.
To smooth the fabric on such edges, you should use a steam generator or steam iron.
It is also recommended to air the products at least once a week.
Popular shades of pigtail pillows
Traditional colors for bumpers: pink for girls and blue for boys. Modern designers recommend moving away from the canons and choosing not plain bright fabrics, but more pastel shades and combining them with other colors, for example, pink with gray or white with blue.
If the crib is in an adult bedroom, choose beige colors to blend the crib into the adult decor. Don't choose dark or too bright shades. This may frighten or upset the child.
On the Mister Cotton store website in the “Velor Fabrics” section you will find many colors of fabrics from Polish, Korean, Turkish and Chinese suppliers and easily select the ideal shade for the protective side of the cradle.
What fabric to sew from?
It should be an elastic soft fabric made from natural fibers. Pleasant to the touch, preferably with delicate fibers, the material will not irritate the baby’s skin. It is also important to avoid allergies, so it is better to choose fabric with hypoallergenic properties.
Cotton velor is well suited for sewing braided borders with your own hands. This is a soft, pleasant-to-touch fabric made from natural cotton fiber, the front surface of which is covered with short velvety pile.
The material breathes well, absorbs moisture, does not cause irritation, and dries quickly, so it is often used in sewing children's clothing. To make sure that the material is well dyed and the print is applied well, rub the fabric in your hands and make sure that the design does not smear.
Suitable material and filler
The best thing for a child is natural. This rule also applies to crib bumpers. Protective elements should be made of natural fabric: preferably calico, satin, thick cotton or flannel. These fabrics do not cause allergies, are easy to wash and do not lose their appearance. In addition, manufacturers of children's themed fabrics follow current trends and offer their customers stylish and modern prints.
The fabric for the bumpers should not only be natural and safe for the child, but also pleasant to the touch, because the delicate baby skin will come into contact with it. Tactile sensations are extremely important for newborns, so special attention should be paid to this criterion in the process of choosing a material.
ADVICE. It is necessary to ensure that the protective sides have replaceable covers, because the older the baby gets, the more actively he interacts with the outside world, which often leads to the appearance of food stains, saliva and simply dirty stains.
The filler for the sides also needs to be chosen correctly. Despite the fact that all modern synthetic materials are safe for the health and life of the baby, it is necessary to pay attention to their functionality.
Safe and familiar padding polyester tends to clump and lose shape, especially after washing. If you take more careful care of such bumpers for a newborn, they can last for several years.
A modern analogue of padding polyester is holofiber . This material is preferable for the manufacture of protective edges, since it does not lose its shape, does not shrink even when washed and is considered absolutely safe.
Among the worthy options are also periotek - a hypoallergenic fabric that is suitable for sewing soft protection, polyester that does not absorb moisture and foreign odors, as well as hallcon - a unique material that will not only create comfort and softness, but also protect the baby from cold air.
When it comes to dense sides, the only filling option is foam rubber. Some experts are categorically against the use of such material near a newborn, but tested and certified material is safe for the baby. At the same time, the foam rubber does not lose its shape or break, and its sufficient strength is ideal for the sides of babies older than six months.
How to sew a side braid and calculate the amount of fabric
The product has a unique and yet simple design. To create it, you can choose 1,2,3,4 colors of cotton velor and make an interesting, pleasant combination of shades in weaving.
The amount of velor must be calculated based on the following parameters:
- crib shape (rectangular, round, oval);
- how much space will the braid take up, for example, an L-shaped side, i.e. the product lies on 1 long side and 1 short side;
- height – depends on the number of braid links (3,4,5,6).
To determine the height and length of the braid bumper for a newborn’s crib, focus on the following indicators, based on the number of stripes:
- of 3 links – about 15 cm;
- of 4 links – about 20 cm;
- weaving of 5 strands about 25;
- weaving of 6 strands - about 30 cm.
The optimal side would be 15, 20 cm high.
For a rectangular crib, the braid can be laid out on 1, 2, 3 sides or along the entire perimeter. Depending on this, its length will be different. The side for a standard cradle measuring 120*60 cm will have the following parameters:
- on 1 long side – 1.2 m;
- on 2 sides, the long and short sides of the rectangle are 1.8 m;
- on 3 sides in the shape of the letter "p" - two long sides and 1 short - 3 m;
- on 3 sides (2 short sides and 1 long) – 2.4 m;
- the entire perimeter is 3.6 m.
For the side of a round bed, you need to take into account the diameter of the mattress. For a braid covering the entire circumference of the cradle, the length of the product will be as follows:
- 2.2 m for a mattress with a diameter of 70 cm;
- 2.35 for a mattress with a diameter of 75 cm.
To the entire length of the braid you need to add from 40 to 60 cm for allowances, compaction with filler and the weaving itself.
Bottom line: What is the best bedding fabric for newborn babies?
| Properties | Flannel | Ranfors | Calico | Linen | Muslin | Satin | Mahra | Pique |
| Service life, years | 2-3 | 3-4 | 1-2 | over 10 | 3-4 | 4-5 | 3-4 | 3-4 |
| Density, g/m2 | 165 | 240 | 115 | 165 | 145-170 | 110-120 | 320 | 550 |
| Naturalness | 100% | 100% | 100% | 100% | 100% | 100% | 100% | 100% |
| Difficult to care for | Simple | Simple | Simple | Difficult | Simple | Difficult | Simple | Difficult |
| Wrinkleability | Average | High | Average | High | Low | Average | Low | Low |
| Price | ~$5,5 | ~$5,5 | ~$3,5 | ~ $12 | ~$5 | ~$8 | ~$7 | ~$9 |
| Rating | 7 | 8 | 5 | 6 | 9 | 7 | 8 | 7 |
It is quite difficult to choose the best fabric for children's bedding, but judging by the rating, preference should still be given to muslin and terry cloth. Both types of fabric are environmentally friendly, pleasant to the body, durable and breathable. In the summer, you can put a light muslin bedding in the baby's crib, and in the cold winter, terry will warm the baby. You can buy these best fabrics for children's bedding for newborns and many other high-quality fabrics in the GlamurModa online store catalog at a low price.
Step-by-step master class
Today we will walk you through step by step how to sew a protective border made of velor from 3 and 4 strands for the entire perimeter of a rectangular crib measuring 120*60 cm and a braid length of 3.6 m (perimeter of the crib). We will also try to sew a braid from 4 strips 120 cm long, i.e. on 1 side of a standard rectangular crib.
How to determine the length of a strip of the same color for the side of a braid of 3 and 4 strands? (frequently asked question)
To calculate the length of strip 1 of fabric, we need to multiply the perimeter of the crib + 40/60 cm by allowances and weaving by 1.14 (for a braid of 3 strips) and by 1.22 (for a braid of 4 strips).
3.6 m (perimeter of the crib) +40 cm (for seams, filling and weaving) * 1.14 = 4.36 – the length of one strip of fabric of 1 shade. With a standard width of the entire cotton velor fabric of 180 cm and a strip of fabric of 1 color of 20 cm (which are then sewn along the width), we get 60 cm of fabric. It turns out that the length of the canvas of 1 color should be 60 cm with a width of 180 cm.
How to sew a side braid from 3 strands
To sew a braid around the entire perimeter of a standard rectangular crib you will need:
- 3 any colors of cotton velor, each 60 cm long and 180 cm wide;
- about 2 kg of holofiber;
- threads;
- pins for fastening the fabric and 1 large pin for turning;
- scissors;
- sewing machine;
- knitting needle;
- PVC pipe with a length of 50 cm and a diameter of 5-7 cm (for filler) and a pipe with a diameter of about 30 mm for pushing holofiber.
- We cut out 2 strips of each color, 20 cm wide, after slightly cutting off the edge of the velor on each side.
- We connect pieces of the same color in width face to face. Pay attention to the pile when folding. It must go in one direction.
- We connect all the colors along the width in random order into one long strand.
- We fold all the velor in half and stitch it along the entire length of the harness. For convenience, you can pin everything together with pins. When passing a seam through the junction of two seams, try to carefully join this area.
- After the strip is sewn, take the pins and turn the product right side out.
- Now the braid needs to be filled with holofiber. To do this, take a pipe of a suitable diameter and pull a sewn rope onto it.
- Start filling the braid with filler and push it inside with a smaller pipe. Before filling, sweep one side of the bundle widthwise so that the filler does not fall out. If the tourniquet is very long, you can fill it on one side and then on the other. Try not to stuff the braid too tightly because... it will be awkward to weave.
- After the strip is filled, all holes must be sewn by hand and tightened well. On velor, due to the pile, the seams are not visible, so do not worry about threads showing through.
- Fold the braid in half and place the free edge in the middle.
- We begin to weave a regular braid of 3 strands.
- The braid is ready.
[MASTER CLASS] Beautiful sides that keep their shape
To sew sides that hold their shape, you need to prepare:
- a piece of panel and other type of fabric of equal size (34*34 cm);
- 2 rep ribbons 62 cm long;
- insulation sheet (38*38 cm);
- scissors;
- filler;
- needles or pins;
- sewing machine
Step by step process:
| 1 | To begin, place a panel on a sheet of padding polyester and cover the workpiece with a piece of other fabric. The squares should be facing each other. | |
| 2 | Treat the ends of the ribbons with a lighter. Place one of them on the edge of the canvas, measuring 8 cm with a ruler. | |
| 3 | Secure the tie with a pin, placing the entire length inside and leveling the fabric. | |
| 4 | Do the same on the opposite side. And secure the product with needles around the entire perimeter to make stitching easier. | |
| 5 | Make a mark at the bottom for the hole through which you will stuff the side (10 cm). | |
| 6 | Sew the product around the entire perimeter (except for the part left at the bottom) with a hidden seam. | |
| 7 | Turn the stitched part right side out, aligning the corners. | |
| 8 | Iron the product well and fill it through the hole left with holofiber or other hypoallergenic material, straightening the side and leveling the filler. | |
| 9 | Hand stitch the unstitched part with light threads, carefully folding the edges inward. | |
| 10 | It turns out a beautiful neat side. If necessary, make several more of these products using a similar pattern. |
How to sew a side braid from 4 strands
Let's look at how to sew a braid from 4 strips 120 cm long, i.e. for 1 side of a standard rectangular crib.
What materials are needed
To sew a border with your own hands we will need:
- 4 different colors of cotton velor, 180 cm wide.
- holofiber or other filler;
- threads;
- pins for fastening the fabric and 1 large pin for turning;
- scissors;
- sewing machine;
- knitting needle;
- PVC pipe with a length of 50 cm and a diameter of 5-7 cm (for filler) and a pipe with a diameter of about 30 mm for pushing.
- We cut 4 strips of different colors of cotton velor, 20 cm wide and 180 cm long. To prevent the edge of the fabric from rolling, first secure it with pins. We cut off the edges.
- We take 2 strips and sew them together along the width. This way we get one stripe. Pay attention to the direction of the velor pile, it should lie in one direction.
- After this, fold the strip in half and carefully stitch along the long edge. Don't forget about seam allowances, approximately 1 cm.
- We sew velor at one end along the width so that the holofiber does not fall out when filling.
- We sew the two second halves together and also get a long rope.
- Now you need to fill each half with holofiber. To do this, pull the material onto the pipe and carefully push the filler inside.
- After stuffing, you will get 2 separate bundles with filler.
- Start braiding according to the pattern.
- Once you have made the braid, measure the desired length and cut off the excess edges.
- Connect the 2 cut ends together and sew by hand.
- We pass the long ends into an already sewn loop of short strips. We cut and sew.
- Look at the product, turn all the seams to the side so that the side looks aesthetically pleasing from all sides.
- The side is ready. To secure it to the crib, you can use neat satin ribbons.
How to care for the finished product?
Everything around newborns must be especially clean, so the cotton velor bumper should be washed regularly. To do this, it is not necessary to unbraid the braid. It is enough to select the delicate mode at 30 degrees. It is better to switch the spin cycle to 600 rpm. If the side does not fit into the washing machine, use dry cleaning.
Expert opinion
Zakharov Igor Vyacheslavovich
Consultant at a furniture store. 5 years of experience.
A bumper for a children's bed is a very practical and necessary thing. This element makes it possible not only to protect the baby from a cool draft, but also to weaken his contact with the hard bars of the bed.
A great gift for a newborn will be bed bumpers.
Thanks to these soft devices, the baby will not get bumps in the first year of his life when trying to move independently in his crib.
A baby's bed must have such protection. Soft sides may well protect children from injuries, bruises and abrasions. You can make beautiful and original bumpers with your own loving motherly hands, using ready-made patterns or expert advice.
Baby crib bumpers may even become your first hand-sewn item.
Similar products can be purchased in any of the shopping centers. They are also called “bumpers” or “security”, but is it really necessary to spend a huge amount of cash, because it’s quite easy to make a bed rail to prevent falls with your own hands.
To ensure everything goes smoothly, follow the recommendations given below in the article.
[MASTER CLASS] Animal bumpers with patterns
To sew a side in the shape of an animal, you need to prepare:
- pattern;
- sewing machine;
- thick fabric in 2 colors;
- threads;
- a needle;
- 2 satin ribbons 60 cm long, 1 cm wide;
- felt, felt of different colors for making elements;
- hypoallergenic soft filler;
- ruler;
- scissors;
- thermal pen for drawing (can be replaced with chalk or soap);
- pins for fixation.
Step by step process
| 1 | To begin with, you should print the pattern in real size on 4 A4 sheets and cut it out according to the drawing. Then glue the parts together with tape or glue. Patterns can be found on the Internet or drawn yourself. | |
| 2 | Place the finished stencil on the prepared plain fabric, folded in half, and cut along the contour. | |
| 3 | A strip 12 cm wide and 32 cm long should be cut out of another material, placed on a single-layer base of the side and secured with pins or needles. Trim the excess fabric along the contour. | |
| 4 | Next, carefully sew the strip with a zigzag. | |
| 5 | Then cut out the elements of the animal’s face on a piece of felt (ears, tail) and stitch them. Draw eyes, mouth, mustache on the product using soap, chalk or a thermal pen that can be easily erased. For better symmetry, it is better to use a ruler. Next, sew the drawn facial features with a thick seam. Make the cheeks out of felt and stitch them with a light thread. | |
| 6 | Place both pieces of plain fabric on top of each other, right sides facing inward. Then bend the prepared strips in half and insert them into the sides of the product. Fix the folded end of each tie to the side, and place the others below in the center of the part. | |
| 7 | Fasten the fabric with needles, then sew all sides of the workpiece, retreating 1 cm around the perimeter and leaving a hole at the bottom to fill the side of about 8 cm. | |
| 8 | Then make small cuts with scissors in the corners of the ears and on the top of the head so that the toy remains symmetrical when stuffing. Next, turn the product right side out and place the filling tightly through the hole left, which at the final stage must be carefully sewn up by hand with light threads. | |
| 9 | Using a similar pattern, sew other pads, and you can change the shape and color of the sides. |
Ready-made patterns (to download, right-click and select “Save link as”):
Types of bumpers for a crib
Before making a decision about what type of bumpers to sew for a children's bed with your own hands, you need to understand the main indicators for each type of these products and the sewing features.
Sewing bumpers for a newborn's crib is not at all difficult.
- Sides with replaceable covers.
Consist of pillows with covers made of natural fabric. The covers are put on like pillowcases and fastened with zippers. The advantage is that it is possible to sew two sets of outer covers and wash only them. However, this kind of aspect is suspicious, since the baby is capable of contaminating both pillowcases and pillows.
For this reason, the sides will not be able to remain dry and clean for a long time; they will also have to be washed.
For sewing, you will need additional cotton fabric and 4 zippers, no less than 42 cm long, which will lead to additional costs. Replaceable covers are sewn a couple of centimeters larger than the pads so that they can be worn comfortably.
The need to use zippers and fasteners is alarming, as they contain small parts that the baby can swallow.
Therefore, it is better to make zippers hidden, invisible to the child.
- Pillow sides.
Convenient in that it is possible to use more filler. In cases with small pillows, 40–50 cm in size, the thickness of the sides can be increased. This way the bed will become the warmest and most comfortable.
The finished pads are simply secured to the rods supported by ties or adhesive tape.
- High sides.
Cover the entire wooden rods around the crib. They protect the baby quite well from drafts and protect against shocks. But the baby is forced to limit himself only to the view of the inside of his bed, which can affect the level of his mental development.
The disadvantage is that they completely block the child's view.
- Low sides that partially cover the bed bars.
In shopping centers you can find many modifications of the sides, which cover the bed by 2/3 or 1/3. Such products have an undoubted advantage - they do not limit the baby’s view and allow him to monitor what is happening around him.
But the safety functions of such products are quite limited.
- Sides with pockets.
If you want to make a bumper with pockets, then an essential condition will be their presence on the outside of the bed. Internal placement will always attract the baby.
He will try to extract and examine the contents.
- Rollers.
They are made and secured in the same way as pads. This option is used much less frequently, since it does not protect the child’s head well from bumps and falls. But under conditions of high temperature in the room where the baby is, this type of sides allows access to fresh cool air.
Therefore, this option is well suited for newborn babies who do not yet know how to move or crawl independently.
Protections made with fastenings in the form of ties, locks, or Velcro can tear when the child tries to rise and pulls the edge.
For this reason, the type with ordinary fasteners is more highly reliable.
The material used to make the bumpers is also very important. Artificial materials can irritate the skin, causing allergic or inflammatory reactions. Therefore, it is better to give preference exclusively to natural fabric.
It will enable the product to withstand washing well and dry quickly without losing its shape.
Types of filler for baby bed sides
Today, a large number of fillers have been developed that have their own advantages. Namely:
- Foam rubber is a microfiller that requires special conditions.
This is, first of all, meticulous and high-quality drying. This base has the ability to retain water well, which promotes the formation of microorganisms inside.
Foam rubber has good wear resistance, which is important for frequent washing.
- Sintepon is the best microfiller.
This material is not expensive, simple, quite flexible, washes well and dries instantly. Its qualities prevent the formation of fungus.
The most important thing when making a border with your own hands is to quilt the fabric so that the filling does not roll off.
- Holofiber is the latest filler, superior in quality to padding polyester.
It is absolutely non-toxic, does not retain moisture, and dries instantly without changing its original configuration. Due to the spiral texture, the filler is very wear-resistant.
It does not cause allergic reactions, which is very important for babies.
- Periotec is an innovative fiber.
Its main advantage is hypoallergenicity. This is a very flexible artificial material that washes well.
It also dries quickly and holds its shape well.
- Hallcon is an artificial filler.
Has fantastic heat resistant features. Absolutely non-allergenic, flexible and wear-resistant.
Indispensable for cool and ventilated rooms.
- Polyester is a hollow fiber.
Has anti-allergenic qualities. Does not lose its original configuration. Does not absorb water or odor.
The child feels very comfortable in such a crib.
How to sew bumpers for a newborn's crib with your own hands, step-by-step instructions
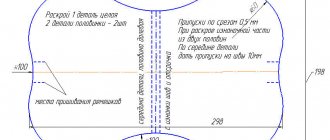
In order to make the bumpers for a newborn crib with your own hands, patterns are not at all necessary. You can mark directly on the fabric.
To correctly measure for sewing a side, you simply need to measure the perimeter of the crib and divide it by the number of pillows. But since cribs mostly have standard parameters, you can use the following sizes.
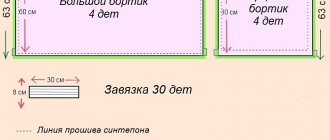
- Make 4 parts – 43 by 63 cm.
- Make 4 parts - 43 by 123 cm
- For the frills you will need pieces of fabric 7 cm wide and 180 cm long.
Pattern of sides for the crib with dimensions.
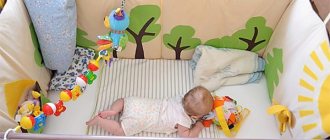
Ready-made bumpers for a newborn's crib.
Decoration
There are no restrictions here. Follow your imagination. Just don't go overboard with the details. Don't forget, the safety limiter must be safe.
The soft side is a protection for the baby and a toy. This useful and beautiful item will create comfortable conditions for the baby. Making bumpers for a baby crib with your own hands is not difficult. The main thing is to follow the sequence of the process. Add to this fantasy in tandem with maternal love. And you will definitely succeed.