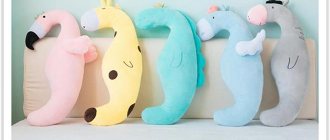
A kitchen apron is a traditional kitchen garment. If 10 years ago it served only a protective function, now it can be a decoration for the owner of her kitchen.
The creative concept of the master, the variety of materials and decorative elements make it possible to create an exclusive item. This article tells you how to sew an apron, select the fabric, shows its types and a classic apron pattern.
Apron
Apron styles for the kitchen
Many housewives decide to sew aprons with their own hands. The savings in this matter are relative. Home aprons are inexpensive. The main question is interest in the matter, the desire to fantasize, to let your creative streak manifest itself. There is absolutely no need to spend money if there is a suitable thing in the house that has long been unnecessary, which you don’t mind tearing up and sewing a new beautiful apron. When it turns out that there is nothing suitable in the house, they buy the necessary material. Fortunately, the costs are small.
The main thing is to choose a style.
It is practical to have several different aprons in your home. It's expensive to use one. We need a replacement option in case the first one gets dirty. In a friendly family there will be aprons or aprons for the husband and children. A similar thing may be needed in the kitchen, when working in the garden at the dacha, in the garage when repairing a car.
You can purchase it at any store or sew it yourself.
Many girls love to help their mothers cook or come up with their own dishes. They want comfy baby aprons or cute aprons. Boys are interested in tinkering in the garage with their dads. They need to make matching aprons in men's style.
An apron made by yourself will become the most practical thing, as it will be made taking into account all your features.
There are many styles of male and female aprons for home craftswomen to choose from. They can make them for their loved ones so that they are protected from clean clothes getting dirty and quickly wearing out.
It is customary to keep several aprons in the house.
What types of aprons are there for the kitchen? Some aprons are sewn without a top, with fastening at the waist. They are called aprons. Other models have a bib with an additional fastening on the neck. For the first sewing, it is better to choose a simple style with ties at the waist. For experienced needlewomen, it is not difficult to make aprons with various color combinations and finishing with additional details.
There are many styles of women's and men's aprons that perfectly protect clean clothes from dirt, dust, and wear.
Drawing class for a child
A student needs protective clothing for art school or labor lessons in general education - an apron. It is absolutely easy to sew.
You can use a ready-made template pattern, or you can make your own drawing.
To work you will need:
- any suitable fabric (cotton, chintz, calico, satin, denim) - 1 sq. meter;
- a piece of soap or chalk;
- sharp scissors;
- bias tape - 2 meters;
- measuring (centimeter) tape;
- sewing machine (or needle and thread to match the fabric for hand sewing).
Manufacturing stages:
- The cutting is done directly on the fabric or first on paper, and then transferred.
- Using a soft “centimeter” measure the length of the entire product, hem and bib.
- The width of the bib should be approximately 1/4 of the width of the skirt.
- The fabric is folded in half and the measurements taken are drawn with chalk (soap), taking into account the folded material.
- Therefore, if the width of the bodice is 16 cm, and the waist is 40 cm, then measure 8 cm and 20 cm from the fold line accordingly (measurements for a child 6-10 years old).
- Connect the outer edge of the bib with the outer edge of the hem with a curved smooth line (if it’s difficult, then first draw a diagonal from the center of the waist line up and put a dot, and then connect the three dots).
- On the contrary, the hem is formed using a semicircle.
- Cut the workpiece along the marked lines.
- Cut two long sections of 25 cm from the fabric for ties or make them from binding (stitching).
- For convenience, the ties can be made with Velcro, then they will be shorter (you need to measure them).
- They begin to sew on the trim from the binding. Work begins at the top edge of the hem, where the tie will be located. But first, they leave the binding (25 cm) in free “flight” (that is, they retreat from the edge and sew it to the fabric only after 25 cm). If there are no sewing skills, then the binding is first basted, and at the end of the work these threads are removed.
- Hem with an edge seam in the direction of the bib.
- When reaching the top, leave the binding (20 cm) unsewn. This will be a strap to put on your head.
- And again they are hemmed down to the waist. Cut again with an allowance of 25 cm (or less, it all depends on individual measurements).
- Sew the binding at the top and sides.
- Now all that remains is to process the skirt.
- If desired, sew on a rectangular pocket. It can also be edged with trim. Or just fold the edges and sew.
The apron for classes is ready. To go with it, a set of the same fabric is used to sew sleeves with elastic bands and a headscarf (for girls).
Which materials are best suited for making aprons?
For one-time use, the apron can be made from any material.
In an apron you can not only feel comfortable, but also work comfortably.
If the product is intended to be used for a long time, the following materials are used:
For a self-made apron to turn out very “successful”, you should choose its style in advance.
Japanese for homework
An apron in the Japanese style of a sundress looks very beautiful and looks like an element of clothing. For work, take any suitable fabric - 1.5 - 2 meters.
Sew this way:
- They are trimmed with bias tape or overcast, or folded over a rectangular piece of fabric. The size should be such that when worn, the apron reaches the knees (take measurements in advance). And the fabric wrapped almost completely around the waist.
- Two shoulder straps are sewn from the same fabric. They are sewn on the front, like a sundress, and on the back diagonally, sweeping towards the edges.
In essence, it turns out to be a sundress, but not sewn at the back. It is convenient to work in such aprons. They are long and protect clothing well. In addition, they are also very stylish.
If desired, a long horizontal pocket, single or with compartments, is sewn on the front.
How to make a pattern
The most difficult thing when sewing an apron is forming the pattern. It should match the desired style. It's easy to choose the right option. There are many examples on the Internet describing the procedure for making aprons, taken from Soviet-era magazines. For example, such as “Worker”. Having created a pattern, the main fabric product is made from it using hand or machine sewing.
You can cut the pattern from paper such as whatman paper, wallpaper or a sheet of newspaper.
The process is carried out in stages. The pattern drawing, consisting of several parts, is made on wide-format paper. In real scale, two squares appear (apron and bib) and two or three pockets. You can draw ribbons. One for the bib to throw over the head and two for tying on the belt.
Constructing an apron pattern
Before sewing any product, including an apron, you need to make a sketch - a drawing of the future model or, as they also call it, a pattern. It is created according to all measurements taken from the figure. Based on the finished sketch, the product will be created in the future.
You might be interested in what interesting things can be made from old nylon tights
Pattern
Beginning needlewomen will ask: “How to make a pattern for an apron for the kitchen?” It's quite simple. An example of constructing a pattern with a bib is presented below.
Before starting work, you need to prepare materials and tools:
- measuring tape;
- paper for the pattern - newspaper, millimeter tracing paper;
- scissors;
- threads, pins;
- fabric and decorative elements for sewing an apron.
Technology for constructing a pattern in stages:
- Measurements are taken of the hip circumference, the size of the product from the waist to the bottom, the height of the chest part from the waist and width.
- The paper is folded in half. Draw a rectangle, the side of which is equal to the length of the product, and the lower or upper side is equal to a quarter of the circumference of the hips.
- The chest part is performed according to the same principle. Fold the paper in half and draw a rectangle. The side side is equal to the height of the part, and the bottom or top is half the width of the chest part. The sides may have smooth concave cuts.
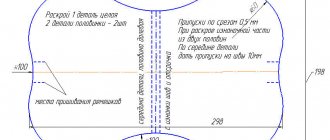
Sketch of a standard apron with dimensions
- For a belt, make 2 pieces of paper 1.5 m long, 5 cm wide, for neck straps - 2 strips 60 cm long, 9 cm wide.
- All drawn details are cut out and copied onto the fabric using a fabric marker or chalk. In this case, the threads on the patterns must match, the pattern is directed upward.
Important! When creating a pattern, do not forget about seam allowances, 1.5–2 cm on each side.
Instructions for sewing aprons for the kitchen
To ensure that the pockets hold tightly and do not tear from loaded weights, you need to perform several lines when attaching them to the apron.
Important! Aprons with ruffles and frills are easier to sew using starched cotton fabric.
Decor options
The choice here is unlimited, but we should not forget that, first of all, the apron performs a practical function. Decorations should be securely attached, not interfere with work, and not make washing difficult. The most commonly used solutions are:
- combination of different types of fabrics;
- ruffles and flounces;
- lace;
- braid and ribbons;
- original shapes of pockets in the form of stars, flowers or hearts.
For men's aprons, the following are more suitable:
- all kinds of belts;
- buttons;
- metal fasteners.
Aprons for children have a wide variety of decor. They do not use them for their intended purpose, so the following will be relevant for decoration:
- rhinestones;
- beads;
- bright applications.
Aprons for girls are very elegant, decorated with bows, inserts made of various fabrics, with patterns made with decorative stitching or acrylic paints. Embroidery or applique is used on plain products. On the bibs of children's aprons you can find funny animals or characters from famous and favorite cartoons.
Decorated aprons require delicate care, so it is better to wash them by hand so as not to damage the decorations.
In fact, sewing an apron is quite simple. You can get ideas and patterns from numerous thematic resources. If you have them, in just a couple of hours you can create a wonderful gift for your mother or grandmother with your own hands, which will always come in handy around the house.
Aprons with applique
Most housewives who have children like to decorate a product with appliqué. For girls, pictures with flowers, butterflies, various animals and birds are selected. The main material is chosen in a light color. Often white or beige. So that the application stands out well.
You can get ideas for sewing and get acquainted with patterns of “interesting” aprons in this article.
For boys, images of construction tools, airplanes, boats, and so on are sewn onto aprons. There are common themes. For themselves, housewives can also be happy to try and decorate their apron with a beautiful applique, choosing an attractive picture.
Aprons decorated with embroidery and pockets always look much more interesting and pleasant than a classic apron.
How to properly sew the details of an apron?
Adviсe:
- It is best to sew the apron parts together using double stitching to ensure the product is durable.
- The apron skirt can be folded into a small fold and stitched so that it is fluffy and voluminous. This will add elegance to the product.
- The tape that holds the bib should be exactly the length that suits you, so take measurements in advance.
- The length of the belt on both sides is not so important, so you can make it with a margin. It is better to cut off a belt that is too long or tie it twice around the waist.
Shabby chic aprons
The product is sewn from thick cotton fabric in a delicate color. Additionally, they are finished with cotton material with a floral print. This style is called shabby chic. The apron is a one-piece product, where the apron smoothly merges into the bib. Fillet lace is used as finishing.
The apron is secured to the figure by tying it around the neck and waist.
Types of kitchen apron
All kitchen aprons are divided into 2 types:
- With a bib, such an apron has 2 parts: the hem, the bib, sewn into a single product.
- Without a bib, it is also called an apron. This type of apron consists of a rectangular piece of fabric with a belt.
Depending on the style of the apron, they are divided into categories:
- Hem based on a semicircle;
- Sundress;
- With tassels, ruffles;
- Asymmetrical cut;
- Straight;
- Knitted;
- From a colored scarf;
- With pockets and inserts.
Polyethylene aprons
Models of aprons made of polyethylene are the most durable, protecting against the contact of any chemicals or compositions with chemical additives on clothing. They are convenient for cleaning using all kinds of household products. In the kitchen they will come in handy when cleaning the stove and sink. Such aprons are sewn in the same way as models made of fabric. You can make a one-piece model for greater strength, or make the look with a sewn bib.
There are a variety of manufacturing and color options available.
For gardening
An old raincoat will make a wonderful apron.
How to do it:
- The sleeves, collar and front are cut off from the jacket.
- Fold the fabric in half.
- Draw the outline of the apron with chalk and cut it off with scissors. If bias tape is not used, allowance is left for folding the edges.
- Finish the edges.
- To sew the ties, cut 50-60 cm of ribbon 4-5 cm wide from the front side of the raincoat (vertically) and 40-45 cm for the top strap through which the head will be inserted.
- Sew the double ribbons together along the edges from the wrong sides and turn them out through the hole left. It is folded and stitched.
- Fix the ties to the apron.
- A pocket or pockets are sewn at the bottom for a cell phone or small items.
Instead of ties, they use old belts or leatherette belts that have lost their original appearance. But with a tight belt, working “bent over” in the garden will probably not be very comfortable.
Basic models of aprons
The school textbook “Technology Grade 5” includes sections on the technology of processing wood, metal, artificial materials, and child-friendly information about rational housekeeping technology. Many of these jobs require special clothing in the form of a children's apron. That is why the ability to sew an apron for a girl is very important.
All apron models are divided into two groups - an apron with a bib and an apron without a bib. Options for models with a bib, in turn, can be divided according to cutting technology into cut-off at the waist and one-piece.
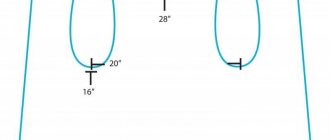
The simplest types of aprons offered for making in labor lessons are shown in the following pictures. For each apron, the construction of the drawing is made on 1⁄2 of the full pattern. This was not done by accident. This is how you should mark out the details of the apron by applying half of the pattern to the fold of the fabric. This will ensure complete symmetry of the product.
If the girl has already sewn a simple apron model, then she can decorate the apron with various details. Several interesting options are shown in the following figure.
Based on simple basic patterns, you can simulate an apron pattern by flaring or changing the bottom cut line. The schematic construction of the drawing is shown in the figure below.
Each hand-sewn apron is sure to be interesting and unique. A novice craftswoman can select jewelry and choose a style at her own discretion.
Next, let's look at sewing an apron step by step.
Fabric for chefs' aprons
This element of the uniform must be comfortable, safe, and meet established requirements. Therefore, it is sewn from high-quality calico containing an admixture of polyester. Its main characteristics:
- environmental cleanliness;
- high density, strength;
- resistance to wear and washing powders.
The most suitable fabric for cutting a professional apron should contain 30% cotton threads, approximately 60% polyester. This ratio provides an optimal combination of the advantages of natural and synthetic fibers - breathability, resistance to deformation, hygiene. A prerequisite is a special impregnation that protects against the effects of hot steam, boiling water, and grease stains.
What fabric to make an apron for the kitchen from - beautiful and practical
Home wear items are not subject to such strict requirements as professional uniforms. And the housewife can decide which fabric to choose for the apron herself, guided by her own preferences.
Let's look at the most common options:
- Teflon coated . Most often it is cotton, calico, viscose, artificial materials, the surface of which is covered with a polymer layer. As a result of this treatment, the material becomes waterproof, does not absorb dirt, and reflects heat well, which is its advantage. This item can be safely washed in a machine on any mode. Features: not sold everywhere, has a relatively high cost.
- “Diagonal” is a cotton base with a small addition of synthetics. Special weaving of threads gives the surface an interesting texture. It has high density and elasticity, and is often used to make workwear. Its advantages are strength, thermoregulation, resistance to deformation. At the same time, it is pleasant to the touch, does not irritate the skin, and allows air to pass through well.
- Synthetics . Inexpensive, easy to wash, dries quickly, does not require ironing. A housewife may have several such things in her arsenal that can be changed daily.
- Linen . A linen apron has a decorative purpose, since the natural material absorbs dirt that is difficult to wash off, and after washing it shrinks and requires careful ironing. But in terms of aesthetics it is difficult to compete with it. It perfectly complements the interior styles of “Provence”, “country”, “shabby chic”. A real decoration for a hospitable hostess during a gala feast!
Photo printing on tiles
Tiles with photo printing always look worse than glass. If we are talking about the kitchen. The area for the apron is very small and photo tiles cut with joint seams will never be a cool solution. It just doesn't make sense. It’s easier to order any ornament you like in glass, where it will look like a solid composition with beautiful reflections.
The only option when photo tiles will be better than glass is your own ornament, which will be designed by you and it will be visible. Uniqueness is always highly valued.
What are the standard sizes, in particular height?
The standard apron height is 60 cm. It is ideal for people of medium and tall height. If everyone in your family is short, it is better to make an apron 45 - 55 cm high. But, as a rule, people select the size of the work surface individually, based on personal preferences, the size of the room and its features. The standard option is to design this zone from the bottom of the wall cabinets to the top of the countertop. Thus, you can completely protect the work area from the accumulation of moisture, dirt and greasy stains.
See below for a few more options for different types of aprons in the kitchen interior:
Decorating an apron with glass panels
Glass is characterized by smoothness and strength. These two options are ideal for a kitchen apron. Glass can be matte or glossy. It also has the function of applying any image that you find on the Internet or choose from a wide range of ready-made pictures.
Our recommendation is to choose a plain or textured wood or marble pattern. Since during operation there will be many objects that separate the overall design and the integrity of the composition will be lost.
A glass splashback has its advantages and disadvantages. Let's look at them.
- A glass apron is ordered complete with a kitchen set. This means you don’t have to spend additional time purchasing materials and installing them.
- Due to its homogeneous texture, glass is easy to clean from dirt. And even if the appearance is neglected, after spending a little time, you can return it to its former luster. In addition, unlike tiles, glass does not have joints containing porous material. This means that the option of ingrained dirt, which can no longer be removed, is excluded.
- Wide range of designs and ornaments
- No texture. Sometimes the texture looks richer and more interesting. In the case of glass, it will not be possible to create a beautiful relief. Only imitation.
A significant disadvantage is the cost of glass. But high-end tiles will also come out at the same financial level. Therefore, it is in your power to weigh the pros and cons of such a decision.
Design options for kitchen interiors and what are they made of?
The most common aprons in the kitchen are:
- ceramic tiles;
- glass;
- mosaics;
- artificial or natural stone;
- MDF or chipboard;
- plastic;
- marble.
Their design can be anything from classic to modern.
The most popular types of lamps are:
- Halogen. They can be mounted, built-in or overhead. Such lamps are mounted in furniture at a certain distance from each other. Their advantages include ergonomics, versatility, and long service life.
- Fluorescent. With their help you can create diffused and slightly dim lighting. These lamps do not heat up and have low power consumption. They are located under wall cabinets.
- LED. This type of lighting is the most common. It is characterized by minimal energy consumption, decorative features, and a wide selection. LED backlight can be multi-colored or monochrome. It is attached with special glue under wall cabinets and diffuses light across the entire working surface.
Tiling the apron
We will consider finishing with tiles in comparison with glass. Because most are torn in choosing between these materials. So, the tiles are characterized by:
- Wide range of sizes, textures and shades
- It has a relief structure, which means it will look cool when illuminated due to the play of light and shadow.
- It is necessary to take into account the color of the grout. We do not recommend making the joints light.
Since the apron takes up very little space, it is possible to decorate it coolly, with expensive textured tiles. At the same time, the cost will not be high, as in the case of choosing an expensive countertop and facades. So take advantage of this life hack. And make the apron the brightest and most interesting accent of the kitchen.
Tiles that imitate wood texture, concrete or marble look interesting. It’s especially cool when not only the external part is imitated, but also the texture of these materials.
Tiles laid like brickwork in light shades have already become a classic. And it is unlikely to ever go out of fashion. This tile is also called “white boar”. It will suit any chosen style and always looks stylish and fresh.
How to choose the color of the material?
As for the color scheme, the apron for the kitchen is chosen to match various elements :
- Tabletop. With this design, it is worth giving preference to the same manufacturing materials in color, texture and texture.
- Facade. This option is appropriate when it is necessary to highlight a certain part of the kitchen composition. In this case, the color of the facades and apron should be combined with each other.
- Furniture. This option looks quite original and aesthetically pleasing.
- Flooring. You can make a floor and a backsplash from one collection of ceramic tiles. For this design, you need to choose harmonious plain curtains.
- Walls. This option is appropriate for studio apartments, when it is necessary to allocate a work area and a recreation area. It is best to choose neutral colors that match the overall interior.
- Kitchen color. This is an ideal option if you want to make the room look cohesive and light. Ceramic tiles of standard sizes in warm colors are suitable for classic interiors.
A classic kitchen design is white. It combines harmoniously with wood, metal and plastic. The shape and size of the tiles can be any. The trend this season is to decorate this area with marble in gray shades with characteristic patterns in the form of contrasting veins.
In general, the color of the apron can be anything, from light shades to bright red, purple, blue. The main thing is that it emphasizes the individuality and uniqueness of the room and combines with other colors.
How to choose by headset?
Since the main part of the kitchen space is occupied by the kitchen set, when choosing colors for the apron, you should pay attention to the facades.
History of apron transformation
Devices similar to aprons have been used since ancient times and were originally pieces of leather or fabric that were attached to the belt and were intended to cover nudity. Later, the functions of the apron were transformed; it began to determine the status of its owner and membership in a certain social group.
Having migrated into the wardrobe of artisans, the apron began to be used to protect against splashes and dirt when working on a potter's wheel, in a forge, in a slaughterhouse or on a construction site. An obligatory ritual attribute of the attire of a member of the society of free masons, better known as the Masonic lodge, was an apron.
This is interesting: Pattern Apron