Any person travels during his life, and since the invention of the wheel, he has been striving to make this process as comfortable as possible, improving and creating new products, one of which is an orthopedic travel pillow in the form of a bone.
This article provides an example of making an orthopedic bone pillow, from sketch and pattern to the finished product, which has positive reviews among people who have tried it. Indispensable on the road and does not take up much space, comfortable and cozy.
A comfortable and functional bone pillow will help you get rid of fatigue and forget about the feeling of pain in the cervical region
How to make a bone pillow with your own hands
The bone pillow has become so popular not only for its practical and supportive properties, but also for the fact that it is quite unpretentious in manufacturing methods and materials. At the first stage, paper of any size is folded in half, and this action is performed again, a pattern in the shape of a bone is applied and its contours are clearly outlined.
In ten to fifteen minutes you can sew a comfortable orthopedic pillow with your own hands.
A small indentation is made on top, which tailors call “mosol”, while the width of the bone in its narrow part is approximately 6 cm. From the place where the paper is folded, retreat 10 centimeters, and this point will be considered the height of the widest side of the pillow. Using a pattern, we round off all straight and sharp corners. Having expanded the resulting sketch, we get the finished workpiece.
The shape of the bone allows the pillow not to roll, maintain stability, and provide good neck support.
If it seems that it is too short, then by cutting it in the middle, you can add the desired length to it. Next, the elements are cut out, leaving no margin for seams. After checking all the parameters, you can fasten the resulting elements. They begin to sew from the center, ending also in the center on the other side. A hole is left on one side for stuffing. If it is not possible to stitch with a sewing machine, this can be done without any problems by hand, using a “back needle” stitch, like our great-grandmothers.
The “Bone” pillow provides anatomical support for the cervical curve of the spine, which is important for the prevention of osteochondrosis and other diseases of the cervical-collar area.
Stitching begins from, i.e. All seams practically start and end at the same point. After stitching, the resulting workpiece is turned inside out. Considering what you want to use as filling, prepare it for stuffing the pillow. Filling is done at your own discretion: if a denser product is required, we hammer it tightly, but without fanaticism; if you need light stuffing, we hammer it so that there are no voids left, but not tightly.
Thanks to anatomical support, the spine in the neck area is in the correct position during rest.
At the final stage, we sew up the hole for the stuffing, and now the product is ready for use.
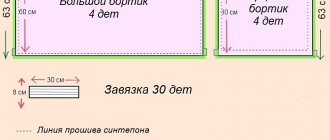
The result is a bone pillow with dimensions: 10 cm wide in the center, 35 cm long. By changing the parameters at the cutting stage, the size is adjusted based on the result of the work.
Sewing the product
So, having chosen the style of the future pillow and made a pattern, you can proceed directly to sewing:
- transfer the pattern to the fabric;
- When cutting out the material, do not forget to leave seam allowances;
- make notches at the junction of the parts, place them right sides together and sew, leaving space on both sides for stuffing the large and small roller. You can sew a ribbon and a zipper into the seam for convenience;
- Now the structure must be screwed in and filled with the selected filler, and the remaining hole must be sewn up.
The finished pillow will be an excellent addition to a DIY mattress.
Important! If you feel unwell after sleeping on a pillow, you may need to adjust the volume of the filler or replace it with another one.
Design selection
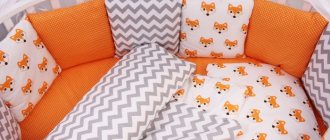
The design for a bone pillow can be very diverse, depending on the purposes for which the pillow will be intended; styles with a variety of colors and materials are chosen. As for the shape of the pillow, here we can say that as much as your imagination is enough, you can ultimately realize bizarre shapes. The top of the bone pillow can be made of different materials, both natural and synthetic.
The pillow helps relieve tension in the muscles of the neck, reduce headaches, improve blood circulation, and prevent pinching and curvature in the cervical spine.
Most often, manufacturers use:
- Linen. The material is natural, characterized by environmental friendliness and the highest quality. Products with linen are easily washed both by hand and in a machine, do not deform, and do not fade in direct sunlight;
- Cotton. It stands out for its naturalness, breathability, and pleasant to the touch structure. This fabric is provided by manufacturers in a wide selection of colors. Cotton is easy to care for and has the highest technical characteristics;
- Eco leather. Externally, there is literally nothing different from natural skin. But it is considered more resistant to wear and mechanical damage, and the method of obtaining it is more “humane”. You just need to keep the fabric clean. An eco-leather product can simply be wiped with a damp cloth to remove dust and dirt. This is an ideal option if the pillow is used for long trips.
The relaxation pillow filled with buckwheat husk has optimal rigidity and elasticity and perfectly supports the neck area in an anatomically correct position.
Cutout
Fold the piece of fabric facing inward, apply the pattern so that there is 1 cm of allowance on all sides. pin it with needles, trace the pattern around the edge and then add 1cm along the edge around the entire perimeter.
Attach the template, pattern with an indentation of 1 cm from the edge of the template
An allowance of 1 cm from the edge of the template or pattern.
A piece of fabric is cut with an allowance of 1 cm from the pattern.
Attached pattern to fabric.
Remove the pattern from the piece of fabric.
Cut out piece of fabric and template.
Selection of tools and materials
Since the manufacturing method itself is simple, the set of necessary equipment and materials will be equally unpretentious. You will need:
- threads;
- needle;
- scissors;
- pattern;
- any chalk or lime pencil;
- almost any paper, large size;
- ballpoint pen or graphite pencil;
- sewing machine.
Items
To sew a nursing pillow for your arm with your own hands, we will need:
- Piece of paper
- Pencil
- Ruler
- Scissors
- Fabric (Cotton)
- Filler (Hollofiber)
- Elastic band, 2 cm wide. You can use several pieces of simple linen elastic.
- Pattern.
Orthopedic bone pillow
Being indispensable for long journeys, the question involuntarily arises, what are its main advantages?
First of all, this:
- The antistatic properties of latex on the inside of the pillow do not collect dust like a regular one.
- The so-called effect that the surface of the pillow breathes allows you to stay cool in summer and warm in winter.
- Three-dimensional parameters of the pillow: 30×20×10 cm.
A zipper in the pillow cover allows you to adjust the density and volume of the filler.
Positive sides:
- unloading of the cervical spine;
- prevention of cervical osteochondrosis;
- improving blood supply to the head and neck;
- normalization of neck muscle tone.
Used in a variety of areas, including:
- migraines, dizziness, periodic fatigue, neck pain;
- prevention of neck osteoarthritis from prolonged sitting.
High-quality fillers provide comfortable support for the neck, are quite elastic, do not roll or wrinkle over time, allow air to pass through, and do not accumulate moisture.
Orthopedic bone pillows, like all accessories, require care, the main stages of which are:
- Possibility of dry cleaning;
- No need to use dry cleaning;
- The pillowcase is replaceable, which allows you to clean it not with all the filling at once;
- If the filler is made of synthetics, then it is undesirable to keep it in the open sun for a long time;
- If it is synthetic, then heating the pillow on a heater for a long time is also not advisable.
Mode of application
Recommendations for using the pillow should be indicated on the packaging or separate instructions included in the kit.
Basic rules of application:
- The product is placed with a narrow cushion under the neck if the child sleeps on his back, with a wide cushion if he sleeps on his side.
- The child's head should lie in a round recess (for a butterfly pillow).
- In models with bolsters, the child is placed on his side and the body is well fixed.
- On inclined pillows, the baby is positioned with his head on the high edge, shoulders on the lower part of the surface.
- The swimming accessory is worn around the neck so that the open part is in front and does not interfere with normal breathing.
In the car
In a car, a bone pillow becomes an integral part, especially when the trip is long. Its use in the car is most adapted, since the headrests of the seats are conveniently suitable for fixing it. Due to the lateral convexities, the neck and head are comfortably fixed and thereby avoid swelling of the muscles of the neck and spine.
For lovers of increased comfort when traveling and at home, the compact, very comfortable “Bone” pillow will be a real godsend.
If rigid fixation is required, then in some cases additional straps are used to secure the cushion to the back of the seat. The issue of protection from allergenic materials in the composition of the pillow becomes especially relevant, since in the car there will be constant contact of the neck with the pillow.
This pillow is recommended for diseases of the cervical spine, chronic fatigue, and sleep disorders.
Decor features
Of course, you want to make such a thing, which is constantly in sight, noticeable and beautiful, so that it does not merge with the surrounding interior, but blends harmoniously into the overall picture. In this case, to decorate the pillow, it is best to use patterned embroidery with threads made from natural materials. But using jewelry and hanging this kind of decoration on it may in the future cause unpleasant pain, since all this will interfere with the comfort of the pillow.
The pillow is elastic, takes the desired shape, supports your head and helps you completely relax.
To sum up all of the above, it is worth saying once again that a bone pillow is very simple to make, but it provides such comfort and convenience that right now you want to take all the necessary accessories and create such a miracle for yourself! Don’t be afraid of imaginary difficulties when making a pillow; rather, think about the convenience that awaits you with its purchase.
Fabric preparation
Before cutting a piece of fabric from a previously prepared pattern, you need to iron the fabric. A household ironing iron is sufficient. We iron on both sides using steam mode, which will give maximum shrinkage during further washing of the finished textile product. The future pillow will be less susceptible to changing shape and size, in other words, so that it does not shrink. For maximum effect, it is advisable to wash the fabric.
Ironing
Iron with steam on both sides.