You can buy bumpers for your baby's crib at any children's store. This accessory became popular back in the Soviet years and has not lost its relevance to this day. At the same time, making bumpers for a baby crib with your own hands is not so difficult. The main thing is the desire of the parents themselves to decorate the space of the cradle. The stores have enough materials for sewing and decorating such products.
The article shows how to sew bumpers for a child, what models you can choose and how to decorate. The accessory is not only attractive, but also practical. It prevents the baby from getting injured and adds comfort to the interior.
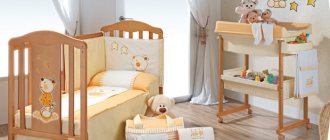
DIY bumpers for a baby crib
Side functions
The frame of children's beds made of metal and wood is quite rigid. The side parts often consist of beams. Light enters through the holes in the crib. A small hand or foot of a newborn can get there, which also adds to the concern of young parents. The solution in both cases is to protect the sides of the cradle. A special bumper with filler acts as a limiter and becomes a buffer between the baby’s cozy world and the outside environment.
An additional function of the sides is educational. You can place interesting pictures on them, add educational motifs to decorative elements, and equip baby accessories with squeakers, rustling sounds, moving and musical parts.
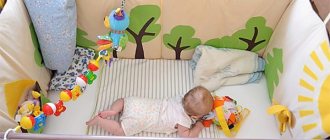
Star pillow attracts baby's attention
When choosing a crib, it is recommended to take into account several factors: the practicality and safety of the material and design, the appearance and functionality of the product. Modern manufacturers offer a wide range of models to suit every taste and budget. The round crib has become especially popular lately.
Types of products
It is enough to visit one specialized store and you can get lost in the variety of products offered. The best manufacturers try to surprise their fans by releasing more and more popular models that differ not only in cost, but also in the material of manufacture, design, dimensions, colors and functionality. However, despite such diversity, all limiters are aimed at fulfilling the main task: to protect overly active children from injury and drafts. They are attached around the perimeter of the crib, covering it completely or partially.
Before making a final decision, it is worth deciding on the design features of the product. This is not one large pillow, but a whole complex of small square, oval, round, polygonal or rectangular soft devices that are placed on all sides of the crib or only on some sides. May not be removable. Designed to minimize child injury from a fall. They come in one piece and double-sided.
Removable accessories are installed by parents at their discretion. Quite a convenient design solution. You can remove it at any time and put it back. Sides with increased rigidity are also available for sale. They are purchased when there are no restrictive walls in the crib. The main condition is that the product must not have cracks or chips; high-quality processing is required.
Soft restraints are purchased for cribs. Rigid options are needed for beds without side rails. Semi-rigid models are very popular among parents who constantly travel with their children and have to spend the night away from home. Such limiters can be tilted 180 degrees.
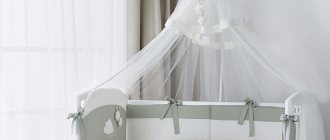
The age of the child plays a big role in choosing a product. Newborns require exclusively soft structures, while older children can purchase removable sides. Parents, along with purchasing protective accessories, look for canopies that can protect their children from mosquito bites and other insects. The canopy is also a decorative element.
Often in stores you can find small bumpers - pillows, which together constitute a soft wall. You can immediately buy educational accessories. The baby should not have monotony. Otherwise, its development will slow down significantly. Bright pictures and cartoon characters will cheer up your baby, make you smile, and calm you down.
Child's age and bumper type
Ideas for arranging the internal contents of a crib are determined based on the needs of the child.
Protection in the form of sides can be full or partial. The first covers all sides of the crib, the second protects the child on the right and left. The age of the baby in this case is the main indicator affecting the density of the structure.
Pillows for sides, which can later be used in the nursery
Solid sides are ideal for active babies who explore the world and are able to move around the perimeter of the bed, but are not suitable for a newborn who wants to explore what is happening around them.
Which models are suitable for home sewing?
There are removable sides for the crib, which are mounted in the form of a dense rectangular piece on the side. The work requires reliable material, which is not always easy to find. In addition, it is worth taking care of fixation - this may require complex structural elements or rare fittings
In general, vertical removable parts for sidewalls are more convenient, but they are not so easy to make at home.
Sides for a newborn's crib
Non-removable sides are ideal for sewing yourself. They are either placed in the crib as an insert, or tied to it with ribbons, fastened with buttons, etc. Sewing a non-removable buffer is easier, since it is based on a filler and a cover. Such models are universal and do not require special materials, complex tools or skills. They can be decorated to your taste. A huge selection of fabrics and decorative elements, the ability to use several types of covers for the interior - all this gives room for imagination and creates a unique, inimitable atmosphere in the nursery.
Sewing bumpers for a baby crib is usually not difficult. They do not require intricate cutting. The parts are cut out according to the standard, or based on the dimensions of the crib, if its dimensions are far from those presented in the store.
Types of fixed sides
Protective soft fencing can be classified into several categories. The choice is strictly individual. At the same time, there are many types of fences with filler.
According to the degree of density, crib restraints are:
1. Solid - such bumpers are presented in the form of fabric stretched around the entire perimeter, or in the form of similar parts with a soft filler.
Solid side for crib
2. Composite - a bumper in this category consists of interconnected parts (they can also be of varying degrees of softness), the advantage of which is their multifunctionality (pillows, for example, can be used not only as part of the bumper, but also for their intended purpose).
Depending on the presence of additional elements, there are simple crib guards and decorated ones. For a small child, it is advisable to think through the decorative component so that the side serves not only as an element of safety, but also develops the baby’s visual reactions.
The limiter may have a bottom. It can also consist solely of sidewalls. It is advisable to make the choice of one design or another based on the temperature conditions in the room. If the apartment or house is quite cold, a dense base filled with insulation will be a good choice. The side parts of the side will be attached to it.
Soft side without bottom
The bumper, which is sewn to a dense base, allows less air flow for the child, but in the warm season and hot heating season this can negatively affect his well-being. In addition, a fence that is too dense can interfere with the child's ability to explore the world, completely obstructing his view.
Before cutting, it is necessary to take into account the configuration of the bumper that is supposed to be used:
3. Pillow sides - can be with or without removable covers; The main requirement for pillows is the absence of small parts in fasteners and other elements that the baby can accidentally pull into his mouth and swallow.
Pillow sides can be found both in standard beds and in extension beds. In the latter case, cutting and sewing are carried out with less material consumption.
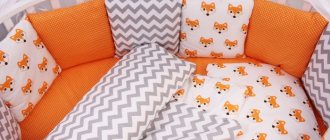
Traditional design in the form of pillows
4. High soft barriers - the design blocks the view, despite the good protection of the baby from impacts and falls.
High bonbon sides
5. Low-height sides are the complete opposite of the previous option; they require a more attentive attitude to the safety of the child.
An alternative to the previous option is a low side
6. Bumper with pockets - the internal filling will always attract attention, so this configuration will educate and develop the little inhabitant of the crib, but at the same time it can overstimulate.
7. Fences in the form of rollers - this option can be used as an alternative to pillows.
Side bed rails in the form of pillows
Criterias of choice
When choosing a bed restrainer, you should pay attention to the purpose of the side and take into account the real possibilities. The main criteria when choosing a protective system are:
- Age of the child - to care for a small child you will need a functional bed with guards, and the smaller the child, the more reliable the protection system should be. If the child is highly mobile and can carry out playful activities in bed, fall guards also serve the function of preventing bruises and injuries. It is advisable to create them soft. If you need to create a protection for an adult's bed, you should first think about the purpose of the fence. Railings for the disabled serve to create convenience when climbing, so they must first of all be strong and detachable. There is no need to create foam cushions for them. The main purpose of softening elements is to protect the child’s head and body from bruises;
- Bed size - when making or ordering a child bed restrainer, you must measure the length and width of the mattress, since not all models are made to standard sizes. Removable barriers can be used to cover the entire length of the side of the mattress in a child's bed and to limit the horizontal space in which the child is forced to sleep and which needs to be protected;
- Room design - if this criterion is important when choosing a protective system, it is recommended to select protection taking into account the design of the children's room. But when installing a protective system, first of all you should pay attention to the reliability of the installation.
An important factor when choosing restraints is also the financial capabilities of parents. Homemade options do not require significant financial costs, but their production requires a lot of time and effort. Pre-fabricated barriers are sometimes expensive and require little construction skills to install, but they offer a high level of protection and reliability.
When considering, selecting, making or purchasing and installing bed guards, much attention is paid to the intended purpose of the bed rail and the weight of the sleeping person. These parameters are the main ones when choosing protective systems.
Based on financial capabilities, personal preferences, room design and the features of each specific design, the most optimal option for each specific bed is selected. When traveling frequently with small children, it is recommended to choose removable barriers that are installed on different horizontal surfaces. They will serve as reliable protection for the child wherever he sleeps.
If the baby constantly sleeps in his crib, it is recommended to install a stationary side that is attached to the base of the bed. It will serve as protection for the child not only during sleep, but also during play. The child can stand up, holding the side with his hands and leaning on it. To protect the sleep of teenagers or adults, protective systems are chosen that cover only part of the side of the mattress, since they look more aesthetically pleasing, but fully fulfill their functional purposes.
Bumper fillers
If you have decided to use soft parts in the design of the guard, you should think about the inside and choose one of the following types of natural or artificial fillers:
Table 1. How to fill the crib restraints
| Natural ingredients | Artificial materials |
|
|
Features of fillers
An interesting idea is to use not only soft fabrics, but also dry herbs as filling.
Table 2. Impact of aromas on a child
| Herbs | Impact on well-being |
| Lavender | Normalizes the functioning of the nervous system, gives peace, improves sleep, eliminates excessive emotionality and tearfulness |
| Fennel | Eliminates anxiety, relieves abdominal cramps |
| Bergamot | Treats anxiety, helps fight viruses, is good for skin with rashes |
| Hop | Calms, improves sleep |
| Rose | Stabilizes the nervous system, improves immune function |
| Chamomile | Relieves pain, spasms, antiviral |
You can use the above herbs in their pure form and in various proportions. As a result, the child will sleep better, be capricious and get sick less.
Herbs in a case - pleasant aroma and benefits for the body
Negative opinions
Basically, all negative opinions regarding crib bumpers are based on photos, looking at which parents decide whether the product is needed. At the same time, if we talk about high-quality kits that are certified according to all standards, created from natural materials with safe fillers, the negative aspects disappear.
The ventilation of the crib is not disturbed, only drafts and cold air are excluded. The child also breathes easily without getting hypothermia. Light also continues to flow, excluding only random glare (headlights outside the window or the flicker of a mobile phone), which only contributes to a more sound sleep.
Materials for the outer part of the bumper
To ensure that the covers are well ventilated, they can be made of linen or thick calico.
The main requirement is that the threads of the woven material must be tightly intertwined, securely connecting to each other and creating a barely noticeable relief. A fabric that is too smooth will be uncomfortable for the child.
In general, it should be said that choosing fabric for children's clothes is a responsible matter. Any specially processed cotton is used to sew covers. But not every cotton fabric is suitable for sewing an accessory for a crib. Chintz, for example, leaves lint that can cause allergic reactions. Canvas has a similar disadvantage. Moreover, it is too tough.
Satin may be too slippery. If you use elements of denim when sewing protective sides, they may turn out to be rough for the delicate skin of the child’s hands and feet.
Different types of fabrics for sewing
The outer parts of the sides can be made of anything. But you should avoid silk, satin and 100% synthetics. Compared to cotton, these materials offer a lot of stretch. The outer part of crepe-satin can be stitched with propylene - this prevents unraveling. It is also better not to use allergenic wool for the outside of the bumper.
Crepe-satin sides are the outer part that can serve as decoration during the child’s waking moments.
Before cutting any model, the fabric should be washed and ironed.
The color of the material is also an important element. The general rule is that shades should be dim and unsaturated. Warm or neutral colors are preferable. This is due to the color perception that is available to the baby.
A successful and moderately contrasting combination of colors in a crib
Due to his age, he is able to accept not all visual images well, but only certain tones of the picture.
The dominance of one color in the side of the crib, as well as the presence of too bright color spots in the decoration, which overload the fragile psyche, is wrong. As a rule, certain color combinations that should not be used are perceived as too catchy.
Unacceptable color combinations for baby bed bumper
What is a baby bed limiter?
A child bed restraint is a holder for a bed to prevent a child from falling, mounted separately or installed at the manufacturer's factory. This element helps to protect the child's sleep and prevent accidental falls from the bed in the middle of the night and subsequent injuries. Bed restraints are relevant both for small children sleeping separately from their parents, and for babies sleeping with their mother, because the part can also be installed on an adult bed.
Bed restraints can significantly reduce the risk of falls.
Note! Built-in barriers are necessary for children sleeping on the second floor of a bunk bed to avoid falls, regardless of the child's age, because the resulting injuries can be extremely dangerous. They can be purchased in furniture stores, purchased to order, or you can make them yourself from scrap materials, and they will not be inferior in efficiency to purchased ones.
A bed restraint is a protective barrier that prevents the person on the bed from falling.
Attachments for child side boards
The sides can be attached to the crib using ties or Velcro. For fastenings, you should not choose smooth ribbons - for example, satin. They can easily fall off, in which case the child may be injured.
Separately, you should consider the features of the ties - any other method of placing the sides in the crib is more difficult to implement, and its elements can, moreover, harm the child.
Short sewn ties are only suitable if they are made on pillows. By connecting such elements in pairs, you don’t have to worry about the collapse of the structure. A reliable option are flip-over ties that need to be sewn in. Reversible fastenings can be additionally equipped with Velcro.
It is better to decide on the fastening method in advance - the sewing pattern depends on this
Differences in mounting method
Without fasteners, the sides cannot be installed, so parents pay special attention to this element. The most common are ribbons that are tied into bows. There are fastenings in the form of buttons, elastic bands and Velcro. This allows you to remove and wash the product, and then install it in its original place. If fastenings do not play a big role for newborns, then for older children who can easily master the removal technique, it is advisable to choose a product with a strong fixation. Reliability should be checked directly in the store. Let's look at the characteristics of the main types of fasteners:
| View | Description |
| Ties | They are distinguished by reliability and durability. The ties, in most cases, are satin and grosgrain. Easy to tie and untie. It will take some time before the kids master the untying process. |
| Velcro | Located at the back of the side. They are practically invisible to the baby, so there is no interest in them. Requires careful care. Before washing the product, you need to fasten the Velcro. Otherwise, all kinds of villi and hairs may stick to them. |
Decorating the sides
In order to give the sides that protect the child from injury an attractive look and create a truly original product, you can use many finishing options.
Soft parts are decorated with felt appliqués or cotton fabric stripes.
It is important that the decorative elements are securely sewn to the base. Otherwise, the child may tear them off and harm himself.
You can make your own patches or purchase ready-made ones.
One of the decorative options is special stickers, which are sold in hardware departments or furniture stores. They do not leave sticky marks on the surface and can be successfully used on fabric bases.
Adhesive-based applications have similar functions. The only difference is that they cannot be removed easily. But there is also a plus - the adhesive applications are securely fixed to the fabric of the protective sides.
We must remember that a baby’s bed is not a place for small rhinestones, beads and other elements that can be easily detached.
The adhesive parts adhere firmly to the fabric base.
When decorating children's things, you can use any ideas. The main thing to consider is the degree of security of a particular element.
How to properly care for edges
Like all things in a children's room, the sides should be looked after carefully, but at the same time neatly. Removable baby bumper covers should be washed on a delicate cycle at least once a week. For washing, hypoallergenic baby powders are used, or better yet, liquid laundry detergents, which are much easier to rinse out of the fabric and do not leave microscopic particles on the surface.
If the covers are not removed, then the sides should be hand washed and thoroughly dried in a horizontal position: this way the filling will not fold down and the pillow will not lose its shape. It is impossible to iron such pillows - you have to use a steam iron. So removable covers for protective sides are a significant convenience for both the baby and the mother.
Making your own fabric borders
The most common side configurations are:
- solid model;
- pillow version;
- “sausage” sides made from rollers.
Sewing a continuous border
To make a protective board with tape fastenings, you will need the following materials and sewing supplies:
- calico;
- padding polyester;
- pins;
- ribbons to match.
To connect the parts you need a sewing machine and an iron. You will also need scissors during the manufacturing process.
Consider the option of sewing for one side of the bed. In a similar way, you can make sides for the remaining parts of the perimeter.
Such sides breathe well (if compared with a continuous liner throughout the entire perimeter, sewn to a dense bottom). In addition, they perfectly protect the baby and are securely fixed with tapes.
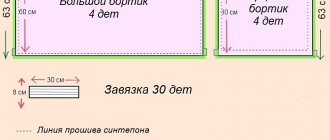
Step 1. You need to cut out two rectangles of calico and a filler of the same size
Step 2. Cotton is folded right sides together
Step 3. Place a filler piece on the calico
Step 4. Cut the ribbons and fold them in two layers
Step 5. We pin the ribbons for sewing Step 6. We sew all the details Step 7. We prepare the side for the final stage
Step 8. Sew up the hole, iron
Step 9. Attach the finished side to the sidewall. From this moment on, the baby is protected from sudden injury on the side where there is a protective fence
Instructions for sewing children's bumpers - cat pillows
Pillow bumpers are suitable for quiet babies who are not inclined to crawl between the bars of the bed and climb out beyond its boundaries. Pillow bolsters are especially popular among inquisitive sanguine children who love various educational games.
The complexity of sewing cat pillows is low - even novice seamstresses can handle them. It will take 3 hours to work.
The following are instructions for one pillow. The sides are combined from several elements, and the visual design can be anything - animals, geometric shapes, favorite characters from fairy tales and animated series.
For the finished product you need to prepare:
- cotton fabric - two colored bases and a small piece of a different shade for a bow;
- pillow filler – holofiber;
- suitable threads (required color and density);
- meter of satin or rep ribbon (width from 1.2 cm to two and a half centimeters).
Shape-resistant holofiber
Tools:
- scissors for cutting and other operations;
- pin needles;
- simple needles;
- sewing machine;
- a pencil for marks or chalk (you can also use modern fabric markers);
- ruler.
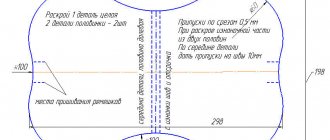
The number of elements and the cutting pattern should be determined based on the crib standard: the length of a standard product is 120 cm, the width of the crib is usually 60 centimeters, the height of the sides is usually 55 centimeters. In total, fabrics of different colors will need 55 by 110 cm. A similar amount of foam rubber or other filler must be prepared for sewing.
Operating procedure:
Step 1. The pattern of the front part of the cat (top and bottom - different shades) is transferred to woven fabric. The image contains the required dimensions of the base - the cat itself, cheeks and ears. The top part is cut taking into account the fold. Add 1 centimeter to the seam. The lower part of the base for the cat measures 34 centimeters * 17 cm (dimensions are given taking into account allowances).
Scheme
Step 2. Using a special disappearing fabric marker, draw eyes, mustache and muzzle. You can also use chalk or a piece of dry soap for this. It is important to ensure that all parts are placed proportionally and symmetrically. At the final stage, you need to sew the bottom strip to the top base and iron the resulting seams.
Transferring the design to fabric
Step 3. Sew the felt parts to the base.
Sew on felt parts
Step 4. Elements of the muzzle are embroidered. To make the eyes, mustache and muzzle bright, this is done several times. Next, 2 ribbons 50 centimeters long need to be folded in half and attached to the fabric. To do this, use regular pins.
Embroidery of a muzzle
Step 5. The back element of the pillow, identical to the front, is cut out of fabric, then the halves are sewn together. There is a place at the bottom where the filler will be placed. The length of the slot is from ten to eleven cm. The corners need to be processed from the inside - when the pillow is turned right side out, ironed and filled with holofiber, they should not puff up and spoil the appearance of the product.
We sew the front and back parts. We stuff the pillow with filler.
Step 6. The place for the filler is sutured.
Sew the bottom
Step 7. A bow is cut from printed fabric. It requires: a strip of 15.5 centimeters by 14.5 cm and a square of 4.5 cm by 4.5 cm. Next, the rectangular part is folded in half and stitched on three sides.
In the middle of the future bow, an incision is carefully made along the top of the fabric. Next, the part is turned inside out through the hole. It is ironed and sewn tightly.
After the base of the bow is ready, the square is folded in half and then doubled again. The result is a strip that needs to be sewn exactly in the middle to make a bow.
Finished product for crib
Now you can cut and sew other pillows with soft filling into the kit. In order for the cat to serve as a soft toy in the future, the ribbons are cut off from it.
Modular bumper made of rollers
Roller boards are an interesting option for a baby crib. They are used less often than pillows, but have a number of advantages:
- as the child grows, they can be gradually added; they are suitable for any height and age, being in a certain sense a universal barrier;
- the roller has the lowest fabric consumption (but it requires quite a lot of filler);
- There is no need for complex sewing operations for edging parts.
The disadvantage of rollers is the difficulty of storage. Unlike pillows, they do not fit together as compactly.
To make one roller you need:
- 40 centimeters of white calico with a density of 142 grams;
- 40 centimeters of satin;
- hidden zipper 35 cm long;
- Holofiber filler weighing from half a kilogram to 700 grams.
Also used in the manufacture of rollers:
- scissors;
- pencil;
- iron (for preparing fabric for cutting and ironing seams).
Step 1. All fabrics are ironed to ensure maximum shrinkage.
Fabrics are ironed
Step 2. Cutting is carried out (rectangle 60 by 35 centimeters and 2 circles with a diameter of 11 cm). The data is given without taking into account allowances (they are 2 centimeters, including for the diameter of the circle - a round part also has an allowance of 2 cm). The result is circles with a diameter of 13 cm and rectangles 62 by 37 cm.
Cutting diagram
This model is supposed to have a removable cover, so the cut is made from two types of fabric - satin and calico. You can also cut out strips from satin to decorate the finished roller, but this is not necessary.
Instead of ribbons, you can also use lace or other material at your discretion
Step 3. We begin sewing the inside.
At the first stage, we fold a white rectangle of calico in half and begin stitching from about a third to one edge and in the same way from the other end.
There is a slot in the middle for stuffing the inside
Step 4. Sew two circles of white calico on both sides
Sew the circles slowly and carefully so that the parts do not wrinkle
Step 5. Notches are made on the fabric, not reaching the stitching (also on both sides).
Making notches
Step 6. The inside of the roller is filled with holofiber, and the sidewalls can be reinforced with special circles made of this material.
Stuffing the pillow
Step 7: The remaining open space in the slit is pinned to prepare for sewing.
We pin the hole with pins
Step 8. The slit is sewn up using a machine or by hand using hidden stitches.
Flashing
Step 9. Next, they begin to create a removable cover for the roller - it is sewn from satin.
To do this, ribbons are sewn on the outside. Ribbons are sewn on a machine on both sides and ironed.
Step 10. Markings are made for sewing in a zipper.
Marking for zipper
Step 11. A hidden zipper is sewn in.
Sew on a zipper
Step 12. Round parts are sewn on both sides of the satin cover.
Sew on the round pieces
Step 13. After sewing, you need to overcast the circles from the inside - this can be done with a zigzag on a simple sewing machine or with a professional overlocker.
Step 14. The inner part of the roller is inserted into the removable satin cover, after which the zipper is fastened. The product is ready! Quality depends on perseverance and accuracy in the cutting and sewing process. However, the excellent roller you end up with is worth the effort.
Insert the pillow into the cover
You can sew a large number of such cushions into your baby’s crib. They are good because they can be combined with each other in any form, installed vertically, laid horizontally and designed in various compositions. In the future, when the baby gets older, soft rollers with filling will become a decoration for the nursery, taking their place on the sofa and among the toys.
Soft geometric details will arouse the child's interest. You can play with rollers, so it is permissible to use not only decorative patterns and materials, but also developing details on the cover of the roller. You can attach various safe elements to it, sew on appliqués, including those made of felt and thick cotton, flounces, frills, etc.
Ready roller
If you attach tapes to the rollers, you can connect different parts into a common long structure. It will occupy the entire perimeter. In a similar way, you can lay out entire “floors” and form a dense and continuous side from soft rollers, fastening them together.
Making a wooden limiter with your own hands
Do-it-yourself limiter for a children's bed
Even if you don’t have much experience in carpentry, making a barrier of the simplest design will not be difficult. Before starting work, you should choose the type of fastening - the simplest involves screwing the holder to the side of the bed. This will save materials and time, but it will not look very aesthetically pleasing and the side of the bed will be damaged.
The child bed restraint is easy to install and securely fastens
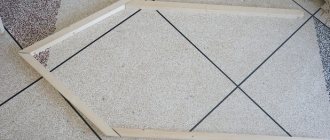
The second way is to make holders that will be attached to the bottom of the bed and covered with a mattress on top. This option is more convenient, but the possibility of its implementation depends on the design of the bed.
For work you will need the following materials and tools:
Tools for making a side with your own hands
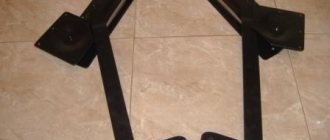
To make a simple U-shaped side (attached with bolts), you will need fairly short slats - the length of the barrier is 55cm. The height of the limiter is optional; for a removable model, a height of 15-30 cm is sufficient.
Example of a short limiting barrier
The stages of work are performed in a certain order.
Restrictor diagram for a children's bed
Assembling racks - sidewalls with designated places for securing the sides
Fastening the sides of a future bed with posts
Do-it-yourself bed limiter protection
Wave shape stopper for baby crib