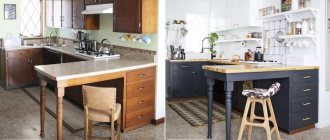
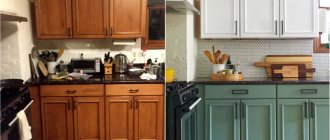
How to paint a baby crib at home?
It makes sense to paint a baby crib if it is not new, because at the time of purchase you can purchase furniture for the nursery in almost any color scheme. For work, it is important to choose non-toxic paints and follow safety precautions. It is not advisable for the expectant mother to renew the coating on her own. You need to involve close people in this.
For children's furniture, it is necessary to carefully select paint, as it must meet all safety parameters and not contain dangerous compounds.
How to paint a baby crib? When choosing materials, it is important to focus not only on the desired shade, but also on complete safety for newborns (see also: videos and lessons on knitting booties for newborns). They should not contain toxic solvents, poisonous oxides, volatile chemical compounds, heavy metal salts and other harmful impurities. The following types of paints meet these requirements:
- Water-based acrylic. Wear-resistant, easy to use, and do not break down from constant cleaning. However, their cost is quite high.
- Nitro paints. Form a durable fireproof coating. They dry quickly, have no pronounced odor, and have a low price for painting 1 sq.m.
- Water-based. Non-toxic, easily and tightly cover furniture, odorless, can cover cracks 1-2 mm deep, last up to 5 years.
- Oils-waxes. Creates a flawless coating thanks to its high-quality composition. The oils are absorbed into the wood, and the wax creates an outer water-repellent coating. The only drawback is the high cost.
Types of paints and varnishes
How to paint a baby crib? Paint and varnish materials that are suitable for use in a children's room are divided into several main types. Paint for children's furniture is as follows:
- Water-based acrylic paint. This type has many advantages. This paint is easy to apply to the surface. It has high wear resistance, resistance to moisture, and does not emit harmful substances during operation. Acrylic paint for a baby crib has a huge range of colors and all shades. The negative feature is the high cost.
- Acrylate paints are considered harmless, but less practical. The consistency is elastic and easy to apply during the painting process. But first, the surface must be carefully treated, since any puncture or unevenness can cause damage or cracking of the coating. Does not tolerate wet cleaning well.
- Water-based paint will be a wonderful analogue of acrylic and acrylate. It combines their positive characteristics, but at the same time has its drawbacks - it is quickly erased from the surface as a result of wet cleaning and mechanical stress.
- Oil-wax is an original coating for furniture, which often replaces varnish. A completely environmentally friendly substance that has high wearability and processing quality. The oil penetrates into the depths of the wood, and the wax creates a protective layer on the surface. The negative features are that the paint and varnish substance is not very widespread and is expensive.
- Nitro paints can completely replace all of the above options. Durable, bright, environmentally friendly, non-flammable and elastic. At the same time, the price of one can of paint is quite high.
What paint can be used to paint a baby crib? There are other analogues of similar dyes, which are not yet widely used in our region. These are unique developments that have many advantages.
Is it possible to varnish a crib at home?
The most popular colors that parents prefer to paint children's furniture are cream, brown, pink, blue. However, many of them only want to emphasize the natural texture of wood and protect it from negative environmental factors. Non-toxic acrylic varnishes are suitable for this. They are transparent, resistant to ultraviolet radiation, chips and damage, and do not have a strong odor. Nitrovarnishes and water-based coatings are not suitable for children's furniture. The former are toxic, the latter are impractical because they are destroyed under the influence of liquid.
Acrylic varnish applied to the surface of the crib will highlight the structure of the wood and give it a classic, natural look.
Furniture can be coated with an acrylic composition at the final stage. Its surface is first painted, sanded (sanded with sandpaper No. 80, 100) and covered with a water-based stain. In the first case, the furniture will take on a more well-groomed appearance. In the second option, the stain will darken the wood in several layers, and the varnish will emphasize its pattern.
Stages of painting a crib
Before painting the sleeping bed, it is necessary to prepare the materials and surfaces of the furniture. You will need paint, a roller (a small flat brush and a large round brush), a sponge and a rag. There are aerosol coatings that are applied by spraying, but their use results in increased material consumption. During painting work, you should adhere to the following plan:
- disassemble furniture into elements;
- clean off the old paint (if you are not planning to coat it over the existing composition) using a spatula, grinder, brush, or chemical remover;
- remove dust, treat resinous knots (if any);
- fill up flaws, chips and cracks;
- sand the surfaces with sandpaper and remove dust with a rag;
- if you plan to paint on the sides, you should prime the surface after sanding;
- using a roller or brush, apply a thin layer of paint, carefully covering the ends and back;
- After the first layer has dried, apply subsequent layers and leave until completely dry.
Painting is carried out in several layers after each has completely dried.
Paint the bed correctly not with one dense layer, but with two or three thin ones. The procedure is carried out 3 weeks before the start of use of the furniture. This will allow you to promptly eliminate coating defects and completely remove the subtlest smell of paint. If after painting the coating begins to bubble and come off, the work is redone: the surface is sanded, degreased and painted. Final drying time takes up to 8 hours.
Instructions for painting an old structure at home
To paint the bed, you must follow the instructions and carefully follow each step. It is recommended to paint the bed approximately three weeks before using the furniture directly.
Wooden and chipboard
Painting a bed made of wood or chipboard is carried out in several stages:
- Disassemble the furniture into its component parts.
- Remove old paint with a spatula, sponge and chemical remover.
- Wipe all parts from dust and dirt.
- Fill existing cracks and chips.
- Carefully treat the surface with sandpaper: remove burrs and irregularities.
- Prime the surface - this will make the paint last much longer.
- Apply a thin layer of paint with a roller or thin brush, carefully painting the details on all sides.
- When the first layer has dried, apply subsequent ones. It is recommended to paint the bed in two or three thin layers, allowing each layer to dry thoroughly.
- After the paint has dried, the bed can be varnished for additional protection from temperature changes or high humidity.
- Wait until the paint is completely dry and assemble the bed.
Attention: If after painting bubbles appear on the surface of the bed, the paint begins to peel off, the surface is cleaned, degreased and painted again.
Video instructions on how to paint a wooden bed:
Metal
The steps for painting a metal bed are practically no different from painting a wooden one.
- Disassemble the frame.
- Wash each part with warm soapy water.
- Use a stiff brush to remove dirt.
- Sand all parts to remove any rough edges. Wipe off any remaining dust with a damp cloth.
- Apply metal furniture primer to the parts. It will ensure strong adhesion of the surface to the paint. Wait a few minutes for the product to dry completely.
- Using a thin brush or roller, apply paint to all parts. For even coverage, let the first coat dry thoroughly, then apply the second.
- After complete drying, assemble the product.
Recommendations for restoring a crib
Often a baby inherits a bed from older brothers, sisters, friends and relatives. It does not always have a look that suits parents, and restoration has to be done. The following activities will allow you to update the appearance of your sleeping place in a short time:
- Checking the possibility of coating restoration. It is important to determine whether the old coating contains lead. If this is the case, then the paint has already become embedded in the wood and cannot be removed. You should refuse such a sleeping place.
- Safety assessment. Instructions for use of toddler beds change. Furniture that was safe 10-15 years ago may not meet modern requirements. You should pay attention to the distance between the sides of the crib. It should not be so large that the baby can stick his head through.
- Preparing for a new paint job. It is worth removing traces of old paint, cleaning it from dust, sanding it, and making sure there are no burrs or sharp corners.
- Painting. Craftsmen recommend choosing Tikkurila, Dulux, “Yarko”, PF-115, Symphony Winner paints. The brands Tikkurila Miranol, Enamel Poli-R, Krasivo (Kvill) are suitable for painting white. Alpina, Tikkurila Euro Pesto, Enamel Aerosol coatings work well in brown. It is not recommended to use red and yellow alkyd enamels from the manufacturers Kudo, LA-060 Element, PF-115 Lakra, since they contain lead.
- Choice of bedding. The mattress and linen must be new and match the size of the bed so that the baby is comfortable.
- Strength test. It is important to make sure that the model is ready for long-term use. For this purpose, mechanisms and loops that can cause harm to a child are checked. The crib frame can be wrapped in a protective cover that the baby can chew on without harming himself.
Note to crafty parents: how to make a baby’s crib unique?
You can give your baby's sleeping area a designer shine with your own hands in a few days. This inspires parents who like to work independently to improve the interior of their apartment and house. In this case, it is better to look at photos of interiors in children's rooms and act in this way: (we recommend reading: children's room for a newborn girl or boy: photos of interiors)
- think over the original design of the bed (pattern, decor);
- choose a color, choose the right paint (acrylic, latex);
- calculate the cost of work and begin execution;
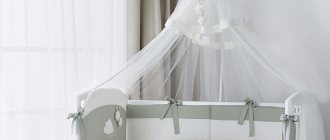
- make decor from fabric: patchwork blanket, crib bumpers, canopy and more (we recommend reading: how to put a canopy on a crib yourself and a video tutorial);
- add wheels, make ventilation holes in the bottom of the bed;
- decorate bed linen with appliqués and stripes according to the nursery style.
Parents should know that sometimes you can do without paintwork. In this case, the crib should be sanded and left in its natural form. Often, when restoring a crib, craftsmen use special waxes and oils, which allows the natural shade of the wood to be preserved. However, if you need to express the uniqueness of a child’s room with a certain color, only painting with safe materials will help.
Source
How and with what to paint a wooden crib
All children love to be surrounded by bright, colorful, light and cheerful objects. Painting children's furniture in bright colors, applying cartoon characters, fairy-tale characters, flowers, patterns or cute animals to its surface will delight any child and add a good mood to everyday life. You can create a designer crib in just a few weekends.
How to reupholster the base of a bed with your own hands: master class + tricks and tips
If the base of your bed is upholstered in fabric, and the fabric is no longer as fresh as you would like, here is a master class on how to make new upholstery.
This method is suitable if the upholstery of the bed base is worn out, dirty, or you just want to change it. For example, in our case, for a small bedroom, we wanted the furniture in it to be light. Therefore, it was decided to change the dark fabric upholstery to a new, light pink color.
All work was completed in 1 day. Here the reupholstery took a little longer than it might have, as the original dark upholstery could show through the new light pink fabric, and the base was first reupholstered with an additional layer of white fabric. If your fabric for upholstery is thick enough, you can skip the “lining” step.
How to sew a sofa cover: 3 master classes
You will need:
— fabric for reupholstery;
Materials for children's furniture
The main point in implementing such an idea is the choice of paint for the crib, because if the approach is incorrect, the baby’s health may be at risk. Keep in mind that teething babies will try to chew on the crib. Therefore, in order to avoid an allergic reaction, poisoning, or irritation of the baby’s mucous membranes, the paint must be environmentally friendly and free of toxic substances.
Special types of paints for children's furniture do not contain lead, toxic oxides, toxic elements, heavy metals and harmful organics. In order not to make a mistake in choosing a material, you need to check the availability of an authorization certificate for paint or varnish, which allows you to use them for children's products.
The crib should be painted with materials that are resistant to mechanical stress, so that the child cannot break off pieces of wood. When choosing paint, preference should be given to products made from safe solvents, preferably water. It is necessary to select materials that are not flammable and that do not emit toxic substances during combustion.
Painting process
It takes very little time and expense to remodel an old wooden crib. All work consists of the following stages:
- First of all, disassemble the crib into its component parts;
- old paint, if any, must be removed and the wooden surfaces polished with fine-grain sandpaper, trying to make them as smooth as possible;
- sand large parts using a special round attachment on a drill with emery pads;
- remove dust from treated surfaces in order to apply paint and varnish materials in an even, clean layer;
- Wash small parts and grilles thoroughly with soapy water and dry well;
- sanded elements should be coated with a water-based stain that has the same tone as the gratings;
- assemble the furniture, firmly connecting all the parts;
- Apply clear acrylic varnish or paint to all elements, including grilles. The choice of varnish should be given special attention. It must be safe for children's toys and not contain harmful substances. It is good to use one that is water-based, odorless, dries very quickly and is absolutely harmless to the child’s health. Paint or varnish must be applied in 2 layers;
- at the next stage, use a rag or sandpaper to walk along the edges of the product where drops of paint could have accumulated;
- After painting, the baby crib should not be left in the fresh air (on the street or on the balcony) until the paintwork has completely dried. Otherwise, small debris or insects may stick.
The primer is the main character
Primer is an important part in the furniture restoration process; with its help you will paint your cabinet with high quality. It will also help the paint dry quickly, as it does not allow moisture to be absorbed into the surface. A positive point is that after priming, the color saturation of the paint will remain the same as when painting.
If you choose acrylic paint for painting, then you need to use an acrylic-based primer.
The painting will be of very good quality, because the elements of the materials for painting are perfectly combined with each other
Before priming, it is important to read the instruction manual and find out how long it takes for the primer to dry, since you only need to paint a dry surface.
Apply it with a roller in a very thin layer, leave it for the time specified in the instructions.
Additional recommendations
It is not necessary to paint the crib with only one type of paint material. You can show your imagination and paint only individual elements, and apply varnish to the rest of the surface, because wood itself is a beautiful material. You can buy small jars of azure in different colors and make the furniture multi-colored; this will help your baby learn to distinguish colors.
By creating a new bed design for a child, you can simultaneously increase the ventilation of the mattress due to the bottom of the crib. This is done by cutting a hole in the bottom of the product, which consists of fiberboard or a solid sheet of plywood.
Source
How to paint a baby crib
The health of the child is always a priority for caring parents. Therefore, the choice of materials for children's mothers and fathers is approached with special care. The use of toxic dyes with a pronounced odor is completely unacceptable.
Painting wooden furniture for children is one of the most popular topics on forums for young mothers and fathers.
But what paint should you use to paint a crib so that the baby’s safety is not endangered? We talk about the available options.
What is the best paint to use for children's furniture?
What should the paint and varnish material be like:
- Safe - the paint is not suitable if it contains compounds that cause allergic reactions when evaporated. Typically, the packaging of products that are suitable for children's furniture indicates compliance with safety certificates, for example, the EN 71 marking (European certificate);
- Water-based - only such paints do not leave odors or harmful substances on the surface when dry;
- Elastic - the paint must withstand significant loads, for example, a child may try to bite the bed;
- Washable - so that parents can regularly wet clean the nursery.
Suitable paint for a crib can be found at any hardware store. It is worth paying attention to water-based and water-dispersion, acrylic, latex and eco-varnishes.
The choice of color is also very important. Dark and bright shades are not suitable for children's furniture. They can cause negative emotions or overexcitement in the baby, which will negatively affect his mental state and quality of sleep. Typically, parents choose white, beige or pastel (lemon, mint, peach) paint.
Choose bright paint for painting children's furniture.
Cots coated with varnish also look good. The texture and color of natural wood will suit any interior design.
Water-based paint
Dries quickly, has no toxic odor, and is completely safe. This is one of the most budget options that meets the main requirements. To ensure a rich shade, the paint is applied in two layers.
You can create a designer crib in just a few weekends.
If you make a single-layer coating, the texture of the wood will be visible. It can look beautiful if a pastel finish is used on light wood.
Colored acrylic paint
Several safe materials are made from acrylic. Among them: enamels, varnishes, paints. Acrylic-polyurethane varnish is ideal for children's furniture. It can be colored and transparent, withstands significant mechanical loads, is hydrophobic, and wear-resistant.
Painting wooden furniture for children is one of the most popular topics on forums for young mothers and fathers.
Where to buy paint for wooden furniture
JSC Raduga has been operating since 1991 (formerly Tsentrmebelkomplekt, Decor-1).
The company was organized to supply raw materials to enterprises that are part of ZAO Centromebel. Today, the company's regular business partners are not only Russian manufacturers, but also leading companies from Germany, Austria, France, Italy, Switzerland, Finland, Poland, and Sweden. Our office is located in the center of Moscow, as well as our own warehouse complex with an exhibition hall of 200 m².
Based on customer requests, our team produces polyurethane enamels in almost all colors in one or two days. We offer adhesives from five leading European manufacturers, natural veneer and lumber - more than 60 types of ordinary, exotic and exclusive species. Front and fastening fittings are constantly available - more than 4,000 items from manufacturers from Europe: Austria, Poland, Germany, etc.
Every month we process applications from more than 1,800 clients. These include both large furniture factories and private entrepreneurs.
Deliveries of goods are carried out throughout Russia. Our company delivers goods throughout Moscow for free. Products are shipped by road to all regions of Russia.
We invite you to cooperate on mutually beneficial terms! We value our clients and try to find an individual approach to each buyer.
Features of painting a crib (+ rules for restoring a crib)
Having chosen the best way to paint a wooden crib, you need to prepare tools and materials for the work. You will need:
- roller for large parts;
- brush and sponge for small details and decoration.
Stock up on rollers for painting furniture.
If you intend to restore an old crib, you will need a spatula, sandpaper or a hair dryer to remove the existing coating.
Before applying the final coating to the product, it is recommended to prime the surface.
The use of chemical solvents is acceptable, but these are toxic materials that contain volatile substances. They will erode for a long time, which is not safe for the child’s health. Therefore, it is better to remove the coating mechanically, in other words, clean it off: first with a sharp spatula, and sand the remains with sandpaper of varying degrees of grain.
The highest quality painting is done in parts.
Important! Before applying the decorative coating, the parts must be primed. A water-dispersed composition is suitable. It is safe, smoothes out small irregularities well, and ensures strong adhesion of the paint to the surface. Can be applied with a roller, brush or spray.
How to restore an old crib:
- disassemble into component elements;
- put all the bolts and screws in a separate container or ziplock bag, or even better, label them so as not to get confused;
- remove the outdated coating (preferably mechanically);
- smooth out large defects - fill chips and cracks with wood putty;
- wait for the putty to dry, coat with a primer;
- when the soil dries, apply paint in 2-3 layers;
- assemble the crib.
Be responsible when painting children's furniture.
In 3-4 days the furniture will be ready for use. But it is better to wait a week from the moment of painting. By this time, the residual smell will completely disappear.
What paint to paint a baby crib
› Paint › Working with paint ›
When purchasing a finished wooden crib that was not coated with protective compounds at the production stage, you need to paint it yourself. Restoring the varnish layer is also required when using an old product.
In both cases, it is important to properly prepare the surface before starting work. You need to choose what to paint the crib with
Choosing paint for a baby crib.
How do manufacturers paint cribs?
For a newborn, select furniture that does not contain toxic substances. For this reason, the most common option is made of wood. To eliminate the risk of injury if a splinter gets under the child’s skin and to increase the service life of such a product, it is painted. In production conditions, the following options are used:
- Water-based compositions. Materials of this group do not cause harm to the child’s body; the unpleasant odor when painted quickly disappears. The coating is smooth, and the layer of dried paint is pleasant to the touch. Colored composition or transparent water-based varnish is popular. More often, a baby's crib is painted brown or white. If varnish is used, the natural texture of the material is preserved. At the same time, it is not advisable to decorate a piece of furniture in a different color, even if the coating is outdated. It can be restored.
- Oil paints. Such compositions do not allow moisture to pass through and allow you to apply a uniform layer of material. Oil paints protect wooden structures well from damage. To increase the service life of the coating and the crib itself, special additives (antiseptic) are used. This helps prevent the development of mold, mildew, and rotting.
Based on milk casein
Milk casein based paint
These are safe materials and do not contain volatile components. The composition includes milk casein, porcelain. The last of them acts as a strengthening substance. The first is in the form of a binding component.
When applied to wood, no characteristic odor appears; the composition is characterized by high adhesion, which allows you to treat even surfaces on which old paint remains.
Such materials are considered conditionally safe. This expands the scope of their application. A composition of this type can be used to improve the appearance of particle boards: chipboard, fiberboard, laminated chipboard. The material can be used in confined spaces.
Painting a baby crib for the first time
If furniture is made to order, it is not always coated. Then the owner paints the crib himself. You can purchase a ready-made color composition or white, and add the color of the required shade to it. Painting instructions:
- The entire surface of the crib is cleaned of dirt: dust, shavings, oil stains.
- The first layer of material is a primer. This measure will ensure high adhesion of paint and wood.
- Rollers and brushes are used to distribute the composition.
- To make the color more saturated and the coating even, apply the paint in several layers. There are breaks between stages, as it must dry completely before painting work continues.
If a water-based composition is used, the tool must be washed after finishing work. The drying speed of this paint is high. The coating stops being sticky after 30-60 minutes. The crib can be used after 2 days. However, complete hardening of the material occurs after 10 days. After this, the coating becomes resistant to aggressive environments (solvents, detergents).
Renewal of previously painted products
If you need to repaint the crib, it is not necessary to completely remove the layer of old lining. Modern materials are characterized by high adhesion, so it is permissible to start working on top of a previously applied coating. Instructions:
- Use medium or high grit sandpaper to sand the crib. This measure allows you to strengthen the adhesion of the paint to the old coating. When it begins to peel off, it is completely removed with a spatula.
- The old layer of cladding is cleaned and degreased.
- If there are defects on the surface, they are removed at this stage. You can use mastic or putty for woodworking. When these areas are dry, move on to the next step - painting. The wood is first cleaned and primed again.
- The composition is applied according to the same principle as in the previously discussed case - when a new crib is painted.
It should be taken into account that water-dispersion compositions are not recommended for finishing laminated particle boards.
What paint to paint a baby crib Link to main publication
Restoration of chairs
The work is carried out on the same principle as restoring a crib. The only difference may be if the chair has a soft seat.
Bright chairs diversify the design of the nursery.
To restore it, you will need to remove the upholstery, replace the filling and secure it with a furniture stapler or glue, which is suitable for fastening different types of surfaces.
Painting a new product
Painting a new crib is somewhat easier than restoring old furniture: there is no need to remove the outdated coating. This significantly reduces time and labor costs.
The crib can be used around the third day.
Otherwise, the scheme of actions is completely the same:
- disassemble into parts if the furniture is already assembled;
- sand with sandpaper to create greater adhesion of the surface and paint;
- wipe with a slightly damp cloth to remove any dust that has formed and dry;
- if the furniture is planned to be coated with colored dye, apply a primer;
- if the crib is covered with clear varnish, use stain instead of primer, which will protect the wood from rotting;
- After priming, additionally sand the parts;
- Apply paint or varnish in one layer, let dry and re-coat.
The most obvious decoration option is to choose white.
All that remains is to wait until all the parts are completely dry and assemble the bed for the child. You can decorate the assembled crib or individual parts. Drawings and patterns are applied with the same safe dyes to the dried coating and dried for several days (so that the smell disappears).
Typically, white, pastel colors and delicate patterns are chosen to decorate the crib. You can apply patterns to large parts using a stencil (this technique is useful for people who are far from the fine arts).
Multi-colored crib slats will look interesting in the interior.
If you have artist skills, it’s time to use them and paint the crib with your favorite children’s characters, natural patterns or abstract elements. However, you shouldn’t overdo it: it’s better to limit yourself to a minimum set of shades, and not go beyond the soft, pastel range.
Methods for restoring an old wooden stock
Sometimes it's hard to part with an old wooden bed, whether because of its convenience or its value as a memento. You can use several methods to restore, decorate furniture and give it new life.
Updating the backrest (headboard)
You can update the backrest in the following ways:
- Restore a damaged area of varnish: If there are no bubbles or deep cracks, wipe the surface with a rag soaked in gasoline to remove grease stains.
- Wait until the product dries, treat it with conditioner, and then wipe it with a wooden furniture polish.
- From the dried back, wipe off the top thin varnish layer with a steel wool. You can't cut through it all the way through!
- Remove dust with a dry cloth and apply a varnish similar to the previous one in several thin layers.
- Allow the product to dry.
- In the first case, the wooden back is sanded and craquelure varnish is applied. After it has dried, the surface is coated with basic varnish. When the varnish layer cracks, cracks form, giving the furniture an antique look.
The dried surface is sanded, and a new layer of stain is applied to the parts that are planned to be left darker, having a different base than the composition when first used. After the product dries, the wood pores are filled with shellac primer. When the back is dry, wipe it with antique wax along the fibers. After it dries, sand with a soft cloth.
Mattress restoration
To reupholster a spring mattress you will need the following tools and consumables:
- new fabric for upholstery;
- hammer, construction stapler;
- nails or staples for fastening.
Depending on the structure of the mattress and any damage inside it, the following may be required:
- cord for tying;
- wooden slats;
- foam;
- items without defects.
- The mattress is placed on a flat plane in a horizontal position, and the old textile covering is removed. Using any tool, remove the parts that attach the worn fabric to the base. If the mattress is covered with stitched fabric, it is cut at the seams and carefully removed.
- The mattress structure is inspected for damage, cleaned of dust, small debris shaken out, and the frame is wiped.
- After making sure that the internal parts are in good condition, they begin the sheathing: laying a fresh gasket layer and top covering material, securing with nails or staples. To avoid wrinkles in the fabric, stretch it slightly with your free hand.
How to restore a mattress in the video: