For a domestic person, a kitchen is not only a place where food is prepared. This is a room for family lunches and dinners, a place to meet friends and family. All this means only one thing - the kitchen should not only be convenient for the housewife, but also attractive in appearance. Every piece of furniture and decor matters, and even more so the kitchen set. When cracks and stains appear on it, or when it no longer matches the style of the kitchen and the tastes of the owners, many people think about buying a new set. But is it always advisable to spend money on new furniture if you can improve the existing one? If the set is still strong and outdated in size and layout, then you can transform it with your own hands. Let's look at the most popular and effective ways to update your kitchen set.
Self-adhesive film
This method of restoring a kitchen set has become truly popular, and all thanks to its many advantages :
- vinyl film is inexpensive, so updating facades will not break your pocket;
- The range of self-adhesive films is huge; you can find options that imitate any type of wood, stone or leather. There are films depicting landscapes, with interesting designs, etc., with a smooth and embossed surface;
- Almost everyone can handle installing the film - just be careful during the measurement process and directly during gluing;
- vinyl film is not afraid of temperature changes and moisture, which is very important for the kitchen. It will be easy to care for such a surface;
- if any part is damaged, or you again want to change the situation, the film can be easily removed.
The downside is the low durability of the film, only 3-4 years, but the low cost and ease of replacement smooth out this drawback.
The procedure for gluing kitchen facades is quite simple. The main thing is to follow the following recommendations:
- choose a film of a suitable color, taking into account your preferences for the new kitchen interior. It is not necessary to take a material with imitation wood - you can take a plain, light-colored film, and then you will be able to make a small kitchen larger and make your dreams of creating a minimalist interior come true;
- It is best to remove the kitchen facades - this will make the work easier. The fittings must be dismantled in any case;
- measure the parameters of each removed facade;
- the film must be glued to a clean, dry surface, i.e. facades must be thoroughly cleaned of stains of grease and dirt. This can be done with a soap solution or using dishwashing detergent. After this, you need to remove the remaining detergents and wipe the facades dry;
- If the facades are seriously damaged, you will have to spend some time on repairs. The peeling edges at the ends must be glued. The holes must be sanded, then filled with acrylic putty, sanded again and primed. If there are large potholes, then it is better to glue a patch of plywood or veneer in their place;
- In accordance with the measurements taken, the film must be cut. Experienced craftsmen recommend adding 4-5 cm of allowance in places where the film will bend. If there is a large design on the film, then when cutting it is necessary to control that it is positioned correctly. It is better to cut with a stationery knife - this way the edge will be as smooth and neat as possible;
- Take the first piece of film, start removing the protective layer of paper and apply the film with the adhesive side to the facade. Controlling the evenness, gradually peel off the protective layer and stick the film;
- You can roll the film with a rubber roller or a plastic scraper. This removes any remaining air. It is necessary to smooth out from the center to the edges. If there are any air bubbles left, you can pierce them with a needle and roll the surface again with a roller;
- If suddenly you notice that somewhere the film is glued crookedly, then within 5-6 hours the situation can be corrected. The film can be re-glued, but not more than 1-2 times, since then the glue will simply lose its properties;
- when all the facades are pasted over, you can screw them back on;
- You can use old fittings, or you can replace them with new ones, which fit better into the updated style.
If the shelves are dirty to such an extent that no detergent can remove them, then they can also be covered with film. The operating principle is still the same. The film can be chosen to be close to the original color of the shelves.
What tools will you need?
Before work, you must prepare a whole set of tools and auxiliary materials:
- Sandpaper for thorough cleaning of surfaces.
- Solvent for removing blemishes and for removing existing layers of old coating (relevant for wooden furniture).
- A primer to enhance the adhesion of paint to the surface - its class is selected for each enamel separately.
- Putty for sealing cracks and chips.
- Masking tape.
- Plastic corners for ends in enamel color.
- New fittings: hinges, handles, holders, etc.
Tools such as a hair dryer, sanding machine, spatulas, scissors, brushes, rags, screwdrivers, and auxiliary containers will also not interfere with painting. It is also worth thinking carefully about protective measures: wear an apron or work coat, protect your eyes with goggles, and your respiratory system with a respirator.
Replacement of facades
Many people think that facades covered with film look somehow too modest. This is all, of course, a matter of taste and personal preference, but it is difficult to radically change the kitchen using vinyl film, because glass inserts or panels will not be added to the doors. To make serious changes to the kitchen interior, it is better to act radically and completely replace the facades. Yes, it will be more expensive than with film, but still much cheaper than buying a new headset. This method is perfect if the furniture frame is still quite strong and durable.
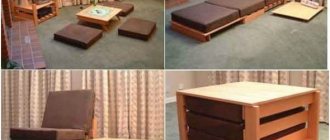
It will be easiest for owners of modular furniture that was purchased relatively recently. Then you can buy facades of the required size and replace them yourself. But you’re not so lucky often, so you usually have to make custom-made facades. It is not at all necessary to change wooden doors to wooden ones, and chipboard to chipboard. The uniqueness of this restoration method lies precisely in the fact that the appearance of the set can be dramatically changed using completely different materials.
The cheapest option is facades made of chipboard or plastic. MDF and wood will cost more. You can choose fittings and decorations, for example, use glass inserts, but all this will be reflected in the price. Handy craftsmen, of course, can make all the facades themselves. If you have woodworking skills, then why not? But it’s much easier and faster to contact a specialized company that will produce facades for your set.
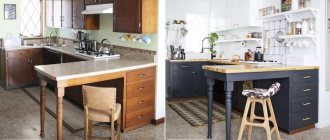
Repair of kitchen facades in Moscow We recommend to residents of Moscow and the region, which has been working for more than 20 years and specializes in repairing kitchen facades. Experienced specialists can replace facades or repair existing ones by painting, enamel coating or gluing film. The company's services also include hardware repair and countertop replacement. All work is carried out on site, preliminary measurements are taken, the design and estimate are agreed upon, and the required fittings are manufactured from the desired material. All work is guaranteed. You can view detailed information and examples of work on the page https://remont-kuhni.com/service/remont-kuhonnyh-fasadov/.
An example of the work of specialists
Restoration of kitchen furniture
To determine the direction and degree of changes in the style and type of kitchen set, it is necessary to highlight the purpose and overall scope of the reconstruction. In the case of a simple renovation of coatings, simply gluing the facades with self-adhesive film may be a sufficient option. Vinyl coating, when pasting facades, will hide any damage, and will also completely update the look of the kitchen set.
If significant changes are planned, with replacement of fittings and repair of individual elements of the headset, then appropriate measures are needed. The procedure for a full reconstruction includes the removal of certain parts of furniture, their repair and painting of surfaces with possible decoration in various ways (decoupage, moldings, replacement of the original decor).
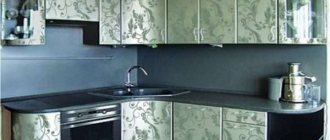
Coloring
The method is quite simple, but requires careful surface preparation. The main advantage of this method is the ability to paint the facade in any color. If you want to make your kitchen bolder, you can choose a bright shade, such as blue, green or orange. A win-win color is white, as well as many light shades, incl. beige, gray, cream, etc. Imagine in advance what the kitchen will look like and get creative.
At the same time as painting the facades, they can be slightly transformed using moldings , special strips that are glued to the surface and give it an interesting relief.
The sequence of actions is as follows:
- remove the facades from the furniture, dismantle the fittings and glass. Those elements that are difficult to remove can be sealed with masking tape;
- It is most convenient to remove old varnish or paint using a sanding machine. If PVC film was used as decoration, it is better to use a hair dryer. The temperature will melt the film and make it easier to remove. It is better to work in a respirator so that small particles of the facade and the pungent odor of PVC do not enter the respiratory tract;
- if there is serious damage, they must be filled with putty and then sanded;
- the surface is rubbed with sandpaper, then the dust is removed and degreasing is carried out;
- if you plan to use moldings, then they are attached at this stage. You can choose smooth or textured planks; there are products that imitate stucco. It is better to sand the planks in advance, then they are cut into pieces of the required sizes. Often moldings are attached along the contour of the doors, or they are formed into a pattern closer to the center. Usually a connection at an angle of 45 degrees is used. After you are sure that the figure is laid out evenly, the elements are glued, you can use glue for wooden products. It is allowed to use nails without heads;
- MDF, chipboard and wood absorb moisture well, so it is better to pre-coat them with a primer. The one designed for woodwork will do. It is better to apply two layers;
- Now you can start painting. It is better to use acrylic paint or auto enamel. The first is cheaper, the second is better in terms of moisture resistance and resistance to mechanical damage. You can use a brush, roller or spray gun. The paint is applied in 2-3 layers depending on the required color saturation. To guarantee, some craftsmen cover the facades with a layer of transparent varnish;
- when the paint has dried, the masking tape is removed, the fittings are returned to their place, and the facades themselves are hung on hinges.
If painting seems too banal to you, then use glisal , a translucent glossy paint. It is applied in exactly the same way as acrylic paint, but while the coating dries, you can create an interesting texture on the surface. Using a sponge, bag or other available items, you can make a geometric design or an ornate pattern. If anything happens, part of the drawing can be removed with a roller. The result is an unusual result that will appeal to lovers of ethno-style.
Restoration of kitchen facades: different types
Facades are part of the kitchen that is constantly in sight. They primarily suffer during operation and lose their original beauty. Each type of facade has its own service life, its own characteristics of restoration and repair.
- Laminated. The base is MDF or chipboard, on which a melamine film is laid. They are inexpensive, but the coating wears out quickly. It is impossible to laminate the surface again at home, so depending on the nature of the damage, another renovation method is selected.
- Frame. The perimeter of the facade consists of MDF, and glass, plastic, chipboard or rattan is placed in the center. Not resistant to damage, but easier to repair.
- Coated with plastic or PVC. These materials make the furniture attractive and resistant to damage at an economical price. It is not difficult to restore such facades: the most common problem is the peeling of the protective layer from the base, which is solved with the help of glue.
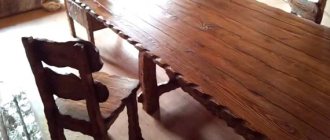
- Wooden facades. Elite furniture consists entirely of solid wood, which is incredibly expensive. Therefore, more often only the façade parts are made of wood. For this, species such as beech, teak, oak, walnut, and maple are used. Such headsets are practically eternal with proper care; minor damage can be repaired yourself.
Attention! A selection of photos of the sets before and after restoration is presented at the end of the article.
Varnish coating
This option is only suitable for facades made of solid wood . Varnish allows you to reliably protect the wood and at the same time does not hide its chic natural appearance. When it comes to furniture, nitrocellulose, alkyd-urea, polyurethane, epoxy and polyester varnishes are used. It is important that the varnish protects the wood from moisture and elevated temperatures. The varnishes have a not very pleasant smell, so it is better to carry out all work outside. If this is not possible, then it is better to take a water-based material, it has almost no odor.
It is very important to decide in advance on the degree of gloss . The varnish can be glossy, which will add visual volume to the set, or it can be matte, which will emphasize the wood pattern. The degree of gloss is indicated on the packaging as a percentage of reflected light: glossy varnish will reflect up to 90% of light, matte - only 10%, there are many intermediate options. Which is better depends only on your preferences.
The operating procedure is as follows:
- remove the facades, dismantle the fittings, if necessary, seal some parts with masking tape;
- remove the old layer of varnish; you can use sandpaper. Dust is best removed with a vacuum cleaner. After finishing the work, wipe the surface with a damp cloth, then allow it to dry thoroughly;
- apply primer varnish;
- The varnish is applied using a brush or roller; it is better that each new layer is slightly thinner than the previous one;
- Some types of varnish need to be worked only outdoors;
- drying speed varies for different varnishes, the average is indicated on the packaging;
- After drying, the tape is removed and the fittings are returned to their place.
To create an aging effect , you can apply stain in several layers.
Restoration of the ends of chipboard furniture
The front surface of sets made of this material is restored using the methods described above. Other damage typical of furniture of this type, such as chips at the ends, can be repaired using melamine edges.
- In the store we select a new edge according to color and thickness. We measure the length of the required segment in advance and buy material with a small margin.
- We remove the old edging. To do this, heat the end with an iron.
- Using a chisel we remove the unevenness of the end, and then sand it with fine sandpaper.
- We put the new edge in place and smooth it with an iron. After the glue has hardened, we trim off the excess with a sharp knife and sand the joints.
Updating hardware
We have all repeatedly heard about the enormous influence of little things, but many, however, refuse to believe the truth of this statement. Designers, without any doubt, convince us that sometimes changing the handles on a kitchen set can transform the kitchen space. More often, however, replacement of fittings is carried out along with updating or replacing facades.
It happens that the kitchen set itself is perfectly preserved, but the handles from constant interaction with them have become peeling, tarnished, or even deformed in places. Remove the old fittings and head to a specialty store, where they offer a wide variety of handles to choose from. The main thing is that the size matches and you don’t have to drill new holes.
If the old handles fit perfectly into the style of the kitchen, then you can find new ones that are as similar to them as possible. If you want something fresh, or if the kitchen façade has become completely unrecognizable after some simple manipulations, then choose handles in a new style. The range of manufacturers includes handles in modern and classic styles, smooth chrome-plated and antique carved. There are handles with imitation leaves and animals, and some with inlaid glass and stones. There are wooden, plastic and metal, transparent and colored - everyone can choose the right one.
Perhaps the hinges and mechanisms of the sliding shelves need to be replaced . Before going to the store, these elements should be dismantled and taken with you as a sample. New loops are selected to match the size of the previous ones. It happens that the existing holes become very loose, and it is impossible to attach new hinges to them. Then they will have to be puttied with an acrylic-based compound in the color of the facade, sanded, varnished or painted, and only then new holes will be drilled and purchased hinges installed. Old roller mechanisms can be replaced with ball ones. All these actions give a huge result - using the headset becomes more pleasant and comfortable.
Glass replacement
As a rule, it is enough to simply wash glass inserts in facades well to return them to their original ideal appearance. But what if you want something new? You can replace the existing transparent glasses with frosted or colored ones, then the kitchen will noticeably change. True, the glass will have to be made to order, and not everyone can handle the replacement itself.
A more budget-friendly option is to buy self-adhesive film. With its help, you can give the glass the desired shade without depriving them of transparency. It will help create a matte effect or imitate a real stained glass window. Anyone who knows how to use a tape measure or measuring tape, scissors and is able to carefully apply the film can definitely cope with gluing the film.
There is also an old, ancient method that involves applying a mixture of chalk powder and silicate glue to the glass. This material is applied to the glass in two layers, after which they become matte.
Features of kitchen paints
The quality of furniture painting and the implementation of conceived ideas directly depend on the accuracy of the choice of paint and varnish materials. When choosing paint, you need to consider a number of important points:
- the appearance of the created surface, which can be matte or glossy;
- the price of paint is not a guarantee of high quality of the facing layer, so there is no need to strive to buy the most expensive paints and varnishes for furniture restoration;
- take into account the area of the surface to be painted;
- choose paints taking into account the level of humidity in the room where such furniture will be located later.
It is necessary to take into account the nature of the composition, water resistance, degree of hiding power and color. The created surface must be resistant to moisture, temperature changes, exposure to ultraviolet radiation, steam, grease, and chemical compositions of cleaning agents. It should have an increased level of wear.
Types of paints for furniture
To paint kitchen facades with your own hands, you can use the following types of paints and varnishes:
Oil paints are resistant to moisture, steam, and temperature changes. The structure of this paint is viscous and difficult to apply. Oily compounds take a long time to dry and smell unpleasant when drying.
Waterproof acrylic paints . They lay down easily and evenly, so painting the kitchen façade with your own hands will be easy.
Alkyd enamels are best suited for the kitchen. They are characterized by high hiding power; safe, dries quickly and easily, does not wash off, is resistant to steam and condensation, does not absorb dyes and soot, and is not afraid of temperature changes.
Repair paints for repairing kitchen furniture and other surfaces. They are easy to apply and produce a durable and very attractive surface.
Paint for chipboard facades
Chipboard facades can be painted with different paints:
- oil;
- alkyd;
- acrylic with polymer additives.
Beginner painters are recommended to use alkyd paints and acrylic polymers. They lay down easily, dry quickly, are highly resistant to external aggressive factors present in the kitchen, and are not afraid of microorganisms.
Solid wood facade paint
It is better to use enamel to paint solid kitchen furniture. It is characterized by excellent resistance to temperature changes, is not afraid of high humidity due to the thin film that forms on the surface, withstands mechanical stress and can only be damaged in cases of strong pressure with something sharp. A wide palette of shades allows you to create any kitchen design from solid wood.
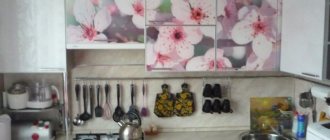
Decoupage of kitchen facades
Decoupage is a great way to update your kitchen set and give it a touch of Provence style. After the transformation, the facades will look as if talented artists painted them for you, but you will know that you made all this beauty with your own hands. You can put absolutely any design on cabinets and shelves, but usually they choose something related to plant and kitchen themes: images of fruits and vegetables, coffee, jars of spices and cereals, flowers, etc. Decoupage will help decorate facades with ornaments in the style of Gzhel or Petrikov painting. The main thing is to find a suitable drawing - no one limits your imagination.
Everyone can cope with the restoration of facades on their own:
- remove all doors, remove fittings;
- If the surface of the headset is perfectly flat and smooth, then you only need to wash it well to get rid of stains of grease and dirt. If there are defects, it is better to sand the surface. First use fine-grained sandpaper, and then coarse-grained sandpaper. If you have a sanding machine at your disposal, it will greatly simplify the process. If there are cracks, depressions, or pits, it is better to fill them with putty. When it dries, the treated areas are sanded again. After this, the facades can be primed, but many skip this stage;
- The decoupage technique is suitable not only for wood, chipboard and MDF - it can also be used to decorate plastic and glass facades. Preparing them for decoration is very simple - just get rid of all the dirt and grease;
- The easiest way is to use three-layer napkins for decoupage. Think in advance about which part of the façade the drawing will be located. Don't use images that are too small. Different cabinets can be decorated with pictures in the same style. The image can be glued to regular PVA glue;
- Now all that remains is to open the facade with acrylic varnish, it is better to use 3-4 layers, each applied after the previous one has completely dried. The easiest way to work is with a narrow brush with long bristles;
- All that remains is to return the fittings and install the facades.
If this is not your first work using the decoupage technique, then you can use not only special napkins. Experienced craftsmen know that fragments of wallpaper with a suitable pattern, and even maple for a kitchen table, will do, not to mention that the image you like can be printed on a printer.
Painting furniture yourself: advantages
The undoubted advantage is that as a result the master receives a set of the very shade that he has long wanted. With all the diversity in the assortment of furniture stores, sometimes the desired shade is not available and it is impossible to buy it. The color for repainting a cabinet using the RAL palette can be selected with mathematical precision.
The maximum task is completed - the shade is chosen exactly
The second important advantage is the acquisition of invaluable experience. Most often, performers do not stop at one successful experiment, due to its low cost. In the future, nothing prevents you from updating the furniture at the dacha and in other rooms.
Decoration with ceramic tiles
After renovation, almost everyone has leftover tiles. You don’t need a lot of material for this method, so even buying new tiles won’t break your budget. Naturally, not all facades are tiled. A fragment with a beautiful pattern can be glued in the center. This can be one tile or four smaller tiles laid out in a square or diamond shape. You can lay out the contours of the cabinets with small tiles. Often such decoration is used to decorate the lower or upper edge of the set. The image on the tiles should match the overall style of the kitchen.
The operating principle is as follows:
- It is better to remove the facades, dismantle the fittings;
- At a minimum, the surface must be washed and degreased with an alcohol-containing composition. If desired, the facade can be painted, following the tips described above;
- Place the tiles on the surface in advance, determine the ideal place for them, it is better to carefully trace them with a pencil;
- Prepare tile adhesive, apply it to the facade and start gluing the tiles. The principle is almost no different from the usual installation of tiles, only the glue will be needed so that it can hold the tiles on a wooden (or other) facade;
- when everything is dry, you can frame the tiles with molding to make the decor look complete.
Why paint the kitchen furniture
First of all, updating the shade of furniture facades helps to bring something special and unique into the interior. The most beautiful samples displayed in the windows of furniture stores often evoke a feeling of annoyance: everyone can buy exactly the same set, that is, there is no individuality or zest in it.
No matter how hard the owners try to achieve a pre-planned result in the process of repainting existing furniture, in reality it always turns out a little wrong. But that’s the beauty of creativity. Sometimes the result exceeds expectations, and sometimes it differs dramatically from plans, but you still like it.
There are also more significant advantages to a creative approach to kitchen renovation:
- radical transformation of the interior with a minimum of financial investments (you just need to buy paint);
- the entire amount of work can be done alone, without attracting anyone to help, but nothing prevents you from involving all family members in the process, thereby giving everyone a chance to feel like a creator;
- the scope for realizing your most daring ideas is unlimited - from minimalism to French Provence or Rococo, because you can not only paint it one color, but also apply an ornament, glue tiles, and add zest using the decoupage technique.
Change the old boring color to a new one - what could be easier?
Decoration with rattan inserts
The principle is the same as with ceramic tiles. Rattan inserts will look appropriate with ethno- and eco-style. Rattan copes well with moisture, which is why it is well suited for the kitchen. It can be used to replace glass inserts along with large-scale restoration of facades. Rattan inserts can be glued on top of blind cabinets. The variety of weaves and the presence of several shades will allow you to choose the appropriate insert option.
Working with rattan is easy:
- a fragment of the desired shape and size is cut out; you can use pruning shears or metal scissors;
- the segment can be attached to the facade with a stapler;
- Wooden planks pre-treated with an antiseptic are installed around the perimeter of the insert. You can use glue;
- The main thing with rattan is not to overdo it - small inserts on the largest cabinets will be enough to add the necessary notes to the interior.
Methods for restoring countertops
Even the oldest kitchen countertop can be transformed and improved. Simple improvised materials are suitable for repairs. When choosing them, you should take into account the style of the room. For example, decoupage will look great in a Provence kitchen, especially if it is applied to the facades. Repair work should begin after full familiarization with the technological process. You can remake the tabletop as follows:
- Using glass surfaces. The old coating is removed, the surface is cleaned and painted with several layers of paint. Then the tabletop is covered with prepared glass. By placing various photos and paintings under a transparent layer, you can create a three-dimensional effect.
- Decorating with tiles. Material of any shapes and sizes is suitable. It is better if the tiles are not heavy, so as not to overload the structure. For decoration, you can use mosaics and broken remains of ceramic products. The main thing is to arrange the parts with minimal clearance.
- Decoupage. This method is suitable for laminated chipboard surfaces, but only if they are not subject to frequent washing. Suitable designs are soaked in water and glued to the tabletop, and the top is coated with varnish. You can transform your apron in the same style.
- Stencil painting. The sanded tabletop is covered with paint of any color for the background, then the design is applied through a stencil. To prevent the tabletop from quickly becoming worn out, it is coated with varnish.
- Restoration of natural wood. You can refresh the natural surface using water-based varnish. First you need to remove the cracked material, clean the table and treat it with a special primer.
How to fix a burnt spot on a table or countertop
The most common problem encountered with countertops is burns due to carelessness from hot dishes. Since the surface is affected quite deeply and extensively, such a defect cannot be masked using retouching agents.
First, you need to prepare the affected area for restoration. It is necessary to remove as much as possible the blackened layer of varnish. Cover the hole around the perimeter with masking tape and moisten the burnt area with solvent. After 10 minutes, the coating will soften and can be removed with a spatula. You can also clean the area with a router.
We fill the resulting recess with softened putty in small portions, gradually compacting it. We remove excess material with a knife and grind it. The treated area must be varnished in the most suitable color, trying to reproduce the texture of the rest of the table.
Use of chintz
Fabric decor is rarely used, so this is your chance to make your kitchen unique. You will need a piece of fabric with a suitable pattern, and then everything is simple:
- the beginning, as always, is to dismantle the facades and fittings;
- cabinets are measured, fabric is cut out and glued to pre-washed and degreased facades;
- facades are covered with colorless varnish in 5-7 layers, it will protect the fabric from moisture, grease and odors;
- All that remains is to return the fittings to their place, and you can purchase new, more suitable handles;
- An interesting effect can be achieved if you make a lampshade for a lamp from the same fabric, or sew covers for chairs.
Rules for caring for a modified façade
Furniture care must be carried out according to rules corresponding to the type of material or work performed.
Wood needs quality care.
- It is not recommended to clean painted or varnished doors with abrasive and aggressive chemicals; a warm soapy solution and a soft sponge are sufficient.
- Facades covered with film should not be rubbed intensively or abrasives should be used on them.
- It is important to rub metal surfaces and fittings dry with a special microfiber cloth so that no residue remains.
What else is used to update kitchen facades?
The imagination of home craftsmen knows no bounds, and people's ingenuity has generated a lot of interesting, non-trivial ideas on how else to refine an old kitchen facade. The following materials are used for this:
- vinyl stickers, the range of which amazes even experienced designers. Plain, boring facades can be decorated with animal figures, world landmarks or inspiring phrases. It is very easy to glue and remove this decor;
- sea pebbles and mosaics are glued like ceramic tiles and allow you to create interesting decorative effects;
- wooden decor. There are ready-made kits for children's creativity, but if you have the skill, you can cut wooden figures yourself. All that remains is to open them with varnish and glue them to the facades. This decor looks best on wooden facades.
How to update your kitchen countertop?
Renewing the facades and leaving the countertops unattended means not finishing what you started. The countertop is the most vulnerable place in a kitchen set, because its surface is constantly exposed to drops of water and fat, mechanical stress, and high temperature. Chipboard countertops, as a rule, are the first to suffer, and while the façade looks even more or less normal, the work surface leaves much to be desired.
What can you do yourself to update your kitchen countertops? There are several options:
- glue the vinyl film . The option is not very durable, but simple;
- varnishing is a method for wooden countertops;
- painting is carried out according to the principles described above;
- tiling, and they usually use tiles in the color of the one with which the kitchen apron is lined. The tiles are easy to clean, are not afraid of moisture and high temperatures, and are relatively easy to install. The weight of the headset, however, will increase significantly. If the frame is weak, it may not hold up. Work begins by attaching a metal corner around the perimeter of the tabletop. The tiles are laid using regular tile adhesive, and the gaps are kept to a minimum. The glue dries quickly, so it is better not to cover the entire tabletop with it at once. All that remains is to rub the seams and open the tiles with a protective layer of varnish. Work in a similar way with mosaic;
- tempered glass finish , under which you can use anything: sand and small pebbles, coins, pieces of corks, caps from drink bottles, a printed image of a beach, forest or some kind of pattern. The glass is bonded to glue and firmly protects the entire decor from negative influences.
If the countertop is still in good condition, but has only one or two noticeable flaws (for example, burn marks or places from a knife blow), local repairs can be carried out. The defective area is carefully processed with a milling cutter to end up with a quarry-type depression. It is filled with wood putty to match the color of the tabletop, the material is added in portions, compacted well, and the excess is removed with a knife. The treated area is sanded, polished and painted. If you can accurately replicate the color or pattern of the countertop, then the repair area will be invisible. When everything is really bad with the countertop, it is better to completely replace by turning to professionals.
By combining the methods described above, you can transform your kitchen set with your own hands in such a way that all guests will think that you bought new furniture.
If you combine this transformation with cosmetic renovations in the kitchen, the result will be absolutely impressive. Tags:Kitchen
Moldings, overlays and decoupage
These restoration methods will give the kitchen set unique features: there is no limit to the scope for imagination.
Before applying jewelry, the surface for it is prepared: the application area is sanded, cleaned and degreased.
A 3D decoupage pattern is formed using a stencil: a material is applied through it to form a bas-relief. A popular option is to use wood putty. After drying, the pattern is sanded with sandpaper and covered with a protective layer of transparent or colored varnish.
Volumetric decoupage Applying putty through a stencil Decoupage with putty
For decoupage using napkins or decoupage cards, PVA glue is applied to the selected material. Then the drawing is applied to the cabinet door and smoothed out. After drying, apply 4 layers of matte or glossy varnish.
Moldings are overhead wooden or plastic elements. They, like decorative overlays, are attached with glue to a previously prepared surface. For wooden moldings it is possible to attach them to small nails without heads.
Moldings and overlays Updating the kitchen with moldings Moldings for furniture Furniture decor