Over time, any thing begins to lose its original attractive appearance. Doors are no exception to the rule. Depending on the location and frequency of use, the natural aging process will occur faster or slower. When scratches, chips and abrasions increasingly begin to catch the eye, it feels like the door is beginning to introduce dissonance into the interior. The question arises, what to do to make the door look like new again.
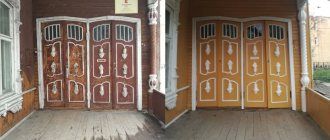
Veneered doors look elegant and expensive, and it is not always possible to simply replace a time-worn door with a new one.
Thus, we have come close to the topic of restoration of veneer doors. We will consider restoration methods that can be resorted to at home without the involvement of specialists, but we will immediately make a reservation that not all damage can be eliminated without leaving a trace.
Preparation
First, you need to thoughtfully, without haste, examine the door and assess the scale of the work ahead. The type and nature of the damage will determine what tools and materials you will need to make the restoration process successful.
Many people who are not satisfied with the appearance of a veneered door do not have a sufficient theoretical basis for carrying out restoration work.
A person sees damage, but does not know that it can be easily fixed, or does not know where to start and in what sequence to carry out the work. So, for example, in order to paint a door efficiently, you will have to use wood putty, which must first be used to level the surface. If paint is applied without using putty, it is unlikely that a good result will be achieved.
Preparatory stage
Before the door restoration process begins, it is carefully examined for damage. You should purchase materials and necessary tools only after this stage. It is often impossible to do without veneer paint. It allows you to quickly and effectively eliminate any abrasions.
Many people cannot understand how to update a product with their own hands, since the task is not considered simple. This requires accuracy and certain skills. Repair of veneer doors begins with preparing the surface with special compounds. Use wood putty, which helps to level the canvas and subsequently produce high-quality painting.
Blisters on the surface
Blistering is one of the most common surface defects of a veneered door. The reason is a violation of the veneer application technology by the manufacturer. Perhaps the veneer was positioned incorrectly or poorly glued. Repairing bulges will not cause you any special problems.
If you find a swollen area:
- Arm yourself with a regular medical syringe and needle.
- Place the veneer adhesive inside the syringe.
- Poke the swelling with a needle and inject glue under the surface of the veneer.
In order to achieve a better result, the place where the glue was introduced is additionally rubbed with a finger, evenly distributing the adhesive composition under the surface of the material. The described method allows you to get rid of bloating in a few minutes.
If you don’t have a syringe and adhesive at hand, but you still want to correct the bloating, use an iron. Take a damp cloth and wipe the swollen surface to make the material more elastic. Using a heated iron, gently rub the swelling area. It is likely that these manipulations will be enough to solve the problem. If not, then a needle, syringe and glue will be your second chance to get rid of the air bubble under the surface of the veneer.
Blistering on the surface
If the veneer is swollen
The main reason for veneer swelling is improper gluing of its sheets. So, for example, if the material used for decoration is too dry, small “waves” may appear when gluing it. Having discovered these “bubbles”, you need to act immediately, otherwise cracks and crevices will inevitably form on such a surface.
You can eliminate bloating using a hot iron: the device needs to be heated (medium mode) and applied to the surface of the door leaf for a few seconds. In addition, a damp rag will help make the veneer more elastic: it is recommended to spread it on the surface of a horizontal canvas and leave for 10-15 minutes.
Also, the “bubbles” can be filled with glue (it is injected using a syringe), after which it is recommended to treat the surface with a dry soft rag.
Scratches and scuffs
Small scratches and chips can be easily removed from the surface by applying wax.
First you need to clean out minor defects. Cleaning must be done very carefully so as not to further damage the material. Use fine sandpaper, but don't get carried away, because if you press too hard, you will damage the varnish around the damaged area, and then there will be one more defect.
After cleaning, the canvas should be cleaned as much as possible from dirt and dust, and also degreased so that the wax lays down in an even layer.
Wax cannot be simply rubbed into a scratch; it must be preheated and only then applied to the undamaged area. The heated wax will penetrate as deeply as possible into the depths of the damage and can stay inside for years.
If you did everything correctly and carefully, you will be able to forget once and for all about the existence of the scratch that has spoiled the appearance of your flawless door for so long.
News
In which direction should interior doors open in an apartment?
There are standards according to which interior doors must open in a certain direction. This is connected not only with comfort, but also with safety precautions: so that in an unusual situation the door does not become blocked. This article contains some tips on the rules for installing interior doors.
In public buildings, the doors of all rooms must open towards the exit, otherwise problems will arise with the fire inspection. But no one inspects private housing, so the owners themselves decide in which direction the interior doors in their apartment should open.
There are only four options:
- In a room with right-hand opening (door hinges on the right)
- In rooms with left-hand opening (door hinges on the left)
- From a room with right-hand opening
- From a room with a left-hand opening.
Often, residents are guided not by safety rules, but by the convenience of placing furniture, especially in cramped apartments. Comfort is important, but some rules for installing interior doors must be followed. By the way, building codes also take into account comfortable operation.
Rule No. 1: According to building standards, doors should open towards a larger room. This is provided for cases where a person suddenly becomes ill and falls. In a small room - bathroom, toilet, dressing room - there is not enough space, and the door will be blocked. But if it swings outwards, it will not be difficult to open it, even if the lock is locked.
Rule No. 2. Adjacent doors should not touch each other. It is necessary to plan the location so that when one door opens at the same time, it does not block the other. Otherwise people may get hurt.
Rule No. 3. According to fire safety rules, doors open outward so that in the event of a fire you can easily leave the room. The kitchen door, as the most dangerous room, should always open into the corridor.
Rule No. 4. When the child is small, it is better that the door to the children's room opens inward. If it closes accidentally, the door will be easier to open.
Rule No. 5. In cramped apartments, it is convenient to use opening limiters so as not to damage the furniture or door leaf - especially if it has a glass insert.
Rule No. 6. The interior door should open in the direction opposite to the switch, so as not to look for it later behind the door leaf.
Rule No. 7. When opening the door to a room, we should see most of it with a window.
Rule No. 8. Doors with satin glass inserts are installed according to the principle: matte glass surface on the corridor side, glossy glass on the room side.
Wax pencil
A wax pencil is suitable for removing very minor, barely noticeable scratches. To eliminate more obvious defects, it is better to use wax immediately.
The pencil must be warmed in your hand until its shaft acquires a more viscous consistency, which will allow you to treat the damaged area. Draw the pencil over the surface of the scratch and then rub the wax in with your finger. Excess can be removed with a rag.
Wax pencils
Alternative options
Updating and restoration of interior doors can be done in various non-traditional ways using:
- photo or vinyl wallpaper;
- fabrics;
- author's drawings;
- stained glass windows;
- improvised materials - newspapers, maps, napkins, sheet music, photographs, artificial stones, etc.
There are so many options that it is impossible to list them all. Today, any fantasy can be brought to life by making an old door attractive and original.
Serious damage
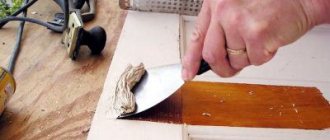
Serious damage cannot be repaired quickly. You will need to install special patches.
To begin, visually identify the damaged area, circle it with a pencil and continue further inspection of the door. Once you have identified all similar damage, you will need to cut them out. A scalpel or razor will allow you to perform the operation as carefully as possible.
Take a piece of veneer from which you are going to cut patches. When applying it to the damaged areas, determine how you will cut out the patches so as not to disturb the overall pattern. When cutting, try to make cuts across the grain of the veneer.
The cut patches are fixed with glue in the places where the damaged areas were located. Wait until the glue dries and treat the entire surface of the door with varnish.
Veneer patches
Repair technology
Restoration of veneer doors usually involves replacing damaged coating. This operation is carried out in several stages.
- Determining the boundaries of the damaged area (if the reason for the repair is the veneer detaching from the surface, this boundary is not always obvious, as when receiving dents or scratches).
- Careful removal of veneer.
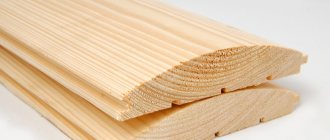
- Selection of replacement plates based on thickness, color, texture and the condition of compatibility of the natural pattern of the new plates with the existing one on the canvas.
- Cleaning the surface from which damaged veneer has been removed (removing glue residue, degreasing).
- Restoring veneer doors - gluing new plates.
- Drying.
- Soft grinding and polishing of the surface.
Most often, restoration of veneered interior doors can be done on site; sometimes the door leaf does not need to be removed from its hinges. In difficult cases (relief surface of the model, large area of damage, etc.), work may need to be done in a workshop.
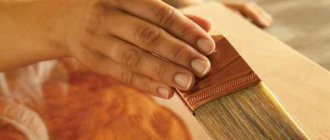
Painting a veneer door
Painting is the simplest of all possible operations. You don't need any special knowledge or skills to paint a veneer door. All you have to do is choose the paint color you like. The main thing is that it is intended specifically for veneer.
When applying paint, use a small roller to dry faster and prevent smudges.
It happens that after drying, the paint becomes rough. This can happen because dust gets onto the surface during the painting process.
The solution to the problem is to carefully go over the rough areas using fine sandpaper P600. Once the defects have been eliminated, the entire surface of the door can be treated with wax to provide additional protective properties.
How to restore a wooden door leaf?
Carrying out the restoration of wooden doors with your own hands consists of three stages:
- Preparation. The sash is removed from its hinges, all fittings are dismantled, and the soft upholstery or paint layer is removed.
- Restoration. The product is puttied in places where the gaps form. The holes are sealed with putty. After hardening, the putty is sanded through. Remaining dust is wiped off with a rag. The prepared surface is painted.
- The final. The sash is hung with hinges on the door frame. Install the handle, lock, latch. If the boat is loose, strengthen it with anchor bolts. The gaps between the wall and the frame are filled with foam.
There are several options for restoring a wooden door:
- To restore a varnished product, remove the old layer of varnish down to the wood. Sand with fine sandpaper in the direction of the wood grain. The new varnish is applied with foam rubber or using a flute brush. The first two layers are applied at intervals of 3 hours. The third and fourth staining is performed every other day. A total of 4 layers are applied. After drying, the product is polished with felt.
- Restoration with veneer involves complete cleaning of the product. The surface of the sash and veneer are lubricated with contact glue. The pieces are left to dry for at least 1 hour. For reliable gluing you will need a press, but there is no such equipment at home. The veneer sheets are laid on the sash and quickly, with strong pressure, they begin to rub down with a wooden block. For reliable gluing, go centimeter by centimeter. You can use an iron heated to 50°C instead of a block, but after this method, swelling of the veneer often appears.
- The old wooden door is covered with laminate or MDF panels. An iron or rubbing with a block will not help here. The product is placed under a homemade press.
- When restoring a hollow sheet, it is insulated. After removing the panel, the pockets between the frame elements are filled with sawdust, mineral wool or other insulation.
- The wooden entrance door is restored on the inside using artificial leather. The material is nailed down with furniture nails, forming a pattern on the surface. To obtain bulges and additional insulation, a thin sheet of foam rubber is placed under the skin.
- A heavily cracked solid wood door is restored with clapboard cladding. The work requires precise fitting of the workpieces. Finally, the surface is sanded and varnished.
The most common restoration method is simple staining.
Removing paintwork
Restoration of the door leaf cannot begin until the old paint is completely removed. There are three ways:
Mechanical removal. The method involves erasing the paint with a grinder, grinder or drill with special grinding attachments.
Chemical cleaning. Removal of old paint with reagents is carried out in a well-ventilated room or outside. Use goggles and gloves while working. Chemical solutions soften the paint, which is then scraped off with a spatula and wiped off with a rag.
Of all the methods, mechanical removal is most often practiced. A chemical solution and a hair dryer will ruin the wood if the cleaning technology is violated.
Sanding, putty and primer
After getting rid of the dried paint layer, the surface is sanded. First, I use coarse sandpaper to remove paint residues, burrs, and bulges. The door is wiped with a rag to remove dust. The second pass of sanding is done with fine sandpaper. Dust is wiped off the treated canvas, and the surface is degreased with a solvent. White spirit will do.
If sanding does not get rid of the cracks, putty made from a mixture of sawdust and PVA glue is stuffed into the deep holes of the door leaf. You can use store-bought formulations. The dried putty is rubbed with sandpaper.
Before painting, the surface of the sash is primed. The process cannot be neglected, otherwise the coating will be unevenly absorbed into the wood. When using stains, no primer is used.
Coloring
There is a large selection of paints and varnishes that allow you to obtain a glossy, matte or semi-gloss surface. Water-based varnishes and paints are used for interior door blocks. The front door is painted with alkyd enamel or nitro paint. Stain allows you to preserve the naturalness of wood.
The paint is applied in two layers to a horizontally laid canvas. It is easier to roll a flat surface with a roller. The sash with convex patterns is painted with a brush.