Vadim
7637 0 0
Vadim May 5, 2018
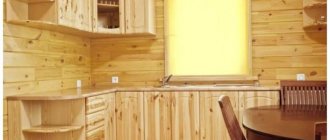
Kitchen sets contain a lot of dishes, household appliances and other kitchen utensils. All this stuff has serious weight, there are no problems with floor blocks, but fastening wall cabinets requires a responsible approach. At the moment, the suspension bar is considered the most reliable device, and further, we will step by step analyze the intricacies of such a suspension, plus I will show you a few more useful tricks.
Wall cabinets in kitchen units only seem light in appearance; in reality, they require the installation of a reinforced, durable suspension.
Hanging height
Before you start assembling the set into a single “wall”, you need to decide on the height at which the furniture will be hung. To correctly carry out these manipulations, preliminary calculations must be made.
In addition, it is worth deciding on the mechanism that will hold the row of kitchen cabinets.
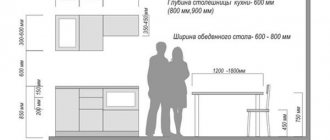
It is necessary to correctly determine the gap from the tabletop to the bottom of the set. This primarily provides convenience to the owners of an apartment or house in using furniture.
Often, GOST is used to determine this factor and the main value is taken to be a distance of 45 cm, but this is not entirely correct.
The boxes should be located at eye level of the owner to create the most comfortable conditions for their use.
The main measure for determining height is often the height of the household.
For people with average height, this value varies from 55 to 65 cm. The optimal height is considered to be the one when a person, without third-party devices, reaches the highest shelf and takes the desired item without risking letting it go from his hands.
The most important thing is comfortable use of kitchen cabinets.
If you do not plan to install the lower part of the set or tabletop, then you should take into account the calculations presented in the table:
Human height/mount height (in centimeters)
- 155-165 / 175-180
- 165-175 / 185
- 175-190 /200
You need to remember: attaching wall cabinets is a serious procedure; due to incorrect calculations, all mistakes will be noticeable.
Let's take a closer look at some of the issues that we will have to face during the installation of wall-mounted furniture.
Preparing the wall surface
The preparatory stage is not necessary in every case, but sometimes the installation of fittings and high-quality hanging of cabinets is complicated by unfinished finishing or uneven walls.
Wall furniture hides minor defects, so sometimes they don’t put wallpaper under kitchen cabinets or do decorative painting. But in the case when the finishing work is not completed, it is necessary to level the walls. To level out crooked walls, the beacon plastering method is most often used.
The walls are cleaned of mortar build-up and several layers of primer are applied. Next, metal or plastic slats are installed, which play the role of “beacons”. Ropes are pulled through two longitudinal strips fixed with plaster.
Using the first section as a guide for the building level, the remaining planks are attached. Apply the solution over the beacons and level it. After a few hours, when the solution has dried a little, carefully pull out the metal strips. Plastic ones can be left in the plaster.
If there is already a layer of plaster on the walls, the surface is carefully leveled with mortar and a spatula. If you are not confident in your plasterer skills, use the wooden plank method. Two horizontal strips of wood are attached to the wall with screws, which act as tires. The fittings are hung on these strips, so the furniture does not come into contact with the walls.
Installing wall furniture on completely finished walls has several nuances. Some finishing materials require a special approach. Let's consider the difficulties that may arise when attaching fittings.
Features of wall materials
Walls covered with plasterboard look perfect - smooth, neat and beautiful. But even the strongest sheet will not withstand hanging furniture. For this reason, it is worth figuring out in advance how to properly hang kitchen cabinets on a thin wall.
If the plasterboard box is fixed on top of a load-bearing wall, then the fittings are mounted directly on the wall beams. The mounting strip is hung on fasteners 12-16 mm long, drilling through the drywall. The entire load falls on a strong supporting base - the thin box is not used.
The second case is more complicated. We are talking about a hollow plasterboard partition, which is installed on a metal frame and painted. Using a magnet, the internal metal structure is located and marked. Having drilled through the plasterboard box, a mounting rail is installed on the metal frame using special fasteners with spacers. Now the fittings are firmly mounted and you can hang the cabinet without fear for safety.
Important. Clay, adobe and wooden walls are drilled with a drill with a diameter of 8 mm and the fasteners are reinforced with wooden plugs or glue for self-tapping screws. A more modern option is “chemical” anchors.
The load-bearing capacity of aerated concrete is sufficient to support the weight of the kitchen unit. Specialized anchors and dowels are inserted into the drilled hole and secured until it stops. The spacer created by the opened anchor firmly fixes the furniture to the foam block wall.
Cinder block is the most durable of the materials listed , but hollow cells inside can create a problem. A multi-chamber cinder block is drilled so as to pass through one chamber and long metal anchors are installed as fastening.
A single-chamber cinder block is drilled through, a long pin is inserted and the fasteners are fixed on the back side.
Marking the wall and determining the height of the cabinets
To choose a comfortable height for wall cabinets, it is recommended to focus on the average height of the household.
A simple way is for the shortest member of the family (or the housewife who will use the kitchen furniture most often) to stand on tiptoes and extend their arm upward. The point that your fingers reach will be the main mark. It is used to determine the height of the top shelf of the kitchen unit. This simple method determines what arrangement of furniture will be convenient for the whole family.
There is also a standard chart that will help you figure out at what height to hang kitchen cabinets.
Verified and accurately calculated data on the relationship between height and height of the top shelf:
- height up to 160 cm - height 175 cm;
- height up to 175 cm - height 185 cm;
- height 175-190 cm - height 2 m.
Accurate and correct markings will ensure accurate installation of hanging furniture. All measurements are carefully checked by level and correlated with the position of the floor, ceiling and vertical wall. It is especially important to take accurate measurements when you plan to hang a row of upper cabinets. Unevenly secured cabinets violate safety regulations and spoil the interior.
Important. The hood above the gas stove, built into the panel of the upper block, is planned taking into account the safety requirements of the gas supply service. The central ventilation window must not be blocked by the air exhaust pipe. The rule is effective from January 1, 2019.
The technology for applying markings to the wall varies slightly for different mounts, but the general procedure is the same.
It is divided into several stages:
- First, determine the height of the furniture. Focusing on the height mark, the horizon is leveled, i.e. draw a straight line on the wall. For accurate marking you will need a construction hydraulic level and a tape measure.
- When installing a corner set, markings begin from the corner. The central cabinets are marked from the side wall of the outer one.
- All marks made using a level and tape measure are connected into an even line. Fittings for cabinets are installed according to the markings.
The height of the top shelves of the kitchen set above the kitchen apron
According to the manufacturers' standard, the minimum height from the tabletop to the top cabinet is 45 cm. The parameter varies up to 50-60 cm, because a narrow gap is often inconvenient. All sizes are adjusted to ensure comfort for household members.
To avoid difficulties when joining furniture with a kitchen apron, follow the useful recommendations of experts:
- Accurate measurements of the upper and lower cabinets, as well as the thickness of the countertop, will help to avoid inconsistencies with the kitchen apron. For example: the cabinet does not fit between the tiles on the backsplash and the ceiling. In this case, it is very difficult to fit all the furniture.
- Measuring the walls for furniture is done after installing the kitchen apron. Otherwise, there is a risk that the tiles will interfere with the correct placement of the cabinets.
- If the cabinets and countertop are hung end-to-end with the apron, then behind the hood it is made according to the size of the niche between the pieces of furniture.
- The “overlapping” option on the apron is less practical and is used forcedly. In this case, an overlap of 1 cm is made, including on the apron behind the hood. The margin will help to avoid distortion and place all cabinets strictly in the same plane.
- It is prudent to stretch the wires for sockets with a good margin. When moving a socket, difficulties may arise if the “tail” of the wire is too small.
Mounting options
There are 2 methods by which fastenings for kitchen cabinets are made. Installation is carried out:
- One line, that is, the location of the fastener is equidistant from the ceiling;
It is considered the most common type of accommodation. This way you can easily secure the cabinets yourself. - Different levels are used for hanging, that is, objects are at different heights.
This method is used much less frequently, since its implementation is much more complicated than a linear fastening scheme.
The first method is popular because you can use only your own strength to attach kitchen cabinets, without turning to outside help.
The choice of option is determined by the number, size and depth of wall cabinets.
The second option for attaching fixation items is less common among ordinary people. This is because the roof of this furniture is used as an additional surface.
Any of the proposed variations is perfect for both a room with a small area and a large one.
Installation methods
By using new fittings used to attach modern kitchen cabinets to the wall, a person has greatly simplified his life, because the installation of wall cabinets has now become much easier. The new support system helps eliminate small errors associated with marking. In addition, it adds stability to the entire structure.
In addition, you don’t need to use a lot of force, and the owner can handle this task himself.
To make the fastening necessary for installing kitchen cabinets, you should use a special rail and hanger.
The hinge has a hook, thanks to which it is attached to the side wall of the box. At the same time, it is completely invisible.
There are 2 installation methods:
To attach the cabinet to the wall, a specially prepared rail and a device called a hinge are used.
This fastening method will use hinges and fasteners.
The advantages of the first option are:
You can do all the work yourself, without any help.
The second option is more accessible (it uses hinges as well as fasteners), but takes more time and requires additional help.
You will need help with this installation method.
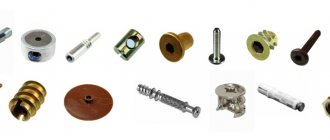
Regardless of the option, the following materials are needed for work:
Materials and tools you will need.
Required tools:
Required tools and materials
To carry out high-quality work on installing a kitchen unit, in particular, hanging cabinets, you need to have a number of tools and materials with you:
- screwdriver, drill or hammer drill;
- building level;
- hammer;
- tape measure and pencil;
- clamps are an optional tool that may be required to connect several pedestals together to give the structure a monolithic effect;
- when anchoring, you will need a wrench;
- a certain number of screws and dowels (you can purchase ties to connect cabinets to each other);
- mounting bar (tire).
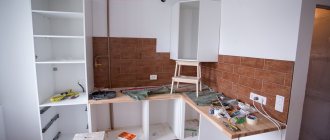
Preparatory actions
To begin the process of installing kitchen cabinets, you need to follow these steps:
- Alignment of vertical walls, please note that for a corner kitchen the angle of the walls at 90 degrees is provided (most often this process is carried out using drywall, and thanks to this alignment occurs);
- Applying markings (this stage must be performed using a plumb line, pencil and level);
The points at which the kitchen cabinets will be fastened must indicate the required height. - Electrical installation (installation and connection of all sockets and lamps);
- Wallpapering or painting walls.
These points will be the basis for the work ahead.
The next step is to prepare tools and consumables.
Installation instructions
When finished, you need to attach the strip using dowels or self-tapping screws.
Fixing cabinets on fastenings.
Useful drilling tools
You can never have too many tools, but in a city apartment, a home craftsman has nowhere to put a full-fledged machine, but he needs to work, and here the problem will be solved by special attachments for an electric drill.
| Illustrations | Recommendations |
| A circular saw . A convenient device that allows you to unravel relatively small bars with a cross-section of up to 50 mm at home. | |
| Fraser . Attachment for milling small blind holes. With it you can easily cut out a bed for a door lock, handle or hidden canopy. | |
| Stand for corner and straight drilling . This stand makes it easy to create precise holes at the desired angle. Working depth is up to 150 mm. | |
| Lathe . The power of such a machine depends on the engine power and the maximum speed of the drill, but most models are suitable for working with soft wood. | |
| 90º collar . An indispensable thing for working with furniture, especially for repairing it, when it is not possible to drill a straight hole in some narrow compartment. | |
| Pump . Summer residents will appreciate a unique nozzle that replaces a garden pump. Its productivity is 2500 l/hour, which is quite enough for a country house of six acres. | |
| Engraver . For small engraving work there is a flexible “sleeve” with the ability to connect a set of special attachments. | |
| Grinding and sharpening machine . This is perhaps the simplest and most accessible device. The drill is attached to the table with a clamp with a special holder, after which the attachment with the desired circle is inserted into the chuck. | |
| Metal scissors . A whole series of such attachments is produced. The configuration of these devices is different, but the task is the same everywhere - to quickly and effortlessly unravel the sheet of metal. | |
| Cord brush . Such nozzles are available in 2 versions - with metal and synthetic bristles. | |
| Drilling machine . Here the drill is already used for its intended purpose, but the rigid frame with a feeding mechanism allows you to make precise holes with a fixed depth |
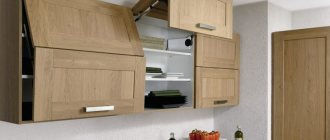
Installing the top of the furniture
The first priority is to fix the hooks in the middle position. For this, adjusting screws are used. After this, you need to fix them from the inside on the side walls so that the hook is on the outside by 2-3 mm and it is possible to fix them on the fastening bar.
The design of the hinge allows you to adjust the mount in height and depth.
The next stage is applying markings to the wall. But for this you must follow a number of rules.
This is done for clarity, so that you can see the number of centimeters that need to be taken into account when making the final marks.
The next step is to make holes in order to install the rail. Here are some useful tips that will come in handy:
- If the drill "jumps", make small notches using a nail or punch and hammer;
- If the wall crumbles during work, then first you should make a small hole, and then drill it out to an acceptable size;
- If you need to change the drilling depth, you need to use a prepared dowel;
- If you need to make a hole in a concrete wall, but there is no hammer drill, you can do it with a hammer and a punch.
Wiring locations require special attention.
Upon completion of all actions, the dowels are placed in the holes. Next, the mounting strip is installed on the fasteners. The cabinets are fixed to the mounting plate. To adjust their position, screws of mounted mechanisms are used.
To make the set look like a single “wall”, they need to be connected closely to each other.
The elements are fixed with clamps, starting from the corner, avoiding chipping (in accordance with the above instructions).
Thus, alignment of the overall ensemble of cabinets in one plane is achieved.
The next step is to drill holes between the tightly fitting parts of the headset to then fasten them with intersectional ties.
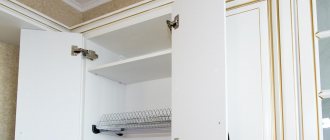
At the final stage, shelves are installed and doors are secured.
Selection of fittings for fastening and preparation of walls
Types of fasteners
When choosing fasteners, you need to consider several factors:
- The total mass that will be exerted on the box;
- Budget allowed for the purchase of fasteners;
- Requirements for fastening (possibility of adjustment along several axes, maximum permissible weight).
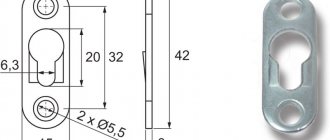
Furniture hinge
The most common and simplest fastening technology. Before installing wall cabinets in the kitchen, the walls are marked. Hinges are attached to the furniture, which are later mounted on a self-tapping screw.
Pros of the loop:
- Price. Hinges are cheap and can be found at any furniture hardware and tool store. One drawer can be equipped with several hinges for strengthening.
- Diversity. There are two types of loops: single-axis and adjustable. The first ones involve monolithic fastening, without the possibility of additional regulation. The latter can move along a horizontal axis, so it is possible to further customize the location of the furniture.
- Stealth. They are installed at the back so they are not visible.
- Easy to attach. All that is required for installation is to screw the hinges on the back. No additional cutting of grooves is required.
Minuses:
- Low load capacity. Due to their primitive structure and price, they can put pressure on the chipboard, which will lead to the box falling.
- Corrosion. Cheap hinges are made of galvanized steel. During installation, it is possible to damage the zinc layer, which will subsequently lead to corrosion.
- Minimal adjustment. Such settings cannot be further configured after installation.
- Installation duration. Each hinge requires a separate hole.
- Need for high precision. It is necessary to carry out jewelry work when drilling, since small indentations will lead to mismatched holes.
Plank
A simplified solution for installing top drawers.
Pros:
- Possibility of adjustment. Special roller mounts are installed on the bar; it is possible to adjust the furniture at your discretion along the horizontal axis.
- Aesthetics. The design is in a simple white style.
- Strength. The mount can withstand enormous loads, including from heavy ceramics and glass.
Minuses:
- Difficult to install. It is difficult to install the fasteners yourself, as you need a special tool, such as a jigsaw or milling cutter.
Ikea
This type of fastening is the most complex and this is its only drawback. Otherwise, it is a convenient mechanism that makes adjustments easy. Installation is performed according to the following algorithm:
- A stainless steel corner with a large hole is installed inside. It must have a ridge notch.
- An anchor is installed at the marked point on the wall.
- The cabinet is installed on an anchor and fixed from the inside.
Preparing the walls
This stage cannot be called mandatory. First of all, the furniture will be able to remove all the unevenness on its own. However, in some cases, when the walls are too crooked, the cabinets will not be able to be hung because they will not be able to relate to each other correctly. In this case, they will need to be pre-processed and leveled. And the fastening forms, like a mounting strip, will not be able to press tightly against the wall.
First of all, it is important to pay attention to whether it makes sense to prepare the walls when they are bare. Since furnishing is done at the final stage of arranging the room
Action plan:
- The walls need to be cleaned of previous layers of plaster and putty. We need to achieve bare concrete. Before further work, it must be dust-free.
- With a drying break, apply two coats of primer. It is better to use purchased compounds for this coating. You can make it yourself by mixing water and wallpaper glue or PVA in a ratio of 1 to 2.
- We need to install beacons. Regular aluminum profiles are best suited. They are installed vertically and to achieve a right angle, you need to use a weight or a plumb line.
- A primary plaster solution is applied to the walls. To do this, prepare a large amount of the composition and quickly throw it in with a spatula. After this, you need to quickly align them with an even bar according to the thickness of the beacon.
- After it hardens, it is coated with finishing putty for concrete.
Features of hanging on drywall
The main difficulty when fixing a headset to drywall is its inability to maintain strength under heavy loads. For this reason, the use of standard fasteners is not recommended. Even the small weight of a cabinet installed using a mounting anchor will easily damage the plasterboard lining.
Therefore, only decorative shelves and paintings are allowed to be hung on plasterboard walls.
If the set needs to be fixed on a plasterboard surface, then a wooden beam or a thick board, which is fixed to the wall thanks to anchor bolts, will come in handy.