Modern kitchen sets consist of separate modules, wall cabinets, floor cabinets and pencil cases. The unifying elements give the furniture a holistic look: a single kitchen countertop, an apron, a cornice and a plinth. If you want to save money, “assemble” your kitchen in bulk from modules from series of well-known manufacturers. But be prepared for compromise solutions: it’s unlikely that you’ll be able to choose the ideal size and contents of a kitchen from standard modules. Another budget option is to make your own kitchen. Drawings of kitchen cabinets with dimensions for manufacturing will help you in drawing up a design project and subsequently calculating the costs of purchasing materials and components.
Calculation of cabinet sizes for the kitchen
With your own hands, you can make a small compact cabinet and a whole set of kitchen furniture that will fit everything you need in the kitchen.
Making it is not as difficult as it seems at first glance.
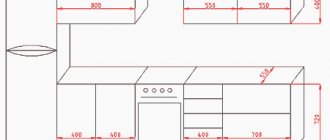
To make a set consisting of several cabinets, you will need to draw up a detailed kitchen plan. On it it is necessary to mark the location of the sink, tiles, exhaust structure, counter, all existing pipes and sockets. Using this plan, it will be easy to determine how to more rationally arrange a future cabinet or several. The dimensions of all structures must be noted in order to understand the possible dimensions.
Once you have decided on the type of cabinet, it is important to choose the right material.
If the kitchen set has been installed for a long time and there is a need for several additional cabinets, then the measurements should be much more accurate than when making a full set. If you don’t want to draw on paper yourself, you can use any calculation and drawing program on the Internet.
Making a kitchen cabinet with your own hands is not that difficult.
When drawing up a future layout, it is important to make sure that the dimensions correspond to reality and the cabinet will fit perfectly. Calculating dimensions warns against mistakes. After all, if the cabinet fits well, this does not mean that its door will open without problems. Therefore, this point also needs to be monitored.
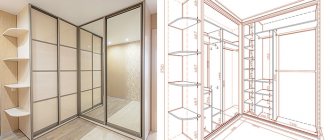
Advantages of corner modules
- The main advantage of corner modules is the transformation of unused space into a work surface. Most often, the corners of the kitchen are difficult to use correctly.
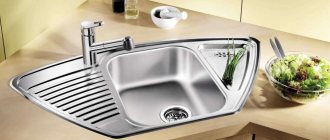
Kitchen set, with corner cabinet under the sink
- Correctly designed corner design is many times more spacious than cabinets. The chosen fittings, which systematize the storage of items in the kitchen, are of considerable importance.
Storage system, in the form of boxes
In the form of rotating platforms In the form of a system of “smart” shelves
- Corner sets can save significant space, so they are suitable for even the most modest kitchens .
Corner cabinet in the interior of a small kitchen
- It is elegantly designed, aesthetically and attractively, making the kitchen interior more harmonious.
- The lower part of the headset perfectly hides communications.
Harmoniously designed corner
There are also disadvantages to this design. The main one is the high cost, as such furniture is most often designed and made to order, according to individual standards.
In addition, due to damage to the work triangle, only one person can comfortably work in the kitchen at a time.
Preparation of tools and materials
There are many materials from which cabinets can be made.
Chipboard. This is the most popular and inexpensive option. Chipboard is moisture-resistant and durable. Higher density options available. For longer service life, the material is finished with natural veneer.
These are the most economical materials that have a quite decent appearance.
Fine fraction. MDF is tightly compressed wood dust. The material is more flexible than chipboard. Resistant to moisture. Available in glossy, matte or painted versions.
There is a wide choice of colors for these materials, which will allow you to choose them to suit any interior.
Multiplex. The material is multi-layered and moisture resistant. It lends itself well to deformation during manufacturing. Therefore, there will be no problems if you have an unusual cabinet shape.
If you have experience in making furniture, then you can build beautiful, high-quality furniture from this material.
Additional materials and tools:
- Hinges or a special mechanism with latches.
- Corners (for hanging models).
- Devices for fastening parts.
- Guides for drawing out drawers.
- Shelf holders.
- Necessary accessories.
- Electric jigsaw.
- Special iron.
- Drill.
- Screwdriver.
- Milling machine.
Preparatory work
Preliminary preparation plays a very important role when making furniture yourself: it is necessary to complete a drawing of future kitchen cabinets. Here again the Internet will come to the rescue: the network is replete with drawings for making kitchen cabinets.
However, it doesn’t hurt to check the drawings first to see how accurate the measurements are - “home craftsmen” may make mistakes.
DIY cabinet assembly instructions
There are two types of kitchen cabinets and their assembly method differs.
The easiest way to purchase kitchen facades is ready-made. They come in completely different sizes, colors, textures, shapes.
Wall
Assembling the wall cabinet is very simple and will not cause difficulties even for beginners.
- Secure the side wall with the pin hole. This happens on the inside of the shelves, which are adjustable. The holes for the front frames are drilled.
- The rear support insert is fixed on top. The cabinet is hung on the wall and screwed.
- The back cannot be used for hanging. It is better to use nails or glue.
- The front frame is attached at the top and bottom flush with the rest of the parts.
- Installation of shelves and doors.
If your closet is wall-mounted, then you need to install the top wall.
Floor
The floor cabinet is also easy to assemble, but there are several nuances that are worth considering:
- The holes are being prepared. Cross-shaped fasteners are attached to the side boards. This can be done with self-tapping screws.
- If the cabinets are retractable, then rails are attached to the side walls.
- Wooden dowels are placed in all through holes. This is how the initial stage of fastening goes. It's better to do this with glue. The dowel is inserted into the first hole and the second is placed on the end, then the whole thing is compressed.
- Checking the evenness of the connection of parts.
- A hex screw is used to finally connect the two parts. For aesthetics, you can use a plastic plug.
- If the cabinet will stand on legs, then it's time to screw them on.
- The shelves and door are attached.
If the cabinet is floor-mounted, then there is no need to make an upper wall, provided that the countertop is placed there.
Where to begin
To do this, you need to be prepared for certain difficulties that you can cope with. There are many instructions for assembling cabinets in a variety of shapes and sizes.
Regardless of the final result, if you want it to be of high quality, divide the entire process into several very important stages: preparatory, creation of parts, assembly stage, and installation of this cabinet in the right place. Next we will talk about individual stages.
Installing a cabinet in the kitchen
We figured out how to make a kitchen cabinet with our own hands. What to do with the installation, how to start and how to finish.
Learning how to install kitchen cabinets may seem intimidating, but the techniques are actually very simple.
Kitchen cabinets can be installed in any order. Starting from the bottom to the top, and vice versa. The only thing that matters is the installation location. Work always starts from the corner, that is, from the side. If this is a set, then the evenness of the installation of the very first one determines the evenness of all other parts.
The main task is to find the best starting point and save all the levels.
The height to which the cabinets rise depends on the height of the future owners. The standard option is a little more than 40-45 centimeters from the tabletop, if it is a wall-mounted option.
For a more convenient and practical installation, you can mark lines on the wall, that is, outline the outline of the cabinet. A bubble or water level is useful for this.
You need to screw several wooden boxes to the wall in the correct sequence.
The installation task may seem daunting, but once you get the hang of it, anyone can do it easily. Care and manual dexterity will help place the cabinets on the same level, so that their side walls are vertical and the bottom walls are horizontal. With careful installation there should not be any difficulties.
You only need a few basic tools to get the job done.
For greater structural reliability, the cabinets can be additionally fastened together. There are two ways to do this. The first is the basic installation, fasteners. The second is first fastening with others, and then the main installation. Hanging cabinets alone is not easy, so it is better to ask someone for help.
The step-by-step photos provided show the key points on how to install kitchen cabinets in a simple and affordable way.
The cabinets can be fastened together with intersectional ties. They are available in different sizes, diameters, lengths and thicknesses. It is important to consider that for one wall you will need about 2 ties, or even more. They are placed close to the hinges, it can be lower or higher. The cabinets are placed on the same level and fastened together.
Making a kitchen cabinet with your own hands is not easy; only people who are diligent and understand the basics of design can cope with it.
If everyone can cut out the parts, then not many will be able to handle the installation. The main thing is to be careful and check every action for accuracy. This way, the chance to avoid mistakes increases and the end result will definitely please you.
What to consider when arranging furniture
It is recommended to design a kitchen with a basic knowledge of ergonomic requirements that will allow you to create a safe, comfortable and functional space. In particular, when arranging furniture and equipment in the kitchen work area, take into account the rule of the “working triangle”, in which the main elements (stove, sink and refrigerator) are visually arranged so that when these main points are connected, a triangle is formed.
Work triangle in the kitchen with an island work area layout
The essence of this arrangement of the main points in the kitchen is to reduce the unnecessary actions of the housewife in the process of performing the technological process of cooking.
A properly organized work triangle allows you to rationally use time and energy in the kitchen
It is worth noting that the visual shape of the triangle can vary significantly depending on the chosen layout of the headset. For example, in a kitchen with a linear arrangement of furniture in the work area, the surface of the dining table is used as the third point. This principle also works with the island type of layout.
It is most successful to follow the rule of the working triangle with a U- or L-shaped kitchen layout.
The basis of the working triangle is to organize interaction between three main points
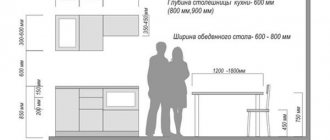
It is necessary to arrange the equipment so that the distance between them is not too small - it will be crowded, or not too large. It is ideal when the “working triangle” has equal sides, but this does not always happen. Therefore, we can note the optimal distance between working points: from 1.2 to 2.7 m.
Note! The distance between the stove, sink and refrigerator should be at least 60 cm.
Table 3. Organization of the “working triangle” for headsets of various layouts.
| Layout type | Description |
| Single row | With this arrangement of furniture and equipment, a triangle will not work, but in order to make the process of working in the kitchen as functional as possible, it is recommended to place the sink between the refrigerator and the stove. On both sides of the stove there must be a working plane of at least 40 cm. The main working plane (at least 60 cm) is organized between the refrigerator and the sink. |
| Double row | If the furniture is located parallel, then one row is equipped with a stove and a sink, and the opposite row is equipped with a refrigerator with a work surface. |
| L-shaped | The most convenient and spacious layout option is a headset that allows you to use a free corner in the room. In this case, the sink is placed between the stove and the refrigerator, which are installed in opposite corners of the unit. |
| U-shaped | This method of arranging a kitchen unit requires a lot of free space. But on the other hand, it is an excellent solution in small rooms, when all the free space is allocated for the set. With this layout, you get three rows of furniture. In this case, the sink is installed in the middle (often near the window), and the stove and refrigerator are on opposite sides. |
| Ostrovnaya | The island is used to install the stove, and the refrigerator and sink are on the main line. |
Note! When choosing a planning solution, take into account that there should be enough free space between the lines of the set or from the working furniture to the dining area.