How to hang a wardrobe on the wall is a question that arises for any real man at least once in his life. One could say that a woman has it too, but mainly to ask a man about it. Although hanging a cabinet is not a difficult task, it is responsible, and requires skills in working with a drill, which has the function of a hammer drill; it is better, of course, when you have a full-fledged hammer drill.
A cabinet that is not securely hung on the wall can fall, in the best case, break with all its contents, and in the worst case, cause physical injury.
Types of hangings for cabinets:
Simple universal hangings for cabinets
Types of simple hangings for cabinets:
Oval hinged eyelet
A hinge for cabinets, with the funny name oval hinged eye , is one of the most common ways of hanging cabinets and shelves on the wall.
Installation is carried out by screwing the hinge to the rear edge of the cabinet or shelf. It is necessary to make markings on the wall and drill holes for installing dowels, the heads of which will catch on the holes in the hangers.
During installation, the plate is positioned with the large hole down; the head of the self-tapping screw will be inserted into it, which will pass through the groove and lock in the upper part of the hinged oval eye. In Figure 1, it is upside down; when screwing it on, do not forget to turn it around.
| Rice. 1. Drawing of an oval ear |
Hinged plate
The hanging plate or open hanger is made of galvanized steel 2mm thick. Functionally, this hinge corresponds to an oval eye, only the dowels will be visible from above.
For installation, holes for dowels are again drilled, hooks are screwed into them as in Figure 2. The plate itself is attached to the back of the cabinet, so that the through groove protrudes from above.
| Rice. 2. Mounting the hinge plate |
Pros and cons of hanging cabinets on the wall using an oval eyelet and a hinge plate
Pros of using simple attachments:
- low price
- ease of installation
- versatility.
Disadvantages of using simple attachments:
- precise marking is required for drilling for dowels
- not aesthetically pleasing
- no adjustments
- unreliable, cannot withstand heavy loads.
Press-fit cabinet hanging
The press-fit cabinet hanger can withstand a load of 20 kg. Since you need two pieces per cabinet, you can hook up a cabinet weighing up to 40 kg.
The suspension is pressed into a hole with a diameter of 30 mm in the chipboard. To do this, the cabinet design must have a longitudinal drawer or a back wall made of chipboard at the rear.
| Rice. 3. Cabinet hanger |
| Rice. 4. Suspension installation diagram |
Pros and cons of hanging cabinets on the wall using a round mortise hanger
Pros of using a round pendant:
- low price
- ease of installation of the finished product
- versatility
- It is allowed that the markings for drilling for dowels are not accurate
- reliability
- hidden from view, nothing spoils the appearance of the cabinet
Disadvantages of using a round pendant:
- it is necessary to change the design of the cabinet so that it has a back drawer or a back wall made of chipboard
- no adjustments
- To press the attachment in, you need to make a hole with a diameter of 30 mm, and for this you need a cutter of this diameter.
Types of fastenings and their features
After choosing the height for mounting the cabinets, you should decide on the type of fastening. It can be different: corners, pendants and tires.
Corners or pendants
Previously, special metal hangers were used when installing cabinets. They were attached to the rear ends of the module walls. Today, such devices are no longer used, as they have quite a few disadvantages. For example, the inability to adjust the position of cabinets after installation on the wall. And how evenly they will hang depends only on the accuracy of the markings on the wall.
Corners are almost the same as pendants, only they are attached to the roof of the cabinet. When using them, it is important to determine the upper limit at which they will be set. You must strictly adhere to one horizontal line, otherwise the wall cabinets will be installed unevenly.
Installation on corners or pendants is a rather labor-intensive process (compared to a tire) and requires perfect precision. If there is a mistake, you may need to make new holes in the wall.
If the walls were not leveled during the kitchen renovation, then fixing them to the corners will be the best option. An outdated method does not mean it is bad, you just have to spend a little more time on installation than when using other types of fasteners.
Tire (bar)
A mounting rail or strip for hanging cabinets is much more convenient and saves time. This kind of work can be done even alone, which cannot be said about installing it on corners.
The fastening consists of two elements - adjustable canopies and a special strip. The canopy is installed inside the cabinet, in the back wall of which you need to make a hole. A rail is attached to the wall, onto which the module is subsequently hung.
This type of fastening has its advantages:
- Self-installation. You can handle the installation of wall cabinets yourself by first fixing a plank to the wall, and then installing modules on it.
- Possibility of adjusting the position of the cabinet. In this case, there is no need to remove furniture from the wall; all the work can be done under the canopy.
- Reliability. Unlike mounting on corners, the option with a bar is considered more reliable and capable of withstanding high loads. Even if a couple of screws in the structure become loose, the rest will hold the modules well.
Sophisticated adjustable closet awnings
Types of complex hangings for cabinets:
Press-in mounting for wall-mounted cabinets Traser-6
Traser-6 wall cabinet mount is designed for attaching a wall cabinet to a wall. Mounted on the side wall of the cabinet.
The hitch has the following adjustment options: vertically (18 mm), horizontally (16 mm), front (25 mm). The canopies are suitable for cabinets with a height of 600-1000 mm and a depth of 300-350 mm. One suspension can withstand a significant load of 65 kg.
| Rice. 5. Press-fit mounting for Traser-6 wall-mounted cabinets |
| Rice. 6. Adjustments for hinges for Traser-6 wall-mounted cabinets |
The concealed mounting bracket is located behind the rear wall after installation. To access the adjusting screw, a through hole is made in the rear wall.
To hang cabinets, in addition to the hangers, you need a counter strip or rail, which is attached to the wall at the required height using dowels.
Installation of cabinets
Lift the box and hook it onto the guide. Use the adjusting screws to secure the desired position. Use the top bolt to level the cabinet horizontally, and use the bottom bolt to reduce or increase the distance from the wall.
To assemble several cabinets into a monolithic structure, you will need clamps. Drill holes for the tie in the places where the clamps are installed. The chipboard can be damaged during this process, so use a smaller drill bit first. On both sides, expand the holes with a nozzle of the desired size, then make a through hole. Another way to avoid damage is to lean a wooden block against the side opposite the drill and press it as tightly as possible with your hand.
Start installation with a corner cabinet. Connect the boxes in pairs with clamps. To maintain the quality of the surface, place a wooden wedge between the clamp and the wall of the box. All that remains is to hang the doors.
When using a sliding system, we recommend that you read the article: “Adjusting wardrobe doors.”
How to hang kitchen cabinets?
What kind of pendants were used to hang cabinets on the wall?
Let's look at an example of how to hang kitchen cabinets on the wall based on our own experience. For hanging, we used adjustable right and left white awnings.
| Rice. 23-24. Adjustable canopies right and left white |
We attach awnings to the sides of kitchen cabinets
We attach the canopies using self-tapping screws to the side walls; select the length of the screws so that they do not come out on the other side of the chipboard side wall.
When fastening, we retreat from above by the thickness of the chipboard, and align the front edge of the hinge along the inside of the groove.
| Rice. 25. Adjustable canopy attached to the side of the cabinet |
Determine the height at which we will fix the mounting rail
To determine the mounting height of the slats, so as not to bother with calculations, first apply the slats to the bottom of the protruding hooks of the canopies. We take a tape measure, hook it to the bottom of the cabinet and determine the distance from the bottom of the cabinet to the axis of the through holes in the mounting rail.
We use the resulting distance to determine the drilling location for the dowels, if you have already decided at what height to hang the kitchen cabinets.
In our example, we ended up with a value equal to 740 mm (Figure 26). We tilt 10 mm so that the cabinets slide onto the tile apron and measure 730 mm up from the edge of the tile, this will be the mounting axis of our rail.
Making furniture with your own hands, hanging it or installing it - if a man knows how to do all this, he is able to do most of the home improvement work on his own. A description of methods for attaching cabinets to the wall and types of fasteners will help you figure out how to install furniture in a particular case.
Types of cabinets
Furniture for storing things, consisting of a frame, shelves, and doors, can be made of wood, metal, or plastic. According to the installation method, cabinets are divided into types:
Fastenings for each type are different, but can be interchangeable if certain conditions are met, such as surface evenness and type of masonry.
Mounted
Individual structures installed on fasteners above floor level are called suspended. To fix the position, mounting rails, “ears”, corners and other fittings are used. These types of cabinets are used to store kitchen utensils, food, and other household items. Depending on the type of door, they can be open, closed or combined.
Types of fasteners
To hang a cabinet on the wall you will need reliable fasteners; hardware stores offer several types of these. They make furniture installation and dismantling simple and convenient.
It is worth paying attention to:
- mounting strips;
- furniture corners;
- special fittings with adjustment.
Mounting strips
A fastening element in the form of a longitudinal metal strip with holes ranging from 5 cm to 3 m in length. Fastening cabinets to a mounting strip is easier to do than to other types of fasteners, since you do not need to hold the entire structure suspended in order to mark the places for drilling holes. First, a rail is attached to the wall, its position is leveled using a level, and then furniture is hung on it.
Mounting for a wall cabinet has the following advantages:
- One person can handle the installation;
- high precision of furniture placement;
- Possibility of adjustment after hanging;
- notches allow you to set the length;
- there is no need for a leveling border;
- simplifies installation and dismantling.
- high cost of the set;
- due to the loose fit of the cabinet to the wall, a visually noticeable gap is formed;
- small objects lying above may fall into the space behind the furniture;
- high requirement for evenness of walls.
Furniture corners
The simplest fastening element in its structure is a small metal strip, bent in half, with holes on both sides. It is used for installation, fastening of wall cabinets, connecting them together.
During installation, you will have to use the help of a second person to help hold the cabinet while marking. You can attach corners to uneven walls or drywall. The disadvantage of a furniture corner is that you cannot adjust the position of objects, so the accuracy of drilling holes is very important.
Special fittings with adjustment
Externally, this hardware is a small plastic box with the heads of adjusting screws protruding outward and several holes for fixing. Some models of fittings are completely metal, which increases their reliability. In metal products, there are metal inserts around the holes that strengthen the mechanism.
A characteristic feature of all models of fittings is a bar with hooks, which is connected to adjusting screws inside the case. The fastening design allows you to adjust the height of hanging furniture within 22 mm and the tightness of fit to the wall within 2 cm, making it easy to correct small errors. To attach hanging furniture, a specially prepared rail is used.
Hanging height
Consider the distance from the countertop to the bottom of the cabinet. Minimum – 45 cm, average – 90 cm. At a height of 110 cm, hang only one shelf.
You can also use the formula:
H=h1+h2+h3-45mm, where the letters are the height:
- H – from the lower stop (table top, floor) to the bar;
- h1 – furniture above which the box is hung;
- h2 – kitchen apron;
- h3 – wall cabinets.
Subtract 45 mm from the resulting sum of all heights - this is the standard indicator of suspension shrinkage.
Focus on the height of people who most often use things from the closet. The optimal distance would be when a person reaches with an outstretched arm to the top shelf and takes the item without the risk of dropping it. But also leave enough space above the countertop.
Standard parameters of a kitchen set
Expert opinion
Bashir Rabadanov
Technologist at the furniture company Woodband
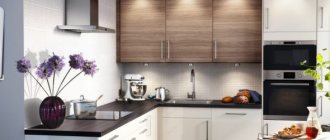
If it is necessary to hang over tall equipment, place the lower part of the cabinet in close proximity to their upper limits, almost close to the ceiling. This applies to refrigerators and ovens.
Find out more about hanging heights for kitchen furniture.
Rules for installing and hanging cabinets
Before hanging the cabinet, you must:
- carefully level the walls;
- finish laying the electrical wiring, installing sockets and switches;
- complete the finishing of the walls - plastering, wallpapering, installing drywall;
- assemble the tool;
- determine the height of the headset;
- Mark with pencil or chalk.
To work you will need:
- electric or hand drill;
- hammer drill if the wall is concrete;
- level, preferably water;
- tape measure for measuring distance;
- screwdriver with a set of attachments;
- hammer and punch;
- clamps, if the boxes will be hung as a whole set;
- wrenches if anchors are used.
On a concrete wall
For hanging on a concrete base, anchor bolts are used, which guarantee reliable fixation. Mounting strips can be attached to screws that are screwed into plugs; holes for them are punched with a hammer drill. You can use a corner to attach the cabinet to the wall.
On a foam block wall
Furniture must be secured to cellular material with air bubbles using special fasteners. Dowels, anchors, and nails will not hold, but can destroy the wall when the load increases. Fasteners that can be held in hollow material are called chemical anchors. They are an adhesive mass. They also hold dowels made of plastic, nylon, and metal.
Installation of fasteners in foam blocks is carried out as follows:
- mark the wall;
- drill holes with a drill corresponding to the dimensions of the fasteners;
- inserts the dowel into the hole, previously cleared of crumbs;
- tighten the screw.
Features of fixing cabinets on a plasterboard wall
Mounting strips are attached to the surface of the plasterboard sheet with special self-tapping screws or anchor bolts, onto which furniture with adjustment fittings will subsequently be hung. This method is not suitable if the cabinets are designed for heavy kitchen utensils and appliances. Decorative cables or tubes are used to attach heavy kitchen cabinets to the wall.
Step-by-step instructions for installing the strip
Work must be performed in the following sequence:
- Initially, the size of the bar is measured and a corresponding mark is made on it. The plank can be cut with a hacksaw, a grinder, or simply broken off.
- Marks for drilling are made on the wall, taking into account the distance from the top edge of the cabinet. You can mark them with dots or draw a solid line for the entire headset.
The main thing is that all measurements are made using a building level. - After the holes in the wall are drilled, you need to check the location of the anchors: they should be carefully driven into the wall and make sure that the depth of all elements is the same. With just one incorrectly installed anchor, the cabinet may not fit against the wall and the entire structure will become warped.
- The bar for hanging kitchen cabinets is applied to the wall (it is advisable for two people to work here: one holds the hanger, the other fixes it), the anchor bolts are inserted into the required holes and driven in until they stop. Using a screwdriver or screwdriver, the fasteners are carefully tightened.
Holes are made on the pre-marked wall for fixing the tire.
It is important! It is better to use a hand tool with which you can adjust the force. Otherwise, there is a high probability that the anchors will be tightened with different intensity.
The body of the hanging furniture must be mounted on a tire. The reference point is the plane of the wall.
How to hang on drywall
The most “painless” method is to screw anchor bolts through the drywall into the base of the wall. The method has one significant drawback - it is easy to overtighten the bolt, which will lead to cracks on the drywall sheet.
The load per bolt should not exceed 15 kg.
A more reliable and material-safe method is the use of mortgages, which are installed on the wall at the design stage. Their role can be played by timber, metal profiles, etc.
If the set needs to be fixed on a plasterboard surface, then a wooden beam or a thick board, which is fixed to the wall thanks to anchor bolts, will come in handy.
The wall is covered with plasterboard, and marks are placed at the location of the mortgages. It is at these points that the kitchen cabinet will then be attached to the wall. The principle is the same as in the previous method - using anchor bolts, but the load can be set to 1.5 times greater.
It is extremely important to make high-quality and durable fastening of kitchen cabinets to the plank, since they create a large load on the wall and fasteners.
Additional advice from experts on installing cabinet fasteners
- Vibrations of the drill at the beginning of drilling can be eliminated by first punching a small hole with a punch.
- To prevent the wall from crumbling, reduce the diameter of the drill.
- The depth of the hole is controlled using a mark on the drill.
- Before drilling, determine the location of the electrical wiring.
Having chosen the fastening option, taking into account the strength and material of the walls in the room, having prepared the place and tools, you can safely get to work.
Kitchen cabinets are a must-have piece of furniture. They are floor-mounted and wall-mounted. To securely mount a cabinet on the wall, the fittings must be modern and of high quality. There are two main types of kitchen cabinet hangers. We will tell you about each and give examples of good manufacturers in a summary table.
Cabinet hanging mechanisms
Initially, furniture was mounted on the wall using nails or screws. The disadvantage of fasteners is their fragility and fragility. The cabinet could collapse at any moment. This is especially dangerous for glass doors on modern headsets. But such canopies are still used today.
Classic hinges
This is a pendant in the form of metal plates 1.5-2 mm thick. They are attached directly to the wall using a regular or L-shaped self-tapping screw (crutch) screwed into a dowel.
There are several types of loops available:
- Simple pendants differ in the location of the mounting hole: at the top and in the center. The most aesthetically pleasing devices are those with a pear-shaped groove in the middle. They are not visible after installation. But this complicates the installation: when hanging a cabinet, you have to aim for a long time to get onto the suspension. Attached to vertical racks, designed for cabinets with a small load. When the groove is located at the top, it is easier to install furniture. The number of holes for self-tapping screws can reach 5, versus 2 for hinges with central fastening. They can withstand furniture with greater load. Screw to the sides of the cabinet.
- The corner canopy is non-adjustable - bolted to the top shelf of the box and to the wall. There are no installation problems, but the suspension is visible from both sides. The shape allows the cabinet to be hung close to the wall or moved away.
- P-shaped - screwed onto the box with self-tapping screws in 2 places: the upper horizon and the vertical post. This allows you to strengthen the structure through screeding. The time required to draw markings is reduced, since the horizontal position of the cabinet can be adjusted.
It is impossible to combine aesthetics and ease of installation of furniture hinges. Either they attach easily and stick out on the wall, or they are not visible, making them difficult to hang.
Mounting strip
Modern suspensions are easy to attach and easily move in the horizontal and vertical plane. The adjustment block is attached to the side panel of the cabinet through 2 through holes. There are mechanisms designed for different capacities. The maximum load on weak suspensions is 35 kg, on reinforced ones - 130. A fixing hook comes out of the block. To attach it, you need a strip that is mounted directly to the wall.
Advantages of adjustable hangers:
- a single strip on which the cabinet is supported is more reliable than a point fastening with screws;
- Possibility of hanging alone;
- adjusting the cabinet relative to the wall and floor;
- no strict requirements for marking - an error of 1.5 cm is allowed;
- Possibility of attaching to a kitchen apron.
Euro hangers have no disadvantages, except for their high price compared to furniture hinges. They are stronger and more reliable than self-tapping screws screwed into the wall.
Table of popular canopies
Below are the manufacturers of accessories. The most valued are Italian, German and Japanese companies.
| Manufacturer | Description | Price in Moscow (RUB per set) |
| Camar (Italy) |
When describing the company, the cost of the cheapest and most expensive kit was taken into account. We will separately tell you about specific models that differ in price and quality from their analogues.
| The company produces suspensions, full-fledged systems, as well as all accessories for fasteners separately. There are models of various sizes, load levels, and designs. | 200-1500 | |
| Hettich (Netherlands) | ||
| Produces strips, fastening fittings and components for them. There are currently no ready-made kits offered. | 350-6000 | |
| Samet (Türkiye) | ||
| The manufacturer offers individual spare parts and a complete set with rack and hangers. The maximum load per element is 40 kg. Movement relative to the wall and floor – 1.5 cm. | 160-700 | |
| Bloom | ||
| The company produces a small line of products, which includes all the components. Load capacity for 2 canopies up to 130 kg. Adjustment in 2 planes: horizontally up to 12.5 mm, vertically – 7-11 mm. | 600 | |
| Name | Characteristics | Price in Moscow (RUB per set) |
| cam0029.L |
The price for hangers is for 2 pieces. The weight of each component (mechanism, tire, plug) does not exceed 80 g. This does not play a role during installation, so the indicator was not considered.
Features of hanging on drywall
The low strength of gypsum boards often leads to the cabinet falling to the floor. To prevent possible breakage of awnings, professional kitchen assemblers use 3 main fastening methods:
- Self-tapping screws with a large pitch and a wide head, impregnated with phosphates, expansion anchors. Ordinary screws, nails, bolts will immediately begin to put pressure on the drywall, and it may not withstand this load.
- Embedded beam - used at the stage of major repairs (during the installation of plasterboard sheets). The block is installed in a metal profile, which serves as a frame for drywall. The method is highly reliable. The disadvantage is the need to immediately allocate space for cabinets, or to adjust to the beam in the wall.
- Adjustable hangers using a metal strip. The most modern and popular fastening method.
For heavy cabinets, it is better to choose a place with a stronger wall. The maximum load on one self-tapping screw is 25 kg, the anchor is 35 kg.
Read on for other ways to attach cabinets to drywall.