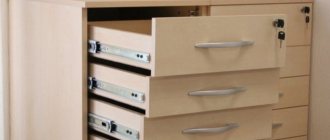
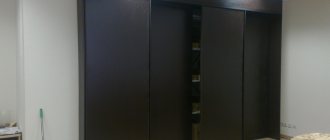
The design for storing bottles in the kitchen cabinet extends on telescopic guides. Over time, a rather complex retractable system can fail. The reason for this, as a rule, is wear of the ball bearings. Removing the bottle holder will seem like an impossible operation.
Solving this problem is quite easy. You just need to know the design of the guide rails. The fact is that a special locking device in the form of a rotating plastic lever is installed inside the runners. Its tongue is visible inside the runners when the bottle holder-basket is removed from the cabinet as far as possible. The stopper levers of both guides are pressed down with a screwdriver or other suitable object. As a result, you can freely remove the bottle holder from the cabinet.
Then change the telescopic guides. Place the bottle holder in its place, securing it with screws. For a more complete understanding of this information, I recommend watching this video:
Designs with telescopic guides have become the most common solution for furniture, especially kitchen furniture. During operation, sometimes it becomes necessary to completely remove the furniture drawer from the cabinet. But you can’t do it just like that. Telescopic guides are the element that prevents the device from falling out during careless movement. This can be done without damaging the structure, with a minimum of knowledge and tools.
Repair of drawers: causes of breakdowns
Before you start repairing drawers with your own hands in a closet or chest of drawers, you should understand the cause of the breakdown. Understanding what caused the problem is the key to successful repairs. The main thing is not to confuse causes and effects. For example, warping the cabinet or cabinet body itself can cause incorrect movement of the guides and their failure. And if you do not “return” the body to the original correct geometry, replacing the guides simply will not solve the problem.
The box frame has fallen apart or the bottom is falling out
This kind of breakdown is especially common in wooden chests of drawers assembled on spikes. Over time, the boxes dry out and become unstuck. All that is required is to take them out, disassemble them into parts, level them, sand them and reassemble them with glue. For reliable tightening, use additional fasteners in the form of furniture corners and self-tapping screws.
The bottom of the fiberboard box may not be nailed securely at first. Fasteners on small nails are especially unreliable. If the drawer is made of chipboard, then it is better to attach the fiberboard bottom to it using 3x16 self-tapping screws. Use washers to expand the clutch area.
The drawer falls out or warps in the guides
Most likely the reason is the insufficient rigidity of the cabinet or chest of drawers itself. Due to the uneven load of the shelves, the body inevitably deforms: the sides bend, the distance between them increases, and the drawers begin to fall out. The cabinet may warp if the floors are uneven and the cabinet or chest of drawers itself is not level.
Correct, smooth movement of the guides is possible only with the correct geometry of all elements. That is, both the body and the boxes of the drawers must be aligned diagonally. Perhaps the assembly was incorrect from the beginning - if you screw the guides unevenly relative to each other by at least a millimeter, and over time, as the boxes are loaded and they sag, this inaccuracy will become critical.
Also, the cause of the box warping and falling out of the guides may be grinding and deformation of the rollers (ball bearings) of the rails themselves. It happens that the metal of the guides itself bends. The reason is simple - the fittings have exhausted their service life and require replacement.
The drawer doesn't slide out well, the guides stick
The reason may be either in the deformations described above or in the fittings themselves. Even if I installed Chinese analogues with thin metal on the guides, it is unlikely that the fittings were originally designed to fully load the box. Therefore, it cannot ensure the expected smoothness of closing and opening the drawer.
Tabletop bottle holders
A separate group is represented by stands for bottles, intended for festive table setting and placing bottles of alcoholic beverages in them. These products have an aesthetic rather than a functional purpose. The stand ensures the correct placement of the bottles and should be a table decoration.
Various materials are used to make tabletop decorative products:
- glass ones are used for temporary storage of dishes filled with wine and cannot provide the required temperature conditions for storing alcoholic beverages; products woven from metal wire are quite decorative and have a low cost; plastic models are intended not only for special occasions, but can also be used to conveniently place bottles on the table, preventing them from tipping over - the temperature regime of alcoholic beverages can be ensured by placing these samples on the shelves of the refrigerator; wooden samples are an excellent addition to the festive table setting and are in perfect harmony with the wooden cladding of classic living rooms; forged bottle stands are highly stable, harmonize perfectly with candlesticks - an invariable attribute of any romantic party and can be a wonderful gift for any gourmet.
In addition, modern models of tabletop stands for wine bottles can be made from a combination of different materials.
DIY drawer frame repair and replacement
Summarizing all of the above, we can identify several repair methods to return the drawer to its former strength and smooth operation:
- Strengthening the structure itself . It is necessary to add rigidity by installing strips along the back wall. You can also level furniture that is standing unevenly so that its geometry becomes correct. After checking all the corners, you can repair the drawers and replace the fittings (if required).
- Strengthening the drawer frame and strengthening the bottom . If during operation it becomes clear that the fiberboard bottom is not able to withstand the load and is expected to fall out even after replacement, there is a reason to strengthen it. To do this, install a stiffener horizontally or vertically along the bottom - a partition. You can additionally attach the bottom to this part. This method will also help make a large box more rigid without warping.
- Replacement of drawer boxes. Sometimes wooden tenon boxes that have fallen apart are easier and cheaper to replace than to repair. For example, make them again from chipboard. You can read how to calculate the dimensions of the drawer parts for replacement here. It is also worth doing if it turns out that the dimensions of the drawers were initially calculated incorrectly, and therefore fall out of the guides. Or the fittings themselves are already outdated and are no longer available (such as some types of guides with an insert into the groove of the drawer).
For roller and telescopic guides, the optimal clearance for smooth extension is 13 mm on each side.
Repair and replacement of guides in drawers
It happens that the guides quickly fail because the box is large and heavily loaded. Telescopic (ball) guides allow installation in two rows. In this case, the drawer will be endowed with greater load-bearing capacity and will last longer.
With such an “upgrade,” it is quite possible to replace the bottom made of flexible fiberboard with chipboard or plywood in order to store, say, tools in such a box.
It is better, of course, to replace the metal guides. They don't cost that much. However, if upon visual inspection the rollers are intact, have an even shape, and only the metal of the runners is bent, you can try to return it to its original shape. To do this, use a vice, pliers and other hand tools.
Source: shkaf-info.ru
Types of closers for the kitchen
Closers for kitchen cabinets differ from each other in several ways .
Mechanism of action
According to the principle of operation, closers are divided into:
- Gas (pictured). The door closes freely until it touches the stem. The rod penetrates the dense gas environment of the sealed chamber, slowing down the movement of the door. Air or nitrogen is used as a filler. The average service life of gas devices is 5 years.
- Polymer . The mechanism of action is similar to the gas version. Instead of gas, a liquid polymer filler based on silicone is used. In terms of durability, they do not exceed gas ones.
- Oily . From the beginning of movement, the door or drawer immediately acts on a spring enclosed in a capsule with oil. The oil slowly flows into the adjacent chamber. The speed slows down and the entire closing cycle occurs smoothly. Oil shock absorbers are more durable, lasting up to 10 years. They are more expensive than gas or polymer ones.
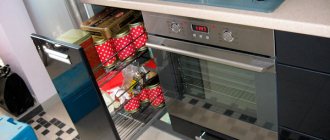
DIY bottle holder for the kitchen
Those who were once puzzled by buying or ordering a kitchen set know perfectly well what a bottle holder is and why it is needed. This extremely compact, retractable mechanism allows you to make maximum use of the space of a narrow cabinet. Making a bottle holder for the kitchen with your own hands is not that difficult. At the same time, you can independently choose both the design and the size, without being limited to standard proposals for a base with a width of 150 mm or 200 mm.
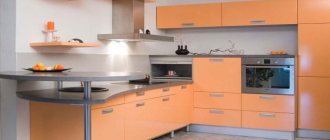
Optimization of kitchen work
Now there are many different devices that make our lives easier. And those of them that were invented for the kitchen simply amaze the imagination. This includes an impressive range of household appliances - for all occasions, and mechanical devices, and modern fillings for cabinets. The bottle device we are considering belongs to the latter.
What you need to know when buying a bottle holder
The range of kitchen bottle holders for integration into the lower kitchen module is truly huge. The price range is also quite wide. Mechanisms made in Poland and China are the cheapest, while well-known Italian brands are more expensive. Bottle holders of the premium segment are distinguished by an interesting design, different mesh designs, the presence of closers and the ability to choose a coating (in addition to chrome, there are models coated with brass, Teflon, etc.).
When choosing a bottle holder for installation in the kitchen yourself, we recommend paying attention to the following:
- Possibility of façade mounting. This fact may surprise you, but some bottle holders do not have fasteners for the facade. You can adapt furniture corners for this by bending them and hooking them onto the front rods. But it is better to be prepared for such a “surprise”.
- Base size. It is customary to call the base the width of the cabinet. This term can be found for any retractable baskets and drawers. The majority of bottle holders are offered for installation into bases with a width of 150, 200 or 300 mm. That is, the cabinet itself must be at least 150 (or 200) millimeters wide. In height, all mechanisms are adapted to a standard module, 720 mm. It may be slightly higher or lower.
- Installation method. The bottle holder can be equipped with side and floor mounted guides. In the first case, it will be attached to the side wall, in the second - to the bottom of the cabinet. Floor mounting is more stable, but not always convenient. After all, if something spills from a container accidentally knocked over inside, it won’t be so easy to wash the bottom with the installed mechanism. And side mounting is not always universal. When you choose a bottle holder, be guided by the kitchen design - how it will be more convenient to “enter”, on the left or on the right side. And buy exactly the model you need.
- Extension mechanism. There are full-roll-out models - they are more expensive. Budget bottle holders are installed on standard telescopic guides, which do not extend slightly from the “insides” of the cabinet. But this nuance is not so critical.
- Number of shelves. There are bottle holders on two and three levels, with the addition of various accessories. In three-section models, the upper section is designed to store various small items.
Prices for high-quality bottle holders start at an average of 2-3 thousand rubles. If you want to save money or the standards set by manufacturers do not suit you, you can always make a kitchen bottle holder with your own hands.
What is the price
The cheapest Chinese-made bottle holders in Moscow online kitchen accessories stores cost from 2 thousand rubles. As a rule, these are simple models without closers with incomplete extension.
Cargo for the kitchen, made in Poland (Rejs) or Italy (Vibo), can be bought from 3 and 5 thousand rubles, respectively.
Narrow retractable systems from well-known brands from Germany or Austria (popular manufacturers - Blum, Hettich, Kessebohmer) are sold at a price of 10 thousand rubles. But you can find relatively inexpensive German-made models (Vault-Sagel), prices for which start at 6 thousand rubles.
The price of retractable baskets depends on the width of the facade, the number of shelves, and the presence of additional fittings.
Is it worth paying for the brand?
In more expensive cargo models, the price is paid not only for a big name, but also for a proven design, impeccable performance and long service life. Good fittings will last you 15 years, or even more.
There may be surprises when purchasing cheap accessories. For example, one of my friends decided to save money and was faced with the fact that bottles in a cheap basket fell every time when opened.
When ordering a kitchen in a showroom, keep in mind that the furniture manufacturer may add its own markup on fittings, and they may cost more than in online stores or construction hypermarkets.
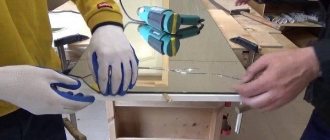
How to make a bottle holder with your own hands, photos and drawings
The easiest way to make a bottle holder for the kitchen with your own hands is to assemble a similar one from chipboard, the same material as the body. The design will resemble something like an elongated box installed across.
It is recommended to install the guides asymmetrically relative to each other, so the bottle holder will be stable.
Due to the need to leave 13 mm gaps on the sides to install the guides, the internal space of the shelf with a cabinet width of 150 mm will be only 90 mm. Therefore, it is better to expand it to 200 mm.
If this is not possible, you can try another installation option - with mounting the guides not on the sides, but on the top and bottom.
Bottle holder PLANERO with closer, front width 300 mm VAUTH-SAGEL
Before using the services of our online store www.vkuhnu.ru, please read this Agreement carefully.
This agreement, hereinafter the “Agreement”, is concluded between the online store www.vkuhnu.ru (Internet address – www.vkuhnu.ru), hereinafter the “Online store” or “Site”, and the user of the online store services, hereinafter “Buyer”, and determines the conditions for purchasing goods through the Site.
1. On the activities of online stores in the Russian Federation.
Legal relations of purchase and sale in the Russian Federation are regulated by the Civil Code of the Russian Federation (paragraph 2 “Retail purchase and sale”, Chapter 30). By virtue of clause 3 of Art. 492 of this Code, the provisions of Law No. 2300-1 of February 7, 1992 “On the Protection of Consumer Rights” apply to relations under a retail purchase and sale agreement with the participation of a citizen buyer not regulated by the Civil Code. Article 26.1 of the said Law (Article 26.1 was introduced into the Law by the Federal Law of the Russian Federation of December 21, 2004 No. 171-FZ, which entered into force on January 9, 2005) establishes that a retail purchase and sale agreement can be concluded on the basis of familiarization consumer with a description of the product proposed by the seller through catalogues, prospectuses, booklets, photographs, means of communication (television, postal, radio and others) or other means that exclude the possibility of the buyer directly familiarizing himself with the product or its sample when concluding an agreement (remote method of selling goods).
DIY wooden bottle holder
The disadvantage of bottle holders made from chipboard is significant. Due to the large thickness of the material, the structures are bulky and small in capacity. Another thing is wood. To reduce the cost, you can take sheet plywood 10-12 mm thick. It will allow you not to lose precious centimeters when designing a wooden bottle holder and significantly increase the capacity of the internal sections.
Plywood also has other positive qualities:
- Firstly, it is lighter and more durable. It will be easier for the bottle holder to slide along the guides.
- Secondly, the material itself is much more environmentally friendly; it does not contain harmful resins and formaldehydes.
- Thirdly, plywood is easier to process and is ideal for making a wooden bottle holder with your own hands.
After cutting the parts to size, just carefully sand off the sharp corners, prime and paint them in the desired shade. It is recommended to use birch plywood as it contains less resin. You don’t have to worry that during operation, the plywood bottle holder will be “driven” by temperature changes and humidity from the hot steam from the oven. After priming and painting, the material becomes resistant to such influences.
Source: kuhni-info.ru
Built-in
But it may be necessary to dismantle it during repairs. This is done like this:
- The door is removed. Typically, such lockers are designed in the form of a compartment, the doors in them are sliding on rollers, and the support can be either the lower or the upper one. To dismantle the door, you must carefully lift it so that the lower roller comes off the guides, then tilt it outward so that the upper roller comes off the rail. Then the door can simply be moved to the side.
- The shelves and sides of the internal sections are removed.
- If the remaining structure is light enough, it can be completely removed from the niche and pulled away (using rollers sold in hardware stores to move furniture or simply pieces of old thick wool fabric as a lining for a support so as not to scratch the floor). If it is still too heavy or you need to disassemble it alone, you need to continue dismantling.
- The back wall is removed. It is usually made of plywood or fiberboard, and is attached to small furniture nails. To remove it, carefully pry it up with the tip of a flat screwdriver or chisel, and separate it from the frame by gently pressing from the inside or lightly tapping it with a mallet.
- The frame itself is disassembled. It all depends on the design. If a tie was used on eccentrics, unscrew them; if the corners are used, unscrew the screws; if dowels are used, the elements are separated by gentle tapping.
- Upon completion of disassembly, the fittings are collected in a separate package, and the structural elements are marked so that when reassembling you know what is attached to what.
The video shows the process of disassembling a built-in wardrobe:
Bottle holder in a kitchen set: what are there, which one to choose
Hello, dear friends! I think many of you are well aware of the problem of storing bottles and jars of spices and sauces in the top drawers. Constant chaos, inability to find the right item, discomfort. The solution to this problem can be a bottle holder in the kitchen set.
Nowadays, buying something like this won’t be too difficult. How to assemble a bottle holder with your own hands.
Today I propose to talk about what a bottle holder is and why it is needed in the kitchen. Although from the name a lot becomes clear.
If you like how such an accessory looks and functions, then we will separately tell you in the following materials how to assemble and make a bottle holder with your own hands. In reality, assembling such a structure is not very difficult.
Just do not confuse bottle holders with wine shelves, which we have already talked about. They have slightly different purposes.
6 more useful tips for choosing a convenient retractable bottle holder
- To make the bottles stand more stable and not touch each other, purchase special metal half-ring separators.
- When choosing a model, pay attention to the load for which it is designed. Narrow baskets, as a rule, can support up to 12 kg. Wider drawer systems can accommodate significantly more weight.
- More expensive fittings differ from cheaper ones not only in their design, but also in the quality of the shiny coating on the metal. The best option is if chrome plating is done by galvanic method. This coating lasts much longer, and its surface will be free of rust, scratches, chips and abrasions.
- Even if you decide to order a kitchen set with framed facades, if possible, it is still better to hide the pull-out sections behind smooth panels. It is easier to install fittings on flat facades.
- Fastening the basket to the facade is not always included in the kit. Sometimes you have to buy them additionally.
- Most baskets in the assortment of Moscow online stores are presented in chrome color. But if you ordered a kitchen set in a classic style with bronze fittings, try to find bottle holders in the same style. They look great with dark kitchens made of solid wood or MDF with oak, walnut or wenge veneer.
Inexpensive DIY foam mattress: simple technology
- Bottle holders are perfect for narrow kitchen units;
- This is a great opportunity to occupy an empty small space;
- This is a useful addition for a small area;
- Bottle holders are great for storing oil, vinegar, sauces;
- They can also be used to place containers with cereals and spices;
- Various boxes and other kitchen utensils can easily fit here;
- It is much more convenient to take objects out of a bottle bottle than from ordinary cabinets and drawers;
- If you have a washing machine in the kitchen, the bottle holder can be used as a pull-out section for storing powders, etc.
As you can see, this element has impressive functionality.
Bottlemakers go by another popular name. This is cargo.
There is only one significant drawback. This is a high price. But how high it is specifically for you depends on the person’s individual earnings.
How to remove a drawer
Now let's figure out how to quickly remove the drawer in order to service the fittings or get things that have fallen behind the back wall. The work algorithm is described in detail below:
| Illustration | Description |
| We open the box we need . Everything is simple here - pull it towards you by the handle. | |
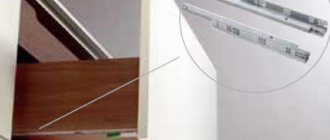
| Pulling out is done until it stops . The roll-out drawer extends until the guide stops it. We are interested in the end part of the element shown in the photo. | |
We find a plastic flag located inside the outer slot. Most often it is black, but it can have a different color, it doesn’t matter.
| |
| The antenna must be squeezed out. To do this, it is most convenient to use a thin flat screwdriver; you need to press on the element and slightly pull the box towards you, it should come out a few more centimeters. Please note that the flag can fall in one direction on both sides of the box, or it can move down on one side and up on the other. You just need to press on it - if it does not go down, then move it up and vice versa. You shouldn’t press too hard, as the plastic can break, which will make pulling out the element problematic. | |
| The antenna extends beyond the outer end of the body as shown in the photo . There is no need to pull it out further, as the fittings may be damaged. It is important that the elements are brought into the same position as shown in the photo on both sides of the box. | |
| The antennae should be pressed with your fingers . Most often they go down, but there may be an option when on one side the element needs to be raised up. Everything is simple here: we try to lower the flag, if it resists, then it needs to be raised, you should not press the plastic through the resistance, everything moves easily and can be pressed without problems. | |
The box is carefully pulled out. If you have removed all heavy objects from it in advance, then this process will not take much effort. It is important to pull the section, simultaneously pressing the flags on both sides, then it comes out easily and the likelihood of deformation and damage is minimal.
| |
| You need to pull until the middle section comes out of the element attached to the wall of the box . Everything is simple here, the main thing is not to distort the structure so as not to bend the guides. | |
| This is what the guide looks like after removing the drawer . Now you can clean up the internal compartment or repair and replace damaged parts. It is recommended to check the condition of the balls; they must be lubricated so that the system operates smoothly and with minimal wear. If the balls are dry, they can be lightly greased with thick grease; the cheapest grease will do, the main thing is to apply it a little so as not to stain the furniture. |
Varieties
Now let's talk about the varieties of cargo, that is, bottle holders.
All of them are divided into 2 large groups.
- Built-in. Combined with kitchen furniture. Can be installed in top and bottom drawers. Most models consist of two levels. They are held in place using special guides;
- Separate. But the free-standing section is made in the form of an independent block. It complements the kitchen furniture. The model is selected so that the cargo matches the furniture set. A good choice for a large kitchen with an island.
The bottle holder can also be open or closed.
Objectively, the second option is preferable, since all contents will be hidden from prying eyes. But the choice depends on the specific situation.
Design Features
Despite the variety of fittings, all guides are similar in their main principle - the presence of two strips, one of which is attached to the plane of the cabinet, and the other to the pull-out element. Inside the system, between the slats, there are small balls, which ensure smooth operation and durability of the structure. The main differences may be in the depth of extension:
- Systems where the fittings do not allow full extension.
- The mechanism can be fully extended.
- Super full extension. The storage system can be pulled out beyond the façade. Often used in archival shelving.
The guides also come in four standard sizes (the most common is 45 mm high). The presence of a closer, that is, a special block that itself presses the drawer until it is completely closed, makes the fittings more comfortable, but does not introduce revolutionary changes to the design.
Assembling furniture with your own hands or how to save a tidy sum
Among the most common options for bottle holders are cargo with a width of 100, 200 and 150 millimeters. If you take a narrower model, you won’t be able to place larger bottles with the same oil inside. There are also very wide models of 400 mm. In fact, these are already shelves for storing kitchen utensils, food and other utensils. Therefore, buyers usually choose in the range from 100 to 250 mm.
But since everyone has different requirements and tasks that the bottle holder faces, then when choosing sizes, start from them.
Conclusion
After watching the proposed video, it becomes clear that a device such as a bottle holder is not just an innovation in modern furniture design, but also an essential item that helps organize the placement of kitchen utensils and saves space.
The bottle holder will also help fill the voids in the furniture caused by the elementary placement of standard cabinets.
Source: gearbestblog.ru
Required number of shelves
Often, narrow retractable cargo has two shelves.
The lower one is used to accommodate tall bottles and containers, and the upper one is adapted for low containers and cans.
Do you plan to use this basket to store various canned goods, other supplies, a large number of small jars and containers of spices? Then the most correct solution would be to use three-tier models. Although there are also cases when just one tier is enough. It is better to think in advance what you will store inside and in what quantity.
Many people make the mistake of buying a model that is too compact, which is why they are then unable to fit the required number of items inside. The bottle holder becomes overfilled and may not be able to withstand the load.
High-quality fittings have the function of adjusting the height of the shelves.
The instructions are not difficult to figure out how to remove or change the height of the tier.
How to remove blum bottle holder
The design for storing bottles in the kitchen cabinet extends on telescopic guides.
Over time, a rather complex retractable system can fail. The reason for this, as a rule, is wear of the ball bearings. Removing the bottle holder will seem like an impossible operation. Solving this problem is quite easy. You just need to know the design of the guide rails. The fact is that a special locking device in the form of a rotating plastic lever is installed inside the runners. Its tongue is visible inside the runners when the bottle holder-basket is removed from the cabinet as far as possible. The stopper levers of both guides are pressed down with a screwdriver or other suitable object. As a result, you can freely remove the bottle holder from the cabinet.
Then change the telescopic guides. Place the bottle holder in its place, securing it with screws. For a more complete understanding of this information, I recommend watching this video:
Multifunctionality is the main feature of high-quality and reliable furniture. This is especially true for kitchen utensils, which should make working at the stove easier. When arranging your kitchen space, you should not forget about the possibility of installing a bottle holder with side mounting.
Purpose and design of a kitchen bottle holder
This device expands the functions of the kitchen set. The compartment is designed to store all kinds of bottles and small cans. Cereals and spices can be poured into jars, and various sauces and oils can be poured into bottles.
Since the direct purpose of the accessory is to store various mixtures and liquids in glass containers, it is rational to place a retractable bottle holder close to the stove. Designers involved in the design of kitchen furniture suggest installing a bottle holder on both sides of the stove.
Initially, the bottle holder performed only one function - it served as a special compartment for storing wine bottles. Its task is to relieve space on the table surface.
Gradually, the device turned into a multifunctional design, which is now made to suit the individual needs of clients. Specialists produce departments that are used to store not only food, but also various detergents. Housewives have learned to place towels and many other things in bottle holders. Such designs also find their place near sinks.
Types of fastenings and their advantages
To equip a kitchen table with a special “cargo” section, several options for fixing the fittings are used. The efficiency of the entire system will depend on the location of the working elements. The most common are two types of fastening - side and bottom.
Side mount
In this case, the guide should be attached to the side panel of the cabinet. The width of the device should not exceed 15 cm. This is the optimal value.
The bottle holder must accommodate as many items as possible without overloading the supporting structure, which is why it is so important to follow a certain order in the selection and installation of elements:
- The first step is to select the kitchen cabinet itself to which the fittings will be attached. Among the wide variety of side-mounted models, there are options in which a special compartment is allocated for cargo. However, this is not necessary if we are talking about making a headset yourself. Absolutely any cabinet is suitable for these purposes. A partition is simply installed between departments.
- The second stage is the installation of guides to the inner surface of the drawer wall. As a rule, all the necessary fasteners are sold complete with fittings. If these parts are not included in the kit, you can use self-tapping screws of short length - 1 cm. You should buy only wood screws.
- The third stage is attaching the bottle holder.
- The last step is to attach the front panel and the handle to it.
Video of correct installation:
Bottom mount
This type of device is much more convenient and practical than the previous design. The only negative is the cost, which directly depends on the quality of materials and brand of fittings.
The price is also determined by the distinctive characteristics of the parts. The bottom-mounted design includes a special trolley equipped with rollers. It is to this element that the main part of the structure is attached. Bottle holders with bottom fastenings demonstrate excellent functionality even after 5-7 years.
The installation process is slightly different from the side-mounted options:
- The mechanism does not require a separate compartment in the kitchen drawer for proper functioning. The element can be installed between cabinets.
- The mounting method depends on the unique characteristics of the model. Before fixing each individual option, you must carefully read the instructions compiled by the manufacturer. It is the step-by-step guide, which describes in detail how to assemble a bottle holder, that will allow you to avoid gross mistakes leading to damage to structural elements.
- The next step involves fixing the façade panel to the retractable basket. The part is usually made of MDF and must fully match the design of the kitchen.
- The last step is to attach the handle, which should be comfortable for all family members.
Location options
The place where the basket will be located is selected taking into account the weight and quantity of dishes that will be installed in the departments. If we are talking about placing household chemicals and towels, it is best to install “cargo” near the sink.
If you need to choose the optimal place for seasonings, spices and oils, installing the structure would be appropriate near the kitchen stove. You should also pay attention to the method of fastening.
Bottom cabinet
The most common and simplest option is the lower basket arrangement. In this case, the basket can be used for different purposes; it will prove to be a practical accessory in any interior. All the housewife needs to do while preparing food is to open the compartment conveniently located at hand and take out the dishes with the necessary contents.
Installation method
Some people decide to take a regular basket and hang it on the wall. But it’s difficult to call such a design a full-fledged bottle holder.
Cargo is a retractable system.
They are mounted in two ways. Manufacturers use bottom or side mounts.
The side mount is the most popular. It allows you to install cargo up to 250 mm wide. Furniture makers themselves call this option more comfortable for adjusting the facade. The fittings themselves will sit more securely inside the cabinet.
The second option involves a bottom mount. A more rational choice for a heavy and wide basket.
Accessories for smooth exit of bottle holders
The retractable opening system that these designs are equipped with is very convenient and ensures simple and safe use. Closers perform quiet, smooth closing of the door. The cabinet itself goes to meet the owner, and, having coped with its role as a food delivery person, silently disappears into the depths of the cabinet.
Model with closers
These storage systems also differ in purpose.
There are storage systems:
- bottles;
- towels - equipped with towel holders;
- baking sheets - the design includes special holders for baking sheets;
Material of manufacture
Before installing a bottle holder in your kitchen, you need to think carefully. Consider which material would be best suited for these tasks.
The kitchen is associated with constant high humidity and temperature changes. Because of this, it is not worth using materials that have low resistance to these influences.
On sale there are cargo made of wood, metal, chipboard, MDF and plastic. If the furniture in the kitchen is wooden, then it is better to take cargo based on wood. At the same time, it would be better if the shelves themselves were metal.
Don't forget to make sure that the shelves of the bottle holder are covered with protective materials to prevent rust. Aluminum and chrome-plated products perform better in this component.
If you are interested in making a bottle holder with your own hands, this material describes the process in sufficient detail. Or leave your feedback. And soon we will separately tell you about all the nuances and subtleties of cargo manufacturing.
Mistakes leading to breakdown, or what not to do
All removal operations must be carried out with the boxes completely unloaded. When pulled out, a heavy box can damage (bend) the guides, after which it will be difficult for them to give the correct geometric shapes.
It is better to carry out the operation of removing large boxes together, for the reason stated above.
You should not disassemble the closers or the guides themselves, due to the presence of many small parts in them.
In order to ensure the most rational use of kitchen units, as well as to save space, various types of retractable baskets are being developed and constantly improved, among which the retractable bottle holder for the kitchen has found widespread use.
The life of a modern working woman is eventful. Dedicating a huge amount of time and effort to work, and being exposed to constant stress, it becomes simply necessary for her to arrange her home in such a way that she can relax when she comes home.
A shelf like this in the kitchen is very functional.
Of course, household chores, especially work in the kitchen, also take a lot of energy. Therefore, it is very important to have everything at hand in this space, simplifying and reducing cooking and cleaning time. And here every little thing becomes very important.
With this device, all kitchen equipment is always at hand