Carrying out renovations in a home that will be a refuge for you and your family for many years to come is a natural and useful activity, especially if done in a timely manner, but it also takes a lot of effort.
Sometimes even such a simple task as unsticking a mirror from a cabinet can become overwhelming if you don’t know the special secrets that professional builders have developed over many years.
Mirrors are usually glued tightly to cabinets, or screwed using fastening devices. But their shape can get boring, and over time they become damaged. Let's learn how to remove them by learning several techniques for separating mirrors from the surface of the cabinet.
How to remove a mirror from a closet door?
Separation of mirrors held on its surface by fasteners from the cabinet
So, first of all, we will discuss how to remove mirrors from the cabinet that are mounted on its surface using fastening systems.
When separating the mirror from the surface of the cabinet, it would be wise to remove the door from its hinges and lay it horizontally so that the glass does not fall to the floor haphazardly
Table 1. Mounting systems for mirrors
| Fasteners | Description |
| Suckers | Silicone suction cup holders are not often used as a fastening device for placing a mirror on a vertical cabinet surface, however, they are still found. In this case, you are more likely to worry about the suction cups not accidentally coming off if the door of a given piece of furniture slams too loudly, since silicone suction cups are too often poorly made. Consequently, they are unable to hold the mirror in the place you have determined, and this accessory often falls. How to remove: You can easily remove a mirror fixed to the surface of the cabinet door using suction cups by simply gently pulling its body. If the suction cup does not come off easily, carefully pick up its edge with a ruler or fingernail. |
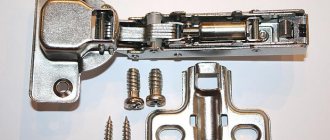
| Screws | Quite often, mirrors are attached to cabinet doors, walls and other vertical surfaces using screws. Screws can hold this accessory to the surface of the cabinet, while being passed through: mirror frame; "body" of the mirror surface. In both cases, the screws do not stick out on the surface; they are hidden under special rivets made in the shape of a mushroom: with a wide hat; with a leg that fits inside the groove of the mirror screw. How to remove: All you need to do to remove a mirror mounted on screws is to pick up the decorative knob of the fastener, remove it, and then, using the most ordinary screwdriver that fits the size, unscrew one by one all the screws that hold the mirror. Please note: to remove the mirror without breaking it, you need the help of a second person to hold the accessory, preventing it from falling. |
| Staples | Bracket holders are another way to secure a mirror to a cabinet door. Each holder is separately screwed into the wall using flat-head screws. Before screwing it in, a bracket is put on each screw - a holder, which will then hold the mirror. The tighter the bracket is tightened, the stronger the mirror “sits” in it. Several such staples are used along the entire perimeter of the mirror to clearly fix our mirror accessory. How to remove: And depending on the quality and thickness of the staples, as well as your desire to use them in the future, the following methods can be used to remove the mirror from the surface of the cabinet: bending the staples with pliers (in this case it will be impossible to reuse them); unscrewing screws. Please note: in this case, you will also have to enlist outside help, since when the brackets are sequentially unscrewed, the mirror will no longer hold anything, and someone must do it with their hands. |
The above methods of attaching a mirror involve the use of special fasteners, which are initially designed in such a way that you can get rid of them as simply as possible by easily removing them from the mounting location, and along with them the mirror itself.
Such fasteners are called reusable. Indeed, if you do not accidentally or deliberately damage them while removing the mirror, they can then be used in tandem with it, while placing the piece of furniture on a different surface. We recommend that you use just such fasteners, since they are the easiest to remove, even without any specialized experience or sophisticated construction tools. To rid your closet of a mirror with each of them, the maximum you will need is:
- assistant;
- screwdriver;
- time.
Reusable fastening systems for mirrors, of course, are much more convenient, since they allow you to quickly remove the reflective surface, and then use both it and the fasteners themselves more than once.
However, preliminary fastening of mirrors to other construction devices can create a serious problem. Let's look at them in the next section.
The most effective method
It is more correct and efficient to cut with a conventional glass cutter. It may be indispensable if you decide to make a dressing table yourself, or to restore old mirrors to decorate the interior of your own home.
The advantages of special tools are that with their help you can easily cut out even quite complex elements, process a thick mirror and set the desired shape of the canvas.
When purchasing a glass cutter, be sure to pay attention to its type. The tool can be roller or diamond. The first one is more budget-friendly, but has lower accuracy, quality and cutting speed. Diamond glass cutters are expensive, but with frequent use, the investment will be fully worth it.
It won’t take much time to learn how to properly operate such a device. By following certain rules, you will be able to achieve the desired result:
- The glass cutter must be held at a right angle, but a slight deviation is allowed;
- pressing with the index finger, the instrument is firmly fixed with the middle and thumb;
- while moving along the blade, you cannot change the position of the cutter;
- it is extremely important to make the cut with a quick and confident movement;
- It is not recommended to make a second cut along the same line;
- a strictly uniform force is applied, but except at the edges;
- when approaching the edge approximately 5 mm before the edge, you need to reduce the load on the glass cutter;
- the cut is made from the far point towards you;
- a high-quality cut is obtained in a dark color in the case of a roller tool;
- Diamond cutters always leave behind a light, thin strip;
- It is not recommended to deepen poorly executed cuts, but it is better to step back a little and make a new one.
As you can see, there are quite a lot of nuances. But they can cause some difficulties only during the first attempts to cut the mirror cloth yourself. With a little practice, everything will start to work out quickly and efficiently.
Sequence of procedure
Some cut an old, previously glued mirror, while others use new canvases. But regardless of this, cutting requires mandatory preliminary preparation, as well as correct execution of the procedure. Only then will you choose the method of attaching the mirrors, or select the appropriate glue for the mirror to fix it.
If we consider the process step by step, it involves the following steps:
- First you need to prepare a flat surface of appropriate size. Often this is done simply on the floor, but it is better on the table. The canvas is laid face up;
That's it, now you have managed to cut out the required element. What to do with it next depends on specific goals and objectives.
As you can see, using a glass cutter is not so easy, but it is the most effective and useful tool in such matters.
Is it possible to peel off an extra decorative element yourself?
The answer is clear: yes. But for beginners, the process is quite labor-intensive and requires high concentration and careful attention, so it is better to arrange for yourself an environment in which nothing can distract you.
If you follow all the rules, follow safety precautions and follow the recommendations, you can remove the mirror at home in half an hour or less , but in cases of difficulties or complex fasteners, it is better to contact specialists with experience in such work with this issue.
All types and properties
There are two types of glue: neoprene and acrylic. Neoprene has a strong chemical smell (contains rubber), but has good adhesion to surfaces. Acrylic – environmentally friendly, harmless. But it is water soluble, so it is not used in bathrooms. Exposure to high temperatures is also unacceptable.
Among the neoprene series, QUELYD Mastifix can be distinguished - it reliably glues even heavy mirrors without damaging their reverse side. Can be used on bathroom walls.
There is acrylic LACRYSIL “Super strong fixation” intended for exterior and interior use. Bonds all building materials to any building surface.
We recommend that you look at the review of IRFix mirror adhesive:
Rubber GROVER is designed for mounting heavy structures and mirrors. Suitable for interior and exterior work.
Tips and step-by-step guide on how to peel a mirror off a cabinet door yourself
Sometimes things happen that make a mirror on a closet, for one reason or another, need to be removed and replaced to avoid trouble. If a chip has formed on it, hopelessly spoiling the appearance, or a crack, it is better not to keep such a thing in the house and try to replace it with a new one as soon as possible.
In such a situation, your mirror not only spoils the appearance of the interior, but also becomes a direct threat to the residents, especially if there are small children in the house who are fond of active games. You can get rid of a cabinet decor element that has become superfluous in several ways, depending on the fastening, and the main tool is you and your hands. Our article is about how to peel off a mirror from a cabinet, remove it from a wall, or separate it from a wardrobe door if it was glued with liquid nails, double-sided tape or other glue.
If you do everything correctly, you will easily cope and will not spend a day waiting for a specialist and, most importantly, money.
Details matter
Signs about a cracked mirror can have different meanings, depending on the circumstances that led to the breakdown and the location of the incident:
- An object cracked in the marital bedroom foreshadows conflicts, misunderstandings in a couple, serious disagreements, even divorce.
- A mirror surface damaged for no apparent reason indicates severe damage to one of the household members. The house should be thoroughly cleaned as there may be lining in the room.
- An object broken inadvertently, due to the fact that it was stepped on, touched, or dropped, portends positive changes in life, as well as the destruction of barriers that previously prevented the achievement of desired goals.
- If a thing is accidentally damaged by pets or small children, then the sign also loses its negative meaning.
- A mirrored piece of furniture damaged on the wedding day promises the newlyweds a difficult family life, full of obstacles, financial difficulties and small troubles.
- If a small chip appears on the surface as a result of a fall, this is a sign of problems that the owners will have to face soon, or a warning about illness in one of the household members.
The nature of the damage to the damaged interior item also matters:
- If there is one big crack running through the mirror, then you should mentally prepare for family quarrels and disagreements. Sometimes the subject warns of betrayal and imminent divorce.
- The presence of numerous cracks running through the entire surface of the glass indicates that the plans and goals of the owners of the mirror are unattainable.
- A damaged small or pocket accessory indicates minor problems that can be easily resolved.
- It’s much worse if a large wall mirror breaks. According to popular beliefs, such an incident can foreshadow big troubles or the death of one of the family members.
What tools will you need?
To safely peel off the mirror you will need the following set of tools:
- construction hair dryer (can be replaced with a household hair dryer, but with an increase in heating period);
- metal ruler or copper wire;
- regular or double-sided tape;
- stationery knife;
- screwdriver figured or flat.
In fact, the set of tools is small. Thanks to it, you can remove the door from the cabinet and start working with the mirror element. Even if the closet has mirrors with an area of more than 2 square meters, you can make do with improvised means by zoning the work in advance. This is the first thing you need to do before learning how to peel a mirror off a cabinet door.
If the mirror is attached with a special fastener system, then dismantling is simple, but if the mirror is held on by “liquid nails” or special glue, then the task is much more difficult.
Safety regulations
Since it is quite difficult to peel off a mirror, and the procedure itself is not safe, it is important to follow the following safety rules:
- clothing should completely cover the entire body, and the elastic bands on the sleeves and legs should fit snugly to the body;
- Be sure to use glasses (it is better if it is a full-size face shield);
- all work is carried out in an open space, preferably not indoors;
- when working, it is necessary to exclude the presence of children;
- After work, wet cleaning is carried out several times;
- Hands are washed with soap more than 2-3 times to completely wash off all glass microparticles.
Although dismantling a mirror is considered a simple process, it is dangerous, because the mirror can burst at any moment, flying into pieces.
Note! Automotive hand cleaning paste is the best solution for washing your hands if your mirror is cracked or has visible defects.
What is the best way to disconnect?
- The first method is suitable for cabinets from which the door can be removed. Do not remove the mirror when it is in a vertical position, as you may break it and injure yourself.
- For the second method, you will need wire, and it works like this: with movements to the left and right, you need to cut off both the layer of liquid nails and other adhesive mass that attaches your mirror to the cabinet. This option is very convenient and the safest: nothing will burst or crack if you do not overdo it with sharp movements.
- The third method is intended for a wardrobe, when working with which it is especially recommended to be more careful and adjust the level of brute force if the mirror is not to be damaged.
How to peel off a mirror from a cabinet if it is attached to it using construction substances
In this case, construction substances will be understood as disposable fasteners, represented by condensed liquids that have pronounced fastening properties.
So, we are talking, of course, about:
- double-sided tape (tape on which a layer of adhesive is applied);
- liquid nails (special construction adhesive, especially strong when hardened, which is used for mounting various parts, and in particular, installing a mirror);
- construction adhesive specifically used for working with specific surfaces.
Using liquid adhesives as a way to secure the mirror to the surface of the cabinet, you must understand that removing the mirror will most likely break it into many pieces
Removing a mirror from a closet door without damaging the mirror and also without getting hurt is very difficult if you don’t know specific tricks that will at least help you protect yourself. The fact is that when the required substances mentioned above are used, subsequently the mirror turns out to be tightly fixed and it is really very difficult to separate it without breaking it.
Let's sum it up
Removing a mirror is an incredibly labor-intensive process, since mirrors are usually attached to cabinets so that they hang in a specific place for them even after the cabinet itself fails. It would be good if reusable fasteners were used to install the reflective surface, however, as a rule, we are talking about the use of adhesive construction substances that make easy removal of the mirror from its current location impossible. Please read the instructions we have provided above carefully. At least one of them must be suitable in your case. Then you can peel the mirror off the cabinet and place a newer model in its place.
Video - The process of removing a mirror from a cabinet door
How to Remove a Mirror from a Closet Door: Step-by-Step Guide
The most common case is defined as the removal of a part from a furniture accessory. All that is needed is indicated above in the article. So let's get straight to the simple steps:
- As in the previous method, you need to cover the front side with tape to fix the position.
- Next, without applying much effort, you should place a small part of the screwdriver under the edge.
- At the end of the process, it is worth eliminating the particles that remain from the glue and getting rid of contaminants.
How to remove a mirror from a cabinet that is well glued with double-sided tape, so as not to damage it?
I’ll write how I did it, although you might think that the double-sided tape was a temporary phenomenon, but the mirror could not be torn off and there was a danger that it would simply break.
I glued it to the tape without sparing, not only along the edge, but also in the middle and boldly.
So it was impossible to get under with a spatula or a utility knife; ordinary wire came to the rescue, which was in an electric corrugation for pulling the wire inside.
I cut off a piece of about a meter and began to peel it off from the top using sawing movements, then, having reached about the middle, I started from the bottom, and in about twenty minutes I disconnected the mirror from the door.
I removed the tape from the door itself, not paying attention to the fact that I might damage something, just with a plastic spatula, but from the mirror I carefully had to remove it piece by piece with a hair dryer, so as not to damage the mirror coating.
This is how I removed it, by the way, I removed it, trivially, so that later I could simply hang it higher, again gluing it with double-sided tape.
www.remotvet.ru
How to cut or tear off a mirror panel glued with double-sided tape from a door?
Double-sided tape does not seem as impressive as liquid nails, but this is not entirely true, because the mirror can be glued to it not only in the middle and along the edges, but also over the entire area. If desired, the mirror can be torn away from its mounting location, but there is a high risk of breaking the thing and injuring your hands with large fragments, so it is better to discard this method immediately and not try to use it under any circumstances.
A good way to remove a mirror from double-sided tape is similar to the one described above using cutting wire. If you don’t have an item for exactly this purpose, you can take a strong string or any thin but strong wire that will pass between the mirror and the door and will not break during the sawing process.
Alternative options
Agree that not everyone has glass cutters. Therefore, many go in search of alternative options so as not to spend extra money on the purchase of special tools.
On the Internet you can find many videos in which glass and mirrors are cut with all kinds of improvised means.
I want to tell you about several original and simply effective ways to replace a glass cutter and cope with the task.
- Tile cutter. If available, you can process a fairly thick mirror sheet with a tile cutter. But again, the tool is not cheap. If you choose, it is better to buy a diamond-type glass cutter;
The options are truly varied. Moreover, all of them are tested in practice and have proven efficiency and performance.
How to remove marks on the wall after dismantling?
Once the mirror has been removed, you can begin to peel off the old adhesive layer . You can do this in the usual way, using a spatula or knife, if this place then covers the mirror again. To preserve the surface and not scratch it, you can use the second option: here the main assistant is gasoline or solvent.
The solution with dissolution is more successful if there is information about the composition of the glue. You need to apply a solvent to the surface of the cabinet and wait until it softens the glue and allows it to be wiped off. You can stick a new mirror onto the cleaned area, but this must be done carefully so as not to break it.
Fastening process
Let's get started with the work:
- First of all, it is recommended to prepare the workplace. It is better to place the door on some kind of flooring, so as not to worry about the surface of the floor or table on which the work will be performed.
- On the door you need to draw the correct placement of the mirror using a template. If you glue it unevenly, it will ruin the appearance of the cabinet.
- Let's move on to degreasing the surface: to do this, wet a rag with a special solvent and apply it to both surfaces that will be bonded in the future. Moreover, when working with a mirror, you need to be extremely careful so as not to damage it. To do this, it is recommended to spread some kind of blanket and only place our workpiece on it. And then start treating the back of the glass with a degreasing agent.
- Insert a tube of silicone into the gun, cut off its edge and you can start applying the product to the surface. It is better to do this in a zigzag pattern in increments of no more than 10 cm.
- As soon as silicone has been applied to the back side, the workpiece must be placed on the door according to the drawn marks. To do this, it is recommended to place the edge of the glass in the drawn corner and align the sheet along the side line. If the mirror blank is large, it is better to use the help of a friend.
- The glass is gently pressed against the surface of the door. Care must be taken to ensure that it does not move or warp. All lines along the mark must coincide with the edges of the workpiece.
- The final fixation on the door will occur in a day. During this time, you need to place heavy objects on the surface that will improve the adhesion of the materials. The main thing is that it is a uniform load.
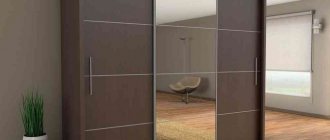
Features of mirrors
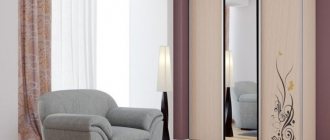
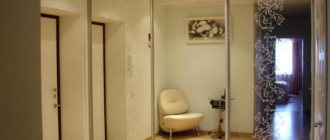
Thanks to their reflective properties, mirrors can visually expand the space, add light to the room, and hide its imperfections. Enclosed in beautiful frames with built-in lighting, clock mechanisms, ornaments, drawings or inscriptions, they perform a decorative function and can also be part of the decoration.
The expected effect is reduced to zero if flaws appear on the mirror surface. This often happens due to improper care, because despite its apparent strength, the mirror is a rather fragile material. Of course, it will not be possible to completely eliminate the defects, but you can try to mask the scratches on the surface yourself.
ATTENTION!
To extend the life of the mirror, it is necessary to provide it with high-quality care. Do not use sharp objects, hard sponges or abrasive cleaners for cleaning and washing. For bathrooms, it is better to purchase special mirrors designed for rooms with high humidity, where the coating is protected from destruction by moisture.
How to remove?
Before you begin removing double-sided tape, you must carefully read the instructions and removal tips, because any careless movement can ruin the surface on which traces of the tape are located.
There are dozens, maybe hundreds of methods for removing adhesive marks, but the most effective ones are revealed below. Let's look at each of them in more detail.
Stationery knife
The method is simple, but it is permissible to use it if the likelihood of scratching the surface is minimal . Proceed with caution.
The paper or film base is pryed off with a blade. The loose edge of the tape can be easily torn off by hand.
If it was not possible to remove all the adhesive tape at once, and pieces remain, you need to lift the edge of the adhesive tape again with the tip of a knife, and so on until it is completely removed.
Rubber (caoutchouc) disc
A soft attachment for a drill or screwdriver will help you cut off adhesive tape from a large area . The rubber disc will remove the top sticky layer without leaving scratches on the surface.
The tool must be set to minimum speed. Plastic rubber will not harm even the paintwork.
Glue heated to 80-100°C is removed faster. You can use either a hair dryer or a hair dryer to dry your hair. They can be replaced with an iron set to the minimum temperature.
The advantage of this method is the absence of scratches even on paper . The most tightly attached tape can be removed without difficulty.
But there is no need to heat non-heat-resistant objects to high temperatures, especially with a powerful hair dryer - they will immediately deform. It is better to expose them to the sun for a short time or keep them under steam - the glue will noticeably soften.
Oil
The glue will easily slide off if you lubricate the area of contamination with vegetable or essential (for example, eucalyptus) oil . They contain organic unsaturated acids that can dilute polymers:
Wipe the sticky surface with a sponge and leave for several hours.- You can lay a rag soaked in oil on a horizontal tabletop or bedside table for about 20 minutes.
- If the stain is stubborn, it is best to leave the greased stain on overnight. In the morning the stain will come off without effort.
- All that remains is to wash off the oil. Easy to clean surfaces (glass, polished furniture, plastic) do not absorb grease, so there will be no problems.
This method is not acceptable for paper wallpaper.
Eraser
If you rub the remaining glue with a regular eraser, it will form pellets and come off easily . Just rub it with a cloth.
Gasoline, acetone, white spirit
The main advantage of the method is the ease and speed of removal:
It is necessary to moisten a rag in any of the existing types of solvents and rub the stain.
The type of surface should be taken into account. Regular gasoline can leave behind greasy stains.
It is better to replace it with a highly purified composition, for example, liquid intended for refilling Zippo lighters.
Acetone easily dissolves paint and varnish, so it is not recommended to use it for cleaning furniture. The same goes for removing stains on wallpaper. White spirit is used to treat any type of surface, with the exception of those painted with unstable dyes.
Glass cleaning liquid
Most of them are made with alcohol, which is an excellent solvent.:
- You need to rub the stain with a sponge or rag soaked in this mixture, and after a couple of minutes there will be no trace of the sticky stain.
- You can replace the windshield wiper with regular drinking alcohol or ammonia. They can even cope with dried out, old stains.
- More serious products are car glass cleaners. But it should be noted that, in addition to alcohol, they contain quite strong chemicals and ammonia.
Table vinegar or citric acid
Any acid can dissolve glue . In everyday life, vinegar or lemon is more often used.
You should rub the contaminated area with citric acid soaked in table vinegar or diluted water, and the dirt will easily come off.
This method has a significant advantage: the acid does not leave streaks . The smell of vinegar will disappear in just half an hour.
General Tips
For those who often face the need to remove glue residues, we can give several useful recommendations:
when gluing tape to a painted surface, you need to be prepared for the fact that this area will lighten a little over time;- fresh traces of glue are much easier to remove than old ones;
- Solvent 646, in addition to ethers and alcohols, contains acetone; this mixture will cope with any type of glue;
- There are special products on sale for removing adhesive tape, for example, Label Remover; you need to look for them in construction stores;
- Fire starter fluid will also help remove remaining adhesive tape; however, it is only able to dissolve certain types of glue;
- You can replace acetone with a more gentle composition - nail polish remover.
But there are different types of tape. Packaging, paper or mounting is coated with acrylic glue. Rubber is used primarily for masking tape. The easiest way to get rid of the rubber base is.