/Furniture/Set, wardrobe, rack/
Kitchen layout is more than just a layout of furniture and appliances. This is a project for a significant part of the household’s life, so its development must be approached with all responsibility. Our layout guide, as well as a selection of 80 illustrative photo examples, will help you make the right decisions and think through your kitchen plan as efficiently as possible.
Kitchen layout options
Before deciding on the organization of space, it is necessary to consider all the options and correlate them with the configuration of the room. It is important to consider the storage system in the kitchen. Let's talk about six popular types of layouts and their features.
Linear
The simplest and most common layout. Otherwise, it is called single-row, because the furniture in the kitchen will be located along a long wall.
This layout is suitable for small kitchens with an area of 4-6 sq.m. You can properly organize your workspace and leave free space in the center of the room.
This layout has a significant drawback - minimalism in the setting. If there is too much furniture and objects, it will create a feeling of clutter. Therefore, it is better to get by with a universal set that already includes a free surface for cooking.
Advice! If there is nowhere to put the stove, give preference to a hob. The design fits perfectly into the linear layout.
The dining table can also be placed along the wall. However, if there is free space near the window, it is better to place furniture there.
Furniture arrangement in a linear kitchen layout
An example of the location of the set in a linear kitchen layout
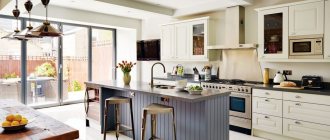
L-shaped
An L-shaped or corner kitchen layout will help if it is physically impossible to place all the furniture against one wall. In this case, objects will be located along two adjacent surfaces.
This option is suitable for both miniature and spacious kitchens. The L-shaped arrangement of furniture is convenient from a Feng Shui point of view. The result is an ideal work triangle, where everything is at hand.
For a corner layout you will need a special kitchen set. If you did not plan to purchase it, try to correctly arrange the furniture that you already have. Move cabinets and hanging shelves close to the corner so that every centimeter is put to good use.
It is better to place a dining group of a table and chairs in the center of the room. This arrangement rhymes perfectly with the L-shaped layout and creates a feeling of fullness of space.
Furniture arrangement in a corner kitchen layout
Location of furniture in an L-shaped kitchen layout
Double row
The two-row layout of the kitchen set means that the furniture will be along opposite long walls. This option is suitable for spacious rectangular rooms. The minimum kitchen area to implement the idea is 8 sq.m. However, parallel layout is undesirable for spaces that are too large. In very large rooms you will have to spend a lot of time moving from one functional area to another.
It is not necessary to cover the entire length of the walls with furniture. Most often, the size of the cabinets is only enough for half the surface. For balance, you can place a dining group at the opposite end of the kitchen. Then the room will have a separate dining area and a functional corner for cooking.
Arrangement of furniture in a parallel kitchen layout
Arrangement of items in a two-row kitchen layout
Important! The optimal distance between cabinets on different sides is 1.5-2 m.
U-shaped
A U-shaped kitchen layout means that furniture should be placed along three walls. This option is only suitable for spacious kitchens, because there will be practically no room to move in a small room.
It is better to organize your workspace along one wall. For example, place a hob, a table for cooking, shelves with utensils. Along the opposite wall it is advisable to place racks and cabinets for storing food and kitchen utensils. On the third narrow surface, a cabinet with a built-in sink or a dining table will look organic.
You can organize a full-fledged dining area in the center of the room. However, this option is suitable if the headset modules do not occupy the entire surface of long walls. Otherwise the room will seem too cluttered.
Location of the furniture in a U-shaped kitchen layout
An example of a U-shaped arrangement of items in the kitchen
Ostrovnaya
An island layout suits dramatic American-style kitchens. It is worth considering this option if the room is spacious. An island is a fairly massive piece of furniture that will occupy the entire central space of the room.
Island layouts are commonly used in private homes. It is much easier to communicate there. For convenience, the kitchen island is equipped with a hob or sink.
Other furnishings can be arranged as desired. For example, along one or two kitchen walls. However, you should not include a lot of furniture in the interior. The island must remain the focus, otherwise the meaning of this non-standard layout will be lost.
Adherents of minimalism try to include only an island and a dining table in the decor. In such cases, the main piece of furniture becomes both a work surface and a module for storing food, utensils and other kitchen utensils.
Placing a kitchen island in an island layout
An example of the location of the island in the layout of a spacious kitchen
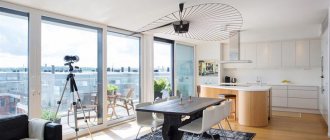
Peninsular
The peninsular layout is both island and linear. It will help out if the kitchen is not too large and it is inappropriate to occupy the center of the room.
The main attribute of the decor will be a peninsula - a small table, one end of which rests against the wall. An alternative option is to combine such furniture with a bar counter. In this case, you can exclude the dining group from the interior.
Placing a kitchen island in a peninsula layout
Example of a peninsular kitchen layout
Let's sum it up
Independently planning the details of the furnishings of your future home is an exciting and responsible process that can drag you in because you are actually creating a picture of a future happy life in a new place in your head, and at the same time repel you, since after all, planning involves studying a lot of difficult and not for all interesting nuances. However, if you firmly take up the matter and approach it with all responsibility, everything will turn out just fine.
Everyone knows that a kitchen is needed not only for cooking, but also for relaxation, as well as pleasant gatherings with the whole family or with guests. That is why, even with limited space, it is necessary to ensure maximum comfort in this room. In a special article we will look at kitchen designs with an area of 10 sq.m.
Video - Correct kitchen layout and proper location
How to plan your kitchen correctly: points to consider
We discussed furniture arrangement options. Now is the time to choose the right one, based on the functional features of the room and furnishings.
Shape and area of the room
It is logical that layout options for rooms of 4 and 16 square meters. m. will differ. If you have a small kitchen, first of all, make sure to free up as much central space as possible. Suitable furniture arrangement: linear and L-shaped.
If the kitchen is elongated, your task is to visually expand it. Two-row and island layouts are definitely not suitable. It is better to choose linear, angular or U-shaped.
A two-row layout is ideal for a square kitchen. With the help of furniture, you can visually adjust the configuration of the room and successfully organize functional areas.
It’s easiest for owners of spacious rectangular rooms. Almost all types of layouts are suitable for such rooms. If you are the happy owner of a large kitchen, make your choice based on ergonomic principles and furniture features.
Design and dimensions of kitchen units
You should pay attention to this parameter when the furniture has already been selected. If the set consists of a large number of modules, give preference to corner or U-shaped layouts.
The compact set can be placed along one wall. If the furniture comes with additional cabinets, place them on the opposite surface. The result will be something like a two-row layout.
Try to place the kitchen island strictly in the center of the room. Place the remaining furniture at a sufficient distance. So that there is at least 1.5 m of free space between the island and the cabinets.
Availability of a balcony and two windows
The task of arranging a kitchen becomes more complicated if the room has two windows or access to a balcony. The main rule is that these elements must be freely accessible. Therefore, you should not move the set or dining table close.
A common solution for this layout is a bar counter between the kitchen and the balcony. It serves as both a functional element and a zoning detail.
Most often, the balcony in the kitchen is located on a narrow wall. Therefore, the U-shaped option for placing the headset is definitely out of the question. This method of planning will be questionable even if there are two windows. However, if there is a wide space between the elements, you can place hanging shelves or cabinets there.
A good example of a narrow kitchen layout
Ergonomic interior of a square kitchen
Stylish interior of a large rectangular kitchen
Science at the service of the housewife: the working triangle
As experts involved in this issue say, working in the kitchen is practically a sport: walking short distances is replaced by stops, bending in different directions, and hand movements. And more than 300 individual actions and manipulations with kitchen utensils, appliances or food products are performed per day, and about 160 thousand per calendar year. Of course, optimizing these movements and manipulations can make kitchen chores take less time and effort.
The architect F. Wright from the USA thought about this, writing at the beginning of the twentieth century that the arrangement of the kitchen must be done taking into account the height and proportions of the human figure. But the real breakthrough was made by German scientists in the twenties of the last century: pedantic burghers transferred their passion for streamlining even the simplest processes to home life. Thanks to their research, results were obtained demonstrating the relationship of movements between the main areas: cooking, food storage and the work area. To do this, they analyzed the movements of women preparing food for a long time, measured the distances traveled and took into account the time they spent on it.
Work triangles for kitchens
The Germans developed the principle of constructing a “work triangle”, which to this day forms the basis of the ergonomics of kitchen premises. According to statistics, the housewife spends the longest time (up to 60 percent of the total time spent in the kitchen) in the sink area; this vertex of the triangle should be located in the most convenient place. The next top is the refrigerator, which should be placed at a distance of 1.3-2.3 meters. The last one is a stove, which is ideally placed 1.3-1.8 meters from the sink. The optimal distance between the vertices of the far corners is about 3-4 meters, but the total area of the working triangle should not be more than 5-7 square meters. To ensure that the work surface is not interrupted, it is best to place the refrigerator in one of the corners of the kitchen.
The main principles of ergonomics when planning a kitchen
Ergonomics is the science of rational arrangement of objects. Designers often use its principles when organizing space. The kitchen is one of the most functional rooms in the house, so the rules will definitely come in handy. Basic principles:
- Implement the work triangle rule . It implies that the stove, sink and refrigerator should become the three main points of the space. If items are placed on the same line, the cooking process will slow down significantly. The ideal distance between points is 180-250 cm. If the segments are larger, inconvenience will arise.
- Choose the right location for the sink . The sink should be located no further than 2.5 m from the riser. If possible, plan the location during the major renovation phase. In a private house there are more maneuvers for an ergonomic interior and energy saving. In apartments you will have to adapt to the existing communications.
- Make sure the stove is positioned safely . The device should be placed at a distance of at least 40 cm from the sink. In general, according to safety rules, such a distance should be on both sides of the stove. However, these norms are often neglected.
- Maintain minimum aisle widths . According to the standards, the optimal figure is 120 cm. This distance is enough to easily move around the kitchen. However, as a last resort, you can reduce the length to 100 cm, but no less. There are standards for walk-through rooms. In such cases, the width of the passage should be increased to 150 cm.
- Consider the location of the refrigerator relative to the stove . Safety regulations strictly prohibit placing the food storage device near heated surfaces. Otherwise, the refrigerator will quickly fail. It is better to install the device on the side opposite the stove or build it between the headset modules. If this is not possible, it is advisable to take the equipment out into the corridor.
- Tap into niches . If there are recesses on the kitchen walls, take them into account when planning. There you can place shallow cabinets or shelves for storing spices, decor and other small items.
- Buy compact items for a small kitchen . If the room is small, consider smaller appliances. There are narrow refrigerators, miniature microwaves and dishwashers on sale. Discard unnecessary items. For example, a washing machine. It is more logical to install such equipment in the hallway or bathroom. In a small kitchen it will take up space and look out of place.
- Decide the fate of doorways . If necessary, they can be moved, narrowed or expanded. It is not necessary to install doors - you can get by with screens and partitions. However, these elements will also be superfluous if you want one movement to smoothly flow into another.
Principles of ergonomics in kitchen interiors
An example of a successful small kitchen interior
Important! Install the stove closer to the ventilation hole or provide an exhaust hood.
Design features of the kitchen set
As noted earlier, first of all, it is necessary to decide on the location of the main working points - the sink, refrigerator and stove, as well as the method of placing the set in the room, based on its area and configuration. After this, you can approach in more detail the organization of the functional equipment of each individual zone - choosing a place to install exhaust hoods, dish shelves, drying racks, drawers with spoons and forks, places to store pots and other kitchen utensils.
Corner set with dimensions
Having decided on the location and purpose of each module, we begin to determine their optimal sizes.
What to consider when designing cabinets
First, you should decide on the internal components of the cabinet. These parameters will affect the type of cabinet construction.
Note! You can save space by installing a roll-out basket inside a standard cabinet.
Roll-out baskets
If you plan to install a roll-out basket in the cabinet or equip it with drawers, then its design is limited to 4 drawers. When the shelves stop, another piece is added. The optimal shelf height is 30 cm, so the lower cabinets can be equipped with two shelves, and the upper ones with three (for a cabinet height of 90 cm) or two (for a cabinet height of 60 cm).
Shelves inside upper cabinets
The design of a standard cabinet is represented by two side, top and bottom parts. In this case, the width of the lower and upper parts is determined as the difference between the width of the cabinet and the thickness of the chipboard, equal to 1.6 cm and multiplied by 2 (40 - 2*1.6) So, if the width of the cabinet is 40 cm, then the upper and lower parts will be have a width of 36.8 cm. Industrial furniture production offers cabinets in which the top cover is replaced by two slats - this allows you to significantly save material, but complicates the assembly process.
Types of cabinet designs
If there is a shelf inside the drawer, its width corresponds to the dimensions of the top and bottom parts. To make the back wall, LDVP is used, which is secured using furniture nails or staples.
The HDF back wall is 2 mm smaller on each side than the size of the cabinet
You can develop a kitchen drawing on a computer using one of the many design programs. A special article will tell you about the main nuances of making kitchen furniture drawings yourself.
Edging parts
When making furniture from laminated chipboard, the end sections of parts must be finished with a decorative edge, which protects the material from moisture and mechanical damage. When designing parts, it is necessary to immediately determine which cuts will have an edge and which will not. You will need to glue the edge on the front side or where there is a high probability of moisture getting in.
Decorative edge
Note! The edge thickness can be 0.4 or 2 mm. Thin and cheaper tape is used to finish structural elements of drawers.
PVC edges are applied to laminated chipboard sections in the factory using special equipment, but a thin melamine edge can be applied independently using a regular iron.
Types of PVC edges
Features of designing corner cabinets
When designing a kitchen set with an L- or U-shaped arrangement, the issue of choosing the design of the corner module is relevant. The cabinets can be connected at an angle of 90 or 45 degrees. In the first case, the cost of the structure is lower, and in the second, it is possible to install a sink or hob.
Corner cabinet at 45 degrees
The main problem with 90-degree corner joints is the difficulty of installing the façades. Drawers and doors will create some interference, so the design of such a cabinet differs from the usual one.
Design of a corner cabinet with inserts
The design can be made more functional by special inserts that pull the drawers together and act as a façade. The width of the inserts is 7 cm, and the height corresponds to the height of the cabinet.
Placement of inserts
To install the facade, another insert 10 cm wide is inserted on the opposite side for fastening the hinges.
Cabinet with additional insert for door fastening
The corner module with a facade at 45 degrees has more impressive dimensions - with a tabletop width of 60 cm, its sides are 90 cm long.
Trapezoid under the sink
When designing such a cabinet, you should take into account the location of the upper and lower parts, which are located and fixed between the sidewalls, and not on top. This is due to ensuring correct installation of the façade and existing hinge designs.
Design of a corner cabinet with a 45 degree front
What to consider when designing a drawer
When designing drawers, you can use standard metaboxes (ready-made drawers) or design your own laminated chipboard drawers of the required size.
Metabox
The main element of a drawer is the guides, which can be roller or ball. The latter provide full opening, and therefore are more convenient and functional. When designing a drawer, it is necessary to take into account the width of the guide, which is 1.3 cm. With a cabinet width of 40 cm, the dimensions of the drawer will be 34.2 x 50-54 cm.
Drawer on roller guides
How to create a kitchen plan with dimensions and furniture
In fantasies, the interior can look stylish and beautiful, but in reality it can be very different from what was planned. Therefore, it is necessary to draw up a clear plan that will reflect the location of furniture, household appliances, decorative elements, sockets, electrical appliances, windows and doorways.
The plan can be created in special design programs or simply made a drawing on paper. It is important to reflect the configuration of the room and all dimensions: area, length of walls, location of windows, exits to the balcony, width of openings, distance between elements.
If you have already purchased furniture, measure it too. Important parameters: height, width, length, depth. Think about where items will be placed and check whether they will fit into the designated areas. If you don’t have furniture yet, when purchasing, use a ready-made kitchen plan.
Advice! Designers recommend making 3D visualization of the interior. You will see how the renovated room will look in reality. This is a great option if you are doing interior design yourself and are afraid of making mistakes.
Storage Distribution
- All instruments, utensils and devices that are used every day must be located in the work area.
- In one place you need to collect only items of the same type in order to easily search.
- For convenient storage, it is recommended to use trays, boxes and other dividers. Closed containers are equipped with labels. Fixing rods are used for lids and boards.
- Drawers and systems will simplify access to even the most remote corners of the kitchen. In addition, every square centimeter is used.
- All things should be stored in rows, not in piles, so that you don’t have to constantly move or lift everything. Trays, hooks, rods or special elements are used for separation. The only exceptions are deep dishes and large pans.
- It is recommended to use non-standard storage places, such as rod hooks on cabinet doors, mounts for jars of spices, clothespins for gloves and kitchen towels, nets for small items, etc. Larger items will support the outer side ends (cans, rolling pins, kitchen towel holders, etc.).
- The interior corners of the set, as well as on the work surfaces, are equipped with carousels or shelves with drawers that match the interior.
- One of the corners of the room can be allocated for a tall cabinet, which will act as a storage room. Its height should be for the ceiling itself. Inside there are shelves, drawers, and fastening systems for different types of products or devices.
- The lowest tier of furniture is equipped with wide drawers in which you can put pans, unclaimed dishes, and bottles.
- There is a lot of wasted space under the sink. The use of trays will allow you to organize the storage of detergents and various household chemicals, sponges, gloves, and buckets.
- The sink organizer will simplify the storage and use of dishwashing detergent and sponges.
Even hard-to-reach places can be used correctly. For example, between the wall and the refrigerator you can place a narrow rack on wheels for spices, and equip the apron with a magnetic knife holder.
Kitchen zoning: ideas and best practices
When thinking about the layout of the kitchen, designers always strive to make every corner of the room functional. And to visually delimit the room, zoning techniques are used. There are a lot of techniques, but we will focus on those that are suitable specifically for the kitchen. For example:
- Island or bar counter . Excellent options for a spacious room where there is no dining table. Also, designers often zone the kitchen-living room with a bar counter. This is convenient - you can visually divide the space into two functional areas.
- Glass or plasterboard partitions . The first option is more suitable for compact rooms, the second - for spacious ones. The fact is that, if desired, the glass screens can be moved aside, and the plasterboard structures will remain in place. But they create the complete impression of a separate room. With their help you can separate the dining area from the working area.
- Fabric screens . Not a very practical option for the kitchen, because grease splashes can get on the material and it will lose its appearance. If you choose this method, consider partitions made of water- and stain-resistant fabrics.
- Podium . It is assumed that in one part of the room there will be a small ledge where a bar counter, island or dining table will be located. However, most often the podium for zoning is used in combined rooms. For example, a dining room-living room.
- Textile zoning . For example, in the dining area you can lay a beautiful carpet on the floor. The accessory will help create contrast between areas.
- Zoning with color . The trick is to decorate the kitchen work area in one tone and the dining area in another. For this design, consider shades that are in perfect harmony with each other. Typically, this technique is rarely used independently, so it can be used to enhance the effect of other techniques.
- Zoning with light . This technique allows you to visually divide rooms into sections using different lighting schemes. For example, above the bar counter you can hang original lamps on long cords or chains. It is easy to highlight the work area with the help of lamps built directly into the furniture facades.
Feel free to combine different methods. For example, zoning with light and color, podium and textiles. Screens and partitions are considered the most self-sufficient methods. You can only stop there.
An example of kitchen zoning with textiles and color
Glass partitions for kitchen zoning
Decorative lighting for kitchen zoning
Bar counter for zoning the kitchen-living room
Black and white podium for kitchen zoning
Figured plasterboard partition for kitchen zoning
Designer.
Any furniture showroom will welcome you with open arms and assign a professional designer to provide advice and develop a kitchen project.
Don't forget to take with you a sheet of paper with your measurements taken in advance.
After the preliminary design has been approved, a surveyor will most likely be sent to your home to more accurately measure the kitchen and detect hidden pitfalls.
Interior styles
Each direction in design has its own characteristics, and the choice depends, first of all, on the personal priorities of the owners. But remember that the design of the kitchen should match the design of other rooms, especially the hallway and living room, so that the entire living area looks harmonious.
Classic style
The main features of an aristocratic classic kitchen are elegant lines, symmetry, expensive furniture and noble shades of decoration. An indispensable companion to the classics is a large number of decorations, in the form of plaster stucco, carved, forged elements, curtain draperies. Natural materials are welcome here: wood, stone, natural fabrics or leather.
In the style of minimalism
A minimalist kitchen is characterized by functionality and simplicity combined with high aesthetics. The interior is devoid of pompous decorations, and the arrangement of objects is as laconic and rational as possible. The design welcomes light colors (preferably white), closed furniture systems with built-in appliances and clear geometric lines.
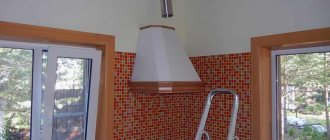
Loft style
While a traditional loft requires space, modern interiors have long moved away from these stereotypes. Leave the brick wall, use concrete finishing, do not hide communications and boldly combine modern technology with retro furniture. Stick to light and warm colors, use the contrast of brick and gray, and a 3 by 3 kitchen will look much larger.
Provence style
A medium sized kitchen would look great in a French country style. Light colors, open wardrobes with dishes and accessories, antique wooden furniture, a lot of textiles and light are welcome here. In this direction, special attention is paid to decor in the form of ceramic figurines, elegant watches, bouquets of flowers, photographs. Elements such as retro textiles, decorative plaster, forged parts, aged furniture, and wooden ceiling beams give it a special charm.
High-tech style
Modern design looks good in small and standard kitchens. It is distinguished by simplicity, a minimum of details and decorations on the facade and decoration, practicality and convenience of the equipment and furniture used.
Built-in wardrobes and appliances are ideal. From the fittings: cabinet doors that open easily with a light touch. Finishing with shiny, smooth and shiny materials such as PVC film, plastic, acrylic, enamel.
Steel, translucent or tinted glass looks great in the interior. The colors used are combinations of white, black, gray and metallic. Accents are made with a small amount of bright red, green, orange and other colors.
Art Nouveau style
A set in this style is distinguished by bright glossy facades with blank doors and rounded shapes. Chairs and tables can have unusual shapes; they are made of wood, plastic, glass and metal. The presence of mirrors that reflect light will improve the overall lighting from artificial sources, and also make the room deeper. The design of a 3 by 3 meter kitchen in the Art Nouveau style can be seen in the photo below.
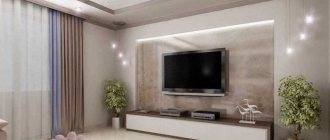
Decoration of a walk-through living room in a Khrushchev building
The advantage of such rooms is a large window that lets in a sufficient amount of light. To get soft lighting, you should choose light translucent curtains. Opposite the window opening, you can place a partition with a reflective surface or glossy furniture. If you combine a walk-through living room with a kitchen, you can increase the free space. It is better not to use large pieces of furniture here. Luxurious chandeliers should be replaced with floor lamps and compact lamps.
Large walk-through kitchen Source archidea.com.ua