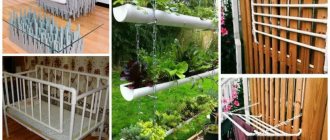
Metal-plastic or polypropylene pipes are an excellent material not only for household needs, but also for creating homemade fixtures and pieces of furniture. In particular, a reliable and beautiful rack made of pipes can be placed in a garage or auto repair shop, and an elegant shelf made of thin metal-plastic products can also decorate a living space.
Tools and materials required for work
Depending on the type of furniture that you plan to make, the set of materials and tools may vary. But basically the following tools will be required for the job:
- perforator;
- screwdriver;
- hacksaw;
- scissors or knife.
Materials required for work:
- pipe cutting;
- glue;
- connecting elements of different shapes;
- stubs.
To make furniture look more beautiful, paint is useful. Beds, tables, shelves can be painted in the color you like. For beds in the children's room, choose delicate pink, blue, bright orange, yellow shades.
Assembly steps
First, we determine the dimensions of our future rack. Here are some recommendations:
- for storage rooms, the height of the shelf should be at the ceiling, the depth should be at arm’s length (to make it convenient to reach the item);
- if the rack can be approached from both sides, then its depth can be increased;
- for storing tools: height – 2 m, depth – 50 Washing machine, number of shelves – 4, distance between them – 45 Washing machine;
- for storing canned food, the step between shelves can be reduced (up to 30 Washing machine), and their number can be increased.
Typically the dimensions of the shelf are:
- 180x50 Washing machine – with 4 shelves;
- 200x60 Washing machine – with 3 shelves;
- 180x50 Washing machine - with a high bottom shelf, the rest - in increments of 35 Washing machine.
Of course, these dimensions are not absolute; they can be changed when making them yourself.
When this stage is completed, prepare the drawing. As a last resort, a diagram. But be sure to indicate the dimensions that need to be maintained during assembly.
Important! Always practice safety precautions, especially when working with sharp objects and power tools. Do not neglect the protective cover on the angle grinder. To protect against plastic and metal dust, use a respirator and goggles.
When this documentation is ready, production can begin.
- Cut the profile into equal sections. If this does not work, bring it to the desired length by grinding the end of the workpiece.
- Clean off burrs and chamfer.
- If the pipes will be connected with fittings, the protective varnish must be removed from the ends of the workpieces. To do this, use sandpaper again. In addition, a rough surface adheres better than a perfectly smooth surface.
- Start assembly with the vertical posts. Then connect them with cross beams. Fasten the parts together in the desired sequence. The method of fastening depends on the material of the workpieces and the type of connections.
- Be sure to use a level - the product must be level. The more often the checks, the fewer errors.
- Using this method, assemble the entire frame.
- Install shelves. If the fastening is through, then the frame is assembled to the height of the lower shelf, which is then placed on the pipes. After this, grow the frame to the desired height.
- If the bookcase is high, secure the top crossbar to the wall with anchors.
- Once the shelving is assembled, paint it. Preferably in several layers.
READ Acrylic paints have dried out, what to do?
The structure is ready. Both plastic and metal shelves are assembled using this system. A homemade rack does not have to be rectangular; it can be made angular. The general assembly technology does not change.
And finally, an important tip. Load both factory and homemade shelves correctly. Place heavy things on the lower shelves, light ones on the upper ones. Periodically inspect the fastening points, because this is where destruction begins.
To learn how to make a shelving unit from pipes in a loft style with your own hands, see the following video.
Project preparation
First, you need to decide on the location of the future product in the garage so as not to make a mistake with the dimensions. Write down the results on paper immediately.
Then you need to draw a design diagram. If the rack is portable, then its basis is made up of sidewalls in the form of two racks, between which jumpers are located.
The sidewalls are connected to each other by beams. In this case, the lintels and beams form the basis for the shelves. Stationary racks have the same design, but without rear posts, and often there are no rear beams. Therefore, the jumpers are attached directly to the wall.
Be sure to indicate the following design parameters on the diagram:
- Overall height - to save space in the garage, it makes sense to make the furniture as high as the ceiling. On the upper shelves you can store items that you rarely use;
- The length of the structure and the depth of the shelves - these parameters have already been written down on paper, since they correspond to the dimensions of the area on which you want to place the product;
- The distance between the shelves is selected depending on the dimensions of the items that will be stored on them. It must be said that the distance between the shelves does not have to be the same. For example, the compartments for storing rubber can be made larger - 600-700 mm, and it would be advisable to make smaller so that more of them can fit.
After preparing the project, you can start working.
Preparing materials and tools
First of all, you need to prepare the pipes. There are no specific requirements for their diameter or, for example, wall thickness.
Therefore, if you specifically buy materials for these purposes, estimate the future loads on the structure, and in accordance with them, select the pipes “by eye”. But, most often, such furniture is made from what is available “at hand”, so there is no choice.
Advice! It is advisable to use profiled pipes for shelving, as they are more durable. But, if you don’t have these, use regular ones, i.e. round.
The only thing is, if you are going to make furniture not for the garage, but, for example, for the house or cottage (Washing machine. Shelving for the home: types of structures), it is advisable to use chrome-plated pipes for the shelving, as they have a more attractive appearance.
In addition to the main material, you will need fittings to connect all the parts - 90-degree angles and tees. To find out the required number, count the number of 90-degree connections, as well as “triple” joints.
Flanges are ideal for future design legs and wall mountings. Also calculate the number of flanges you will need on the diagram.
You should also prepare the material for the shelves - this could be plywood, OSB, boards or wooden slats. To attach shelves to lintels and beams, use self-tapping screws and horseshoe brackets that match the diameter of the tubes.
To protect the product from negative influences and give it an attractive appearance, you will need paints and varnishes for wood and metal.
As for the tools, prepare the following set:
- Grinder/hacksaw for metal;
- Welding machine (if you don’t have a welding machine, you can connect all the elements using a thread. In this case, you will need threading dies or other tools for these purposes);
- Metal files and sandpaper;
- Tape measure and pencil;
- Electric drill;
- Jigsaw;
- Paint brush.
Important! If you are making shelving for your home, pipe yourself using a special cutter, which allows you to preserve the chrome coating.
Having learned this secret, you will never throw away the remains of plastic pipes!
It is also advisable to have a workbench with a vice, which will greatly simplify the work.
Manufacturing and assembly process
Below are the diagrams and drawings necessary for making furniture from pipes. With their help you can make armchairs, chairs, beds, shelves, tables, and a huge number of decorative elements. The products are interesting, durable and safe.
Armchair
An original way to use plastic pipes is to make a chair out of them. There are many options for making it. It all depends on the desire, capabilities and imagination of the master. Plastic pipelines can become a material for making a chair. You can make it using PVC pipes, a knife and glue.
To get an unusual chair, you need to do the following:
- First, cut pieces of different lengths. The main thing is that the longest segments should be the same length. They will act as supports;
- long ones will be needed for the backrest and armrests;
- Then the segments are glued together so that the surface of the armrests and backrest is at the same level. Towards the bottom, the length of the segments changes.
Thus, we get an interesting chair that will decorate any room in the house. To make it even more comfortable, pillows are placed on it or covered with foam fabric. You can have a good time in such a chair, read a book, watch TV.
Bed
Using the method described above, a table and a bed are made. The different sections are glued together to create the base of the bed. On top of it you need to put a comfortable mattress, pillows, and blanket. This is quite a suitable place to sleep and relax.
In addition, cribs are made from this material. To do this, you need to study diagrams and drawings. Then prepare the required size pieces. They are connected using fittings. If you fasten the parts together with glue, they will be very strong and durable. Without the use of glue, the structure will be collapsible and can be removed at any time. A crib for a baby will be unusual, reliable and durable. If there is more than one child in a family, you can make several beds.
Another option for a sleeping place for two children made from PVC pipes is a bunk bed made of polyvinyl chloride, photo. It’s not difficult to make, you just need a drawing or diagram. Following the instructions, you can create a variety of bed options: single or double, bunk.
You can make such furniture from polypropylene pipes with your own hands, like a table. Its frame will be made of pipes, and the tabletop will be made of any other material. At the same time, it must be remembered that PVC pipes are not suitable for heavy loads. The lighter the countertop, the better.
The size of the tabletop in this case will be 91.5 x 203 cm. The following materials and tools will be needed:
- door leaf as a tabletop;
- fasteners for connecting parts;
- drill;
- saw.
You will also need pieces of size:
- 30 cm – 10 pcs;
- 7.5 cm – 5 pcs;
- 50 cm – 4 pcs;
- 75 cm – 4 pcs.
To assemble the frame, prepare:
- t-shaped fittings – 4 pcs;
- plugs for pipes, fittings – 10 pcs;
- 4-sided fitting – 4 pcs;
- cross fitting – 2 pcs.
According to the diagram, assemble the side elements first. Then move on to the back of the table. Pay attention to the stability of the structure. All details must be the same.
To make the table more stable, it is recommended to make an additional third leg.
The last thing is to assemble all the elements into one structure. Inspect the product for any unevenness or sharp parts. Process everything carefully, glue the connections. This is a simple way to make a table.
Rack
Armchairs, beds, tables - this is not the entire list of products that can be made from this material. Another useful interior item is a shelving unit. Design parameters can be very different. It all depends on the size of the room where it will be installed and the wishes of the master.
First of all, it is recommended to make a drawing, a diagram of the future product. Next, use them to prepare the required quantity of a certain size of parts. Connect everything together. The base of the shelves can be plywood or other material. The only thing we must not forget is that the materials are not suitable for heavy loads.
Such racks are used for flowers and toys in a children's room. Shelving can be installed in the garage. There, the products will be a great place to store tools and other things. You can place garden tools on the shelves: pots, tools. PVC products look unusual, neat, and do not require additional decoration. Plastic shelves and racks do not harm the health of others, they are durable and environmentally friendly.
Peculiarities
A distinctive feature of the rack is the complete accessibility of the contents. Finding the right item is not difficult, so bookcases are ideal for storing tools, books, documentation and everything that may be needed at any time.
At the same time, they are also good for long-term storage of things - thanks to their strength and stability, the shelves can withstand a large weight. The shelf can occupy the entire height of the room, and the space is fully used.
This leads to the main disadvantage of purchased models – their standard sizes. It is not always possible to find a rack with the required dimensions, so it either does not fit into the niche, or the useful volume of the room is lost. But such a purchase also has other disadvantages:
- unpredictable quality - even without exceeding the load, the material can crack, especially at fastening points;
- if the product is certified, the price will increase;
- you need to wait until the rack is delivered;
- and then assemble it yourself anyway (or pay again for assembly).
Therefore, it makes sense to make the bookcase yourself. This way, reliability is guaranteed, and the dimensions will be accurate. And it will cost less - rolled metal and PVC pipes are very affordable.
The work is easy - even a beginner can handle it. And the result is obvious - complete order in the warehouse. Therefore, making a rack yourself is also a pleasure.
The nuances of working with the material
Models made from water pipes turn out to be unusual and original. They decorate the room, garden plot. Handmade plastic furniture will add zest to the interior and attract the attention of guests.
Furniture is made from plastic pipes. Two types of materials are used in production: polypropylene (PP) and polyvinyl chloride (PVC). Each of them has its own characteristics and is suitable for the production of different products. Polyvinyl chloride is a cheaper material. It is more often used for sewer pipes. Its advantages include:
- strength and durability;
- ease of installation;
- low cost.
The disadvantage of PVC is that when exposed to high temperature water, the pipes begin to deform. In contrast, products made from polypropylene are not subject to change in shape at high water temperatures. They are able to withstand liquid heating up to 60 degrees, and even more if the pipe is reinforced.
Both materials are equally suitable for making furniture. In addition, there are a huge variety of items that are made from scraps. These are shelves, stands, mirror frames and more. The furniture is easy to assemble. The structure consists of pipes and fittings, the elements are also glued together. Even a beginner can make pieces of furniture from PVC pipes with his own hands.
(Shelf) Book rack made from water pipes
When choosing which pipes to make a rack from, the author of the photo had a hard time:
- PVC is cheap and easy to work with, but it is not flexible enough: it will not withstand the heavy load that the rack implies. PVC pipes are suitable for small shelves
- Copper pipes are fairly easy to work with, are stronger than PVC, and are relatively affordable.
- Galvanized steel pipes are more expensive than PVC, strong, durable, but more difficult to work with.
Therefore, the author’s choice fell on copper pipes.
Attention, in this design there are no rear diagonal beams, which usually give stability to wooden shelves; here they are replaced by horizontal supports, which are located under the massive shelves (see photo). The diagonal supports were removed for aesthetics to completely open up the back wall. In this case, it is still worth fixing the rack to the wall, which will provide additional stability.
This tube holder can be used for books, flowers, toys, children's room, ideal for garage tools, shoes and country garden tools
For the rest, see the visual step-by-step guide below, presented in gallery format.
Photo source: Instructables.com Author: David Katriel (Canada)
Rack of 3 pipes from floor to ceiling.
This shelf made of galvanized pipe belongs to the racks; its advantage is that it is fixed in the apartment without a single hole in the wall or ceiling and can be located away from the walls. The method of fixing our shelf is based on clamps between the floor and the ceiling. According to the author of the photo, making this shelf with your own hands is not at all difficult. Then let's look at the features.
For the rack, the author used flanges, which, unfortunately, had an inner edge. Therefore, the first thing the author had to do was remove this part of the flange so that the pipes could freely pass inside the flange (see Photo 2-7).
Next, we cut the pipes to the length we need. When we measure the length of pipes we need, we take into account the width of the clamp that will stand between the pipes. This clip should be neither too short nor too long.
The author made a clamp between two pipes (short and long) at the top of the rack, under the stream. But later he came to the conclusion that a short tube was not needed here; the clamp could be positioned so that it rested directly on the flange. The presence of a small tube reduces the stability of the stand (see Photo 11). Be sure to wash the pipes with soapy water before installation.
Next, we cut holes in the tubular shelves. The author recommends placing all the shelves on top of each other and using the marked top shelf, like a template, to drill all three holes in all shelves at once.
How to bend a pipe
Products made from this material look unusual. They will look even more interesting if they consist of curved parts. For example, a table with curved legs. In addition, various decorative elements are made from pipes, which come in different shapes. In such cases, bending the pipe is simply necessary.
For this you will need:
- funnel;
- sand;
- scotch;
- plate;
- metal containers;
- gloves;
- saw (hacksaw);
- knife (scissors);
- sandpaper;
- a device for bending pipes (there are different types, mostly improvised materials are used).
The process looks like this:
- cut a piece of the required length;
- cover one end with tape;
- using a funnel, pour in as much sand as will fit;
- heat a measured amount of sand in a metal container;
- put on protective gloves for safety, carefully pour sand into the pipe through a funnel;
- Seal the other end with tape, then the sand will not spill out during the bending process;
- leave it for a while, it will warm up from the inside;
- when it warms up, start bending;
- give the pipe the desired shape;
- at the end of the work, tear off the tape and pour out the sand;
- When the pipe cools down, it will be in the required shape.
Stylish furniture made of plastic and profile pipes
After the construction of a water supply or sewerage system, repair work in a house or country house, consumables are often left behind - metal profiles, polypropylene pipes, fittings. Careless owners throw away excess material, and craftsmen find their own use for each element. For example, they independently develop projects and make durable and beautiful furniture from PVC pipes with their own hands. Tables, chairs, shelves and organizers serve for years, delighting with impeccable functionality and stylish appearance.
DIY children's chair made of PVC pipes
Products made from polypropylene are safe, which is why they are used to make playpens, cribs, fences and furniture. One of the options is a comfortable, light and beautiful chair, assembled from modules (self-cut sections and connecting elements). The size of the chair, which is assembled according to the principle of a designer, depends on the size of the fragments. As an example, let's take the instructions for assembling a chair for a 4-5 year old child.
The material you will need is about 3 meters of plastic pipe, 6 T-shaped connecting elements, 8 corner elements, and a piece of durable bright textile. Tools – fine-toothed saw, PVC glue, sewing machine.
- cut the pipe into fragments - 7 pcs. 33 cm each (A), 4 pcs. 20 cm each (B), 4 pcs. 13 cm each (C), 2 pcs. 18 cm each (D);
- we assemble the back, then the seat, using connectors, we check the chair for stability;
- we sew a rectangle according to the dimensions of the crossbars, bending the fabric along the edges to form holes for the modules;
- we stretch a piece of fabric over the crossbars so that it sag a little;
- we disassemble the chair frame and reassemble it, but using glue at the joints.
After practicing assembling a chair, try to make a table, tent or cozy house for kids.
Organizer shelf for utility room
A large shelf-rack will allow you to restore order in any utility room. Plastic containers are easy to store holiday decorations, clothes and other household items. At the same time, all things are kept within reach, and even a child can get them. The entire structure is made of high quality plastic. The material is ideal for damp basements or garages as it is waterproof and mildew resistant.
For work you will need
- 1.25-inch (3.8 cm) plastic piece - 92 feet (28.04 m);
- 1.25-inch (3.8 cm) 4-way connectors - 12 pieces;
- 1.25-inch (3.8 cm) 5-way connectors - 18 pieces;
- 1.25-inch (3.8 cm) end caps for polymer parts - 10 pieces;
- 12 plastic containers, approximately 16 x 18 inches (40.6 x 45.7 cm);
- roulette;
- pencil;
- circular saw or pipe cutter;
- drill with drills;
- screws;
- hammer;
- screwdriver.
Before assembly, use a circular saw or pipe cutter to cut plastic parts to the required size:
- 15 blanks of 13 inches (33 cm);
- 54 pieces of 16 inches (40.6 cm).
Office desk on a plastic frame
The range of office tables is large: in the store you can purchase any model - from a simple table top with legs to a complex design with shelves and cabinets. But we will not monitor the nearest markets and spend money on a ready-made table, but will make durable and practical furniture from polypropylene pipes with our own hands.
Video: Laptop stands
Materials and tools
Our goal is to build a strong and stylish table with tabletop dimensions of 915x2030 mm. To make a smaller model, it is necessary to adjust the dimensions of both the top and the frame. To make the table light, despite its large dimensions, it is better to take a hollow tabletop (door leaf) and polypropylene blanks. T-shaped and cross fittings serve as connectors; plugs will also be needed. Make sure that the diameter of the clamps matches the diameter of the crossbars.
To make one table you need 12 meters of plastic pipe, cut into pieces:
- 5 pieces of 7.5 cm;
- 4 pieces of 50 cm;
- 10 pieces of 30 cm;
- 4 pieces 75 cm each.
PVC products are sold in construction supermarkets and plumbing stores. In addition to the crossbars for the frame, the following parts are needed:
- 5 flat top end caps;
- 5 caps for cups for table legs;
- 2 crossover (X-shaped) fittings;
- 4 T-fittings;
- 4 four way fittings.
The finished countertop is the canvas for the door, but there are other options. You can order a plastic or glass top, and also create a flat plane of the required dimensions from boards. For assembly you will need fastening materials (screws, self-tapping screws, screws and special PVC glue).
When using connectors, a welding machine is not required. Required tools:
- electric saw or jigsaw;
- fine-toothed hacksaw;
- sharp knife for plastic;
- screwdriver
Prepare all materials and tools in advance, then the assembly work will take less time.
Frame assembly
It is recommended to carry out the first assembly “dry”, that is, without using glue. First, we assemble one by one the sides of the frame on which the tabletop will rest, then the back part connecting the first two. For additional stability and strength, we attach a third leg in the center of the back. We monitor the parallel arrangement of elements.
When all three sides are assembled, we connect them into a single structure. The result should be a frame standing on five legs. After making sure that all the elements are positioned correctly and the frame is level, we disassemble the structure and reassemble it again using glue, special cement or small self-tapping screws.
Tabletop installation
Place the finished table top face down on the floor. We install the frame on top so that the flat plugs fit tightly to the surface. We mark the locations of the plugs and remove the frame. We screw the screws into the designated points and secure the plugs. We turn the structure over, put it on its legs - the office table is ready.
Handmade furniture made from plastic pipes looks more natural if the wooden tabletop is varnished and the legs are painted in a shade that matches the interior.
Floor shelf for books
Making a bookcase from plastic elements with your own hands is an original and definitely affordable solution. Starting with the shelf, you can create an interior ensemble that matches your individual style. The work will not require a lot of money and time. Even a beginner can handle this.
The dark matte paint and wood details give the piece an elegant and industrial look.
Materials and tools
- 1 inch (2.5 cm) PVC pipe with a total length of 30 feet (about 9 m);
- 0.5" (1.3cm) x 24 metal screws
- spot;
- pine board measuring 6x12 feet (1.8x3.66m);
- PVC glue;
- screwdriver;
- paint in vacuum containers;
- drill with drills;
- 90 degree rotating corners 1 inch – 4 pcs.;
- 2.5 cm (1 inch) galvanized shelf hinges with 2 holes – 12 pcs.;
- latex gloves;
- a circular saw;
- PVC cutter;
- Roulette;
- polymer tubing 1 inch long, 30 feet
- PVC cuff 1.25×0.75 inches (3.2×1.9cm) – 4 pcs.;
- plastic connector 3-pin 1 inch – 12 pcs.;
Before you begin assembling the shelf, use a special cutter to cut the PVC into pieces of the required length:
- 12 pieces 18 inches (45.7 cm);
- 4 pieces 2 inches (5.1 cm) long.
- 2 pieces 17 inches (43.2 cm) long;
- 6 pieces 12 inches (30.5 cm) long;
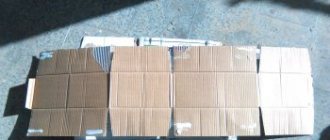
Now use a circular saw to cut the wood into 3 2 x 12 ft (0.6 x 3.66 m) pieces. Sand the edges and surfaces of the wooden shelf blanks in advance.
Metal shelving for the garden
Let's try to do without welding and assemble a rack from a galvanized metal profile of a small cross-section, which is more convenient to process. We will need a tape measure for marking, a hacksaw for metal and a screwdriver, instead of which you can use an ordinary screwdriver.
To simplify the work, we make an exact sketch to which we “transfer” the installation location. We draw a simple diagram indicating the dimensions. Then we calculate how much material – thin profile – is required. If the appearance of the rack is important, we buy a chrome-plated pipe (approximately 22 mm in diameter). For shelves, plywood (10-15 mm thick) is suitable, which we fix with self-tapping screws (8-13 mm).
Use a hacksaw to cut the pipe into fragments. One of the kit options: 4 vertical posts, 8 rear and front crossbars, 8 side crossbars.
We assemble four frames for the shelves, securing the corners with self-tapping screws or additional corner fasteners. Then we fix the frames on the vertical posts - the legs of the rack. We screw the back part of the finished structure to the wall using brackets for stability. We paint the shelving frame (chrome plated is not needed), lay out the shelves, and secure them with self-tapping screws. Convenient for storing things and workpieces, hand-made furniture from a profile pipe is ready.
Materials for basement shelving
- plywood (bought in scraps at FMK, it turned out that it was already the same size as the width);
- welding machine
- assembly;
- polypropylene pipe, without reinforcement, DN25 and DN32;
1. Arranged it according to quantity, made several empty spaces, cutting the tube to size.
2. Using a welding machine, I welded a DN32 pipe and fittings.
3. This is how the first product was made.
4. Cut the plywood to size and trim the corners under the hardware.
5. Having gathered in large numbers, he lowered the structure underground. I attached the plywood to the first rows, welded the vertical posts, and so on.
6. The first stand made of DN32 pipe is ready - for the arc, etc.! I left some shirts with an upward outlet if we want to expand in the future. The stand is stable, can withstand a lot, and does not bend. For reliability, I secured it with tape to the rafter screws.
7. Then, using the same principle, I made a multi-story rack from a DN25 tube for 0.5 and 1 liter cans. You can safely place jars on it in two rows!
8. Second half of the floor with brackets for easy installation on floor joists. The other half is attached to the posts at the base, also using mounting tape and self-tapping screws.
Stylish interior elements made from PVC modules
Very small fragments of plastic products are useful for decorating the interior and creating objects useful in everyday life. Using holes in the pieces, you can make several types of organizers - for shoes, stationery, toys, cleaning products. 5-15 wide elements, glued together and fixed to the wall, turn into a convenient shelf for bottles. A decorated PVC pipe with a longitudinal cut, hung above the bar counter, is a great place to store empty glasses.
To decorate your interior, you don’t need to buy expensive decor. It is enough to cut a thick plastic pipe into pieces of various lengths, paint the resulting elements in different colors, decorate them with sparkles, shells, pieces of colored glass, and you will get a magnificent set of flower pots. Plastic rings are an excellent material for creating festive compositions in the form of wall panels. Christmas tree decorations, hearts, flowers or Easter figures are placed in its holes, depending on the festive occasion.
As you can see, ordinary building pipes in skillful hands become comfortable furniture, useful home equipment, and exquisite decor.
Variety of plastic pipes
It's no secret that plastic pipes come in different purposes, colors and sizes. Their physical characteristics also vary greatly; the pipes withstand different power loads and operate in different temperature zones (for example, for cold and hot water).
The plastics from which pipes are made today are divided into three groups:
- Polyethylene - PE. Do not behave well at high temperatures, the material is elastic and pliable even after exposure to sunlight! Consider the conditions in which your invention will operate; if it is in contact with hot water, then choose a different material.
- Polypropylene - PP. Today, products made from this material are considered the highest quality, durable and toughest. Unfortunately, these are also the most expensive pipes.
- Polyvinyl chloride - PVC. The main advantage is resistance to chemical attack and reduced flammability. In terms of price-quality ratio, we recommend using PVC pipes for various crafts.
Some manufacturers, for the convenience of their consumers, apply color markings to the surface of the tubes to indicate ownership. So, the blue stripe is for cold water, the red stripe is for hot water. It happens that there are 2 stripes on the pipe, which means that it is suitable for both hot and cold.
To increase the rigidity of plastic, manufacturers produce reinforced pipes. A layer of aluminum or fiberglass is inserted between two layers of polymer. Reinforced pipes are much stronger and more reliable, but their price is considerable.
Plastic pipe connections
You can often hear that plastic pipes are construction toys for adults. If you learn how to correctly assemble the parts of this construction set, you can make almost anything!
As already written above, it is generally best to use PVC pipes for crafts. Their price-quality ratio is optimal today.
Plastic pipes can be connected into a detachable or permanent connection, it all depends on your needs. Another option is to heat the pipe in a certain place with a hairdryer and bend it as needed for your design, that is, in fact, do without connections at all.
Plastic pipes. Interior ideas
Crafts made from pipes look fresh and not hackneyed in the interior; a significant plus should be seen in the cost of the material. You can create unique things without investing just your time! Below are examples of what you can easily make from leftover pipes.
Work organizer
We advise you to start making crafts with the organizer. It couldn’t be simpler - cut the pipes at the same angle and glue them to a solid base. You can arrange them in a fancy shape, paint them in your favorite color, or leave them natural. Now the workplace will be in perfect order.
Frames for mirrors and openwork partition
To make a frame you will need pipes of different diameters, thick paper (cardboard), a jigsaw, glue and a mirror. Trace the outline of your mirror on cardboard and remove it. Now, cut the required number of pieces and create a beautiful frame for your mirror. In places of contact, spread the pieces with glue, ensure that the parts adhere to each other and leave the frame alone until the next day.
Using the same principle, you can make an openwork partition for zoning a living space. This design of large diameter circles looks beautiful.
Clothes hanger
There is a huge variety of hangers these days. It all depends on the task at hand. If you have a small hallway, then a stand-up hanger will be what you need; if you need to make a hanger for a child’s room, then a U-shaped one with a stable base and additional branches for hanging a backpack will be an excellent solution. For little money you will get a designer item! It should be noted that you can decorate the resulting product in a color that matches the interior.
Pots and vases for flowers
Crazy hands make cool flower pots from sewer pipes of large diameters, and flowerpots from thin ones. You can get a stylish composition from such flowerpots by installing them on a common base made of painted plywood. You can decorate the pots with stickers, you can paint them with acrylic paints and varnish them, you can print family photos on self-adhesive film and wrap homemade flowerpots.
Shoe shelf
Use the remaining pipe from the sewer wiring as a stylish shoe rack. The diameter of the pipe must be at least 150 mm so that you can comfortably place your pair of shoes. Cut the pipe into pieces 25-30 cm long (slightly longer than the length of the boots).
The number of fragments depends on the area of the corridor; you can attach the pipes directly to the wall or to an additional base (this is smarter), connect the cells together using plastic glue.
Which rack is better - bolted or welded?
Garage shelving is made of metal and wood. The latest options are mostly non-separable, as they are fastened with screws and nails. The installation is stationary, fixed to the wall. Metal racks can even be welded. There are also bolt-on designs, and their advantage is that they are mobile, i.e. can be disassembled if necessary. The disadvantage is the insufficient level of rigidity, since such a connection always has backlash. To make the structure stable, it should be attached to the wall. To do this, metal plates with a hole can be welded (or bolted) to the outer walls. A crutch should be driven into it (but first you need to drill a hole with a smaller diameter in the wall).
Both structures serve well, but welded structures are most common. The collapsible option is also chosen when it may be necessary to move to another garage and you will need to transport all the equipment, but the structure itself weighs hundreds of kg and is problematic to move entirely. The second option is that there is no possibility or desire to weld metal (if the garage rack is made by hand). The rest usually choose the welded option, since it is more stable and, if you have experience in welding, everything is assembled much faster.
Please note that metal racks made from perforated corners are still on sale. They are also mobile and everything can be taken apart, but everything is connected with hooks (on the crossbars) and grooves on the racks. Such designs are convenient, since it is possible to rearrange the shelves to the desired height. Disadvantage: high cost.
Dimensions and design
If we talk about the features, the racks consist of racks, shelves and crossbars. Sometimes, to improve rigidity, even transverse ties are made on the rear side - two strips of steel that are screwed or welded to the outer posts diagonally. It will compensate for lateral loads and also increase reliability and stability. The dimensions - the depth and height of the shelves - are selected almost arbitrarily, since it all depends on what you are going to store. The only thing that will need to be selected carefully is the span length, and it will depend on the rigidity of the material that will be used - even under full load, the shelves should in no case bend.
It is interesting that for heavy objects the span length should be 1.5 meters, if the load is not large, and the distance can be increased to 2 meters, but it is definitely not worth doing more.
If a longer rack is required, install intermediate posts and the distance between them should not be more than 2 meters. Now about the height of the shelves. The lowest one can be raised from the floor level by 0.5-0.7 meters. The heaviest items are usually placed here. The remaining shelves can be made at any height, but 0.3 meters will be inconvenient. In general, the optimal size is when the height of a 1.5 liter bottle fits on the shelf, which is 0.35 meters. This distance will be convenient.
What to make from
What to make a rack with your own hands - from boards or pipes? Metal is not cheap at all now, and if you buy everything at the market or in a store, then one rack (with all consumables) will cost the same amount as a finished one. The only way to save money is to buy metal on the base in solid rods (6 and 12 meters each), and then cut it into pieces of the required length. The cutting can be done immediately at the base and you will have to pay extra for it, but the cost is small. In this case, costs will be reduced by 25%.
If you want to make metal shelving, the choice of materials will be wider - there are a couple of options for metal bases and a standard solution for a warehouse (perforated corners). You can also use metal parts that are intended for other purposes (a steel cable duct or cable stand will do) that is used for the bundle.
What will the frame of the metal garage shelving be made of:
- Made from metal corners, metal thickness 0.3 cm. Shelf width from 0.25 to 0.45 meters depending on the load. The material is durable, but metal-intensive, weighs a lot and is expensive.
- Profile pipe (rectangular cross-section). With less metal consumption (less wall thickness), compared to a metal angle, it has better elasticity characteristics (more difficult to bend), and also has excellent torsion resistance. The approximate dimensions of the racks are 5*5 cm or 4*4 cm, for the crossbars 5*2.5 or 4*2.5 cm.
- The racks are made of profile pipes, and the crossbars are made of angles. The thickness of the metal is 0.3 cm, the width of the shelf is from 0.25 meters or more. The corner should be turned so that the laid flooring appears as if it is in a nest.
The flooring for the shelves is made from the same material as for a wooden rack (OSB, chipboard, board, plywood), but sometimes they add interesting options that are rarely used with a wood frame due to their heavy weight - sheet metal. The advantage of metal shelves is their reliability with a small thickness, but the disadvantage is price, weight and “loudness”. They also need to be painted, but first cleaned of rust, and then treated with converter and primer, then painted in 2 layers. We process the metal frame in the same way, then the structure will not rust.
Metal shelving can be welded or bolted. There are usually no problems with welding, and if a corner is used, then you can even overlap it - a difference of 0.5 cm when laying shelves is unnoticeable. If you wish, you can cut out the excess from the shelves and butt weld them, but this will take a lot of time, and there is not much difference.
Please note that when assembling a frame with bolts, the order is as follows - first, the squares of the shelves and side frames are assembled separately, then they are twisted together. It is best to have at least two bolts per connection for good rigidity.
If you assemble a rack from a profile pipe with your own hands, then the order of work is different. First, you should assemble the sidewalls and attach short crossbars to them. You will get two rectangles with crossbars, and then connect everything using crossbars. See the photo for how to make connections. Sometimes welding is very necessary to weld the “heel pad”, and sometimes you don’t need to use the method, but simply cut out the “ears”, bend them and cling to them. Another way would be to use crab systems. These are metal plates with formed recesses for the profile. Pipes are placed in the grooves, then the two plates are tightened using bolts. It is unlikely to withstand heavy loads, but there is an undeniable advantage - it does not require drilling many holes in the metal. In a profiled pipe everything is simpler than in a thick-walled corner, but it will still take a lot of effort and time.
Interestingly, the bolts must be M6 or M8, and large holes are needed for them. It’s easier to first drill everything with a thin drill, and then expand it to the required size with a thick one. But even with this order, you will need a lot of drills. To prevent them from overheating and breaking, place a jar of water nearby and periodically lower the drill into it.
Plastic pipes. Ideas for children
If you have a small child in your home, then do not rush to buy the necessary items for crazy money. Kids are growing up quickly and soon all this will no longer be relevant. Try to show your imagination and make useful things for the children with your own hands.
Manege
In order to limit a small child’s movements around the apartment, a wonderful device has been invented - a playpen. You can buy it, or you can make it according to your individual measurements! You will need a lot of material to make the playpen, so you won’t be able to get by with scraps in the design.
It is best to purchase pipes in the store, having previously calculated how many of them are needed to create the playpen. Do not regret the money spent; after the child grows up, the playpen can always be disassembled and made into something else.
When creating a playpen, take into account the distance between the bars and the size of your baby; it will be a shame if the child crawls between the bars. Experienced parents advise to come up with fastening the structure to a reliable support to prevent the playpen from tipping over.
Swing
To make swings, it is recommended to use reinforced plastic, because... the situation here is related to the movement and safety of the child. Start making them only when you get good at working with simple crafts.
There are many swings. The most interesting and attractive ones in the form of swinging sofas can be found in country furniture supermarkets. They're just expensive. See how they are made, take the necessary dimensions, develop a sketch adapted to your leftovers.
Football goal
Do you live in the private sector or have a dacha? Consider making children's soccer goals from plastic pipes. In fact, the product will consist of several components that will need to be assembled into a frame. To be more convincing, you can purchase a net and stretch it over the manufactured gate. When the little football player grows up, you will disassemble the structure and immerse yourself in creating a new masterpiece.
small waterfall
An interesting tip for a summer residence is a small waterfall. On hot days it will be a great salvation for children. The waterfall is a U-shaped structure. Drill holes in a row in the horizontal rack, and provide places at the base for attaching water hoses. By supplying water you will get a water arch, you won’t be able to kick your baby out of such a shower!
Plastic pipes are an excellent material for realizing your bold ideas. Create, dream, create, delight your loved ones and friends with useful homemade products.