how to make a sofa bed with your own hands
Do you have a small apartment or a limited budget for full-size expensive furniture? To solve these two problems, make your own sofa bed . Don't sacrifice the beauty of your interior in an attempt to save space. Performing double functions, sofa beds primarily save space. Therefore, they are ideal for small apartments, where placing standard furniture is sometimes a difficult task.
To make your own sofa bed at home , you don't need expensive tools or special knowledge. You will be convinced of this when you look at the 15 instructions presented here with step-by-step photos of DIY sofa beds. The main advantage of a homemade design is that you can add the features you need and change the design to your liking. Unlike a regular sofa, which is limited to the living room, a sofa bed can be installed in a bedroom, children's room, living room and even an office.
What solid material are bedrooms made from?
- Headsets made from birch are often found on sale. This wood, similar in its characteristics to beech, is easily glued, stained and polished, resulting in a wide variety of furniture shades. Products made from Karelian birch have a unique pattern, and sometimes look as if they were made of marble. Birch is often used to produce veneer.
- Bedroom furniture made from solid pine is very popular. This material has many different shades.
- Oak is a very hard and durable tree. Furniture made from it can last for many years and even decades. Such sets also have enough shades: from light yellow to yellowish-brown. If you look hard enough, you can find bedroom furniture made from solid wood in gray or even green tones.
Oak products lend themselves well to painting, drying and varnishing. It is quite difficult to split such wood, and even more difficult to carve. In addition, the workpieces bend well, can be sanded without problems and can be drilled well.
Beech is inferior in strength and hardness to oak, but not by much. At the same time, beech wood is very plastic. The color range is quite wide: from pink-yellow to reddish-brown. Wood is rarely used as veneer; it is more practical to produce products from solid wood.
Bent furniture pieces are most often made from this type of wood, since its wood is easily processed and tolerates painting and bleaching, sanding and tinting well. The advantage of beech compared to oak is that furniture made from it is somewhat cheaper.
Larch is distinguished by its extraordinary hardness and is used not only for the manufacture of furniture sets, but also for various types of finishing materials. This tree is famous for containing many biologically active compounds that are very beneficial for human health. People who have such furniture in their bedroom are less susceptible to colds and viral diseases - thanks to the phytoncides released by wood. As for the shades of larch, there are 12 of them.
- Pine, unlike larch, is a very soft tree. It doesn't cost anything to accidentally scratch such furniture. Despite this, light pine sets are deservedly popular among the population, mainly due to their pleasant pine aroma. In addition, this wood resists moisture, temperature changes and microorganisms well.
- Linden wood is very durable and at the same time plastic, well suited for making carved furniture. Linden products are not very convenient to paint - this material has poor permeability. But if you cover pieces of furniture with stain, you get shades characteristic of valuable types of wood.
Linden is not very resistant to pest infestation, and it cannot be done without treatment with special compounds.
- Cherry can easily be classified as an elite type of wood. It is quite simple to process and can be easily varnished. Truly luxurious products are made from it, which look great in combination with carvings and glass. Over time, such solid wood bedroom furniture takes on a darker shade.
- Sets made of maple are rarely made. The fact is that such wood weighs quite a lot, it is very dense and durable. But maple is used quite often as veneer in the processing of expensive furniture. This is especially true for Canadian maple, which has a unique and very attractive texture.
- Cedar has a low density, is resistant to moisture and is practically not afraid of microorganisms. All these qualities make it indispensable in the production of furniture intended for rooms with high humidity - for example, saunas. Furniture made from this type of wood is quite rare in houses or apartments.
Soft finish
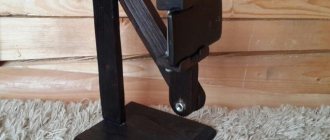
At the next stage of our work, we will try to mount a support grid on the frame of the sofa, which would hold the seat cushions. For these purposes, the armored mesh from the metal beds that our grandfathers used is quite suitable (I was convinced from my own experience that if you want, it is quite possible to find such a mesh even today). After securely attaching such a mesh to a wooden base (using ordinary metal staples), you get exactly what you need. Just don’t forget to cut four transverse bars into the longitudinal bars of the frame before fixing the mesh (the cut is best done using the tongue-and-groove method using special glue).
Schemes and drawings
There are a variety of sofa designs, as well as shapes and upholstery methods.
Main components:
- back;
- frame;
- frame;
- fabric lining;
- sides.
Frame. For assembly, slats and bars are used. For greater rigidity, plywood sheets or fiberboard are used.
The back is made hollow inside. The shape most often chosen is sloping or rectangular. The side elements are made in the same way as the back.
Fabric lining is made using ready-made patterns or patterns. If they are not there, then you can make the drawings yourself. For this purpose, the facing material is applied to each part of the structure, then the necessary cuts are made.
Attention! When making a round sofa, furniture panels are used, which are made of wood or plywood sheets. This material allows the round structure to withstand sufficient load
Sofa made from construction pallets
Not everyone is comfortable using too low frameless furniture. The option described above can be improved by using ordinary pallets to create the base of the sofa - wooden construction pallets for transporting bricks and other materials.
Original idea: a sofa made from construction pallets
And here again you will need a little imagination to come up with a convenient design from the available parts. Pallets can be disassembled into individual boards and used, but this is not necessary. It is enough to assemble a sofa frame with a back and armrests from them, fasten all the elements together with nails or self-tapping screws, and then cut out the parts from foam rubber in accordance with the resulting dimensions. As in the previous case, they are covered with fabric. And they are secured in place either with the same Velcro or with rubber bands.
Pallet furniture
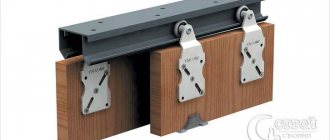
Types of beam connections
When constructing a log house, it is necessary to connect individual elements when crossing at an angle or when the elements are not long enough. Several types of connections are used.
The most popular and convenient connections are with or without residue, in a cup or in a tooth.
Connection with remainder
One way connection. One side of the beam is sawed across the element, the width of the notch is equal to the width of the attached element. This is the simplest and most commonly used method.
The connection of beams with the rest is used more often than others, and the fastening of such beams is more reliable. Source pinterest.ru
A double-sided lock requires making cuts at the top and bottom of the block. Their depth is a quarter of the thickness of the element. The use of this technology creates a high-quality connection, but will require the work of experienced carpenters.
The four-way connection is the most complex and the most reliable and accurate. The cuts are made on all sides of the block. The building is assembled like a construction kit - quickly and efficiently. In this case, all dimensions must be strictly observed, the cuts are made strictly at right angles.
Connection without residue
This type has many options. Here are the frequently used ones.
Butt connection. It is carried out using studded metal plates, they are secured with nails or staples. For this purpose, connecting dowels are also used, which secure the joint well, preventing the beams from moving and turning.
In this case, it is necessary to use additional fastenings, otherwise the house may move to the side. Source orpro.ru
It is good to use a tenon connection. The spike can be shaped like a triangle or trapezoid. The root thorn is popular. A groove is cut out on one of the beams, a tenon of the appropriate size is cut out in the other. With this connection, you can use insulation made from vegetable felt or jute fiber.
What you need to know before you start
First, keep in mind that even though sewing machines and other handy sewing accessories are available, it is important to understand that most of the work will have to be done by hand. Therefore, you need to be able to sew heavy fabrics and make patterns yourself. If you don't know how to do this, you'll have to learn
If you don't know how to do this, you'll have to learn.
However, there is a way to simplify the learning process - if you bought a cover for the sofa a long time ago, then you can tear it into separate parts and apply it to the existing fabric. However, often this is not possible. In this case, you will need to learn from video lessons on the Internet - fortunately there are a lot of them now.
You can make a cape with or without armrests. In the latter case, the process is much simpler, which will greatly help beginners. This option is well suited for country houses.
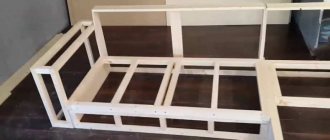
Stage 1: Frame
We make two frames from wooden blocks with a cross-section of 10x5 cm. You can use wood glue or corners as fastening material.
We install spacers (from 1 to 4 pieces) into the frame. Their task is to compensate for the load.
We screw the fences to the frame. It is better to use boards with a section of 15x2 cm (lower tier) or 20x2 (upper) as sides. Fastening is carried out with self-tapping screws, screwing them in from the inside.
We fasten two bars with a cross-section of 10x5 cm and a height equal to the height of the structure together with the fences in pairs to form a profile in the shape of the letter L. We recess the self-tapping screw into the wood, and putty the resulting recesses and sand them.
We make holes for screws in the supports and frames. To prevent the structure from falling apart, we fix it on the wall. To do this, we screw the upper level to the racks, along which we mark the location. We start drilling only after careful measurements.
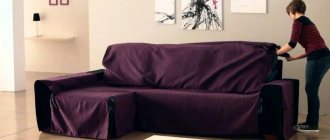
How to sew a cover
Making the body of a sofa is already a lot, but it is also important to trim it beautifully. Considering the fact that the fabric is expensive and cannot be bought in reserve, it is important to make the right patterns and sew a cover from them
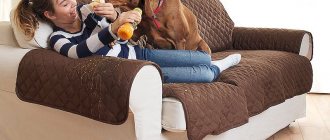
Which fabric to choose?
Depending on where and under what conditions the sofa will be used, a suitable fabric is selected. Let's look at a few examples.
Where is the sofa located Type of fabric In the living room, the sofa is often used, and not only by people living in the apartment. Guests often sit on it during meals, so there is a high probability that a cutlet or a piece of fish in vegetable oil will fall on it
Taking this into account, it is better to use synthetic fabrics, since they practically do not absorb moisture, including fats, and wash well. In the bedroom, a sofa is used to sleep on it or just relax. Instead of synthetic fabrics, it is better to use natural materials, or those containing at least 50% natural fibers
Flock is often used, as this type of fabric is durable, does not cause allergies and does not lint. Concerned about the health of the child, it is better to use cotton fabrics that do not cause allergies. This type of cladding has one significant drawback - it gets dirty easily, which makes it impractical. You can improve the quality of the fabric by using Teflon impregnation. In the area of regular eating, there is a high probability of contamination of the sofa upholstery with food products. Using fabric is impractical and unprofitable, so it is better to use high-quality leatherette, which is made specifically for these purposes. Low-quality leatherette will very soon begin to peel off from the base.
How to cut
When repairing an old sofa, you can use the removed fabric as a pattern, but when upholstering a new sofa you will have to cut it yourself. How to make the right pattern?
Covering with a single piece of fabric
This technology has already been briefly mentioned in the article, but now we will describe the entire process in detail. For example, we will use a sofa seat and instead of a single piece of fabric, we will demonstrate it using a piece that was left after sewing the cover.
So, in order to upholster a separate element of upholstered furniture, you need to cut a piece of fabric that could be used to wrap the piece so that the edges can be secured from below.
Having stretched the fabric onto the parts, it needs to be stapled in front and behind. Then the hanging corner at the front is pulled tight and secured at the bottom. The fabric is laid out in folds so that they converge at one point and nailed with staples.
The back of the seat will be turned towards the wall, so you can not lay it out, but simply fold it, leaving the excess inside, and secure it in this state.
Sewing a cover for a non-folding sofa
The described technology will allow an inexperienced person to cut and sew a cover not only for a new, but also for an old sofa.
Sewing this cover took 3.5 meters of fabric and a spool of thread.
So, you need to throw the fabric over the sofa, wrong side up, positioning it in the same way as the finished cover will be located.
We will put marks so that we can then cut the fabric according to them.
In these places we cut the fabric all the way to the sofa.
The seat piece needs to be fastened to the back fabric.
Using needles, you need to pin the fabric along all the supposed seams. Instead of needles, you can use pins or sew with a basting stitch.
Next we apply the future frill, which will be gathered into folds.
Having fastened all parts of the cover, remove it.
After basting the seams, put the cover on the sofa - it should fit without much effort, fitting the product being covered. If it turns out to be too tight or too loose, then this needs to be corrected by removing it.
Now you can sew the cover.
Then a frill is sewn onto it. If the cover is intended for upholstery of a sofa, then there is no need to sew on the frill, as it will be inconvenient to fix the fabric. The frill can be nailed on later if the need arises.
The result is such a cute sofa. Based on this example, you can cover any sofa, but for a new one it is better to sew separate covers for the back and seat.
As you can see, making a sofa and upholstering it at home is quite possible.
How is the distance between joists calculated?
The pitch of the beams is calculated from the middle to the middle of the wooden support.
The beams serve as support for the material that will be used as flooring, and everything that will stand on the latter and those who will walk. The more often the bars are placed, the greater the load the floor surface can withstand. Therefore, when calculating the lag step, ideally the following factors should be taken into account:
- load per unit floor surface area (static, dynamic);
- the width of the log itself;
- thickness and strength of the flooring material.
The first two indicators are taken into account only in the case of a non-standard expected load or an unusual cross-section of the beams. The third factor plays a much larger role. The distance between the bars directly depends on the thickness of the flooring.
Nowadays, plywood or OSB boards are often used as starting flooring. In this case, taking into account the small thickness, and therefore the strength of the material, the pitch of the timber is made minimal (no more than 300 mm). When using floor boards, the distance between the joists is directly proportional to the thickness of the flooring. The thinner the board used, the smaller the pitch. The recommended distance is shown in the following table.
| Floor board, thickness | Beam pitch |
| 2 cm | 300 mm |
| 3 cm | 500 mm |
| 3.5 cm | 600 mm |
| 4 cm | 700 mm |
| 4.5 cm | 800 mm |
| 5 cm | 1000 mm |
Since the thickness of a modern floor board varies between 2-3 cm, then, accordingly, the pitch of the timber is calculated from 300 to 500 mm.
When calculating the number of logs required for one separate room, two points should be taken into account:
- the beams are installed perpendicular to the main light rays so that the seams between the floor boards stand out minimally;
- the outer support beam is attached 20-25 cm from the wall.
Taking these points into account, calculating the pitch of the supporting wooden beams will not be difficult.
Some tips regarding soft elements
It is important to remember that the comfort of use of the product largely depends on these elements. So stick to the following:
1. To ensure that the seat lasts as long as possible, choose the padding material with the highest rigidity. It can be softened with an additional layer of the same padding polyester placed on top.
2. To prevent soft pillows from always trying to “run away” somewhere, sew small ribbons to them. Using them you can fix the pillows.
3. We obtain the backrest angle required for convenience using the same pillows. We make the top thinner and the base of the pillow thicker (several layers of paralon are glued together).
The product, of course, will still need to be coated with varnish or paint, but the main work will already be over. All that remains is to enjoy the high-quality and inexpensive renovation of the interior.
Choosing the thickness of timber for building a house
The range of standardized timber sizes has the following values: 100, 150, 200, 250 mm. The main requirement when determining the thickness of the walls of a house is that it must impart a certain strength to the structure and have sufficient heat capacity to create a favorable climate in the house.
To determine which timber is better for a house, 150 or 200 mm, you should know what kind of house you will be building. For a one-story building, a thickness of 150 mm is sufficient. If exterior finishing or wall insulation is also done, then this is certain.
Two-story buildings require a stronger and more rigid structure. In this case, a section of 200x200 mm will be justified.
To build a house for seasonal residence in a country house or a bathhouse, if they are not insulated, use timber with a cross-section of 150x150 mm.
For such a house, for temporary residence, a simple beam of medium thickness is enough. Source domasibiri.com
If you build a residential building for permanent residence of people, it will have to be heated. The walls of such a cobblestone house must be insulated, otherwise it will not meet modern energy saving requirements.
It is known that the thermal conductivity of wooden walls depends little on their thickness. The difference between walls of 150 and 100 mm of timber will be 12% of heat. From this we conclude that insulated walls can be made thinner.
How can different types of timber differ:
Nuances of choosing models
No apartment is complete without upholstered furniture. The stores offer a large selection of sofas and armchairs, but homemade options allow you to create a special atmosphere and comfort. A novice master will be able to make a number of interior items with his own hands, including:
- Frameless upholstered furniture - sewn from various materials, stuffed with holofiber, polystyrene foam or polyurethane foam. There are various models of such furniture: small sofas, bean bags, loungers.
- With a rigid structure - these are sofas, armchairs, beds with a frame made of metal or wood.
FramelessFrame-based
What to consider when choosing timber: basic rules
Using the right material is the key to successful construction. This also applies to wooden structures.
What we first pay attention to when purchasing it:
Decide in advance what type of timber to build the house from. A one-story house needs enough material with a cross-section of 150x150 mm. When erecting two-story structures, use 200x200 mm timber. In the country version, use simple planed timber, pre-dried naturally. A residential building requires glued laminated structures
A timber with a profiled joint, dried in a chamber, is suitable. Attention should be paid to the quality of the product; it must have the correct symmetrical cross-sectional shape, there should be no irregularities or curvature. Choose variety A or AB. Use D profile beams instead of rounded logs.
Types of profiled timber for a country houseSource kebyx.moketa.ru.net
Updating an old sofa
If a corner in the kitchen has lost its attractiveness, but the frame has retained its original characteristics, you should not immediately change it. You can make another one out of an old sofa by replacing its upholstery.
The process of restoring a sofa with your own hands begins with removing the parts from the fabric. They are fixed with self-tapping screws or self-tapping screws that can be easily unscrewed.
Using an anti-stapler, all staples are removed. The old upholstery is removed and another material takes its place. If necessary, change the filler.
An easier way is to purchase or sew a cover yourself.
Step-by-step instructions for making a bed
To work you should prepare:
- 1. Furniture panel 2000*300*18 mm, 2 pcs. – 1350 rubles.
- 2. Furniture panel 1200*300*18 mm, 2 pcs. – 806 rubles.
- 3. Beam 2000*40*50 mm, 3 pcs. — 1113 rubles.
- 4. Sheathing boards 1300*96*20 mm, 5 PCS. — 486 rubles.
- 5. Screws 3.5*45 mm 100 pcs. – 120 rubles.
- 6. Confirm screw 7x50 mm 14 pcs. – 150 rubles.
- 7. Screw M8*80 mm 4 pcs. – 74 rubles.
- 8. M8 nuts 4 pcs – 36 rubles.
- 1. Screwdriver.
- 2. Saw.
- 3. Sanding machine.
- 4. Measuring tape.
- 5. Level.
Assembly steps:
- First, the bed frame is assembled. To do this, furniture panels 1200 and 2000 meters long are fastened at the corners. To set a right angle, you can use a homemade chipboard corner (2 chipboard parts of the same size are connected perpendicular to each other using Euro screws). Furniture panels (bed frames) are secured with clamps.
- Next, the two drawers are fastened with confirmatory screws. You will need 3 screws for each corner of the bed.
- Next, you should check the diagonals of the bed: they must be measured with a tape measure. The length of the diagonals must be the same.
- Remains of timber are used for the legs. The length of the legs is about 180 mm.
- Next you need to prepare the timber. To do this, 2 thicknesses of furniture panels (36 mm) and 2 thicknesses of legs (100 mm) are sawn from the length of the beam.
- The prepared beam is tried on: for this, it is placed between the sides of the bed, and the legs are inserted into the corners. It should be a right angle.
- Next, a beam is screwed to each drawer, at a height of 140 mm from the lower edge of the furniture panel. Screws of 3.5 * 45 mm are used for every 10 cm.
- Next, the legs are fixed with a clamp and a through hole with a diameter of 8 mm is drilled. A screw is inserted and tightened with a nut.
- The frame is ready. It is necessary to check the level of the position of the sides of the bed relative to the floor.
- The next step is making the slats for the bed - these are the transverse slats on which the mattress is laid. To do this, the boards are cut and sawed to length from 1300 mm to 1250 mm. This is done to create a reserve for wood swelling.
- The prepared slats are laid on the bed beams at the same distance (30-50 mm). Next they are screwed to the beam. Use 2 screws on each side.
- To increase the strength of the bed, it is necessary to make a stiffening rib: for this, another beam is attached in the middle, parallel to the side beams, which will support the middle part of the bed.
- Next, you should sand the bed with a sander using sandpaper (grit 180).
- After sanding with a machine, the bed must be cleaned of dust and applied with Watco Danish Oil (light walnut).
All! The bed is ready.
Assembly diagram step by step
The general assembly diagram for a corner sofa will look like this:
- First, the armrests are assembled from timber and foam rubber.
- The frame of the left part of the product is mounted.
- The right side frame is assembled.
- Upholstery work is being carried out.
More detailed instructions for making and assembling a soft corner sofa for the living room or bedroom are as follows.
How to make armrests?
A corner sofa requires the manufacture of two mirrored armrests.
Their length should be 90 cm, width – 20 cm, height – 55 cm. To make the armrests, take chipboard and 2 beams. The screws will be screwed from the chipboard into the timber in increments of every 20 cm. The top and bottom of the armrests are cut out from the chipboard and attached to wooden slats. Next, vertical support bars are installed on top and bottom of the sidewalls. As a result, you should get some kind of box, which will have one side, top, bottom and an open front wall with vertical elements. Now the armrests can be covered with foam rubber.
Right part
Next, according to the drawing, the remaining parts of the box are cut out and fixed with nails. To give the frame strength, you can additionally glue all fastening elements.
On the inside of the sidewall, in the place where the seat will be located, a chipboard overlay is installed. All sides of the product are covered with foam rubber, except for the back wall.
Now a second armrest is made, which is a mirror image of the first. The seat side and back are made from chipboard. The elements are fastened together with plywood.
We make two more similar parts for the second part and fasten them together in the same way. A vertical beam is screwed to the two sidewalls.
Important: To strengthen the structure, it is recommended to reinforce the rear wall with vertical support bars.
Let's move on to assembling the frame for the inclined back. For this, a support frame and two vertical slats are used. The manufactured frame must fit tightly into the previously assembled frame.
Now the seat is made from plywood. The thickness of the plywood must be at least 8 mm. The seat is installed on the frame only after it has been covered with foam rubber and upholstered with fabric.
Left side
Now let's start assembling the left side.
This process is complicated by the presence of linen drawers. The left side of the sofa is assembled according to the same pattern. First, the necessary sidewall parts are made from chipboard and fastened together with plywood and timber. All blanks are mounted on a frame and reinforced with vertical bars. Next, a frame for the backrest is made and a lifting mechanism is installed. The assembled frame is covered with foam rubber and covered with fabric.
Step-by-step instructions for upholstery
As for the finishing of the corner sofa, it is worth including the process of upholstering the product with materials. Work is carried out in the following sequence:
- First, measurements are taken of all the parts that will be covered with materials and they are cut.
- Before upholstery, all elements of the sofa are covered with foam rubber and padding polyester.
Since foam rubber will quickly lose its shape upon contact with fabric. A padding polyester layer will prevent wear of the foam rubber and make the seat and back softer and more comfortable to use. - The armrests are covered not with padding polyester, but with non-woven materials, for example, agrotextiles or spunbond.
- Three additional pillows must be placed on the back of the seat. Their inner cover is made of non-woven material, and the outer cover is made of beautiful and practical fabric.
Important: when cutting, you need to make allowances of a few centimeters on each side. Therefore, experts recommend not cutting out the entire fabric at once.
First, work is carried out on one part in order to understand how many centimeters should be left for allowances.
Tip: for the bedroom you can try making a couch, ottoman or sofa. And next to the sofa, a coffee or glass table or even an ottoman will look good.
Bed for teenagers with shelves
Check out the plans for how to make a teen bed with storage that combines style and functionality. A very simple design that is not difficult to assemble with your own hands. Installed on a low platform, the bed will be an ideal resting place for a child. The main advantage is the comfortable shelves at the head of the bed. For the shelf you need to cut the following parts: 4 sheets of 3/4" plywood measuring 15 1/2" x 8 1/2" (40 x 22 cm); 3 sheets 15 1/2" x 82 1/2" (40 x 210 cm) and 2 sheets 15 1/2" x 19 1/4" (40 x 49 cm) 1 sheet of 1/4" plywood measuring 84" x 19 1/4" (213 x 49 cm)
Sawing for the bed:
- 2 2×4 bars 78 1/2" (200 cm) long
- 4 pieces of 2×4, 79 1/2″ (202 cm) long
- 4 1x3 boards 5 1/2" (14 cm) long tapered ends
- 4 1x4 boards 5 1/2″ (14 cm) long Tapered ends
- 2 1x2 planks 73" (185 cm) long
- 2 1×2 planks 77 1/2″ (197 cm) long
- 10 2×2 bars 5 1/2" (14 cm) long
- 3 sheets of 3/4″ plywood size 28″ x 80″ (71 x 203 cm)
Photo source: www.ana-white.com/2011/09/plans/easiest-teen-platform-bed
Wooden bed with storage drawers
Here are plans for how you can make a simple bed with storage drawers to elevate the mattress and provide extra space.
The design features six large wide drawers that are ideal for children's toys, various things or even books. This bed is 30 cm deep. This drawing is also a basic plan for a double size bed modification. In principle, the project is quite simple. Just imagine making little bookshelves. If working with MDF, use drywall screws and drill a pilot hole to prevent the MDF from splitting. You will need to make a box and two side compartments. Don't forget to nail the center divider as well.
For both backs: You can cut the plywood into 38cm wide strips to make them easier to work with. Then cut plywood for the back and two sheets for the side booths. Use nails and glue for fastening. Do the same for the side booths. First, cut the top and bottom of the long boards as shown in the diagram. All outer edges must be straight. Then add the side trim, keeping the outer edges flush. Place the planks on top as shown in the diagram. Don't use glue here. Read the full instructions on the website. The gallery after the assembly diagrams shows several examples of beds with storage drawers made according to these diagrams.
Photo source: www.ana-white.com/2010/05/furniture-plans-full-size-storage-bed.html
Materials and tools
A detailed diagram of the design of a corner sofa will help you save time and money. It is also recommended to make a list of necessary materials and tools in advance. In the process of creating furniture you may need:
- timber from coniferous trees (used for the frame);
- plywood (preferably birch) is needed for covering the base;
- Fiberboard is useful at the stage of installing the bottom and assembling storage boxes;
- laminated chipboard is most often used to make armrests;
- soft materials (foam rubber or padding polyester) are indispensable when stuffing the back of a sofa or pillows;
- upholstery fabrics (thick fabrics impregnated with special water-repellent compounds that protect against excessive contamination);
- fasteners (corners, screws, nails);
- retractable mechanisms for drawers;
- furniture legs (it is more convenient to use elements on wheels);
- consumables (threads, glue).
One of the important aspects of making a corner sofa with your own hands is the correct selection of the necessary tools:
- saw - for cutting large wooden elements;
- a screwdriver, without which it is very difficult to quickly assemble any structure;
- sewing machine (preferably electric) – for sewing covers;
- a furniture stapler that allows you to firmly fix the fabric in the right places.
Depending on the complexity of the design, the minimum list of necessary devices may be expanded during the work process.
Timber Plywood Chipboard Fiberboard Furniture fittings Foam rubber Upholstery fabrics
Which is better, profiled or laminated timber - table
Summary data on the compared parameters (what to choose, which timber is better, what is the difference and which one should be used to build a house) are included in the table
| Parameter | Profiled timber | Glued laminated timber |
| Feedstock | Solid wood | Prepared lumber glued under pressure |
| Drying | Natural or chamber | Chamber |
| Beam dimensions | Maximum cross-section 200x200 mm Maximum length – 6 m.p. | Maximum section 275x275 mm Maximum length – 18 m.p. |
| Environmental friendliness | Does not contain harmful substances | The content of harmful components in the adhesive composition is within acceptable limits |
| Air exchange | Natural, inherent to the wood species | Violated |
| Humidity | 15-18% | 11-14% |
| Shrinkage | With chamber drying - 3-5% With natural drying - up to 8% | 0,4-1% |
| Strength | Low | High |
| Deformations | Allowed width no more than 1 mm | Likely. Depends on the quality of gluing |
| Biological resistance | High | High |
| Fire safety | Average | High |
| Aesthetics | Average. Dead knots and dark spots may occur | High |
| Finishing work | After 0.5-1 year or use casing boxes | Immediately upon completion of construction |
| Loss of properties during operation | Cracks appear that require caulking | No |
| Price | 30% lower than glued | High |
| Probability of counterfeit (fake) | High | Minor |
As you can see, the question of which is better, laminated or profiled timber, does not have a clear answer, and the choice is characterized by a fairly high degree of subjectivity.
Corners that sofas
One of the most popular today is the corner sofa. The reason is high functionality, which is especially clearly manifested in small-sized housing. For example, a sleeping-living room sofa corner, pos. And in the figure, when folded, it does not have any sleeping appearance and the most orthodox moralist will have nothing to complain about. But at the same time, its right (according to the figure) section is already a single bed, and when unfolded it turns into a double bed. These are also called bachelors’ sofas: I’m tired, I don’t have the time – I’ll fall asleep in the one-room apartment. And the next (or forever only) passion has arrived - there is enough room for two to settle down, as it should be in such circumstances. Structurally, there is nothing complicated: a single bed and a folding or roll-out sofa, uniformly designed and put together, like those described below.
Corner sofas
The second most popular is the classic soft corner, pos. B. Sitting in the corner is not only a bad omen, but also inconvenient, so in recent years the corner seat is increasingly being replaced with a casket-bar, as in pos. In, or, for the kitchen, a casket-table. The layout of such a kitchen corner is shown in Fig. below. You can dine on it alone if in a small kitchen the table is occupied for rolling, cutting, etc. And the casket and trunks (as sofa boxes are called) will serve as bins for vegetables, storage of household goods, etc.
Construction of a corner kitchen sofa
This kitchen sofa is made according to the so-called. simplified beam diagram (see below). Its peculiarity is that the seats are narrower than those of the sofas on which they sleep, 400-450 mm versus 550-700 mm. The length of the side sections is according to the location in the room; other sizes are standard, see below. The sidewall material is 40 mm hardwood board or 36 mm chipboard. The bottom of the sofa is 12-16 mm chipboard on a frame (also see below) or OSB of the same thickness without a frame; the rest is a 30 mm board, 50x50 mm and 50x30 mm beams (shelf supports). Assembly - with self-tapping screws, dowels and half-timber inserts, all with PVA or “Moment” gluing. At current prices, no more than 3,000 rubles worth of materials is required.
Preparing for work
Tools
Let's find out what tools you will need to make a table, stool or sofa from timber with your own hands:
Folding sofa bed made of timber and boards.
Stationary or hand-held circular saw
Pay attention to the maximum cutting depth: for compact circular saws it often does not exceed 55-65 millimeters; Plane. Better - electric: it will greatly reduce the time spent on leveling the surface; Sander
It can be belt or vibration;
Even an inexpensive vibration sander will make your work much easier.
- At least three types of sandpaper - from medium to zero;
- Drill and brush attachment for it. It will be needed for the already mentioned operation - brushing. The brush should be made of brass-plated wire 0.3 millimeters thick;
- Wood drill with a diameter of 16 - 20 millimeters;
- High-quality brushes for staining and varnishing. The bristles of cheap brushes often remain in the varnish layer, spoiling the appearance of the surface.
Additional materials
In addition to the above, we will need:
- Stain;
- Wooden dowels with a diameter corresponding to the diameter of the drill;
- Wood glue (albumin, casein or bone);
- Varnish. If you are making a stool for a dry room, you can opt for polyurethane-based parquet varnish; a do-it-yourself outdoor bench made of timber is coated with a more moisture-resistant yacht varnish.
Examples of handmade sofas in the photo
Many craftsmen who have tried to make furniture with their own hands have already appreciated its advantages. This means cost savings, high-quality materials and the opportunity to create unique and practical things with your own hands. Below are examples of sofas that even novice craftsmen can make with their own hands.
How to build a gazebo from laminated timber
Next, we will tell you in detail how to make a wooden square gazebo with your own hands, measuring 4 by 4 m from laminated veneer lumber under a hipped roof.
To build gazebos from logs and timber with your own hands, choose simple projects
Foundation
We start by marking the perimeter and laying the foundation. We dig holes, 16 in total, to a depth of 500 mm, fill the bottom with crushed stone and sand, pour 50 mm of concrete mixture, lay the reinforcing mesh and fill it with mortar, install blocks on top. We lay roofing felt waterproofing on the blocks.
The construction site must be cleared of debris, and the top fertile layer must be removed from the timber along the perimeter of the future wooden gazebo
Frame
The next stage is the lower harness. We lay and fasten timber with a cross section of 150*150 mm along the perimeter. Inside, we install the base of the future floor using 150*50 boards. Then we level the vertical pillars - the supports of the gazebo, they are made of 150*150 mm timber. We attach them to metal corners.
Be sure to check the verticals of the posts with a plumb line
We tie all the supports on top with 150*150 mm timber. On the sides, to strengthen the frame, in some places between the vertical posts we install jumpers; they are of the same cross-section as the supports.
In the middle of the gazebo we install 2 vertical pillars, we connect them on top with a wooden square - a torus, it will serve as the basis for the second tier of the roof.
The notch for fastening the frame should be made in half a beam
Roof
We attach the rafters to the torus. They are made of 150*50 mm timber and are connected using a special metal fastener. We install a turret on the torus.
Corners must be made of galvanized steel
We sew moisture-resistant plywood on top of the rafters. The roof is hipped with a small turret in the middle. The height to the upper ridge unit is 5 m. We cover the roof with soft bitumen tiles.
Moisture-resistant plywood 12 mm thick is suitable for the sheathing.
Floor
It is better to make the finishing floor from a tongue-and-groove terrace board. Special guide beams are placed on the base, across the wooden beam, and decking boards are attached to them using clips.
Decking is not afraid of moisture and does not require additional processing, easy to maintain
Decor
In the spans, between the vertical posts, we install homemade gratings made of timber of a smaller cross-section, and frame them with platbands. We treat all wooden elements with antiseptics, fire-resistant solution and paint.
You can make decorative wooden grilles yourself, the pattern can be any
Near the building you can make a separate platform on which to install a barbecue. Flowers and shrubs are planted around the perimeter of the gazebo. All that remains is to hang the curtains and arrange the furniture.
For finishing, tinted oil and exterior paint are usually used.
Be sure to look at our gallery with pictures, it presents the most interesting photos of chopped gazebos made of logs and timber.
Types of sofas for making at home
Before you start work, you should decide on the design of the sofa and you will definitely have to make a drawing of it. Design is the most important stage, but not the most difficult. You can make a sofa with your own hands using homemade drawings and assembly diagrams, without professional skills. The main types of sofas are as follows:
- Angular. Available with square and rounded corner inserts.
- Book. folds out conveniently, but manufacturing requires welding skills.
- Modular. Consist of several separate blocks.
- Transformers. This is a great option for those who want to save useful space.
You can surprise guests and relatives by assembling a sofa with your own hands - it is not as difficult as it might seem at first glance.
To make any type of sofa you will need approximately the same set of materials and tools. However, each design has its own characteristics.
Additional Information. If it is difficult to design a sofa design yourself, you can use the help of a special designer: PRO-100, Kitchendraw, Woody.
Corner sofa
A corner sofa is installed in the living room or kitchen, if the dimensions of the room allow. It may be somewhat difficult to make a corner sofa with your own hands; simpler designs can be made faster and easier. This is a very convenient and practical design that looks impressive and can accommodate a large number of guests.
Even an inexperienced craftsman can cope with the work; the main thing is to choose the right drawing and purchase high-quality materials.
Like any other, a do-it-yourself corner sofa involves creating drawings and assembly diagrams that will help you transfer the dimensions of the product onto the material as accurately as possible. First you need to make drawings of the future product on paper.
First of all, it is important to develop a general sketch of the product, indicating its length, height, depth and width.
Next, a detailed drawing of all elements, their attachment points, partitions and internal drawers is created. This must be done as accurately as possible, so that later all the parts can be easily mounted and connected to each other.
- Materials: plywood, fiberboard, upholstery material, padding polyester, fasteners, retractable mechanisms, wheels.
- Tools: screwdriver, electric saw or jigsaw, furniture stapler.
- Construction adhesive, double-sided tape, a pencil, tape measure, sandpaper and a hammer will also come in handy.
You can make a sofa with your own hands, which will allow you to get the desired item and save your family budget.
First of all, transfer the dimensions of the parts onto chipboards and beams. They are then cut out and adjusted to fit each other. Then you can start assembling the product:
- A frame is made by connecting long and short beams into a rectangle. First, the first frame is assembled, then the second. The base is connected to the beams with bolts or screws.
- The lower part is sewn up with fiberboard. Nails are used for fastening.
- A corner square insert is made in the same way. If a rounded corner part is intended, the material for it is bent 90 degrees and attached to the frame beams.
- Boxes are made and connected to the base.
- The side ones are attached to the corner part.
- The back of the sofa is fixed to metal corners.
- The facade is covered with a sheet of chipboard or plywood.
- Next, the seats are made and foam rubber is glued onto them.
- Install loops to connect the seat to the module.
Additional Information. The thickness of the filler is selected depending on the desired softness. It is better if it is at least 5-10 cm.
After foam rubber is attached to each structural element using glue, you can begin covering it with decorative material. Parts are cut out of jacquard, flock or any other fabric according to the size of the elements. In this case, you should leave a few centimeters for allowance. Finished products are attached to modules using a stapler.
To give an attractive look and comfort, you can decorate the sofa with pillows and bolsters. You can fill them with leftover foam rubber and cover them with any bright fabric. For contrast, you can take fabric of a different color, or match the colors to the curtains and wallpaper.
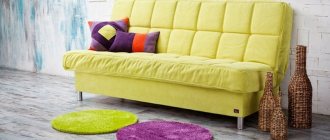
Sofa bed
A folding sofa can be made in several versions: a book sofa, a folding sofa and a roll-out sofa. The difference between them is not significant, so making any of them is not difficult if you have furniture making skills. To begin with, they draw up a diagram of the product, draw up drawings of each element, cut out the necessary blanks and make holes. You will also need:
- Frames or furniture panels for the seat and back.
- Fiberboard boards, beams, spring blocks, covering material, foam rubber, hinges.
- The tools should be the following: jigsaw, screwdriver, screwdrivers, grinder, furniture stapler.
- Available materials: nails, screws, door hinges, construction glue, staples.
The sofa can be made from different materials.
Each option has its own advantages and disadvantages. The step-by-step instructions for making such a sofa are as follows:
- The back of the sofa is made from furniture board. Cut out the diamond-shaped opening and the upper edge of the back with a jigsaw according to the markings.
- Make a support block and attach it to the wall.
- A wooden strip is placed on the support and the seat is hinged.
- Make markings for the hinges of the side supports of the seat, which will fold inward. The hinges are secured with screws and side supports are installed.
- Mount the back of the sofa to the finished structure.
Important! The sofa folds and unfolds thanks to specially designed hook-shaped loops. Their correct installation will ensure the normal functioning of the sofa.
For upholstery, you should choose textiles with a dense texture, reminiscent of a tapestry.
Foam rubber is laid on the finished structure and covered with upholstery fabric. You can decorate such a sofa with decorative pillows and cover it with a blanket. It’s better to sew a removable cover - it can be removed and washed when dirty.
Making a children's sofa
A sofa in a children's room should be small and functional. You can use any type of structure, but the most popular is the sofa-ottoman. It takes up little space, is convenient and folds easily. To make it you will need:
- Materials: lumber, upholstery fabric, filling.
- Tools: electric saw, screwdriver, jigsaw.
- Auxiliary materials: fasteners, tape measure, pencil.
The process of self-manufacturing a structure begins with drawing up a diagram, preparing the necessary materials and tools.
The technique for assembling the sofa-ottoman is as follows:
- Draw up product drawings and cut out parts based on them.
- Make a frame from boards and fasten them with corners.
- Attach the wooden sheet with self-tapping screws.
- The back is made of plywood or boards.
- Drawers are cut, assembled and installed. If they are not provided, the facade is covered with slats.
- Connects structural elements together.
Important! The structure must be durable and safe. All wooden elements are thoroughly cleaned with sandpaper and covered with stain or varnish.
All parts of the product are covered with foam rubber and glued with wood glue. The upholstery material is fixed with a stapler and staples. The fabric chosen is natural, bright colors. The soft back can be made in the form of a house or a car, which will undoubtedly please the child. Decorate with animal-shaped pillows.
The choice of fabrics for upholstery and materials for the inside of the sofa is huge - the choice is limited solely by a person’s financial capabilities.
Modular sofa
A feature of the modular design is that they are assembled from separate blocks. Depending on the area of the room, you can complement the product with any elements. To make such a sofa you will need:
- Plan in advance what modules and parts the product will consist of and choose a transformation mechanism.
- Draw up a drawing of the overall structure and each element separately in accordance with the dimensions.
- Prepare materials: wooden beams, chipboard sheets, upholstery material, foam rubber, fasteners.
- Tools: grinder, screwdriver and furniture stapler.
- Available materials: construction glue, tape measure, set of screwdrivers.
First of all, for work you will need diagrams for assembling the sofa and the tools necessary to take measurements.
If all this is available, you can begin manufacturing individual elements and assembling the structure. Since this model consists of several parts, you can start with any of them. The stages of work will be the same for everyone:
- Assemble the frame according to the drawing from the beams and secure them with self-tapping screws. Do this for each block.
- Make a back from bars and chipboard, attach to the base.
- Make armrests, if provided.
- Place foam rubber on individual elements and secure with glue.
- The pre-cut sheathing is secured with staples using a furniture stapler.
- Attach the transformation mechanism to the frame and moving elements.
Now you can connect the individual parts of the sofa and install it in any room: living room, bedroom or room.
To secure the upholstery, the craftsman will need a furniture stapler.
Important! If a roll-out mechanism is provided, you will need to screw the roller guides to the inside of the frame. The rollers are attached to the sides of the movable part.
Such a sofa can be successfully decorated with pre-sewn covers. This is very convenient because for each part you can sew a covering of a different color.
Pillows and bolsters can also add zest to the overall appearance of the product and harmonize with other interior details.
Wooden leather sofa
Furniture made of wood is especially durable, and leather upholstery gives solidity and lasts for many years. But making such a sofa will require a certain skill and endurance from the craftsman, since working with such materials is quite difficult. For production you will need:
- Materials: genuine or eco leather, timber, foam rubber.
- Tools: hacksaw, spirit level, mounting stapler, screwdriver.
- Additional tools: screws, corner, scissors, tape measure, wood glue, varnish, stain, paint.
When making a sofa with your own hands, you need to draw up a sketch of the product.
The manufacturing of the structure occurs in several stages:
- A frame is assembled from wooden beams.
- A frame for a sofa is made from boards.
- A rectangular back and side parts are made. Covered with wooden planks.
- The wood is treated with varnish, creating a protective layer from damage and moisture.
- A spring structure is placed on the seat.
- Cover it with foam rubber and begin reupholstering it with leather.
Leather is a durable but capricious material. Its cost itself is not small, but the process of covering it with such material is painstaking. For this, special needles and thin but strong threads are used. The pre-marked parts are cut with a sharp knife, if necessary, the parts are sewn together, then the patterns are attached to the elements of the sofa. You can use a glue gun for this.
In order for a product to meet the requirements put forward to it, to last a long time, and to look aesthetically pleasing, certain rules must be followed.
Important! When cutting, the direction of stretching of the leather should be taken into account. It stretches better in the transverse than in the longitudinal direction.
From plywood
This is an original and incredibly simple design that will fit perfectly into the interior of an apartment or cottage. It is especially good for beginners to start with such sofas - they will require a minimum of time and financial investments, but they will be able to gain experience. For this design you need:
- Materials: plywood, chipboard, foam rubber, upholstery fabric.
- Tools: electric drill, mounting stapler, screwdriver.
- Additional tools: screws, corners, paint brush, marker, scissors, tape measure, wood glue.
If you don’t have drawing skills, you can use a ready-made plan downloaded online or taken from specialized literature.
The manufacturing process is as follows:
- The design and dimensions of the sofa are chosen, and detailed drawings of all parts are drawn up.
- Transfer the dimensions onto plywood and cut out the parts.
- For the frame, use plywood or laminated chipboard. The edges are sanded with sandpaper.
- The frame is assembled using the butt-to-butt technique. The frame consists of longitudinal and lateral parts and is tightly sheathed with sheathing.
- To stiffen the frame, a wooden spacer is installed on top.
- Foam rubber is laid on the plywood and secured with wood glue.
Finally, the product is covered with upholstery fabric. For a summer house or kitchen, it is better to use eco-leather: it is easier to care for and more durable. Cover with a fleecy blanket and decorate with soft decorative pillows.
How to make a convertible folding sofa
This model is incredibly practical, and it won’t be difficult to make. With this design, every meter of space will be used. At night it is a comfortable sleeping place, and during the day it is a small but functional sofa. To make it you will need the following:
- Draw up a detailed design drawing. The main elements are the supporting box and the base.
- Materials: MDF boards, plywood, furniture nails, hinges and upholstery material.
- Tools: saw, screwdrivers, sander, sandpaper, drill and drill bits.
The material for the frame must be of high quality and durable, the filling must be of the highest grade, the upholstery fabric must be wear-resistant and must consist of durable fibers.
All parts of the structure are prepared in advance, then assembly begins. To begin with, two load-bearing boards are connected with screws and secured at the bottom with a cross board. The upper part is reinforced with a transverse beam, attached to the side of the supporting posts. They do the same with the front part of the box. The following steps are followed:
- The side cladding is mounted to the end and top parts of the box using fasteners.
- Secure the front pillar. First, a transverse beam is mounted, then an end board is installed relative to it on top of the box.
- The plywood sheet is reinforced with vertical boards so that it does not sag, and then installed to the box.
- The folding part of the structure is made from plywood, on the sides of which there are triangular crossbars.
- The parts are fastened with a horizontal board at the end part. Self-tapping screws are used for this.
Finally, the individual parts of the transforming sofa are connected to each other. You can decorate such a transformer with a cape or cover. Faux fur or long pile fabric will make it even cozier.
In order for the finished product to serve for many years, it is necessary to be very scrupulous about the process and strictly follow the technology.
Advantages and disadvantages of mini timber sets
The kit includes all the necessary elements, adjusted to size. This simplifies the assembly process and prevents deviations from the set level. High-quality preparation of the material eliminates premature aging and delamination of the board with proper care during operation. To create the locking part, high-tech equipment is used, which accurately mills grooves for corner joints.
During installation, there is no need to adjust the boards to size, so even an inexperienced builder can complete the assembly. The appearance of the material is quite presentable, so there is no need to cladding the facades and decorating the internal surfaces. The only requirement is to treat the wood with special impregnations to create a protective layer from moisture and other external factors.
The disadvantages largely relate to the main material - wood and its quality. An unscrupulous seller may pass off one type of wood as another, and the degree of drying may not meet the standards. Then, after assembly, when it dries naturally, the structure may become slightly deformed, or fungus may form on the surface. Therefore, it is recommended to purchase a construction kit from a trusted manufacturer. From the Internet you can find out about the duration of production, accumulated experience and customer reviews.
Cast iron bath sofa
If you decide to replace your old metal bathtub with a modern acrylic one, do not rush to throw it away. An old bathtub can also be turned into a sofa, and a very unusual one that will surprise all your guests.
Sofa from an old bath
Of course, this idea is not suitable for everyone, and for various reasons.
- Firstly, the work ahead will be long, dusty and quite difficult.
- Secondly, the furniture with small dimensions will turn out to be very heavy if the bathtub is cast iron, and unusually cold.
- And thirdly, such a sofa will not fit into every interior.
Sofa from the movie "Breakfast at Tiffany's"
If none of the above scares you, let's get started.
Old bath
- After dismantling the bathtub, we outline a smooth outline of the front part of the sofa on one of the walls.
Marking - Cut out the excess part with a grinder. Trimming along the contour
- Having replaced the cutting wheel with a grinding wheel, use the same grinder to smooth and level the cut. Cleaning, polishing
- We remove the legs and thoroughly clean both them and the bathtub itself, if necessary using chemicals or a grinding tool. It is necessary to achieve a flat and relatively smooth surface.
Sanding from the inside. Puttying uneven edges - Then we putty on rough defects and cover the bathtub with primer. Applying primer
- We paint it in the desired color, applying several layers of paint, drying and sanding each layer. Painting Painted legs Sanding Varnishing
- We install the bathtub on restored and painted legs. Installation of legs
- We make a mattress from foam rubber covered in a cover, sew small pillows under the back - and the sofa is ready.
Sewing a mattress cover
Ready sofa