As a rule, after replacing or constructing a water supply system, plastic pipes and fittings often remain. Of course, such material is no longer suitable for reassembling communication networks, but it can be used to make various decorative crafts and practical things.
If you wish and have free time, you can make a chair from polypropylene pipes with your own hands - the assembly technology is very simple and can be done by any home craftsman. Do you want to collect original furniture, but don’t know where to start? We will help you realize your plans.
The article describes in detail three technologies for making various crafts. By following the instructions, you can assemble a children's high chair, a kitchen stool and a portable fisherman's chair with your own hands.
Manufacturing stages
Taking into account your own skills in making products from different materials, as well as personal wishes, you can build your own chairs for feeder fishing of varying complexity.
Simple model
To make the simplest model of a feeder chair, you will need three interlocking metal pipes with a diameter of 20 mm, material for the seat and back, strong threads, 4 bolts and nuts. Necessary tools: electric drill, hacksaw, grinder. Manufacturing technology:
- The short sides of the seat are stitched with two wide strips and secured at the bottom with a limiter made of a thin strip. In this case, the fabric is sewn directly onto 2 metal pipes, which will serve as the legs of the chair. The material on the back is also stitched along the short sides.
- At the junction of the legs, holes are drilled in the middle of the long sides and connected crosswise to the fasteners.
- A pipe is attached to one of the legs, which will serve as a backrest.
With adjustable legs and backrest
A chair with a back is a more complicated version of a feeder chair. Material required to assemble such a chair: steel pipe for the frame with a diameter of 20 mm, fastenings (bolts, nuts), textiles for the seat and back, threads, rubber nozzles for the legs, anti-corrosion compound. The tools used are the same as for the simple model. Assembly algorithm:
- The metal pipe is cut into several parts: for the legs and seat - 8 pieces of 55 cm, for the back - two pieces of 70 cm, one piece - 30 cm.
- On two pipes, which are intended for sitting, two fasteners are installed at a distance of 6 cm from the beginning and end.
- Another fastener is attached to one of these pipes, with which the back will be mounted. The fastener is located at a distance of 9 cm from the beginning of the pipe.
- To complete the manufacture of the chair frame, the prepared corrugated pipes with fasteners are connected by two more pipes. Thus, 4 metal pieces measuring 55 cm were used.
- Pipes measuring 70 cm prepared for the backrest are connected to a pipe 30 cm long using fasteners.
- The remaining four 55 cm pieces, which will serve as legs, are attached to the ends of the frame tubes. They are equipped with rubber nozzles.
- At the last stage of making the chair, textiles are stretched over the seat and back. Holes are made on the short sides of the tarpaulin, and the material is pulled together using an elastic band. The elastic will allow the seat to sag a little under the weight of the angler. The back textile is pulled together along the long sides.
Made from polypropylene pipes
A simple option for making a feeder chair, for which you will need: PVC pipes with a diameter of 25-32 mm, fittings connecting the parts of the chair, durable textiles for the seat, fasteners, threads. Tools for assembly: pipe cutting scissors or a hacksaw, soldering iron. A guide on how to make a fishing chair from polypropylene pipes with your own hands:
- The tube is cut into pieces: 16 parts for the back, legs, and seat, the length of which you can choose yourself.
- We connect the pipe sections with fittings. For convenience, assembly should begin from the back, then the seat and handles are fastened together.
- For the seat and back, take material that is stitched along the short sides with holes for inserting pipes.
- After checking the structure for stability, it is disassembled, the material is stretched onto the appropriate sections of pipes.
- At the final stage of assembly, the parts are soldered or secured with glue.
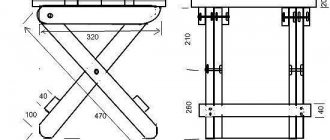
Folding chair
To assemble a folding chair, you will need a polypropylene pipe with a diameter of 25 mm, fittings, material for the seat, threads, 2 bolts, 2 nuts. Guide on how to make a folding chair:
- The fabric is cut to a size of 18 cm. It is stitched along the short sides so as to create holes into which the pipes will be inserted.
- The pipe is cut into pieces: 4 pieces of 40 cm and 4 pieces of 20 cm.
- Long pipes have holes drilled in the middle for bolting.
- Short 20 cm sections of pipe are inserted into the prepared fabric. Corners are put on the ends.
- 2 rectangles are formed from all pipe sections measuring 20 x 40 cm. They must be connected with fabric.
- The rectangles are connected to each other with bolts and nuts in the drilled places. It is not recommended to tighten the nuts too tightly so that the chair folds effortlessly.
For structural strength, glue or welding can be used in the places where the fittings are attached. This folding fishing chair will serve for a long time thanks to the material from which it is made, it will be easy to carry, and the chair will not take up much space in your backpack.
Shoe shelf
For this DIY propylene pipe craft, you will need large diameter pipes. Depending on the planned number of compartments, a different number of pipes may be needed. The structure of the shelf itself can be absolutely anything. The creation process will be the same for any variation.
Initially, you need to measure the required length so that the shoes fit freely. Next, cut the pipes into these sections and sand them with sandpaper to avoid injury and damage to shoes in the future.
After this, all pipe sections are glued together to form a multi-level shelf. The shelf itself can be in the shape of a square, rectangle, triangle, or any other shape.
If the shelf is too high, care must be taken to secure it to the wall it leans against. This will give the product greater stability and strength.
Outdoor table made of pipes
It's a great idea to make an outdoor table for your garden with a base made from water pipes. The design looks solid and assembly is easier than you might imagine. The top of the outdoor table is made of pipes, these are three strong 2x12 boards fastened with cross strips. It is clear that they need to be well prepared - sanded, stained, varnished or painted, whichever you prefer. To secure the three boards, screw 1x4 strips to the bottom as shown in the photo. Then screw the water pipe flanges to these crossbars.
Then, using adapters, assemble the table frame. It is very easy and even fun, it will take about 20 minutes. If you bought black pipes, it is advisable to coat them with silver to prevent them from rusting. Another tip regarding water pipes: be sure to check the cutting and threading by screwing the pipes into a flange or tee. If it doesn’t spin well, ask the store to adjust the cut or retighten the pipe, which should also help. Since the table is on casters, you also need a fitting that would accept the threaded rod of the wheel. It's a small plastic socket that you drive into 4 tubes. You can add a little epoxy resin to make it perfect. If you decide not to put the table on casters, you will need to compensate for the height of the pipes (or whatever you choose for the table legs) of approximately 12 cm. This table seats 6 people. You need at least 6 inches of overhang at both ends of the table to accommodate the chairs. But, if you want a table for 4 people, you can expand the meter tube to about 127 cm, thereby freeing up four more places for legs and elbows.
How to make a kitchen table from pipes and a solid board
Using the diagrams below, you can easily assemble a pipe frame for this beautiful kitchen table. To create a style, you will need a solid board. How to assemble a kitchen table with your own hands. As with most projects, the exact order in which you assemble the structure can vary and depends on your approach to the assembly process. Below is a recommended step-by-step guide for assembling a kitchen table using pipes. First install the horizontal support on the frame. The support uses six tee fittings.
Follow the diagram shown (Fig. 2) to assemble the horizontal support. Be sure to tighten the set screw to each fitting to secure it to the pipe.
From there, insert the length of pipe used for the legs into the open slots on the horizontal support (Figure 3). Tighten the installation screws to secure it to the pipe. Then insert the rollers. Next, slide the flange fittings onto the ends of the pipe at the top of the frame (Figure 5). Once the frame is completely assembled, attach the tabletop. This project used a solid board, but you can attach any wood. Place the countertop over the flange fittings and screw (Figure 6)
Please note that the flange fittings have four holes for mounting to the countertop. Now that the countertop is attached, you should have a complete kitchen table.
Photo source: www.simplifiedbuilding.com/projects/diy-rolling-kitchen-island
Recommendations for using a greenhouse
In order for a greenhouse made of polypropylene pipes to serve for a long time, it is necessary to properly care for it:
- if the greenhouse is not permanent, then it is better to dismantle it for the winter;
- after dismantling, all elements must be washed and dried;
- greenhouse parts should be stored in a place protected from precipitation;
- Every year you need to disinfect it with a special liquid or gas, you can use a sulfur bomb, after which it needs to be closed for one day so that all parasites die.
In addition, if the greenhouse is made of polycarbonate, then:
- You cannot make a fire near it, as this material is afraid of fire;
- a greenhouse covered with such material should be washed with plain water, with the addition of non-aggressive detergents, preferably laundry soap;
- It is recommended not to wash in hot weather, as this will have a bad effect on the coating;
- in the fall the building should be inspected for cracks; if any are found, they are covered with sealant;
- if the greenhouse remains for the winter, then you need to throw a lot of snow inside, this will protect the sheets from damage, and also strengthen the structure itself.
With proper care of the greenhouse, it will serve you for a long time and will not require additional investments.
As you can see, making a greenhouse on your site with your own hands using polypropylene pipes is not difficult and will not cost much. But the presence of such a structure will significantly increase your harvest and improve its quality.
Calculations and drawings
You can design a chair from pipes on a piece of paper or a personal computer. There is no need to make complex calculations, since the products have a simple design.
When planning your work, you should consider the following nuances:
- Using the curvature factor. Curved fragments look more interesting and attractive than straight links. A chair with a sloping back will fit better into any interior. You can give the workpiece a curved shape by slowly heating it over an open flame. Then it is carefully bent and fixed until it cools completely. Another way is to use factory-made contours.
- The length of the pipes is selected taking into account the fact that part of the workpiece will be immersed in the fitting. This distance is 20-50 mm depending on the type of plastic pipes. Before drawing up the drawing, you need to experimentally measure how far the links fit into the coupling opening.
- It is better to take a sample that is comfortable to sit on as a basis for the project. You can supplement it with your own ideas. Please note that plastic bends under pressure. To increase the strength of the finished product, transverse ties are provided on the legs and seat. Reinforced plastic is much more practical than analogues without aluminum inserts.
- The diagram is drawn to scale with an accuracy of 1 mm. It displays all the details, places and order of joining of workpieces to each other, couplers and partitions. An option is provided for cutting blanks, in which the amount of waste will be minimal.
- If the workpieces are joined without glue or soldering, then the joint must be strengthened. To do this, screws are used, which are screwed in so that they tighten and fix both fragments. It is better to screw hardware on the underside of the pipe and from the back. This way they will be practically invisible.
The finished diagram is the basis for carrying out calculations of building materials.
What do you do with old furniture?
Poll Options are limited because JavaScript is disabled in your browser.
Increasingly, it pleases with unusual innovations, expanding the traditional perception of things. So today we present to your attention a homemade stool made from PVC pipes, which any craftsman can make. Let's go! Materials:
- PVC pipe, diameter 25-32 mm;
- Fittings: cross – 2 pcs, straight connecting tee – 8 pcs, plug without thread – 8 pcs;
- Plywood, thickness 10-16 mm;
- Self-tapping screws for fastening the bench;
- Varnish or paint on wood.
Tools:
- Soldering iron for PVC pipes;
- Jigsaw;
- Screwdriver or Phillips screwdriver;
- Sandpaper or grinder;
- Plumbing scissors or hacksaw;
- Painting knife;
- Tape measure, pencil or marker.
Canopy
A canopy is made in the same way, for example, for a car. However, in this case it is better not to bend the pipes, but to install them vertically. This way it will be possible to achieve greater stability. Place 4 columns on one side and the same number on the other. Connect them together with crosshairs made of shorter pipes.
Connect horizontally along the top perimeter using pipes and adapters. As a roof, you can use the same awning fabric that is used to create a gazebo.
It is worth noting that such a canopy is only relevant in the warm season. In winter, if there is strong wind, the awning can be blown away if it is not firmly attached to the ground.
Decorating the partition
If the screen has not been painted or varnished, then it should be painted with acrylic paint in two layers. If the material was previously finished, the wood is sanded. With cardboard everything is much simpler - you can paint right away, as long as there is a clean surface. To fix the painted layer, matte varnish is sometimes used. However, you can refuse it if the partition will be used only at home.
You can attach the laces with a construction stapler. Note: it is better to stretch the canvas so that there are no bubbles. Usually all doors are decorated with the same material.
A more interesting idea, however, would be to decorate the partition with twigs. They are glued using a glue gun.
Sometimes the screen is covered with a plain fabric and covered with a stencil design. Floral motifs are most often used. Don't worry if the flowers around the perimeter become a little smudged. You can increase the picturesqueness of the design if you place the stencil sheet in a new direction each time. Prepare the stencil yourself using a sharp wallpaper knife. Dye it with regular textile dye.
The partition in a children's room is usually decorated with cute figurines of animals or cartoon characters.
Screens in Japanese and Chinese styles make them look as luxurious as possible. Not only the fabric, but also the depicted subjects are selected accordingly. The logical step would be to use images with national flavor. Pagodas and rice fields, hieroglyphs and mysterious mountains, Buddhist symbols and the rising sun - there are a lot of options. In addition to painting, you can also use thematic applique.
Screens for a home puppet theater are made more colorful, the better. This applies not only to fabric, but also to paints. A “roof” with triangular teeth of different tones would look quite appropriate. But whether to do it is up to everyone to decide on their own.
In a Provence style kitchen, a partition imitating a pergola would look appropriate. This is an airy and much simpler product than those described above, made from brown planks impregnated with stain.
An alternative could be a screen imitating a “grass lawn”.
Its rich, rich color immediately catches the eye and attracts attention.
But there is another option - a complex-shaped partition (fixed) with heavily tinted glass and a wooden frame. There is no need to decorate it additionally - it will become a decoration in itself.
What will you need to make furniture?
Assembling PVC furniture with your own hands is not at all difficult - you will need a minimum set of tools, basic skills in working with them and a little creativity. The result will definitely be comfortable chairs, armchairs, shelves and even tables - the range of possible products is limited only by your imagination.
The assembly process will take no more than an hour for each item - and this includes design. By the way, in order to quickly figure out how to shape this or that piece of furniture, on our website you can see a variety of photographs of plastic products. For example, the photo above shows a very convenient and stylish rack for books and magazines, and when complemented with flat shelves, other items can be placed on it.
The minimum set of necessary tools is as follows:
- roulette;
- marker;
- hacksaw for metal.
Other items that can be found at any summer resident may also be useful - a file for smoothing cuts of plastic pipes, a drill, a soldering iron. But, for example, a level is not needed - all the parts, as when assembling ordinary water pipes, will be connected with special fittings - it will not be possible to deviate from the desired angle no matter how much you want. Because of this feature of PVC products, separate fasteners - screws or glue - are not needed.
Preparation of the drawing
Drawings can be easily found on online resources, especially on fishing forums, where more experienced comrades can share the plan for the chair. Any scheme can be easily improved by adding your own details. Computer programs make it easy to create feeder chair layouts.
The easiest way is to draw a plan yourself; on it you need to mark the desired dimensions of the parts, the places of their connections, and the number of parts needed. True, if you lack experience, it is better to turn to ready-made diagrams so as not to build a low-quality seat. It is important to prepare a drawing in several projections; this will eliminate flaws and problems in the finished product.
When choosing a feeder chair, planning to make it yourself, you need to focus on your own physical characteristics, because it cannot be universal. It is believed that the standard size is 1.5 * 0.5 meters, which provides the most comfortable placement and leaves freedom of action.
Plastic pipes. Interior ideas
Crafts made from pipes look fresh and not hackneyed in the interior; a significant plus should be seen in the cost of the material. You can create unique things without investing just your time! Below are examples of what you can easily make from leftover pipes.
Work organizer
We advise you to start making crafts with the organizer. It couldn’t be simpler - cut the pipes at the same angle and glue them to a solid base. You can arrange them in a fancy shape, paint them in your favorite color, or leave them natural. Now the workplace will be in perfect order.
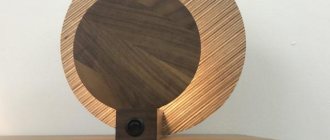
Frames for mirrors and openwork partition
To make a frame you will need pipes of different diameters, thick paper (cardboard), a jigsaw, glue and a mirror. Trace the outline of your mirror on cardboard and remove it. Now, cut the required number of pieces and create a beautiful frame for your mirror. In places of contact, spread the pieces with glue, ensure that the parts adhere to each other and leave the frame alone until the next day.
Using the same principle, you can make an openwork partition for zoning a living space. This design of large diameter circles looks beautiful.
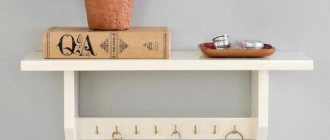
Clothes hanger
There is a huge variety of hangers these days. It all depends on the task at hand. If you have a small hallway, then a stand-up hanger will be what you need; if you need to make a hanger for a child’s room, then a U-shaped one with a stable base and additional branches for hanging a backpack will be an excellent solution. For little money you will get a designer item! It should be noted that you can decorate the resulting product in a color that matches the interior.
Pots and vases for flowers
Crazy hands make cool flower pots from sewer pipes of large diameters, and flowerpots from thin ones. You can get a stylish composition from such flowerpots by installing them on a common base made of painted plywood. You can decorate the pots with stickers, you can paint them with acrylic paints and varnish them, you can print family photos on self-adhesive film and wrap homemade flowerpots.
Shoe shelf
Use the remaining pipe from the sewer wiring as a stylish shoe rack. The diameter of the pipe must be at least 150 mm so that you can comfortably place your pair of shoes. Cut the pipe into pieces 25-30 cm long (slightly longer than the length of the boots).
Coffee table
Don’t think that this item in the interior will look ridiculous or massive. If you assemble it correctly, add decorative elements, and paint it in one or more colors, then this attribute will fit into any design.
Use your imagination and look for non-trivial approaches.
At the first stages of drawing up drawings, you need to decide on the material for the countertop. It can be plastic, tempered glass, wood, steel. You can use the old surface of a disused table.
A glass tabletop is usually attached to the top of the plastic frame.
After this, the pipes are cut and connected using fittings. If you include jumpers in the design, this will make the coffee table more durable. The tabletop can be secured with self-tapping screws. A great idea is to attach wheels to the legs of furniture fittings. This will make this product mobile.
Carefully consider the size and design of the future piece of furniture.
Making a metal chair
Metal furniture is easy to make by connecting straight sections of pipes and using the method of bending tubular elements on a “Snail” type machine. The order of operations is as follows:
- The tube is plugged at one end.
- The workpiece is filled with fine sand.
- Plug the other end.
- Place the piece in the machine, securing it between the pin and the protrusion on the disk.
- By applying force, bend a section of the profile pipe to the required angle.
- To apply less effort, you can heat the bend with a blowtorch until it turns red.
- To get the bend as it should, you will need to use plaz (cardboard or plywood with the outline of the part applied).
- The elements can be connected by welding or threaded connections. For fastening, it is permissible to use wooden bushings into which self-tapping screws are screwed.
- After welding, the resulting seam is cleaned with a file or grinder so that the joint becomes smooth.
To make a simple chair from a profile tube (20x20 or 20x40), you will need:
- welding machine with electrodes No. 3;
- angle grinder (grinder);
- file, sandpaper;
- measuring tool;
- drill with attachment.
The dimensions of the frame are selected based on personal preferences. The seat can be made from boards, plywood or furniture board. If you want to get an all-metal chair, you should cut the required number of tubular elements for the seat and attach them to the frame by welding or bolts.
Shaping PVC tube
To make it easy to bend or flatten a PVC pipe, it should be heated with a gas burner, then quickly given the required shape. As an exception, in the absence of a burner, it is permissible to heat the element of the future product on the fire of a gas stove. Cutting pipes can be done with a metal file or jigsaw; parts can be fastened conveniently using cold welding (a special adhesive will be required for this purpose).
From pipe elements you can make beautiful garden chairs with your own hands, the smoothness of whose lines can be envied. As already noted, this result is achieved by heating on a gas burner and then manually shaping the element into the desired shape. You just need to remember to let the PVC pipe cool after processing.
Material: wood, plywood, pipes and metal
Having decided to build a practical and functional folding chair, in addition to its design, construction and dimensions, you must carefully select the materials of manufacture. Most often, home craftsmen prefer:
- Natural wood. These products have interesting designs. They can be either stationary (that is, quite massive) or portable (used primarily for outdoor recreation). You can build a real work of art from wood. The main thing is to correctly calculate your strength, because all wood is divided into: hard, soft and durable.
For example, a novice master cannot cope with oak. Since this material is quite difficult to process. It is better for beginners to try making furniture items from softer woods: linden, pine, birch.
These lumber have good technical qualities and are more affordable. It is worth adding to the advantages of natural wood: resistance to negative factors (with proper treatment with antiseptics and pest control compounds), safety and environmental friendliness, long service life, pleasant aroma of wood and a delicate texture to the touch.
A wooden chair with a folding mechanism will make you proud and delighted every time. It will harmoniously fit into any yard exterior and become its decoration.
- Plywood. This material has many advantages. The versatility of plywood allows you to create chairs of any design and for different purposes. Such products can be installed in any living space due to the naturalness of the material, or outdoors. The special plywood production technology guarantees it: environmental friendliness, strength, reliability and durability. Plywood can be easily treated with paints and varnishes. Therefore, a piece of furniture can be colorful and original. In addition, coating with varnish or paint will significantly extend the life of the chair. If you choose laminated plywood to make a chair, its surface will be perfectly flat, smooth and pleasant to the touch. One of the positive aspects of making furniture from plywood is that it can withstand heavy loads, and even in its unprocessed form it is not at all afraid of moisture.
- PVC pipes. This original approach to making easy-to-use chairs is in demand among lovers of original ideas. The biggest advantage of making furniture from PVC pipes is saving money. As a rule, men begin to assemble furniture with pieces of pipe available.
The most important thing here is to have a special soldering iron and know how to use it. To make bent shapes from a plastic pipe product, it must first be heated with a gas burner. The peculiarity of furniture made from PVC pipes is that they do not require finishing. This material is not afraid of sudden changes in temperature, high humidity, or direct sunlight. It copes well with the loads when the frame is correctly assembled and has a long service life of more than 50 years.
- Profile pipes. This material differs in diameter and cross-section. Pipes can be round, rectangular or square. To work with a profiled pipe, you need to have a special tool - a snail, so that you can bend the material. The advantages of products made from profile pipes include: high resistance to mechanical damage and negative factors, reliability, durability and affordability. If you choose a thin-walled pipe, the furniture product will have little weight. A wide selection of geometric shapes of profile pipes allows you to create unique and original designs of folding chairs.
- Metal. Such products are distinguished by: low weight, compactness, variety of shapes. Their seat and back can be either fabric or wood. The features of metal products include: a small investment of money in manufacturing and a simple type of design. The only thing is that to make a folding model of a metal chair you need to be able to work with a welding machine.
Attention: to use the chair indoors, you can choose common furniture fabrics: leatherette, tapestry, jacquard. If the furniture will be used outdoors, it is better to choose tarpaulin or Bolognese material.
Floor coat hanger
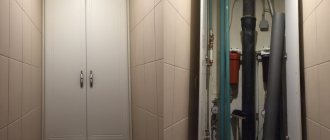
Very often, after laying various types of communications, materials remain that have not found their application. Where should I put them? This question is asked by every person after certain repair work. There are several solutions to this problem: put unused components in the attic, try to return them to the store, or use them to make furniture.
Plastic pipes of different diameters are sold in any hardware store at quite affordable prices.
A DIY floor clothes hanger made from plastic pipes is an original idea for creating the necessary interior elements from unused material. Polypropylene pipes have many advantages: they are resistant to corrosion and deformation, are light in weight and have a durable base, and are inexpensive to purchase.
You can assemble several hanger options from pipe sections.
What will be required in the first stages of production of this piece of furniture: prepare a project, create a drawing, select plastic pipes of the required length, fasteners, fittings.
The craft can have any number of hooks and partitions and, with proper skill, can replace a small wardrobe.
If necessary, the pipe can be cut to the desired size. But the cut may be sloppy. It needs to be cleaned. The pipe can be bent if it is heated to the desired temperature
This must be done carefully so as not to break the product.
An excellent option for installation in a living room.
Step-by-step assembly and preparation:
- Production of a drawing on paper with the required dimensions of each component. The presented version has dimensions 180x110x60 cm.
- Preparation of design details. Cutting them into specific pieces. Cleaning up cuts.
- Assembling a product and fastening individual parts using fittings or glue.
- Installation of decorative elements.
- Attaching the lower shelves. This can be done by fastening wooden elements to a pipe frame using screws.
- Paint the entire structure in the previously selected color using acrylic paint.
- Checking the strength of a floor clothes hanger.
There are plenty of options for organizing clothing storage using plastic pipes, and all these crafts are quite simple to implement.
Assembling a chair with a soft seat
You can make your own chair from leftover plastic pipes. The dimensions of the product are arbitrary; for example, you can take measurements from a regular chair. The assembly work includes the following steps:
Marking. Markings are applied to the pipes in accordance with the measured parameters. After this, the material must be cut into fragments. Seat assembly. To form the base of the seat, a cross is used, to which 4 short pieces of pipe are soldered; they will go from the cross to the legs
It is important that the joints are secure enough, because this part of the chair must support the weight of a person. Soldering is carried out as follows: you need to place the soldering iron on a level place, screw on the drone, as well as a sleeve of suitable dimensions, set the thermostat to 260 degrees, and then plug the tool into a power outlet and switch the toggle switch to the working position
When the nozzles warm up, you need to install the edge of the pipe and the coupling in them, wait a few seconds. After this, you should remove the products and join the elements at right angles. Then you need to wait for it to harden. If the craftsman does not have a soldering tool, then glue can be used for assembly; another possible option is to fasten the parts using self-tapping screws. However, it should be remembered that self-tapping screws can ruin the appearance of the product. Installation of legs. You need to weld a tee to the free edges of the plastic pipes, and then insert the legs into the lower holes of the tees yourself. The lower ends of the legs are closed with plugs. You can also make a rocking chair; to make it, you need to take large-diameter PVC pipes, bend them with a blowtorch, and attach them to the legs from below (instead of plugs). Assembling handrails. To each pipe that will be used as a handrail, you need to attach an elbow fitting on one side and a tee on the other side. Then a short piece of PVC pipe should be connected to the fittings. After this, the handrails are attached to the seat (inserted into the tees connecting the legs to the seat). In this case, the tees of the handrails should be on the back side, where the back of the chair will be attached. Back assembly. To the ends of the PVC tube, which is intended for the back, you need to weld a fitting-turn approximately half the length of the back. Tees are soldered to the edges of these sections, which are connected to each other by another tube that acts as a stiffener. If necessary, you can make several such ribs. Then two more pieces of pipe half the length of the backrest connect the backrest to the railing crosses. Seat installation. At the last stage of making a stylish chair with your own hands, you need to cut the seat out of a piece of plywood, screw it to the cross using self-tapping screws, and then cover it with foam rubber and cover it with fabric.
At this point, the work of assembling the chair from plastic pipes is completed, the furniture is ready for use.
The main options for hanging chairs: cocoon, hammock, nest
Modern shopping centers provide a wide selection of seating options, some of which are not difficult to make at home.
Of course, creating a wicker hanging chair with your own hands will be easier for someone who is familiar with sewing, weaving, or at least knitting. The work of making a chair will be enough for everyone in the family, because it is appropriate to involve children in decorating the finished product, whose ideas are often more interesting than those of adults. Before you make a hanging chair with your own hands, you need to examine the unnecessary things that take up space in the garage or pantry, because they may well become the basis for a hanging hammock or children's swing. In any case, finding and buying components for a chair is much cheaper than purchasing a finished product.
It is the easiest way to make a hanging hammock chair with a soft frame with your own hands. Unlike a hammock bed, which is distinguished by the presence of two fastenings, for a hammock swing it is enough to make only one fastening, and it will be slightly smaller in size than the standard version.
To make a hanging ball chair or nest, you will need a gymnastic hoop, but not a plastic one, but a durable metal one. Among other models, the ball is the most popular because it has an unusual, interesting shape and laconic design that fits into any interior. Based on personal preferences, weaving techniques, colors and decorative ornaments are selected. In addition to the hoop, to make a ball chair, it is enough to have thick textiles, wooden blocks and decorative cord for weaving.
The fastest and easiest option is to make your own hanging hammock chair
Swing chairs are made from various materials, and the frame can be either hard or soft. Despite its simple design, the chair looks attractive and sophisticated. This hanging chair is used for a summer house, veranda, balcony, as well as for living rooms, such as a bedroom, living room or children's room. The main materials that will be required for self-production are textiles, wood blocks and threads to create a seat and backrest.
The cocoon chair, or egg, is considered a favorite model of hanging furniture for children because it has high sides and a small entrance. In such a chair you can comfortably hide from prying eyes and do your favorite things in solitude: read, knit or just dream. When making a hanging cocoon chair with your own hands, the frame is made quite rigid, and the walls are woven using various techniques using wicker, rattan, twigs or any other suitable materials.
To create a wicker chair on a rigid frame, acrylic threads, wicker, metal, plastic or rattan are used. According to reviews, the hanging chair resembles a rocking chair, which is not installed on legs, but is attached either to the ceiling or to a tree branch. To make the base, textiles, leather base, wooden slats, wicker or rattan are used.