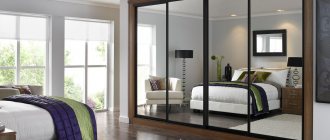
There comes a time when the usual surroundings become boring. I want to change something, update the old interior, add some detail or make a good repair. The best way to update a room, make it brighter, and perhaps even increase the space, is to attach a mirror to the closet. You have purchased new furniture, you need to glue a mirror to the cabinet door, and you don’t know how to do it correctly, let’s look at individual mounting methods.
The best way to update a room, make it brighter, and perhaps even increase the space, is to attach a mirror to the closet.
We apply “Liquid nails” or silicone to the mirror surface in parallel lines at equal intervals.
Types of fastening methods
How to glue a mirror to a cabinet? How to do this job correctly? There are several ways to glue a mirror.
| Method name | Features of the method |
| Mounting double-sided tape. | This material must be chosen correctly. The adhesive tape should be high-grade - 3M, foamed, its thickness should be 0.8-2 mm (to even out unevenness). It is possible to work with it at temperatures from +10 to +25°C. Indicators higher or lower will not provide adequate grip. The tape consumption is 60 cm² per 1 kg of mass. |
| Using “liquid nails”, special glue or colorless construction silicone. | There are some nuances: it is better not to glue the mirror to “liquid nails” or other products that have a characteristic odor. The substance contained in them can lead to damage to the amalgam. It is better to purchase special adhesives for mirrors - “Titan” (the most reliable product), “Abro”, “Soudal”, “Bostik 2750”. A very high-quality and handy method is gluing a mirror to silicone. This is the best option. |
| Mechanical method. | Using U-shaped metal tabs, plastic stops or special screws. |
You have purchased new furniture, you need to glue a mirror to the cabinet door, and you don’t know how to do it correctly, let’s look at individual mounting methods.
The best option is to glue the mirror onto colorless silicone for construction.
Attention! Which gluing option to choose is up to you to decide. The main thing is not to rush, do all the work scrupulously, approach the matter responsibly, then the mirror will be attached firmly enough and will last a long time.
How to glue a mirror to a cabinet?
Remove the protective stickers from the tape.
How to remove and insert into kitchen cabinet door?
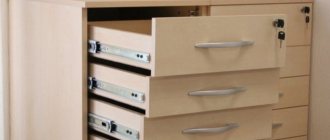
Most often in kitchen cabinets it is secured using plastic L-shaped fasteners and self-tapping screws. It is easy to replace such glass sheet.
- Remove the cabinet door, place it on a horizontal surface, covering it with a soft cloth to avoid scratching the facade.
- Use a screwdriver to unscrew the screws, remove the holders, carefully remove the fragment and put it aside.
- Place a new canvas on the façade, ensuring that the edges overlap the façade equally. This is necessary to avoid accidentally fixing the glass, leaving the glass holder visible from the outside.
- The first element is fixed at a distance of 5 cm from the edge, the subsequent ones - 20 cm from each other.
If you are afraid that the glass holders may not support the weight, place them larger at a shorter distance.When using new glass holders, pierce them with an awl to make tightening the screws easier.
- Using a screwdriver, gradually screw in the screws so that the workpiece does not burst from excessive force.
Attention
Glass holders will firmly secure the new fragment to the facade of the kitchen cabinet. There is no risk that it will come off or fall off.
Mounting to plastic holders is the simplest, but least aesthetically pleasing way.
Necessary materials
Before you begin, you need to prepare the following materials: mirror, liquid nails, glue or silicone for gluing the mirror, double-sided tape, masking tape, degreaser.
There are several ways to glue a mirror.
Now you need to wait for the glue to dry.
Plexiglas products
Plexiglas is a transparent, solid synthetic material made from polymers such as polyacrylate and polystyrene. Previously, plexiglass products were not as high quality as modern polymers.
If we compare organic glass with mineral glass, we can note certain advantages and disadvantages of the polymer.
Plexiglas is a lightweight material and is almost impossible to break. Polymer glass is easy to process. At the same time, organic glass is easily scratched and loses its transparency. The polymer burns, releasing toxic substances into the atmosphere.
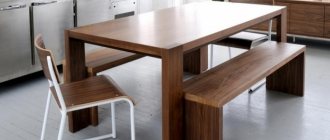
Plexiglas is not suitable for making mirrors. But they make beautiful shelves and display cases from it.
Required Tools
The following tools will be useful: sandpaper, mounting gun, pencil, ruler or tape measure. If you are going to screw the mirror onto the mount, then you will need a drill, a screwdriver, screwdrivers, regular drills, a diamond drill (to make a hole in the mirror), and a special mount for mirrors.
Which gluing option to choose is up to you to decide.
If you decide not to use “liquid nails”, but to attach them to the legs, then you need to make sure that they are manufactured accurately in height and, if necessary, install spacers.
Installation of hinges for glass furniture
The performance of the hinge is influenced by several parameters: the accuracy of insertion and installation, the quality of the hinge itself and the nature of its operation.
The easiest way to install a glass door is using hinged awnings. In this case, there is no need to drill the door. The sequence of actions in this case is as follows:
- Markings are applied at the location of the hinges (on the base and on the door itself).
- Then the furniture hinges for glass are opened and glass is inserted into the resulting groove.
Inserting glass into a hinge
- Next, the clamping bolts are tightened tightly.
Tightening the clamp bolts
- After this, the door is attached to the base, in the places previously marked for the hinges.
If the weight of the door being hung exceeds 20-25 kg, the installation method with drilling is used. For this:
- At the bottom and top of the door (at a distance of 1/3 of the door height) the location for installing the canopy is marked.
- Then, at the marking site, holes are drilled for mounting bolts/screws. To do this, you will need a drill and a glass drill of the required diameter. You can see the drilling technology in the video below.
- After the holes are ready, the hinge is installed on the door and secured with bolts.
- The canopy strike plate is attached directly to the cabinet body according to the markings.
After hanging the door, you should check the smoothness of its movement
After this, all that remains is to hang the door, check the smoothness of its movement, the presence of distortions in the open and closed positions and gaps between the door and the frame, and make sure that there are no extraneous creaks or backlashes.
When installing a glass door at home, you should perform the work extremely carefully, since the glass can crack even from excessive pressure from the drill during drilling. Inexperienced craftsmen should opt for hinge-type hinges for glass furniture doors, the installation of which does not require special skills and equipment.
Fastening process: step-by-step instructions
So, you stocked up on all the materials and tools and purchased a mirror of the required size. It is preferable if its back side is protected with a special film, which, if the mirror breaks, will prevent fragments from falling off. Now let's get to work.
You can use fine sandpaper for better adhesion of the glue.
Before fixing the mirror, you need to place a soft layer, and then press the mirror with paws.
First, remove the cabinet door. To make it easier to work with, you need to place it in a horizontal position. Using a pencil, draw marking lines on the surface. Use a degreaser to clean the door, then the mirror. You can use fine sandpaper for better adhesion of the glue. Use a brush to remove all the dust.
Use a degreaser to clean the door, then the mirror.
If the mirror has ready-made holes, you can use special screws instead of the tabs.
We apply “Liquid nails” or silicone to the mirror surface in parallel lines at equal intervals. Between them, for auxiliary fastening, we glue strips of double-sided tape. The best option is to glue the mirror onto colorless silicone for construction. There is no need to use only adhesive tape, since a mirror glued in this way may fall after some time, especially when the room is very warm or you are doing work in the summer.
First, remove the cabinet door.
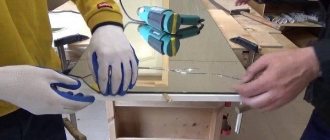
To prevent the glass from cracking, the mirror surface must be wetted all the time or a side made of plasticine must be made and water poured into it.
Remove the protective stickers from the tape. We fix the long edge of the mirror on the marking line. Slowly, we lower the mirror surface, trying to prevent displacement. It is better if an assistant works with you. He will make sure that the mirror lies flat, without going beyond the applied markings. That's it, the mirror is glued. Now you need to wait for the glue to dry. Optimally, a day is allotted for this. The door can be secured in place.
So, you stocked up on all the materials and tools and purchased a mirror of the required size.
The mirror should lie on cardboard or fabric.
If you decide not to use “liquid nails”, but to attach them to the legs, then you need to make sure that they are manufactured accurately in height and, if necessary, install spacers. They should be close to the mirror, but without tension. You also remove the door from the cabinet, lay it horizontally, mark where the holes for fastening the tabs should be, screw them, and bend them. Before fixing the mirror, you need to place a soft layer, and then press the mirror with paws.
The following tools will be useful: sandpaper, mounting gun, pencil, ruler or tape measure.
Gluing a mirror to a cabinet door is not that difficult; all the work must be done very carefully.
If the mirror has ready-made holes, you can use special screws instead of the tabs. In case there are no holes, they are drilled with a diamond drill in the corners. To prevent the glass from cracking, the mirror surface must be wetted all the time or a side made of plasticine must be made and water poured into it. The mirror should lie on cardboard or fabric. Plastic washers must be inserted under the screw heads.
Before you begin, you need to prepare your materials.
As a result, the interior of the room will be greatly transformed.
Gluing a mirror to a cabinet door is not that difficult; all the work must be done very carefully. As a result, the interior of the room will be greatly transformed. It is not necessary for the mirror to be rectangular or square. It can be of any original shape. It is important that it fits the overall situation.
The main thing is not to rush, do all the work scrupulously, approach the matter responsibly, then the mirror will be attached firmly enough and will last a long time.
It is not necessary for the mirror to be rectangular or square.
It is important that it fits the overall situation.
Choosing hinges for glass furniture
Like any other fittings, fittings for glass furniture can be made of aluminum, stainless steel, hard alloy brass, zamak or bronze.
The choice of hinges from one material or another should be determined not so much by the appearance of the hinges, but by the method of their installation and the type of construction of the canopy itself. However, you shouldn’t forget about the appearance either, because the fittings for glass cabinets are visible not only from the inside, but also from the front, determining the aesthetics of the product.
It is also worth recalling that glass doors usually have an impressive weight, significantly exceeding that of wooden products, therefore, when choosing suitable canopies, you should know whether they can withstand it.
Depending on the weight and type of door, the number of awnings used may vary. So, double-leaf doors are usually attached to two hinges, while single-leaf doors will require at least 3 hinges.
By installation method
Depending on the installation method, furniture hinges for glass doors can be overhead or threaded. Each type has its own characteristics:
- Overhead loops:
- No drilling required for installation.
- They look very aesthetically pleasing, are easy to install and do not require the use of special tools, however, the weight of the door hung with their help should not exceed 20-25 kg.
- Attachment is carried out using special clamping bolts, the quality of which should be given close attention. The gasket used to seal the canopy with glass also deserves attention. It can be adhesive, plastic or rubber. Adhesive gaskets are used for doors made of thin glass up to 5 mm thick, plastic - for glass up to 8 mm, rubber - for glass up to 10 mm.
Installation of overhead hinges does not require glass drilling
- Mortise hinges:
- Requires door drilling during installation. They have a cup design.
- The strike plate is installed on the wall of the base (cabinet). A decorative plug is installed on the front side of the door in place of the hinge.
- Hinges of this type provide reliable fastening of even heavy glass doors with a thickness of more than 10 mm. When installing these hinges at home, the greatest difficulty is the need to drill holes in the glass.
How to choose glass fittings
When choosing accessories for fastening glass, you should rely on the type of item itself, its location and functionality. If you are selecting a fastening element for installing a mirror or other glass structure in the bathroom, you should give preference to parts made of stainless metal (steel, zinc, brass). It is also worth paying attention to the decorative appearance. This detail must fit neatly into the design of the product. Fasteners on glass must have a protective gasket so that during contact with the canvas it does not deform.
What is the best glue for mirrors - Abro or Titan?
There are mirrors in every home. They are often built into furniture, for example, in wardrobes or bathroom cabinets, but in some cases they have to be mounted on the wall. The easiest way is if the finished mirror is in a frame, then installing it will not be difficult. And if you have to attach it to the wall, and even more so if the accessory is large, for example, from floor to ceiling, you will have to put in some effort and, of course, high-quality mounting adhesive for mirrors.
Hanging or gluing a mirror requires careful planning.
When calculating the dimensions, it is important to take into account that the mirror should not touch other objects, otherwise cracks may subsequently appear.
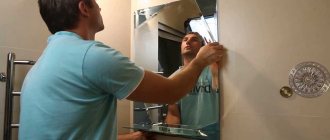
So let's get down to business:
First you need to remove the old tape.
I heated it with a household hairdryer and cut it off with a knife: some part remained on the mirror, and I tried to wipe off the residue with a solvent, but I quickly got tired of this process. These remnants do not affect anything, let them remain.
Now you need to degrease both surfaces
. This can be done with solvent or acetone.
We stick the tape in small pieces, but more often
.
We remove the protective layer, take aim and firmly press the mirror against the door for a minute.
I don’t know what kind of tape they use at the factory that made this cabinet, but it’s a bit loose, 3M looks much denser.
That’s it, the mirror is in place and this time, I think, it won’t fall off.
I wonder if the top mirror will also have to be re-glued soon.
Subscribe to the channel so as not to miss new publications.
My VKontakte group:
Carpentry workshop “Master’s Work”
Instagram:
@crimean_woodworking
What is auxiliary fastener
Before you start attaching a mirror to the wall, especially if it is large, you should think about how to hold it until it dries completely. In this case, various types of auxiliary fasteners will come to the rescue. When gluing small mirrors, you can use lighter types of fasteners rather than the adhesive itself. The most popular types include liquid nails and double-sided tape. Each method has its own scope of application depending on the material.
The advantage of liquid nails over other methods is that they create a strong connection, even if the parts to be glued do not fit tightly together, which is especially important for porous materials. This greatly simplifies the installation of uneven surfaces
The base is synthetic rubber with polymer additives. The big advantage is elasticity.
Before gluing a mirror with liquid nails, you will need to purchase a special gun into which a cartridge loaded with glue is inserted. Outwardly, it resembles a syringe. By pressing, the adhesive composition is applied to the degreased surface in a dotted or serpentine manner. The use of liquid nails for a mirror is advisable when the reflector is to be glued to wallpaper or drywall.
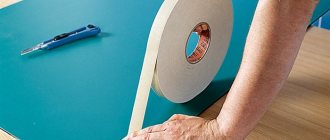
An alternative to this method is double-sided tape. It is a tape with an adhesive applied to both sides. On one side it is protected by a film. It can only withstand light, small-sized canvases. Pieces of tape are evenly distributed over the fat-free back surface. Then the protective film is removed from them and pressed against the material. This way you can glue the mirror to a cabinet or any other furniture. The method is suitable for beginners, since if there are any unevenness, the tape can be easily removed and re-glued.
Liquid Nails
Double-sided tape
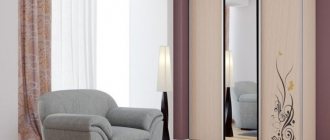
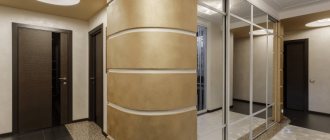
Method No. 4 Sliding wardrobe with stained glass windows - economical option
Only very wealthy people have the opportunity to decorate wardrobe doors with stained glass windows. We offer a decoration method that will allow you to experience all the delights of stained glass decoration without significant costs.
The technology is extremely simple. A translucent stained glass film with an adhesive surface is applied to the mirrored door of a sliding wardrobe. The film transmits light, which returns to us through reflection. The result is a glowing effect similar to reflection from colored glass. Applying stained glass to a wardrobe mirror is as easy as a regular vinyl sticker. Check out the decorative effect.
Stained glass films from the Crystal Frost series are perfect for decorating wardrobe mirrors, glass doors and partitions, and shower stalls. An exquisite translucent pattern will make the glass surface attractive and open up space zoning possibilities. Several surface patterns are available to order
Can this be done according to Feng Shui?
Let's consider whether it is possible to place a mirror on the front door of an apartment according to Feng Shui. According to the teaching, it is through the front door that positive energy comes into the home. It does not particularly encourage placing a mirror on it, but it does not prohibit it either. So, the mirror on the door should be positioned so that nothing interferes with the access of positive energy.
The canvas should not reflect the bathroom, kitchen or toilet . It is also desirable that a person sees his full reflection in it.
When placing a mirror on the front door, according to Feng Shui, there is no need to hang another mirror opposite it so that they are reflected in each other. In the teaching it is believed that this can cause good luck to leave home.
Algorithm for gluing glass using double-sided tape:
- Apply tape around the perimeter of the glass on the back side.
- Apply additional strips of tape at regular intervals.
- Before gluing the mirror product to the surface of the furniture, mark with a pencil the place where it will be located. After that you can stick it on.
Important! Do not use this method for large items. There is a possibility that the tape will come off and the glass will break. This risk especially increases in the summer heat.