Icer
6935 0 0
Icer August 2, 2018Specialization: master in the construction of plasterboard structures, finishing work and laying floor coverings. Installation of door and window units, finishing of facades, installation of electrical, plumbing and heating - I can give detailed advice on all types of work.
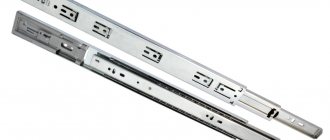
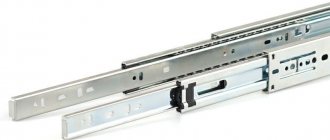
Telescopic guides are the most reliable and convenient solution for drawers, baskets and other furniture elements today. But sometimes there is a need to remove a box from furniture, and many do not know how to do it correctly, which leads to damage to the furniture. In the review, we will tell you how to remove the element quickly and easily, and also briefly examine the main types of telescopic guides.
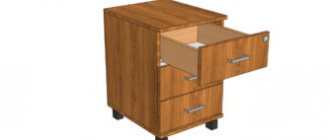
Telescopic guides are used in various furniture
Drawer design with guides
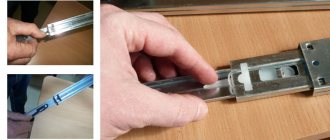
The device consists of 2 “P”-shaped profiles, external and internal. The first is mounted on the wall surface in the interior of the headset. There are two grooves - upper and lower, into which plastic strips containing bearings are carefully placed. It is thanks to them that the profile slides inside. To prevent it from popping out completely, a special plug is installed.
At first glance, this seems incomprehensible, but if you follow the simple instructions given below, then everything will become extremely clear.
Two profiles are nested inside each other, and inside there is a carriage that ensures the sliding of the bar thanks to bearings - balls. The bar is attached to the drawer itself. So, the bar with profiles folds into one mechanism, and when they fold out again, the shelf completely slides out of the niche. The system is convenient, because this way you can get an item from the farthest corner of the furniture.
Materials and tools
To build a hiding place in a desk drawer we will need:
- drill with a diameter of 3 mm;
- hand or electric drill;
- wood glue;
- 80 grit sandpaper;
- steel bar, diameter 3 mm;
- roulette;
- four similar-sized objects, preferably about an inch (2.5 cm) high; they will be used to support the false bottom, and the shorter they are, the less visible the secret compartment will be;
- This one uses four identical corks, but you can use anything: Lego bricks, bottle caps, erasers, it doesn't matter, but they have to be the same.
- hacksaw for metal;
- 1/4 inch (6 mm) plywood;
- old T-shirt (optional).
Types of telescopic guides
To understand how to carefully pull out a drawer in a kitchen or other unit, you need to understand the classification of telescopic guides.
In modern furniture sets, various rail guide systems are installed for ease of use.
There are several types:
- roller and ball, determined by the type of moving mechanism. Rollers have a shorter service life, withstand much less load and become noisy over time. They cost less than ball systems;
- full or partial extension, which depends on the degree of extension.
Important! If a partial extension system needs to be repaired, the back of the dresser will be obscured from view. Such guides have a budget price.
Typically, only the most comfortable models are found on the modern market.
Metaboxes have been developed based on roller systems. Tandem boxes are considered the most expensive option. The last criterion: location of installation. You can purchase products that are installed on the side or bottom of the drawer, the so-called hidden installation.
They usually cost more, but they are very convenient and practical.
Types of products
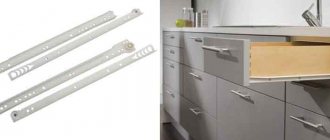
The second name for the hardware option we are considering is ball guides, since the system moves on small balls, which ensure smooth running and durability of the structures. Let's figure out what product options are available, and then consider the model range presented on the market.
Main types
All telescopic options are divided according to the following characteristics:
- Possibility of disassembly . There are both collapsible and non-dismountable options; the second option is not suitable, since the element in it cannot be disassembled and it is difficult to remove such a box. But the vast majority of options on the market are collapsible, so there will be no problems with repairs.
The design consists of three main components shown in the diagram
- Number of steps . Depending on the extension length, structures are divided into two-section and multi-section. If everything is clear with the first option, then the second is much more complex in design, so you should disassemble it more carefully. But as for the installation and removal process, there is no fundamental difference; if you understand the topic, you will be able to service all types.
Multi-section options extend to a much greater distance than two-section options
- Presence of a closer . This element makes the use of furniture more convenient, because the drawers themselves are pressed to the end and become the way they need to be. Of course, models with a closer are noticeably more expensive than simple options without this element. What you choose in the end is up to you, both solutions are quite reliable, there is not much difference in quality.
The closer is a special plastic block on the outer edge of the structure
The most modern solution is guides that open the drawer when you press it; they are often called “Push to open,” which characterizes the principle of operation. The design is similar to the version with a closer, only it has an additional block that slightly pulls out the drawer when pressed.
The guides also differ in the degree of extension of the elements; there are three main options:
| Illustration | Description |
| Partial extension systems . A standard solution in which the element does not come out completely; a small part of it remains inside the housing, as shown in the photo. These are the cheapest products, which are similar in operating principle to standard roller products, although in terms of reliability they are significantly superior to this analogue. Their use is justified if you do not need full access to the internal cavity. | |
| Full extension designs . This type allows full access to the contents of the drawer, which is very convenient. Naturally, the reliability of the system is an order of magnitude higher than that of the first option, since it must withstand higher loads. Most often this is a multi-stage system, since it is impossible to ensure a large guide stroke using two units. | |
| Super full extension telescopic guides . This option allows the drawers to extend beyond the surface of the furniture façade, providing the best access to the contents. Such fittings are usually used in high-capacity elements; they can withstand high loads, but are also significantly more expensive than the analogues described above. |
Guide dimensions
On sale you can find different sizes of telescopic systems:
| Illustration | Description |
Height 17 mm. The most compact option with the following characteristics:
| |
Height 27-30 mm. This option is more reliable and has the following characteristics:
| |
| Height 35 mm . According to the main characteristics, this type of fittings resembles the type described above, so it makes no sense to list all its main features. The only significant difference is the permissible load, here it is already 20 kg. | |
Height 45 mm. The most common and popular solution today, which has a number of advantages:
|
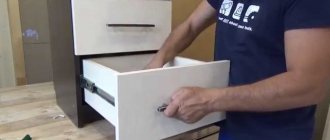
How to remove a drawer
It is not difficult to pull out the structure: black clamps (tongues) are visible on the surface of the guides on the left and right sides. To completely release it, just hold these “flags” on both sides and lightly pull the handle in your direction.
The system may differ slightly on different pieces of furniture.
For example, if the furniture has telescopic guides with wheels, you just need to lift the bar so that the wheels come off the rail - the structure will slide out perfectly with minimal effort.
By performing each action sequentially, you can easily pull them out of the guides without damaging the structural elements.
If there are no “antennae” and wheels, the rail will simply have to be disconnected. The screws are unscrewed from one side and the other, and the shelf is pulled out.
In order to return everything to its place, follow the steps of this instruction in reverse order.
From the chest of drawers
Most often, you have to remove a shelf from a chest of drawers when there is a thing or object inside that does not allow the structure to be completely closed.
Having lowered the plastic holders on both sides and holding them in this position, begin to smoothly push the drawer to the end, pulling it out in this way.
It doesn’t matter whether there is a closer or not, the following actions are performed:
- pull the shelf towards you as much as the guides allow;
- press and slightly turn the plastic latch, which is located in the place where the hardware strips meet each other;
- Repeat the steps for the other side, pull the mechanism a little and pull it out.
You can only understand which model you have by trying to release the arrow. If it does not go down, then do not press harder, otherwise you will break and damage the structure. Just lift it up and everything will work out.
Note! If the latch is made of plastic, do not yank it too much - this will break the latch. You can use a thin screwdriver, but it is better to do everything carefully with your fingers. Do not pull the clamp completely out of the guide system!
On the retractable part there are special stoppers in the form of plastic tabs that prevent the structure from fully extending on its own.
Kitchen set
To open or remove a shelf on kitchen furniture, you will have to perform a number of these steps:
- empty the items and open the structure all the way;
- on the inner slot there is a black flag, made of plastic;
- press out the “tendril” using a small flat-head screwdriver: press it onto the flag and pull it towards you.
Important! The element should not be clamped too tightly - this could break the plastic. The flag can move either down or up on one side or the other.
- when the “tendril” goes beyond the end of the body, you cannot pull it out further. Try to lower the flag down; if that doesn’t work, move it up;
- simultaneously press the clamps on both sides and pull the box towards you.
You need to pull it out carefully so as not to bend the guides. The middle section should come out of the strip mounted to the wall of the compartment. Be sure to check the condition of the balls: they must be lubricated. If they are dry, lubricate them with the simplest grease.
Only with a correct understanding of how a thing works can you use it correctly.
Why is it needed?
1. Bottle holders fit perfectly into the narrow niches of the kitchen set, which are often left when creating a kitchen from standard-sized modules.
If you don’t want to pay extra for non-standard cabinet sizes or lose precious space behind a standard false panel, install cargo - it will be much more convenient to use the kitchen.
2. Narrow pull-out baskets are very convenient for storing bottles of oil, vinegar and sauces, tall containers with cereals, jars of spices, boxes, etc.
In hardware stores you can also buy cargo options with special holders for towels or baking sheets. If you love to cook, you will always have everything you need at hand.
3. If you have a washing machine in your kitchen, use a pull-out basket to store laundry detergents.
Installation nuances
The width, length and thickness of the fittings are selected based on the tasks assigned to the ball guides. Designs with dimensions of 27x350 mm are in fairly high demand. Often used under the keyboard.
Reviews clearly prove that using telescopic guides for drawers is extremely beneficial. They are efficient, glide easily, and allow you to close and open the drawer with a simple movement. At the same time, the marking, adjustment and installation diagram are quite simple. You can watch the video and photos for clarity, and also use some of my tips. I hope you find them useful.
- The kit includes 2 runners that can be disassembled into 2 components. The first should be installed on the sidewall. It has a large width. The narrower part is mounted on the box;
- Be careful not to mix up the sides so that you end up with the boxes hitting the back of the rail. It is better to attach all the elements in advance, leaving the necessary gap;
- The guides (rails) are extended all the way. There is a plastic tongue in the middle. Click on the long end to extend the small rail;
- Apply markings to the side of the cabinet and the drawer itself that will be inserted into it. Here you will have to navigate by the size of the furniture in order to determine the location of the ball-type guides;
- Using self-tapping screws, fasten the wide guides on the sides, and the narrow ones on the drawers on both sides;
- Carefully and smoothly slide the box inside into the special grooves. At first, you do not need to insert the drawer all the way. As soon as you hear a click, stop, pull the drawer back, and repeat the movement several times.
There are also no problems with how to remove the guides. You need to pull the box out of the front, press the plastic tabs on both sides, thereby disconnecting the structure.
In the instructions for collapsible ball guides, the manufacturer usually indicates how to disassemble the fittings. But usually you don’t have to do anything complicated for this.
Collapsible ones are more complex in design, more expensive, but can be repaired. Whether you will repair the fittings yourself is a rather secondary question. As for me, it is much easier to buy high-quality non-separable guides and use them calmly. Repairing fittings is not the most rewarding task.
Mounting options
Before you begin to remove the headset, you must clearly understand what type of fastening was used. After all, each of them has its own nuances. These could be the following types of mechanisms:
- simple loop. This is the most primitive and long-familiar method. Particularly suitable if the walls in the kitchen have not been leveled beforehand. Removal from this type of mount is not difficult;
- hanging corner. By design, it is a plate made of durable metal. One part of it is attached to the wall, the other is fixed to the back of the wall-mounted set. This design does not provide for the possibility of adjusting the cabinet;
- professional IKEA canopies, this option is used for furniture from the company of the same name, since it has the appropriate grooves for fastening;
- guide strips (mounting rails). This type of fixation is considered one of the most reliable. The entire load created by the cabinets is distributed evenly along the guides. The planks themselves are attached to the wall in several places. This option is suitable for walls constructed from shell rock or foam block.
Each mounting option has its own characteristics, and accordingly, cabinets will need to be removed from them using an individual method.
Standard fastenings for wall kitchen cabinets Source ecodacha-nn.ru
Fastening options for wall cabinets for the kitchen Source furnitureezh.rf
Mandatory steps that must be included in dismantling
Dismantling wall cabinets consists of several simple steps:
- devastation. It is important to extract all contents completely. This will prevent any products from leaking or grains from spilling during transportation of the set;
- filming of sashes. It is better not to ignore this stage, as the cabinet may break. As a result, the doors will be damaged (the ends will be chipped, the glass will break), and, as a result, you will have to order new ones;
- removing the zip ties. Traditionally, all cabinets are connected to each other using special fasteners. This is done so that the set does not move around while being in a single set and does not sag. With the help of this part, during operation, a uniform level of the entire facade is maintained;
- dismantling shelves. The internal shelves must be removed, since when the headset is removed they tend to fall out. This is fraught not only with their deformation, but also with causing injury to those involved in dismantling;
- lifting the body. The cabinet frame must only be lifted by the bottom. If you grab the top bar, the cabinet may break.
On a note! Before immediate removal, make sure that all bolts and dowels are unscrewed. It should also be remembered that removing the wall cabinet from the hinge and the IKEA fixing element is done in the same way: you just need to lift the cabinet and it will easily come off the mounting point.
Provided that a corner was used for hanging, then first unscrew the screw and only then remove the kitchen set from its seat.
Mounting corner for fastening the upper part of the kitchen facade, it is not difficult to dismantle Source onlinetrade.ru
Useful tips
This section offers some useful tips for installing wall-mounted kitchen furniture:
- the mounting rail should be mounted slightly below the top edge of the headset (about 3-4 cm);
- Drilling holes should be carried out in places where there is no wiring. You need to check if there are any switches, sockets or distribution boxes nearby. In most cases, you need to know the layout of electrical cables. You can ask for it from professionals during electrical installation work;
- In order not to damage the kitchen cabinet panels or cause the formation of burrs and clamps, it is better to place a thin board between the hook and the fastening element. Maybe plywood. Even a thick sheet of cardboard will do;
- To prevent chips from forming and paint coming off the panels when making through holes, you need to start drilling with the smallest drill size and gradually increase its diameter by reloading another one.
Mistakes leading to breakdown, or what not to do
All removal operations must be carried out with the boxes completely unloaded. When pulled out, a heavy box can damage (bend) the guides, after which it will be difficult for them to give the correct geometric shapes.
It is better to carry out the operation of removing large boxes together, for the reason stated above.
You should not disassemble the closers or the guides themselves, due to the presence of many small parts in them.
Subscribe to our Social networks
Advantages
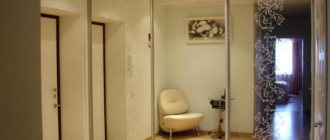
The doors have a complex design just to create maximum comfort for the owner in the house. There are several advantages of using such an interior element:
- Compactness. Due to the fact that the doors do not swing outward, you can open them without taking up space in the room. This advantage is especially important for small spaces.
- Large capacity. In such a closet you can install both shelves and hangers, which can accommodate a lot of things.
- Versatility. This piece of furniture will fit into almost any room interior. Due to the fact that there are many shapes and colors of cabinets, you can choose exactly the one that will harmonize with other furniture.
- Mirror doors. In addition to the fact that you can show off in them all day, a mirror also creates additional visual space in the room.