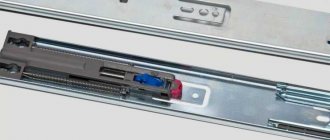
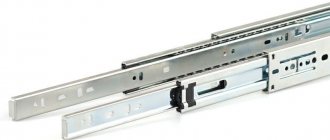
The most popular today, as before, remain telescopic (ball) full extension guides.
They look like this:
Their advantages include:
- Relatively inexpensive price
- Smooth and quiet running throughout its entire service life
- Able to withstand certain loads
- Wear resistance and strength
- Ease of installation
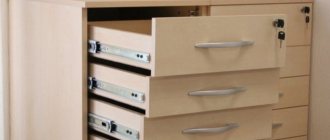
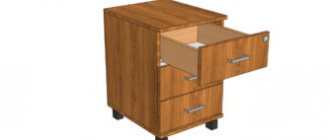
These mechanisms are very often used for drawers of chests of drawers, kitchen sections, wardrobes and other similar mechanisms, with the operation of which they do not want to have problems in the future.
Calculation of drawer dimensions
To install the ball slides correctly, let's check that you have detailed the drawer itself correctly.
Width
According to the technological dimensions of furniture design, an assembled box without a front in width (between it and the side of the product) should have gaps of 13 mm on each side . This is exactly how much the thickness of the “telescope” will take on.
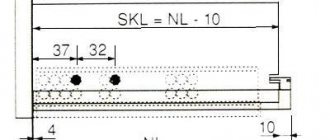
See the diagram for box dimensions:
Length
Dimensions of telescopic guides for retractable structures from 250 to 800 mm in increments of 50 mm: 250 mm, 300 mm, 350 mm, 400 mm, 450 mm, 500 mm, 550 mm, etc.
Ideally,
the depth of the drawer should be equal to the length of the guide . Also remember to leave at least a 10mm gap between the back of the dresser and the back of the drawer.
However, there are situations when it is necessary to deviate from this condition. For example, if the internal depth of a cabinet, cabinet or chest of drawers is not 500 mm, but slightly less, let’s say 495 mm. In this case, if we take a 500 mm box, it won’t fit, but if we make it smaller, 450 mm long, the arm won’t rise, because at the same time we lose 35 mm of usable space:
- 35 mm (loss) = 485 mm - 450 mm (rail length)
- 485 mm = 495 mm - 10 mm (distance between the back wall of the drawer and the chest itself)
In such situations, it is worth considering the option of a 495mm drawer with 450mm slides. Of course, it won't go all the way out due to the shorter guides, but that's not a big deal. But the capacity has become larger; during use, the housewives will appreciate this!
Height
The height is usually made based on the needs of the person who will use it. The height is usually 80-250 mm.
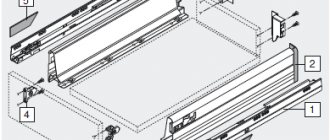
How to install metaboxes
The installation of metaboxes also differs only in the location of the mechanism - the metaboxes are located along the top edge. The design is not the easiest to install for a beginner. To correctly place the metabox, you need to determine the correct height, which corresponds to the dimensions of the front part of the furniture. The guides can be of different sizes: 54, 86, 118 and 150 mm. The guides can be lengthened using two rows of rails.
The diagram shows a metabox measuring 150 mm:
Marking the mounting points for the guides
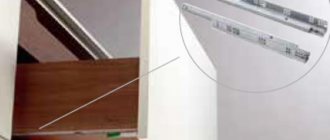
The principle of installing guides is much simpler than it might seem at first glance.
The telescopes (if you pinch the black antennae and pull out one half) can be disassembled into two parts, one of which is attached to the side of the drawer, and the second to the inner side of the chest of drawers.
Our main task is to determine the exact locations of these fastenings, screw each half with three screws and insert the drawer into the chest of drawers, thereby connecting the guide into one whole.
How to install drawer fronts
After installing the facade, it will no longer be inconvenient to adjust the guides. Moreover, this can lead to scratches and chips. Therefore, before fixing the facade, check the functionality of the mechanism, how smoothly it moves. It is important that the box moves smoothly and silently. Only after this, using spacers made of chipboard or other material (even a ruler will do), should the façade be installed.
Using double-sided tape, secure the facade and secure it from the inside with self-tapping screws.
Installation of ball telescopic guides
On the side of the drawer, horizontally, strictly in the center, mark a line and screw one half of the guide along it.
Now we need to mark a similar horizontal line on the inside wall of the chest of drawers.
I took the exact distances and dimensions from the drawing of my chest of drawers; you can use the drawing of your furniture product, approximately as shown in the figure:
That is, we mark 417 mm from the floor on the sidewall and mount the telescope at this height.
This completes the hardest part of the work; now we screw the two halves of the guides strictly along the line to the drawer and to the side and move it into place.
What you need to know before installing guides
Almost all guides are attached in the same way. You should retreat 2 millimeters from the front edge and secure it with screws along the edges, gradually moving towards the center.
The only differences are in the calculation of the height for attaching the skids. All guide fastenings are divided into three types:
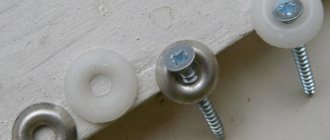
- To the bottom side edge of the box. Roller guides are attached strictly to the bottom of the drawer base. Just like expensive tandem boxes.
- Towards the center of the side of the drawer. Ball telescopic guides can be attached to any part of the drawer, but it is best to do this to the center in order to simplify the installation process.
- To the top of the drawer. The metabox runners are attached to the top of the box base.
Different types of guides are also installed differently. Depending on the type of furniture, its characteristics and material, you should choose the type of guide structure.
Instructions for replacing guides
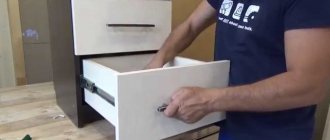
To replace broken roller runners, you need to use a screwdriver to unscrew all the fasteners and remove the strips. Ball-type ones are more difficult to remove: pull out the drawer as much as possible, press the latch down with your fingers, and smoothly pull the structure toward you. Dismantle the planks from the side walls of the furniture, removing all the screws.
Installing new guides for dresser drawers is not difficult: they all have a similar design, and the holes for the fasteners match. There is no need to mark. The strips are applied to the holes remaining from the screws and screwed. Check the correct position and, if necessary, adjust it by loosening the fasteners.
Having learned how to properly mount the guides, you can independently repair failed elements or install new ones on your own furniture. When choosing the optimal option, you should take into account the planned load: if it is large, you should give preference to ball structures.
Did you manage to solve your problem using the recommendations from the article?
Yes!
46.56%
No. More answers required. I'll ask in the comments now.
38%
Partially. There are still questions. I'll write in the comments now.
15.43%
Voted: 771
Expert Tips for Removing Drawers from Dressers
If you are having difficulty completing all the steps above at the beginning of the article, try gently lifting the box to make it easier for you to complete these steps. Sometimes there may be resistance. This is when it is convenient to push the mechanism all the way and try to return it to its original position.
LINK! You may also need to unscrew the retainer along with the elastic, but keep in mind that it will come off over time. To get slippage, you can turn to special solutions that are designed specifically for this. The main thing is that their number should not be large.
Sources
- https://NuclearFactor.ru/sredstva/kak-snyat-vydvizhnoj-yashchik-s-napravlyayushchih.html
- https://LetSelSovet.ru/udalenie-zapahov/kak-snyat-yashchik-s-napravlyayushchih.html
- https://kama-sushi.ru/pravila-hraneniya/kak-razobrat-vydvizhnoj-yashchik.html
- https://arlekina.ru/kak-dostat-vydvizhnoi-iashchik-ikea
- https://joy-jeans.ru/zapahi/kak-vytashchit-vydvizhnoj-yashchik.html
- https://absolut-dostavka.ru/raznoe/kak-snyat-vydvizhnye-yashhiki-s-napravlyayushhie-polnogo-vydvizheniya-kak-vytashhit-s-dovodchikom-v-kuhonnom-garniture-komoda-ili-shkafa.html
- https://AlfaMebel58.ru/udobnye-krovati/kak-razobrat-vydvizhnoj-mehanizm-yashchika.html
- https://kuhniug.ru/himiya-dlya-doma/kak-vynut-yashchik-iz-napravlyayushchih.html
- https://ColorMann.ru/zapahi/kak-snyat-yashchik-s-napravlyayushchih-dovodchikom.html
Recommendations for repairing pull-out chests of drawers
Metaboxes can be an excellent alternative to roller-type guides. The advantage of the structures was the ability to close independently under its own weight. But it is best not to use retractable mechanisms with plastic rollers. At first they will function normally, but after a short period of time the plastic will quickly wear off, a backlash will form and the drawers will no longer close correctly. You can increase the service life of plastic rollers using silicone lubricant, but this is only a temporary measure.
Installation of roller elements
When the markings have been made, they move on to attaching the guides.
Work begins with the box. Apply the strip to the marked line so that the roller is located at the back wall. Attach it to the bottom using self-tapping screws. It is advisable to pre-drill the holes for them: if you tighten the fasteners right away, the chipboard or wood may split. Then screw the second pair of planks to the furniture body, aligning their position along the marking line.
When assembling furniture, you must ensure that both rollers simultaneously enter the track.
How to replace ball or roller guides with metaboxes or tandemboxes
It is not so easy to replace a drawer with ball and roller guides with tandemboxes or metalboxes (metaboxes). And this is quite obvious, because the design of the boxes themselves is completely different.
Therefore, you will have to completely saw down the parts of the box, taking into account the height of the existing facades, and assemble a new box for installation in the same cabinet.
Blum and tandem boxes are interchangeable . Therefore, you can always exchange one retractable system for another by choosing a suitable analogue.
And this is not the only “successful” coincidence in terms of savings. For almost any fittings from well-known brands in the premium segment, you can find cheaper analogues. Let me clarify: I do not address the issue of quality and feasibility of such savings.
Role in furniture production
And although the useful properties of telescopic devices have been evaluated in various fields of activity, such mechanisms are mainly used in the process of manufacturing various furniture.
One example of such an application is wardrobes using folding hanger rods, various cabinets for shoes and chests of drawers, and cabinets with drawers. That is, any furniture that allows you to save space or increase the comfort of using furniture.
It is worth noting that ball guides have a positive effect not only on convenience, but also on the efficiency of using furniture. After all, getting and putting things away is much easier and more comfortable, and free access makes it possible to take up useful space in the closet.
Marking and adjustment
Before attaching the drawer guides, you need to prepare the following tools:
- building level;
- drill with a set of wood drills;
- screwdriver;
- self-tapping screws;
- screwdrivers (phillips, flat);
- roulette;
- square;
- pencil.
To install ball guides, drawers need to be marked in 2 directions: horizontally and vertically. Fasteners installed in the holes at these points will allow you to adjust the position of the runners.
Procedure:
- The side of the box is measured with a ruler, determining the middle. They do this from both ends. The points are connected by drawing a line with a pencil.
- Transfer the marking point to the side of the body.
- Using a building level, extend the mark along the entire plane of the sidewall.