Do it yourself or order it?
High-quality sawing of chipboard is difficult to do manually due to the large size of the sheets. The dimensions of a standard slab are 2440x1200, and this is not the limit. However, if you work with chipboard or MDF quite often, it makes sense to get an expensive tool and work for your own pleasure. If you only need to cut a few sheets, you can go two ways:
- Cut the slabs yourself using available hand tools;
- Order cutting of chipboard in a specialized workshop.
What to choose is up to you, and we will consider each of these options.
What to do if a suitable tool is not available
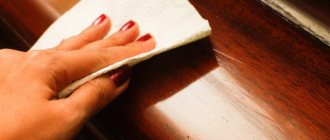
In this case, you can use a regular school protractor. It makes it easy to measure angles. However, a protractor may not be at hand if there are no schoolchildren in the house. In this case, an ordinary tile will help out, with the help of which a strip is drawn at a right angle, and then divided in half. The cut is best made from the front side, working with a hacksaw along the entire plane.
You can also use a regular ruler for marking - the marks will be much more accurate than using tiles.
PHOTO: ukrasy.ru A square or even a simple ruler can do a good job of this.
Cutting panels at home
It is quite possible to saw a sheet of chipboard or laminated chipboard by hand. True, in this case you are unlikely to be able to avoid the appearance of chips and burrs, but you can try to reduce their number and size.
There are several rules that should be followed when cutting chipboard panels:
- Sheets must be cut on a flat, hard surface. For sawing large panels, you can adapt two large tables (their height should be the same!);
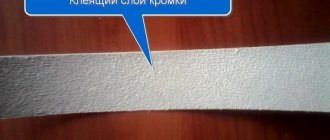
- in order to prevent chipping, stick adhesive tape or good masking tape along the cut line, which will hold the edges of the laminated layer;
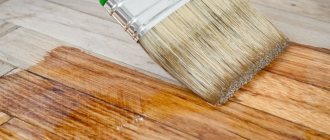
- For sawing with a hand saw, select a blade with a grinding tooth. The saw teeth should be sharpened well. You need to drive the saw with slight pressure, at an acute angle to the surface, constantly monitoring its position;
- To cut chipboards and laminated chipboards using a jigsaw, the cut line should be scratched or even cut through. It is best to use a sharp knife to cut through the durable laminate layer;
- install a file with fine reverse teeth;
- select the maximum speed of the jigsaw, turn off the “pendulum”;
- fasten an even strip along the cut line and move the jigsaw strictly along it;
- The jigsaw should be pressed firmly against the surface being cut.
All these recommendations help to correctly saw and cut chipboard, but chipping, nevertheless, cannot be completely avoided. Therefore, if it is so important to get a perfectly smooth, even cut line, without chips or saw marks, you should contact specialized workshops where they will cut out any shape from a sheet of chipboard for a reasonable fee.
Jigsaw
This tool can be called the main one. A jigsaw is good for everyone and has a minimum of disadvantages. Panels can be cut lengthwise and crosswise. You can cut shapes with ovals and other broken things.
The jigsaw has a special feature. It tears the edge of the panel in places where there is very little to cut. At this time, very often the panels burst (especially in cold weather).
Therefore, it is worth using a file with a minimum tooth. For ourselves, we chose a Bosch metal blade with a 0.8 mm tooth. This file will protect you as much as possible from a torn cut.
If the jigsaw operates at high speeds, you can cut with such a file very quickly. This file is for metal and does not become dull when cutting plastic products.
The main advantage of a jigsaw is its versatility. You can cut PVC panels lengthwise and crosswise. In any spatial position.
The downside of a jigsaw is its weight and the presence of a wire. If the blade is chosen incorrectly, the cut will be torn.
There is one secret
When you have to prepare a lot of frame-sized sticks. For example, you need to cut 20-30 pieces at once.
And so as not to cut one thing each time, but to increase the speed. You can resort to one secret.
You will need clamps (presses) as in our photo. Take several at once, usually 5 pieces. Adjust them so that they do not stick out from each other and clamp them with presses. Two pieces on each side of the panel.
And cut quietly. In this way you can cut up to 5 panels at a time. You can cut more, but the Bosch file does not allow this.
You will speed up the cutting process five times and make your work easier.
Precision and quality
Format cutting machines for sawing laminated chipboards and chipboards have a high quality cut, which allows you to reduce subsequent costs for processing the cuts (grinding, removing chips and burrs, and so on). That is why such machines can be used to cut any complexity and configuration, which means almost inexhaustible possibilities in furniture production. Fancy children's furniture, comfortable table tops for computer tables, figured through carved decorations in the doors of kitchen facades - all this is possible when using machines.
There are two types of panel cutting machines:
- vertical, which are a strong, rigid, vibration-resistant welded bed (frame), installed vertically with a backward deviation of 50°, with guides located above and below, along which the saw beam moves. It is a bracket for the saw unit, which moves up and down along the beam, and also rotates 90°, which allows you to make both vertical and horizontal cuts. The cutting precision is amazing. A special scoring unit is used for sawing laminated chipboard, as well as hard, corrugated or porous boards. The rotation speed of the saw reaches 15 thousand revolutions per minute;
- horizontal, consisting of a table for the stove, a carriage for moving the saw along the saw mechanism and the saw mechanism itself, consisting of one or two cutting units. The cutting units themselves are equipped with a main and scoring saw. The principle of operation is simple: the main saw deeply cuts through the chipboard, and the scoring saw accurately and clearly cuts the bottom edge (veneer or laminated surface). The saw unit can also be tilted up to 45°.
Grinder (angle grinder)
Not every grinder is suitable for cutting panels. It should be small so that you can easily hold it with one hand. You won't be able to use a large grinder.
The thinnest disc of 0.8 mm, 1 mm or a maximum of 1.2 mm is installed in the grinder. The disk used is a regular one for metal.
The grinder gives an amazingly even cut, without nicks and, as people say, “snot.”
The grinder does not tear plastic. It doesn't matter what part of the panel you cut and in what weather. Both in cold weather and in hot weather - using a grinder, you will get an even cut.
Using a grinder, you can cut literally millimeters from a wall panel.
The disadvantages include the fact that it is heavier than a jigsaw, and even more so a knife. But the biggest disadvantage is that the grinder produces a lot of fine dust. It gets everywhere.
We cut other types of panels
Cutting MDF differs from cutting chipboard panels. The high density of the material quickly dulls the saw teeth, so it often has to be sharpened or completely replaced. Unfinished MDF can be cut using a regular machine, but laminated board requires a machine with an additional bottom saw. This is especially important when cutting slabs with a double-sided finish.
Fiberboard can be cut at home using an electric or manual jigsaw. Of course, the file must be sharp, with a fine tooth; the jigsaw must be set to maximum speed. Install the fiberboard horizontally on a support that should not interfere with sawing (between two tables or chairs, for example), secure it with clamps if necessary.
The electric jigsaw should be held with both hands, pressed firmly against the surface, and moved smoothly, strictly along the marking line, without jerking or pressing. The same applies to working with a hand jigsaw.
In cases where it is necessary to cut many sheets of material, it is more convenient to contact a specialized company. This will save you time and effort.
Selection and installation of extensions on interior doors in 4 options
- Remove the fabric from the hinges and free it from the fittings (handles, hinges, other protruding elements).
- Place the canvas on a workbench or flat area (table), securing it with clamps. It is necessary to ensure complete immobility.
- The doorway and leaf are carefully measured to determine the optimal cutting location and the degree of shortening. Marking is being done.
- The place for the cutting tool to work is being prepared. When working with a circular (circular) saw, a board is secured below the cut point. If a grinder is used, it is recommended to provide a stop on both sides of the cutting line.
- If there is veneer, it is carefully cut with a knife along the guides. If there is a varnish coating, then to prevent it from cracking along the cutting line, the varnish is removed with sandpaper.
How to cut MDF panels at home?
The length of the panels is more than two meters, so, especially if you do not have your own transport or are inconvenient to transport, they are cut right in the store, but what should you do at home if cutting is necessary?
The following equipment is recommended for cutting:
- A hacksaw for wood – it is not recommended to use a very large tooth, otherwise the edge will turn out loose, in addition, the teeth can catch and pull the decorative film along with them;
- A hacksaw for metal – cuts accurately and carefully, but slowly, so it can be used for isolated cases when something needs to be adjusted;
- Grinder with a cutting wheel - cuts quickly and accurately, but a lot of dust is generated, so it is suitable for working outdoors, or during major repairs;
- Jigsaw - suitable for indoor work, since it is possible to connect a vacuum cleaner to it.
In isolated cases, you can use a metal sharpener or a mounting knife for adjustment, provided that the panel thickness is no more than 3 mm.
The blade is pressed forcefully against the material, after which a sharp cut is made and the fragment is broken off with your hands, while cutting the film on the opposite side with a knife; metal scissors can be used in the same way.
Molar knife
The simplest tool for cutting PVC. But for an unusual kitchen or shoemaker, all you need is a molar knife.
Its blade, while new, is very thin and sharp. And when it gets dull, the blade can be replaced instantly. By biting off a piece or inserting a new one. An ordinary knife is inconvenient and cannot be sharpened quickly. Also, it won't be as thin.
The molar knife is limited in its capabilities. You can only cut the panel lengthwise with it. Of course, you can try to make a cut across. But nothing good will come of this.
How to cut panels lengthwise? This is difficult to explain within the scope of this article. However, the basic principle can be described.
The blade extends a short distance of 3 mm.
From the back side of the panel we select the place where the cut will be made.
Then we cut out a strip, from edge to edge (we are talking about the internal edges of the panel). A cut is made near the rib, then another cut is made near the adjacent one. We make cuts along the entire length.
A strip of plastic falls out and a groove forms.
Then, on the same back side, you need to make a shallow incision near the desired rib. And break the body over it.
The molar knife has the advantages of being fast, quiet and simple. Its disadvantages are that the panels can only be cut lengthwise.
How to connect MDF panels?
Installation of MDF may seem complicated only at first glance, in fact, the entire structure is assembled similarly to a children's construction set, and even someone who has never picked up a tool in their life can radically change the situation.
Fastening panels may resemble the same process with PVC, but it also has its own characteristics. The connection between each other is carried out using a tongue and groove, each of the panels has one side pointed, and the opposite side is forked, thus, by inserting the point into the groove, a prefabricated structure is obtained.
You can also use a regular glass cutter
The easiest way is to use a conventional roller glass cutter. It is used for small amounts of work. The cutting line is marked with a pencil using a ruler. A glass cutter is used to make a shallow furrow along the intended mowing line. The break occurs by gently pressing on the edge of the tile placed on the corner of the countertop. The edge of the cut obtained in this way has noticeable irregularities and requires additional processing with abrasives. It is generally accepted that this option can only be suitable for thin wall tiles, and cutting floor tiles is unlikely to work. Many craftsmen believe that it is impossible to cut porcelain stoneware with a regular glass cutter.
READ How to cut trim at 45 degrees
How to bend an MDF panel?
It is not always necessary to cover only a straight surface; if you have imagination, you can create decorative elements in a room with a semi-oval or round profile, significantly diversifying its style, but what about MDF panels that have only a rectangular profile?
As it turns out, bending this finishing material is quite possible, but only if the thinnest panels are used, with a thickness of no more than three millimeters and only for painting.
For bending, you will need a template; you can make it with your own hands; any material that can transfer to the panels a circle radius equal to that of the surface to be coated is suitable for this purpose.
Since MDF has a structure whose density is between plywood and cardboard, it will need to be softened before bending. This can be done using alcohol glue; water-based solutions such as PVA are not useful here, they can cause the product to swell.
A layer of glue is applied to each panel using a notched trowel, after which it is stacked, when the stack is assembled, it is tied at the ends, laid on the template, after which the ends are pulled with force and fixed.
Drying lasts two days, then the panels are separated, sanded and painted.
See also:
- Advantages of polycarbonate greenhouses
- How does a water pressure switch work?
- How to disassemble a screwdriver gearbox?
- What is mortar called?
- How to make warm mortar for masonry?
- Reinforcement in architecture: what is it?
Additions to interior doors: what are they and how are they installed?
- Lamination is the most common and reliable option. Laminated MDF has sufficient strength and can withstand high humidity. Nowadays laminate is made textured, so it is not much different from natural wood;
- Veneering - in this case, MDF boards are covered with a thin cut of natural wood - veneer. Such a plank cannot be distinguished from a high-quality wooden board. Veneered extensions are considered the best option when arranging openings for doors made of elite wood;
Door sizes
The dimensions of the additional strips do not have a clear graduation reflected and fixed in GOST. The main GOST 6629-88, which is responsible for interior doors, indicates that the width of the extension ranges from 95 to 215 mm, but this instruction is advisory in nature and is not considered mandatory.
Most companies engaged in the production of doors and accessories for them make additions according to internal technical conditions (TU). Often these strips are adapted to the products that the company produces.
Extensions for interior doors sizes according to the most popular technical specifications
There are no problems with narrow slats; they are a popular product and choosing the right accessory is not difficult. But for doorways with thick walls it is often necessary to make custom-made trims.
There is an option to assemble a telescopic extension from several sections, but not everyone likes this approach. Plus, if the additional plank is wider than half a meter, according to the rules, you need to install a wooden sheathing under it in order to provide reliable support.
It is necessary to install a support sheathing under wide type-setting extensions.
Attaching the trim to the door frame can also be varied. The simplest is to attach telescopic trims. The main thing here is to correctly trim the elements to size, and then simply insert the cash tenon into the groove of the box. Additional fixation is usually not required.
Other types of platbands can be fixed with finishing nails. They have practically no cap, and therefore they will be completely invisible. The next option is self-tapping screws. There is also a nuance here - you need to think about how to hide them. Otherwise, the hats will spoil the appearance.
A separate option worth noting is fixation with liquid nails. But, despite the simplicity of such fixation, it has its drawback - if it is necessary to replace the platbands, you may encounter the problem of dismantling, while the previous options allow you to easily remove the elements.
Expert opinion
Strebizh Viktor Fedorovich, leading construction foreman
In some cases, it is permissible to make extensions for interior doors from plywood, which has good moisture resistance and mechanical strength. If you want to clarify something, please contact me!
Corners for protecting wall corners: selection options
This technique for decorating wall corners - protective corners - is not liked by everyone, but there are no special alternatives. In any case, on walls covered with wallpaper, a corner is still better than sticking out and torn canvases.
There is only one solution available for the integrity of the wallpaper without the use of decorative corners - to make a rounded corner rather than a sharp one. In this case, there will be no problem with finishing it. You can simply roll up the wallpaper without cutting it. But the corner must be drawn out perfectly, otherwise you will have to cut it again, which means that the question of protecting the wallpaper joint at the corner will again arise.
It is important to choose the right decorative corner so that it does not look alien. There are special techniques for this.
The interior looks good in the appropriate style
You need to select corners to protect the corners of the walls based on the overall design of the room. There are several standard solutions:
- To match the wall decoration. A complete color match is desirable, and even better if the texture is similar.
Either match the wall trim or match the doors
One of the options is quite logical
In general, you need to select corners to protect the corners of the walls depending on the design of the room. This can be done after the furniture has been arranged and textiles have been hung. In this case, it is easier to imagine the end result. Because the picture in our head can be very different from reality.
One of the transparent protective corners
If you just can’t find an acceptable color, and you need to protect the corners in your apartment, pay attention to the transparent plastic corners. They are of different types - rigid, flexible, with different wall thicknesses.
Communities › DIY › Blog › Help needed! Furniture makers to the rescue!
Hello everyone. I recently bought a MODULAR kitchen. I decided to have it assembled first by an assembler. But there the deadline was almost in November. I decided to assemble it myself. Everything was clear with the modules and closers and hinges. But there were problems with the apron. I’ll tell you right away when I bought the kitchen I decided to buy it from plastic. I understand that someone will say buy MDF or glass and less hassle*, but at that time the budget was limited. I have a straight kitchen. And here’s the moment: how or what should I decoratively cover the cut of this plastic in the corner by the sink?
Where they gave me the strips - 2 pieces for the end and 1 for the corner. But they are 4 mm inside and the plastic of my apron is 1.5 mm. I called the assembler and asked. He says I have never assembled something like this with such an apron.
I searched all over YouTube and nothing is written about the joint of an apron made of ABS plastic. I would be grateful for any information on the planks and installation.
Arch finishing
Arch design often becomes a problem. In general, there are not many external corners in the apartment, but there are always some on the arch. And in the aisle they very often get touched. Either furniture, or other cargo, or simply a resident who did not fit into the opening. And there are no questions with the straight part, but the rounded part can be a problem.
And not only in the doorway can there be an arched vault
In general, you can use universal corners for an arch. They are flexible, which is very convenient. There are flexible, non-universal ones - plastic, made from a special polymer with increased elasticity.
But in general, corners with different shelf widths are used to decorate arches. They are even called arched. They have one shelf 10 mm (external) and the second - internal - 30 mm or more. They bend easily. You can’t twist it into a donut, but it’s not difficult to get an arc of any curvature. You just need to use a secure hold while the glue dries.
This is an arched plastic corner
If you want to bend a regular corner, you can do this by heating the plastic. For this work you need a hair dryer. The usual one - for hair - will not work, since its temperature is too low. We also need a template according to which we will bend the plastic corner. Take a piece of fiberboard, tighten screws or drive nails, forming the profile that you require.
This way you can decorate the corners of the arch with protective corners
They start bending from the middle. Warm up the area, constantly pressing on the middle, and using a hairdryer, moving from the center to the edges. So you need to bring the corner to the desired curvature and leave it in this position to cool. To prevent it from straightening out, holes are made in parallel with a row of screws for the second row. The distance between the rows is equal to the width of the corner shelf. After the plastic has bent, insert and lightly tighten the screws. After the plastic has cooled, remove them.
Sawing rules
Before sawing, choose a method, as well as accessories and tools.
- scotch;
- masking tape;
- pencil, ruler;
- sandpaper.
- hacksaw;
- milling cutter;
- a circular saw;
- tire;
- jigsaw;
- sawing machine.
How to saw chipboard without chips step by step:
- Apply dots to the end part of the chipboard. You need to determine in advance what type of cutting will be done - straight or figured. Their cutting technique is different.
- Connect the dots into a line and stick adhesive tape on top. It is advisable to saw laminated chipboard using adhesive tape. It will reduce cracks when cutting, since the wooden slab is subjected to strong pressure with increasing temperature.
- Cut the board. The accessory is installed at the desired angle to achieve extremely smooth edges. The process should occur smoothly, rhythmically and without strong pressure.
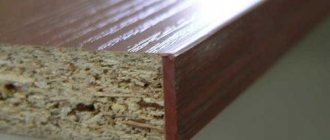
- If necessary, process irregularities and edges with a file and rasp. The edges can be covered with veneer of the appropriate color. This will provide them with protection and will look more beautiful.
Only after placing all the necessary tools on the table can you start cutting.
Characteristics
Despite the production features and size standards that exist at various enterprises, the following characteristics remain common:
- Density. 600-1200 kg/m2;
- Average tensile strength. 0.55 MPa;
- Bending strength according to GOST 10635. 20 MPa (pressure per 1 cm of area 200 kg);
- Formaldehyde emission class according to GOST 27678. E1, which means the emission of a substance in the amount of 10 mg per 100 g of oven (class E3. Prohibited in our country);
- Leaf moisture level up to 10%;
- All natural wood additives are 10%;
- Sheet thickness from 6 to 40 mm.
The side of the MDF sheet can be from 1650 mm to 3660 mm. The standard for basic and additional sizes is set by each enterprise independently.
Plastic, wood or MDF - which one to choose?
Having made sure that installing corners is not just a whim, but a necessity, we will study the construction market in order to make the right choice. These products are divided into types depending on the material from which they are made. So, the corner can be plastic, wooden, bamboo, made of cork or MDF. Absolutely each type has its own pros and cons; let’s look at them in more detail.
Plastic corners are made by hot bending a sheet of polyvinyl chloride. Basically, they have the same shelf width - from 10 to 40 mm in increments of 5 mm. However, there are asymmetrical specimens, for example, 10x25 mm, but regardless of this parameter, the angle between the sides is 90 degrees. If it is necessary to transform an arched opening, this is done using a special flexible profile. Their advantages include their relatively low cost; they do not require painting, unlike wood.
The next type is cork corners. Such decorative elements are quite often used for arched openings, but this does not mean at all that their use is limited only to this area. They can also be used to finish slopes of various shapes. Cork has a number of advantages, including strength, fire resistance, practicality and environmental friendliness. In principle, this material has practically no disadvantages, except that if your pet wants to sharpen its claws on it, this will damage the surface.
It is also worth noting wooden and bamboo products, which will always be signs of excellent taste and will fit into almost any interior. In addition, we must not forget about their environmental friendliness. True, such elements are somewhat more expensive than their counterparts made from other materials, and besides, they often require painting. A material such as MDF can also be compared to natural wood, but it costs significantly less, because wood dust is used to create it.
Photo gallery: finishing materials
It can be seen that the range is quite extensive, and there is plenty to choose from. But what should be guided by this? Of course, no matter how much we would like to, the budget is almost always limited. Therefore, first of all, we have to proceed from our financial situation. As mentioned above, plastic products have a very reasonable price, while their appearance is not much inferior to their counterparts made from natural materials. But, in addition to the price, you should also pay attention to the fact that these decorative elements fit harmoniously into the design of the room.
For arches, you should purchase special arched corners of different sexes; they ideally maintain their position when bent. Please note that the wider the sides of this element, the greater the load it can withstand.
Universal cutter
The universal cutter is called by different names. It has many manufacturers. When we bought our tools, one of the leading manufacturers was Bosch.
The tool is not cheap. But once you buy it, you won’t be able to get by with anything else.
The cutter, unlike all other tools, makes oscillatory movements.
We mainly use two main types of files: wide - 25mm*40mm and narrow 10mm*20mm.
Very often during installation, you need to cut the PVC panel in place. Often this can only be done with a Bosch cutter. It is impossible to get into difficult places with any other tool.
The cutter greatly simplifies the work and speeds it up. Wall products can be cut lengthwise and crosswise. You can even cut off the top or bottom layer of the panel.
Let's talk about the cons. The price of the tool and its consumables is off the charts. For example, a file for a jigsaw will cost 100 rubles, and a file for a cutter will cost 800 rubles. Files quickly become unusable.
Methods for cutting laminated chipboard without chipping
You can saw on a sawing machine. But its cost starts from 50,000 and reaches 1,000,000 rubles. If you need to cut laminated chipboard to make several pieces of furniture for yourself, other methods are more suitable.
Scratch
Using a ruler, scratch a marking line with an awl or nail to the thickness of the laminated coating. Saw along this line, making sure that the edges of the saw teeth fall exactly into the scratch. You can cut with a jigsaw or a hand saw.
Jigsaw
Suitable for cutting small areas. The file should have the smallest tooth size. You need to move the jigsaw smoothly, without pressure, and set the speed slightly above average.
On the side where the teeth enter the slab, there will be practically no chips, but on the opposite side, with insufficient experience, they will appear, but in small quantities.
A circular saw
You will need a saw blade with fine teeth. With this method, long straight cuts will be more successful than when cutting with a jigsaw. There will be no chipping on the side where the teeth cut into the slab. If they appear, it will be on the opposite side, as in the case of a jigsaw.
The use of guides increases the cutting accuracy. In this case, it is better to secure the saw on the table.
Sawing with undercut
You will need a large ruler (tire), which is fixed to the workpiece with clamps. The first cut is made to trim the laminate along the marking line. The tire must be installed on the line, and the cut must be made to a depth of 6-10 mm - there will be no chips.
The second cut is made through. There will be no chips at the line where the teeth enter the slab, but at the exit point the laminate has already been cut off, so they simply cannot happen.
Fraser
In this case, you should first cut the workpiece with a jigsaw, retreating 2-3 mm from the marking line, and then align the line according to the template. The cutter must have a bearing. With this method you can also cut curvedly.
Cutting to format using a saw
The use of a sawing machine guarantees accurate cutting and complete absence of chips. Such machines are used in production and are considered specialized equipment.
Its main components:
- Carriage. Allows movement of the movable table, but the plate is fixed in the desired position.
- Saw unit. It has two flat metal disks: the first one does preliminary sawing, the second one does final sawing right through.
- Bed. The mechanism rests entirely on it. Eliminates vibration and adds stability, which is important for the quality of the cut.
Three desktops: 1st: node location. 2nd (movable): feeding slabs for cutting. 3rd: maintaining the sawn parts.
Types of sawing machines depend on the time of continuous operation:
- light – 5 hours;
- medium – no more than 10 hours;
- heavy – no more than 20 hours.
When setting up the machine, the following matters: depth of cut; plate position; cutting angle.
The cutting occurs as follows:
- the plate is fixedly fixed to the table (movable carriage);
- the workpiece is positioned according to the size ruler and the saw unit is started;
- when the disk reaches the required speed, the table will move forward along with the workpiece plate and fall on it.
The use of format-cutting machines is advisable for mass production, and not for isolated cases. For one-time independent use, you can choose a simpler tool or order cutting from specialists.
Calculation of material quantity
The installation of MDF, like any other material, must begin with a preliminary calculation of the number of panels. To do this, first of all, determine the area of the room: all the necessary measurements are made, and the perimeter is multiplied by the height. It is also important to consider the presence of doors and windows in the room. Their quadrature is calculated in a similar way, multiplying the height by the width, the resulting result is subtracted from the total area of the room.
Then, knowing all the numbers, you can go shopping for wall panels. Since the products are sold in different sizes, you will have to additionally calculate how many square meters are in each slab. Usually manufacturers write this on the packs. If, for example, a panel with a width of 900 mm and a length of 2600 mm, then it is enough to multiply 2600 mm by 900 mm. As a result, it turns out that there are 2.34 m2 in one slab. Then the area of the room that is planned to be covered must simply be divided by 2.34 m2, and you will get the required number of panels.