The main enemies of a wooden floor are moisture and various kinds of bacteria and microorganisms. Under the influence of these factors, the construction material begins to rot, loses its original aesthetic properties and serves much less than it should.
How to cover a wooden floor
To prevent the occurrence of these problems, the wooden floor must be coated with a special protective compound. The modern market offers a large selection of products that not only help to increase the durability and other important performance indicators of wood, but also make its appearance more noble and attractive.
After reading the information below, you will get a complete understanding of the features of the selection and use of existing compositions, which will allow you to independently cope with this event.
Available types of wood treatment compounds
Reliable and effective protection of wooden structures from harmful external influences can be ensured using the following compounds:
- wood varnish;
Polyurethane varnish Pallmann IS 90 Sport for wooden floors
- wax products;
- oil based coatings.
Each option mentioned will give the wooden floor an attractive appearance, while at the same time ensuring increased resistance of the material to various types of influences and loads and helping to extend its service life.
Hard wax oil for wooden floors Saicos
Next, you are invited to familiarize yourself with a description of the basic properties of varnish, wax and oil, as well as study the technology for applying each of these materials. But first you should definitely understand the procedure for preparing the surface for subsequent processing.
Oil-wax
Purpose
Any wooden structures gradually become unusable due to increased air humidity and constant extreme temperatures.
The main task of antiseptics is to protect against the destructive effects of moisture, the proliferation of pathogens, fungus, and mold. Bath treatment products can be purchased in the form of an ointment or solution.
Antiseptic agents reduce the ignition threshold of wood. They are recommended to be applied around the stove to protect surrounding surfaces.
An antiseptic is a chemical that can harm the body. Therefore, before use, it is necessary to study its composition.
Instructions for preparing a wooden floor for coating
The procedure depends on whether you are working with a new floor or a previously used structure.
Guide for a new floor
First of all, check the condition of the fasteners that secure the deck boards. The heads of screws and nails need to be “sunk” into the material by about 2-3 mm. Next, the remaining recesses are covered with a sealing agent. Instead, you can use a special putty designed for wood processing. It is important that the color of the material matches the color of the boards as much as possible.
Drive in the nail heads and apply putty.
Cover the deck with starter varnish and let it dry. The drying time is determined by the moisture content of the boards. If the material humidity is more than 12%, the varnish will dry for a very long time - up to several months. If the boards have been well dried, the waiting period will be reduced to 2-3 weeks.
Apply varnish to the floor
Guide for old floor
If the existing deck boards are in good condition and do not require replacement, preparation begins by removing the existing paint or other coating. If you find defective boards, be sure to replace them before starting work.
Old paint should be removed
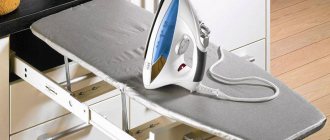
The paint can be easily removed using a sanding machine. But it is not advisable to buy this unit for single use. If your place of residence does not provide such tools for rent, use the old and proven manual method.
Prepare the following:
- iron (preferably one that you don’t mind);
- paper. Take it with a reserve, it will take a lot;
- special paint remover;
- electric plane;
- grinder with an attachment for sanding wooden surfaces;
- several spatulas;
- sandpaper. Practice shows that it is most convenient to work with material having a grain size of 150-180.
Proceed to remove the old paintwork. Place paper on the base and place a well-heated iron on top of it. As a result of this treatment, the paint will come off the floor and stick to the sheet. Remove the remaining areas of the coating with a spatula and knife. If paint has become embedded in the floor material, apply a stripper according to the manufacturer's instructions.
Video - Removing old paint from the floor
Remove the thin top layer of material from the cleaned boards. An electric plane will help you with this. Make sure that the fastener heads do not protrude above the boards.
Electric planer
Important! The work is quite dusty, so for your own safety, wear a respirator and safety glasses.
Sand the surface using a grinder with the previously mentioned attachment and sandpaper. Collect the dust, but do not throw it away - it may be useful to you in the future.
Sanding a wooden floor
Fill cracks and other flooring defects. If you do not have a special primer of a suitable color, use a mixture of PVA glue and wood dust. Add dust until the desired color is obtained. If you use the second option, be careful and attentive: any excess glue that appears must be immediately removed from the surface. This is easily done with a damp cloth.
For putty, mix sawdust and PVA glue
Finally, all you have to do is apply a starter varnish to the floor and let it dry. The recommendations are similar to the previous case.
Answers 20
In a new building, as a rule, the floor is less level and it is cheaper to level it with a screed. a wooden floor is an order of magnitude more expensive, both in material and in work. So I believe that they decided to make it wooden for the reason that there would be sound insulation, which is not found in most new buildings. It is better to regulate the difference with the thickness of the plywood. take 18 mm plywood. (I don’t know what the thickness of the parquet board and tiles you choose is. But in place where the tiles will be, instead of plywood, you need to screw GVL; there are three types of thickness, there are different thicknesses of GVL, you can increase it with glue. GVL should be lower in level than the plywood by about 5mm- 7mm good luck to you
It is necessary to lay plywood under the parquet board, and level the difference with the wooden covering with a screed
You can fill the floor perfectly evenly and lay a board or parquet directly on the screed instead of the joists, but this is more expensive. catching the difference between the tiles is not necessarily the easiest way to cover the difference with a rounded aluminum threshold; it will be invisible that it is there. in most cases, you still can’t do without a threshold. if you need one level, then option 1, invite a generalist, he will shoot the entire level with a laser or hydro level and only then will he be able to tell you where to raise it and how much. The same master must do it, if another one comes, it may turn out differently.
What will you cover the boards with? A screed is poured under the tiles and the tiles are laid at the level of the boards. As for cheapness, the difference is small, but parquet boards are more aesthetically pleasing. By the way, the parquet board is also laid on a screed or poured floor with a backing.
All differences are laid down at the screed stage. What kind of lags? What century do you live in? There has been a massive high-readiness board for a long time. It is laid on plywood, like parquet, but the boards are large.
Anyway, first decide on the height of the wooden floors, and then drive the screed where the tiles will be 1.5-2 cm below the level of the top surface of the finished floor
Probably installing a parquet board on a screed is faster in terms of time, and the increase in cost is small.
Solid wood board is for sale, to lay it you need to level the floor, for example with a self-leveling floor or cement screed, lay plywood on glue and dowels, the board is laid on the plywood according to technology. If you have any questions please call. 89055916364.
hi, I have 18 years of work experience in the USA. The best installation of hardwood floors. This is when floors are nailed onto plywood with staples using a special gun and an air compressor. These floors usually do not wear out and last for many years. I've been doing this work for many years, no complaints. It is also possible to install another wooden floor, which is assembled as a (pergo) laminate floor
Varnishing the floor
Varnishing the floor
Types of material
There is a fairly wide range of varnishes on the market. Before you start, be sure to familiarize yourself with the features of the most popular representatives of this category.
Table. Properties of different wood varnishes
| Type of varnish | Characteristics |
| Water soluble | Advantages: dries quickly; adheres well to the base; doesn't stink. One- and two-component modifications are available for sale. The first ones usually last no more than 2-3 years - after this time the floor will have to be sanded and treated again. If you apply a two-component varnish in 3 layers, it will last about 10 years even in rather harsh operating conditions. But such material also costs much more. |
| Alkyd | The advantage is that the structure of the treated wood becomes more pronounced and beautiful. Disadvantage: long drying time. The varnish is excellent for covering the so-called. "floating" floor. To prevent the varnish from wrinkling, experts recommend limiting its consumption to a maximum of 120 g/m2. It is important that during the drying process the varnish is not exposed to heat from radiators and other heating devices. Contact with direct sunlight is also prohibited. |
| Anhydrous polyurethane | The main advantage is excellent wear resistance. Also, such varnishes tolerate contact with water and various chemical detergents well. Important! The moisture content of wood coated with such a product should be no more than 10%. Otherwise the coating will bubble. |
| Acid curing | Characterized by the greatest strength. Resistant to a wide variety of influences. Natural light shades are created on the floor material. You just need to follow the basic recommendations for using the product, namely: the varnish is mixed with the hardener strictly before using the mixture; the performer must wear personal protective equipment - a respirator; There must be a constant flow of air in the room. Violation of these recommendations may result in irritation of the mucous membranes for the performer. |
Polyurethane, primer and acrylic mixtures
An excellent choice for pine plank floors is polyurethane varnish. This is an expensive product, but as a result you can get an even coating even in cases where the boards do not fit tightly together. This product has increased resistance to mechanical stress due to the acrylic and urethane contained in it.
You won’t have to wait long for this composition to harden on a pine floor, since even in conditions of humidity and high temperature, this product is completely fixed on the surface after 3 hours. The only drawback is that you will need to ventilate the room well after work.
Primer varnish is most often used as a topcoat for pine floorboards. The fact is that the varnish perfectly fixes the base shade and is a good protective agent against ultraviolet rays. As a result, the floor boards will not fade or change color for a long time.
The ideal option is to coat the plank floor with a primer varnish over a cheaper tint varnish. This will provide not only additional protection for the floorboard, but will also improve its decorative appearance, which is also important.
Acrylic varnish is perhaps the only product that is not recommended for use on pine board floors. Such varnishes are very toxic, have a pungent odor and take a long time to dry.
Moreover, to achieve an average level of wear resistance, it is necessary to apply the varnish intermittently in several layers, which increases the consumption of the product.
So, the features of choosing a varnish for a pine floor are considered. You can choose any composition except acrylic, focusing on the main characteristics of the room and floor. It is important to calculate in advance the required amount of product and cost. This will allow you to immediately buy the right amount of product at an affordable price.
Procedure for applying varnish
Various tools are used to apply varnish. So, for example, quick-drying water-soluble compounds are applied with rollers of the highest quality. The performer must distribute the material over the surface using exclusively translational movements. First, the product is applied across the flooring, after which it is leveled in the longitudinal direction, i.e. the surface is varnished “crosswise”.
Procedure for applying varnish
You can use a spatula to apply the first layer of material. The performer makes fairly quick S-shaped movements, evenly distributing the composition over the base. This technology allows for higher coating strength.
If using a brush, the material should be applied in neat U-shaped strokes. In this case, the new stroke should slightly overlap the previous one.
It is most convenient to start work from the wall opposite to the exit from the room - this way you will not have to walk on the applied composition.
Installation of tongue and groove boards
Structurally, a tongue and groove board is similar to a regular board, but it has a longitudinal groove on one side and a tongue (tenon) on the other side. Due to these elements, simple installation of a floor from a tongue-and-groove board is ensured: the tongue of the next one is inserted into the groove of the previous board, resulting in a reliable and tight connection.
Grooved boards, unlike edged boards, have a perfectly smooth surface, so additional sanding of the floor made from tongue and groove boards is not required. The underside of the boards is often not treated, but there are always ventilation holes on it that ensure air circulation in the underground space, which significantly extends the service life of the coating.
High-quality laying of a tongue-and-groove floor allows you to assemble a structure without cracks, and such a structure will not creak and wear out, as often happens with a covering made of edged boards. Of course, if you lay wet boards or do not prevent moisture from getting on them, then sooner or later even the highest quality material will rot, so these nuances should be taken into account in advance.
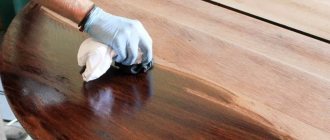
How to coat a wooden floor with oil
How to coat a wooden floor with oil
The oil penetrates the wood structure, protecting the material from the inside and without creating a continuous film on top of it. As a result, the wear resistance of the wooden floor increases significantly. An additional advantage of the oil is its environmental friendliness. As a rule, such coatings do not contain solvents or are present in insignificant quantities.
Solid oil for wooden floors
It is important to know that on a floor covered with oil, material defects will be much more noticeable than if varnish is used. Therefore, the work must be carried out step by step and in strict accordance with the manufacturer’s recommendations. A general requirement that is relevant for all such compositions is the timely removal of excess oil from wood. Otherwise, the floor will be covered with unsightly dark spots.
Oil application
It is impossible to provide specific instructions for covering a wooden floor with oil, because... the procedure is largely determined by the manufacturer's recommendations. We can only describe the general sequence:
- the surface is carefully polished. Small areas can be sanded manually; large areas can be processed more conveniently and quickly using a sanding machine with an appropriate attachment;
- cracks and other defects are sealed with putty;
- the surface is covered with a thin and uniform layer of oil. For application, you can use rollers, spatulas and devices specially designed for such work. This point, as well as other recommendations for applying the product, should be further clarified in the manufacturer’s instructions.
On average, the oil hardens for 12 hours. After this, the material will need to be given another 3-4 days to gain strength.
Wood oil extends the life of the floor
Important! After the first treatment of a wooden floor with oil, the surface will become very dirty. Such marks will stop appearing only after the material is completely saturated, which on average takes several years.
If necessary, such a coating can be restored without much effort: the damaged area is simply sanded and re-impregnated with oil.
Using oil you can reliably protect the floor from moisture
Protecting joists from insect damage
Often, owners of wooden houses are faced with a big problem - insect pests that settle in wood cause them a lot of trouble. This phenomenon must definitely be combated. Since the place where the logs are located is always warm, insects prefer to settle and breed there. Entire colonies of pests can render floors unusable and require major repairs.
To prevent this, it is necessary to treat the logs using special protective agents. As practice has shown, the most effective and proven method is the use of resin. It still needs to be prepared for application before use.
The resin is heated by placing it in a metal container. After it softens, you can begin to work. Impregnation for floor joists is applied using a paint brush. After completing this procedure, no pest can penetrate the wood structure. The fact is that such a durable layer almost does not collapse over time.
Using wax to coat wood floors
Rubbing oil-wax into wood
The main advantage of wax is its absolute environmental friendliness and safety for human health. Wax can be used both as an independent coating and in combination with the previously discussed oil.
Floors covered with hard wax look as natural as possible.
The technology for applying wax is extremely simple and straightforward:
- an even layer of wax is distributed over the previously prepared surface (recommendations were given earlier);
- The material is given time to dry. This point should be clarified separately in the manufacturer's instructions, because drying time may vary depending on the properties of the specific composition;
- The surface is thoroughly polished using a clean cotton cloth.
Experts recommend renewing the wax coating twice a year. Otherwise, the frequency of such processing remains at the discretion of the owner.
Now you know what can be used to cover a wooden floor and how to handle each material considered.
Good luck!
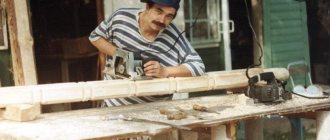
How to make a floorboard with your own hands
The current prices for “ready-made” building materials sometimes force home craftsmen to resort to various tricks that allow them to significantly reduce the cost of the desired product, and secrets on how to make a floorboard with your own hands or turn a rounded log into a beam that is not inferior in quality to “store-bought” and are generally transmitted from mouth to mouth in personal conversations and communication on thematic Internet forums. It would seem, why such difficulties? But, upon closer examination, a commercially available product often does not meet the stated requirements, and making a board with your own hands allows you to obtain the material of the required quality, length and width in the shortest possible time, while sometimes you have to spend more than one hour of precious time searching for lumber suitable for the parameters. time. What does a home craftsman need to make his own floor boards?
general information
Let's start by bringing together all the available information about the material.
- Pine is one of the cheapest wood species along with spruce. Actually, this is precisely what determines its attractiveness: the price of larch, for example, is almost twice as high.
- The density of dry wood is about 500 kg/m3 . This is not the lightest breed, but one of the lightest.
Important: the practical consequences of low density are excellent thermal insulation qualities and rather low strength in relation to compressive loads. In particular, hard heels (and especially stiletto heels) will leave clearly visible marks on the pine floor.
Dents on the surface of a pine board.
- The texture against the background of noble breeds is rather inexpressive. At least without coating or after treatment with clear varnish. But treatment with stain will emphasize the beauty of wooden floors in the apartment: different amounts of pigment will be absorbed into areas of the surface with different densities and resinousness. As a result, the texture lines will become more contrasting.
The difference in texture pattern is noticeable in comparison. The wall on the left is covered with pine, larch is laid on the floor.
- Pine is not the most rot-resistant species. However, excellent vapor permeability will prevent rotting: dampness simply will not accumulate under the flooring. Of course, if you do not use a continuous coating of air-tight paint.
- To finish the flooring, a tongue and groove board is used. It is equipped with a groove on one side and a protrusion on the other, allowing you to assemble the flooring without cracks or gaps. The back side is equipped with longitudinal cuts designed to prevent the surface from cracks due to fluctuations in humidity.
Installation features
How to properly install a pine floor board?
Installation instructions are no different from tongue-and-groove boards of other species.
- The pitch of the lag is determined by the thickness of the flooring. For 22 mm the step is 40 cm, for 28 - 50, for 36 - 60 centimeters; A 45mm board can be laid on joists in 80cm increments.
- The joists are attached to the ceiling. Otherwise, deformation due to fluctuations in humidity can lift them and cause the floor to play.
- A deformation gap about a centimeter wide is left along the perimeter of the walls. It will be covered by a baseboard.
- The first board is tenoned to the wall. The subsequent ones are tapped into the groove with a tenon using a mallet or a hammer with a block.