Background. In 2003, I bought myself a normal bed with a mattress for the first time. Before that, I slept on a couch, on a homemade “homemade” bed under an ordinary cotton mattress 90 cm wide. But such a personal life... I got tired and took myself a base + a 160x210 mattress + a decorative backrest for the base (it’s actually from a different bed, but it’s on topic).
The mattress was the simplest, dependent springs, jacquard + batting cover, without coconut or latex. But I really liked it. For the first time I lay down on him diagonally, spread my arms... good, nothing was hanging down or resting against me. Just a song!!!
Then everyday life began, the slats broke and the mattress also had a hard time. I changed the slats, then made an “upgrade” to the base (). First my wife and I jumped on the mattress, then the children, it began to lose its appearance and elasticity, and finally, after 13 years of use, it suddenly became clearly uncomfortable to sleep on - some metal objects were stuck into the buttocks
It would be time to change the mattress, but the money would cost about 8, and the children won’t stop jumping around anytime soon...
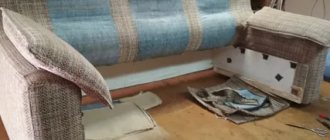
Okay, I think I’ll take it apart and see. Maybe I’ll repair it, but in the meantime I started calling offices in search of components and looking up the repair procedure on the internet (they mostly gut spring sofas). I was not happy with the components; no one was going to sell me separate springs for repairs. Well, to hell with it, where did ours go? I sent my family away for the weekend and got down to business.
I have a mattress cover with a zipper at the end, but due to the state of the mattress I thought that I would have to cut it to remove or put it on (it looked tight).
But it turned out that everything came off quite easily, slowly, like a stocking.
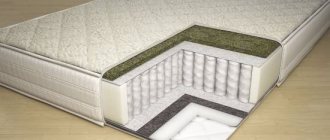
The design after disassembly looked like this: the base is a block of dependent springs, batting on top/bottom + some kind of fabric like geotextile, filling the groove in the block around the perimeter with thick strips of foam rubber.
From the outside it looked acceptable. From the inside, due to the constant friction of the springs, everything is sprinkled with fine metal dust, which is not rusty.
The block itself was broken in several places.
Firstly, the outer frames of the conventionally upper and lower surfaces, representing rectangles with rounded corners made of approximately 1.5 cm of steel strip, broke in places of spot welding (the mattress had difficulty holding the corresponding shape under load).
Secondly, several springs burst, and just “in the most interesting place,” i.e. in the middle of the lying areas. The broken wire was partially sticking out, which caused my discomfort.
What did I do after cleaning the insulation and washing the foam rubber (by the way, it was very difficult to dry).
First, I connected the perimeter strips using the existing copper sleeves (put it on with tension and slightly flattened it).
I had to tinker with the springs. Since they didn’t sell me spare ones, and I didn’t have a used block to throw away from which I could get serviceable springs on hand, I had to take a simple and not very effective route.
I cut the broken springs to two rings (upper and lower), compressed them in diameter to provide tension in this place of the block, and in this form connected them by bending and winding with the surrounding springs and transverse spiral ties.
The results were flat, but the spring force in the most important place left much to be desired. Since it had to be done at any cost and quickly, I came up with the idea of lining the broken spiral as an additional feature. shock absorber piece of foam rubber. As luck would have it, there was no such piece of foam rubber, and even after running around several stores I couldn’t find any large sponges. Where to go, I took a countless number of small ones, like dishware. I think I'll glue it in a large size.
This is where the fun began. The calculated number of sponges gave such elasticity that while sitting you felt a bump. Through lengthy selection and experimentation, I found the optimal size of pads; it turned out that quite a few of them were needed (so I can open a small hardware store selling dishwashing sponges).
The block became more or less uniform.
The next thing was to push strips of foam rubber around the perimeter of the block and glue the original batting + geotextile on top/bottom with tension.
The glue turned out to be very reactive and addictive, a fake of “Titan” for all kinds of plastic products.
Well, I came to the most intense moment - pulling the cover onto the mattress. I was expecting a catch because of the tight dimensions, but it turned out that everything was easy to put on, especially with the two of us, in the reverse order of removal (the stockings were reversed), they managed it in about 15 leisurely minutes.
The mattress came out well, of course it’s not new, but it will still serve for 2 years, and then you see, the children will calm down or switch to the trampoline, then we’ll take a NEW mattress.
Repairing a spring mattress with your own hands does not look like an impossible task even for an inexperienced craftsman. To repair it yourself you need to follow a number of steps:
1) First, let's disassemble the mattress. In view of the possible accumulation of dust in it, it is better to do this outside, if, of course, there is such an opportunity. Otherwise, you can resort to using a vacuum cleaner.
2) next you need to place the mattress on stools so that it can be approached from any side. Then we remove all the nails, paper clips, outer fabric, soft cushion and thick fabric that insulates the springs.
3) then we proceed to the springs. You need to release them from the mattress frame by cutting off the cord binding. Next you need to set all the springs in a vertical position and check the location of their upper ends. They should be at the same level, approximately 8-10 cm above the frame. Check all springs for wobble and swing - if any, they should be attached to the wooden yard using regular nails.
4) The next stage (when all the mattress springs are attached to the frame) of repairing a spring mattress will be tying the springs. This is done using any strong soft cord, approximately 2-5 centimeters thick. Opposite the rows of springs, you need to hammer in large nails (50-60 mm) and bend them slightly. Next, we perform transverse and longitudinal tension on the belts (cords) prepared earlier.
5) Next you need to check whether the springs are the same length. If so, cover the mattress with lining fabric and secure it around the perimeter with nails. Next, we place a roller made of batting, foam rubber or padding polyester, and attach it to the lining fabric. Well, we wrap the spring mattress on top with decorative fabric!
The repair has been completed!
The store has various types of mattresses. Most often, people make a foam mattress with their own hands using available materials. This option is the most common and convenient. How to make a mattress with your own hands? You can get an economical option (spring, feather), but very acceptable for use.
Do-it-yourself foam mattress - an interesting and exciting process
Before creating a mattress, be sure to take into account some points presented:
- Quality – a good product requires accuracy, perseverance and patience. Only a scrupulous approach to the issue will help to obtain the expected results.
- Theory - without basic knowledge and special skills, preparation is required. Before sewing, you should familiarize yourself with the types of fillers, their properties, rigidity indicators and types of covers.
- Materials - the choice of filler, specialized glue, cladding requires responsibility. In some regions it is difficult to find high-quality, durable, safe products. You should prepare in advance for a long search.
Important! Good tools and ready-made sketches of the future creation will facilitate the process of creating an orthopedic product for personal use.
See also: Choosing compartment doors for a dressing room with photos
Stages of repair work
Preparatory work
Preparatory work includes disassembly and thorough cleaning of internal parts. It is best to clean the product with a vacuum cleaner using different attachments, then you need to remove the upholstery, seal, and insulating material for the springs.
Inspection
We remove the nails and strapping. We place the spring system vertically. We equalize the height of the springs. We attach torn or loose spring elements to the slats with nails.
We replace the belts included in the product with slats, the length of which should be equal to the width of the mattress.
Fastening works
Fastening is carried out by securing the slats to the frame. Before starting fastening work you must:
- remove the fastening edging from the structure,
- remove nails and old belts,
- cut the slats to the required size,
- make markings on the frame,
- cut the grooves for the slats.
Harness
Having secured the springs to the frame, we tie the spring mechanism. This is the most difficult and critical stage of repair, responsible for the service life and quality of the mattress.
For tying you need:
- Make hooks from nails and place them opposite each row.
- Tie the springs with a strong cord in the transverse, longitudinal and diagonal directions, connecting the row springs with hook nails.
- After tying, bend the hooks completely.
Sheathing
After strapping work:
- we cover the product with lining fabric;
- we fix the sealant rollers on the lining material;
- we stretch the decorative upholstery and secure it with a stapler.
The mattress is ready for further use!
A mattress is a pretty important thing, they come in different types, but they all tend to break. What to do when your mattress breaks? How to repair it? Repairing an air mattress with your own hands is not worth doing, you will only make it worse, and it will be impossible to restore it. Also, don’t try to repair spring mattresses with your own hands. Do-it-yourself mattress repair, no matter what kind of mattress it is, will not be effective. It’s better to contact a workshop where a professional will repair your mattresses. This is exactly the kind of repair that is carried out in our workshop. Because we care about our clients and their things that need repair.
Selection of tools, material and filler
The main filler that ensures comfort and durability of products in modern production is polyurethane foam or foam rubber. For products without springs, it performs load-bearing functions, in other cases it is responsible for insulating the spring block.
They are produced with different markings, presented:
- brand - first letters;
- density of the material (measured in kilograms per cubic meter) - the first 2 digits;
- rigidity or compression resistance indicator - the next two signs.
There are 6 types of foam base:
- HS (soft) – not used for bedding;
- ST (standard) - made of polyester, the density determines the stiffness indicators, ST 3542 is suitable for sewing, but it can be used by persons weighing up to 80 kg;
- EL (moderate hardness) – reinforced reinforced polyurethane foam; EL 3245 is suitable for obtaining a high-quality base;
- HL (extra-hard) - characterized by durability, reliability, able to withstand the load of the body weight of a full person, the expensive variation HL 4065 is used for springless types;
- HR (highly elastic) - consists of 4 polyols, the high cost is justified by the long service life and increased load-bearing capacity, brand HR 5535 will last 15 years;
- VE (highly elastic) - a new product in the production of polyurethane foam, VE 5020 is distinguished by its quality, durability, anatomical effect, but not everyone likes its enveloping properties.
Preliminary preparation requires purchasing:
- Polyurethane with increased rigidity of the HL level and a thickness of more than 5 cm - for making a frame around the perimeter. If the products will be used by obese people, then an additional base is not needed. In ready-made types for consumers with a large weight, the base is supplemented with a Euro frame.
- The main filler is from the brands EL, HR, VE. Type ST can be used when creating mattresses for the cottage or for guests, with rare use.
- A layer of coconut coir - the material is not included in the list of required ones. Included in the project to enhance rigidity in the form of layers or on one of the sides.
Additional materials and tools are provided:
- tape measure;
- marking marker or felt-tip pen;
- long ruler - to create straight lines;
- a sharp knife to help cut the foam;
- a sheet of plywood - as a substrate when forming the base;
- specialized glue - sold in furniture stores, on websites selling polyurethane foam;
- fabric for the case - jacquard, quilted with insulation, softening lining, bamboo fiber, terry on a waterproof membrane base;
- threads, long zipper;
- scissors for cutting the mattress cover.
Important! Among the required tools is a sewing machine.
See alsoBeauty, comfort and functionality - corner sofas in the interior of a small room, photo examples
Fastening
The stage that requires the most effort and time. It includes several steps:
- checking the serviceability of parts;
- frame installation;
- spring binding.
First, remove the cord connecting the springs and remove the nails from the frame. Then you need to inspect the springs and return them to their original position. Broken parts are thrown away and new ones are installed. To do this, the springs are nailed to the slats using nails that are bent inward. It is first recommended to make precise markings on the body of the product.
It should be taken into account that in orthopedic mattresses the individual springs are located in special bags
. And in conventional ones there are three methods of fastening:
- using wooden slats. Sometimes it is enough to simply hammer a loose part;
- the use of fabric straps over wooden slats;
- fabric belts. They give the mattress orthopedic properties.
If fabric straps were used in the manufacture of the mattress, you will need to cut out the wooden slats yourself. Elastic fabric straps are attached to them. The length of the slats should correspond to the width of the mattress.
To replace the spring bag in orthopedic models, you will need an element with new springs. It is sewn in using a regular needle and strong thread.
Harness
After checking and securing the springs, the strapping process is carried out. For this purpose you will need a strong rope (diameter about 3 cm). First, take nails and drive them opposite a separate spring row. Then the nails are bent to create peculiar hooks. The cord will be wound around them.
First of all, you need to deal with tying the transverse springs. Each spring is processed separately with a cord. Then they begin to tie the elements in the longitudinal direction. For efficiency reasons, they are fastened with transverse ones.
Finally, the springs are processed diagonally. The angle with respect to the previous harnesses should be 45 degrees. At the end of this work, the nails left by the hooks are completely bent.
DIY foam mattress
The simplest model from a polyurethane foam block is made according to step-by-step instructions:
- Measurements are taken on the inside of the bed frame.
- Strips-bars for the frame are cut out: the height of the strips is equal to the thickness of the mattress, the assembled rectangle must correspond to the previous dimensions.
- The pieces are laid out on a flat surface and glued together.
- A base made of foam rubber of lower rigidity is placed inside the solid frame base, the ends of the two parts are glued.
Important! If desired, one side of the product is reinforced with a slab of latex coir (made from coconut palm fibers and latex). It is also glued to the top surface.
See alsoChoose corner wardrobes for the living room from the photo
How to sew a mattress cover?
For the case, natural materials at hand are used, linen or calico. The fabric must not have wool and meet certain standards presented by:
- increased density;
- strength;
- hygroscopicity - easy absorption of liquid;
- resistant to dirt and dust.
An important criterion for a material is the ability to maintain its original shape. There are several variants of cases with their own requirements for execution:
See alsoModular sofas for a living room with a sleeping place: features of choice
Single layer with corner elastic bands
Based on preliminary measurements, a rectangle is cut out with an addition of 3-5 cm at the edges, the corners are cut out according to the template. The further scheme is carried out in stages:
- a layer of fabric is laid out on a flat surface, padding polyester on top and again fabric;
- corner points are aligned, cuts, borders are pinned;
- the product is swept away around the perimeter;
- the case is quilted along the lines that are marked with pins;
- fitting is carried out with trimming of excess edges;
- rubber is fixed on the inside;
- a bias binding is cut out with a width equal to that of the finished part, multiplied by 4, plus 2 cm is added for thickness;
- its pieces are sewn at an angle of 45 degrees;
- in a tense state, one side is stitched to the main part;
- The binding is sewn from the outer section so that the end can turn inward.
Finally, go over the corners with an iron.
See also: How to choose bedside tables for the bedroom?
Option with sides
It is performed using two methods:
- in the shape of a rectangle with stitched sides, rounded corners - used for large mattresses;
- a quadrangle, with an addition to the size of the width of the sides, backing and allowance - a simplified method leads to sharp corner points and a not very neat appearance.
After selecting the appropriate model, the parts are assembled:
- the side strip is prepared - the lower edge is created by folding the closed side, and a hole is left there for the elastic;
- the strip is stitched to the main product;
- the cut is overcast.
Important! The process ends with retracting the rubber band and checking the functionality of the product.
See also: Which metal shoe rack to choose for the hallway?
The principles according to which our masters work:
- Professionalism. Our craftsmen are constantly engaged in self-improvement, which is why they provide the best repair of air mattresses in Moscow.
- Experience. In order to properly repair a mattress, you must have extensive experience working with such things. All our masters have been repairing various mattresses for several years now. That is why our technicians can fix any problem.
- Speed. We quickly carry out all repair work.
- Reliability. Many people are afraid to send their items to workshops because they are afraid that their products will be damaged. You can easily call a specialist to your home, they will repair the mattress at home. You can be confident in the reliability of our craftsmen.
Repairing mattresses in our workshop will not take much time, everything will be done quickly and efficiently, because we have the best professional craftsmen who can carry out any repair work, even the most complex. So if you notice any problem with your mattress, immediately bring it in for repair. In our workshop it will be executed in the best possible way. You shouldn’t put off repairing your mattress, because the sooner you solve this problem, the cheaper it will cost you. After all, if you solve the problem initially, when it first appears, you can avoid further breakdowns, the repair of which will take longer and be more expensive. So learn to fix breakdowns right away.
How to make a mattress smaller at home?
If the calculations are incorrect and the product is too large, you can shorten or narrow it. The process takes place in 5 steps:
- the casing is ripped from the inside;
- Use a marker and a long bar to mark the pattern;
- a section of the block is cut off;
- the sheathing is shortened or narrowed.
The last stage is carefully sewing the cover.
See alsoChildren's transformable bed with chest of drawers and changing table with photo examples
Sheathing of the product
The final stage of repair is reupholstering the mattress with outer upholstery. To do this, first cover the spring block with a lining. The material must be dense, for example, tarpaulin (burlap or dermantin is also suitable). So, the lining base is placed on top of the spring block and secured with it with a regular stapler.
Then take a sealant (foam rubber, padding polyester). These rollers are placed on the lining in selected places. This ensures high-quality styling. The top of the mattress product should be covered with decorative fabric, and the edges of the upholstery should be carefully tucked inward.
How to make a mattress harder or softer?
A thin topper is used for adjustments. To add additional softness to the bed, you can use products based on latex, holofiber (cotton wool, batting) or polyurethane. Latexed coir will help increase the level of rigidity.
Important! Like the mattress, the topper can be sewn with your own hands.
See alsoDisplay for dishes in the living room: functional interior decoration
approximate cost
The total amount for creating bedding varies between 3-7 thousand. The final price is less than the cost of purchasing a finished product.
The cost depends on many factors and the overall design. If you need a small mattress to cover the sofa while you sleep, its price will not be too high. When a person tries to create a full-fledged orthopedic mattress for a bed with his own hands, he will definitely have to prepare for serious expenses.
See alsoPurple sofa in interior design
Preparation for repair
The desire to repair a mattress arises against the background of the appearance of external defects or damage. The most common breakdowns include:
- Formation of holes and abrasions on the outer upholstery.
- Wear of the soft surfaces that separate the springs from the casing.
- Deformation of the base or frame.
- Damage to springs.
If you are interested in how to tighten a spring mattress with your own hands, you need to prepare a number of tools and improvised means. Among them:
- Hammer.
- Nails.
- Foam roller.
- Fabric surface.
- Upholstery.
- Stapler.
At the stage of preparation for renovation, it is important to determine the type of sleeping surface.
They may differ in scope and purpose - for a bed and for a sofa. The first models have a straight shape with a characteristic rounding at the top. The second ones are completely rounded. Carrying out repair operations results in the release of dust and other debris. In order not to litter the room, it is better to restore the structure in an open space. Otherwise, you will need a powerful vacuum cleaner.
Results
To make a mattress with your own hands at home, you just need to study the relevant instructions in detail, purchase materials and create a sketch. Foam blocks are an affordable product; when purchasing, you can choose the desired size, height, hardness, and density.
After completing the process of creating a polyurethane mattress and before sending it to the bed, you need to vacuum the product. To eliminate unpleasant odors, just take it out into the fresh air and leave it there for several hours. When ventilating, avoid exposure to moisture and direct sunlight.
Is it worth buying a modern mattress with continuous weave springs?
Frame mattresses with continuous weave springs are a rather outdated development. The first design of this type proposed to the world appeared in the 19th century. The model quickly became popular and in demand - due to its low cost, improved characteristics (compared to shapeless feather beds and cotton mattresses) and relative durability.
The Bonnell type spring block (modern name) is still not losing ground. True, the technical characteristics of the block itself have become higher, the structures are quieter and stronger, and the filler and cladding materials are more durable. By eliminating the wooden frame, the mattresses became double-sided and “lost weight.”
Reference! Some factories still produce one-sided models with a wooden frame base (slats). However, such options are becoming increasingly rare.
Manufacturers use hardened steel with a high carbon content to make springs. All springs are fastened together using wire. This is where the main design flaw lies. When a person lies down on a mattress, all the springs come into action at once, and not just those that are directly affected (as is the case with independent springs). This characteristic deprives the mattress of high orthopedic properties.
It is worth noting that over time, the springs may begin to produce a characteristic creaking, crunching or rustling sound that is heard every time the sleeper turns over on the mattress. Another disadvantage of a Bonnell-type dependent spring system is the need to replace the entire spring unit if only one or several springs fail.
Reference! This is information for those who are thinking about buying a new mattress and evaluating the pros and cons of the Bonnell spring block.