The magic of charm » Family and children
Taking care of your child is a natural desire of parents. This desire is especially active in the parents of a newborn baby, whom they want to protect from everything in the world. Protective bumpers for a baby crib are one of the affordable and simple ways to create the most comfortable conditions for your baby.
Despite the ongoing controversy surrounding the need for baby bumpers, it is still worth paying attention to this household item for a newborn.
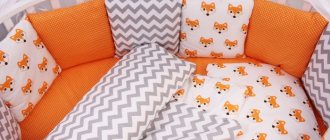
Photo: bumpers for a baby crib
Why do we need bumpers for a crib?
There have been endless debates regarding the advisability of using protective bumpers for newborn cribs from the moment they appeared to this day. The same discussions take place regarding other children's accessories: pacifiers, walkers, swings for motion sickness and others.
The need for protection for a baby's bed should be determined by the parents of each baby, because all children are different. There are calm children who practically do not move in their sleep and do not wake up from a collision with the hard bars of a wooden bed. Such a baby may not need bumpers at all, even when he gets up.
Sides for a round crib
Other children demonstrate activity at an early age, so parents decide to purchase protection in order to protect their baby from injury and ensure a peaceful existence.
IMPORTANT. Protective bumpers for a newborn's crib should not be considered a panacea for injuries or an ideal baby protector. The attention of parents or other adults should always accompany the child during periods of activity and (if possible) sleep.
Among the obvious advantages of protective sides it is worth noting:
- Preventing the child from being injured from contact with hard parts of the crib while awake and sleeping.
- Preventing children's arms or legs from getting into the space between the bars of the crib.
- Protecting your baby from drafts during ventilation or just cold air in the off-season.
- Protection from sunlight if the crib is located near a window. In this case, high protection is required.
- Creating a cozy and comfortable atmosphere for growth and development.
- Decorating the room and maintaining a uniform style of the room.
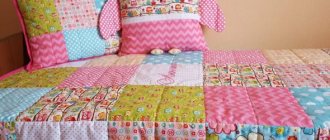
Sides + bag with toys
[MASTER CLASS] Animal bumpers with patterns
To sew a side in the shape of an animal, you need to prepare:
- pattern;
- sewing machine;
- thick fabric in 2 colors;
- threads;
- a needle;
- 2 satin ribbons 60 cm long, 1 cm wide;
- felt, felt of different colors for making elements;
- hypoallergenic soft filler;
- ruler;
- scissors;
- thermal pen for drawing (can be replaced with chalk or soap);
- pins for fixation.
Step by step process
| 1 | To begin with, you should print the pattern in real size on 4 A4 sheets and cut it out according to the drawing. Then glue the parts together with tape or glue. Patterns can be found on the Internet or drawn yourself. | |
| 2 | Place the finished stencil on the prepared plain fabric, folded in half, and cut along the contour. | |
| 3 | A strip 12 cm wide and 32 cm long should be cut out of another material, placed on a single-layer base of the side and secured with pins or needles. Trim the excess fabric along the contour. | |
| 4 | Next, carefully sew the strip with a zigzag. | |
| 5 | Then cut out the elements of the animal’s face on a piece of felt (ears, tail) and stitch them. Draw eyes, mouth, mustache on the product using soap, chalk or a thermal pen that can be easily erased. For better symmetry, it is better to use a ruler. Next, sew the drawn facial features with a thick seam. Make the cheeks out of felt and stitch them with a light thread. | |
| 6 | Place both pieces of plain fabric on top of each other, right sides facing inward. Then bend the prepared strips in half and insert them into the sides of the product. Fix the folded end of each tie to the side, and place the others below in the center of the part. | |
| 7 | Fasten the fabric with needles, then sew all sides of the workpiece, retreating 1 cm around the perimeter and leaving a hole at the bottom to fill the side of about 8 cm. | |
| 8 | Then make small cuts with scissors in the corners of the ears and on the top of the head so that the toy remains symmetrical when stuffing. Next, turn the product right side out and place the filling tightly through the hole left, which at the final stage must be carefully sewn up by hand with light threads. | |
| 9 | Using a similar pattern, sew other pads, and you can change the shape and color of the sides. |
Ready-made patterns (to download, right-click and select “Save link as”):
Types of sides and original models
Classic protective edges vary in height: the range of manufacturers includes high and low models. It is necessary to understand the features of both.
Sides for a round crib
- High sides are a traditional and familiar option for protection, which works reliably both as a tool for preventing injuries and as protection from cold air. But some parents note that the high sides significantly block the baby’s view. If this is not a problem for a newborn, then as the child grows up he needs to see what is happening in the world around him. The best option is a combination of high sides on three sides of the crib and low ones on the remaining side. This way the baby will be both protected and open to the world.
- Low sides (their height ranges from ⅓ to ⅔ of the total height of the crib) do not limit the baby’s view and look very neat. But it is important to understand that in this case there will be no complete protection of the child from the hard parts of the bed. Low protection is relevant for babies who have not yet tried to get up in a crib. When the child begins to rise and inevitably fall, it is more advisable to use reliable high protection.
Low sides for newborns
Classic bumpers, consisting of rectangular flat pillows, are losing popularity today. Modern young mothers strive to find for their babies not only high-quality and reliable, but also impressive-looking bumpers.
Particularly interesting are the bumpers in the shape of animal pillows, houses or cars . Such items turn out to be more functional, because when the baby grows up, they can be used as ordinary interior pillows.
ADVICE. When choosing sides, pay attention to the fastenings: elegant ties can come undone, and the baby can get confused in the ribbons, so the simpler and more reliable the fastening, the better for the baby. Concealed zippers on the covers and durable Velcro tape are the optimal combination for a safe product.
Children's crib bumpers in the shape of an owl
[MASTER CLASS] Sewing a velor braided side
To sew a braided border you will need:
- velor fabric in 2 colors;
- filler;
- scissors;
- 2 plastic pipes for stuffing the product with a diameter of 50 mm and 35-40 mm;
- light threads;
- needle.
Step by step process
| 1 | To begin, prepare 8 pieces of fabric 20 cm wide, 180 cm long in two colors. After this, sew the parts of each color together along the short side into one long strip. Make sure that the pile on the product is in one direction. | |
| 2 | After this, sew the blanks lengthwise, turning the fabric right side inward and fastening each with needles. Next, measure the length of the resulting product, which should be 6 m 80 cm, cut off the excess. | |
| 3 | Turn out the parts and start stuffing using a plastic pipe. To do this, put one of the strips on it and place the filler inside. | |
| 4 | You can fill the side first from one side to half, and then from the other. Push the material with a stick or a regular handle. Do the same with the remaining strip. | |
| 5 | You need to make a pigtail from the finished parts. To do this, carefully stack the products on top of each other, leveling them if necessary (as shown in the photo). | |
| 6 | Then sew the edges of all strips by hand, gathering the fabric inside. It is better to use light threads. | |
| 7 | Complete the braid and fasten the ends of the parts with hand stitching. | |
| 8 | If necessary, make another such side according to a similar pattern. |
Popular colors and prints: for princes and princesses
Borders for a newborn's bed are not only a way to protect the baby from shocks and drafts, but also an excellent option for useful decor for a child's room. Modern fabrics and a wide range of different designed crib bumpers make it possible to choose the ideal option for any interior.
The classic division - pink for girls and blue for boys - also works in the case of a crib protector. But designers advise preferably using delicate shades and be sure to add companion colors. So, a pink-gray or yellow-blue side will look more neat and stylish.
Blue color is popular for boys
Neutral base colors (beige, gray, milky) are ideal if the crib is in the parent's bedroom. In this case, the decor allows you to harmoniously fit a children's item into an adult interior. And so that the side does not seem boring to the little one, you can provide a second set of covers or additional decor.
It is better to avoid sides that are too dark or too bright so as not to create an atmosphere that is unhealthy for the child.
[MASTER CLASS] Sewing borders from panels with ties
To sew one soft side from panels with fabric ties you will need:
- panel;
- thick fabric;
- scissors;
- light threads;
- pins;
- thin padding polyester (60 g);
- filler;
- 4 ribbons 33 cm long, 6 cm wide.
Before making the side, it is advisable to iron the panel and other type of fabric well.
Step by step process
| 1 | To begin with, you should cut out a square measuring 33*33 cm from thick fabric and prepare the panel. | |
| 2 | Place the square-shaped piece on the panel and trim the edges along the contour. | |
| 3 | Next, you need to make ties for the side, folding each ribbon inward along the edges by 1 cm, then fold it in half and stitch. It is advisable to iron them before doing this. | |
| 4 | Then fold the padding polyester in half, place the panel on top with the front side up, and then fix the ties in the central part of the workpiece, placing them on top of each other (as shown in the photo). | |
| 5 | Place the remaining cut on top with the wrong side, level it, secure with needles and cut out the part along the contour. Trim the corners without touching the seams. | |
| 6 | Sew the side on all sides, departing 1 cm from the edges. Leave space at the bottom in the middle for stuffing the pillow (about 7 - 8 cm). After this, turn the product right side out. | |
| 7 | Smooth out all corners with your hands. Then, from below, through the unstitched part, fill the part with holofiber or other hypoallergenic material. | |
| 8 | Rub the pillow with your palms to remove any rough edges. Next, manually sew up the hole with a hidden seam using light threads and iron the product on both sides. | |
| 9 | The remaining sides can be made in a different color or alternated. |
Suitable material and filler
The best thing for a child is natural. This rule also applies to crib bumpers. Protective elements should be made of natural fabric: preferably calico, satin, thick cotton or flannel. These fabrics do not cause allergies, are easy to wash and do not lose their appearance. In addition, manufacturers of children's themed fabrics follow current trends and offer their customers stylish and modern prints.
The fabric for the bumpers should not only be natural and safe for the child, but also pleasant to the touch, because the delicate baby skin will come into contact with it. Tactile sensations are extremely important for newborns, so special attention should be paid to this criterion in the process of choosing a material.
ADVICE. It is necessary to ensure that the protective sides have replaceable covers, because the older the baby gets, the more actively he interacts with the outside world, which often leads to the appearance of food stains, saliva and simply dirty stains.
The filler for the sides also needs to be chosen correctly. Despite the fact that all modern synthetic materials are safe for the health and life of the baby, it is necessary to pay attention to their functionality.
Safe and familiar padding polyester tends to clump and lose shape, especially after washing. If you take more careful care of such bumpers for a newborn, they can last for several years.
A modern analogue of padding polyester is holofiber . This material is preferable for the manufacture of protective edges, since it does not lose its shape, does not shrink even when washed and is considered absolutely safe.
Among the worthy options are also periotek - a hypoallergenic fabric that is suitable for sewing soft protection, polyester that does not absorb moisture and foreign odors, as well as hallcon - a unique material that will not only create comfort and softness, but also protect the baby from cold air.
When it comes to dense sides, the only filling option is foam rubber. Some experts are categorically against the use of such material near a newborn, but tested and certified material is safe for the baby. At the same time, the foam rubber does not lose its shape or break, and its sufficient strength is ideal for the sides of babies older than six months.
Preparation for sewing bumpers
Before making a safety barrier, you need to measure the crib and determine the amount of fabric needed. After this, you should draw the desired design limiter on paper. Some craftsmen do without this stage; they make drawings directly on the fabric, however, such an approach can cause errors, so it is advisable to first draw the future design on paper, indicating the dimensions of all its elements in the drawing.
When the fabric has been purchased and prepared, you need to cut out the parts of the future side, connect the elements of each part to each other (leaving the underside of the safety barrier unsewn) and insert the filler into the fabric cover. When cutting out the filler, you need to remember that the cut out part should be smaller than the cover in which it will be placed by 0.5 cm on each side. If you forget about this rule, then the filler parts will be too large and will not fit into the cases.
The next step is to sew up the bottom sides of the covers (the holes through which the filling was inserted). Another popular option is to sew fasteners in these places - zippers, buttons, snaps. This allows the filler to be removed from the cover for hygienic processing or replacement. The finished product for children can be decorated with ribbons, lace or ruffles. All work is done using a sewing machine or by hand.
How to properly care for edges
Like all things in a children's room, the sides should be looked after carefully, but at the same time neatly. Removable baby bumper covers should be washed on a delicate cycle at least once a week. For washing, hypoallergenic baby powders are used, or better yet, liquid laundry detergents, which are much easier to rinse out of the fabric and do not leave microscopic particles on the surface.
If the covers are not removed, then the sides should be hand washed and thoroughly dried in a horizontal position: this way the filling will not fold down and the pillow will not lose its shape. It is impossible to iron such pillows - you have to use a steam iron. So removable covers for protective sides are a significant convenience for both the baby and the mother.
What size of sides should I choose?
For babies under 5 months, choose bumpers no more than 30 cm in height
This will allow you to see the baby without looking into the crib every time.
But after the child begins to sit down and try to stand up, the bumpers should be higher. So that the child cannot stand on them and try to get out of a crib of any size.
The length of the side for a standard bed 120*60 will be 360cm.
DIY crib bumpers: brief instructions
Sewing protective bumpers for a newborn's crib is often done by expectant mothers, their close relatives or friends. It is important that what you make yourself is of high quality and reliable and safe enough for the child.
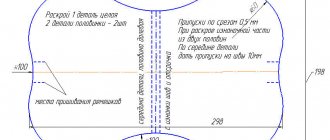
Pattern pattern for the sides of the crib
To make your own bumpers for a newborn’s crib you will need:
- Fabric cut into pieces suitable for the crib. If you plan to sew sides with covers, then you need two fabric options - for the pillow itself and for the outer cover.
- Sufficient amount of filler. Sheets of foam rubber must be cut to the size of future pillows, padding polyester or holofiber divided into piles of suitable size.
- Fastenings (zippers, tapes, Velcro tapes) and decor, if any is planned.
The process of sewing the sides is very simple and straightforward: filler is placed into a part sewn on three sides and sewn along the fourth side. Removable covers are made separately, and it is important to measure the workpiece correctly so that the cover fits - does not tighten the pillow and does not dangle on it.
Pattern of sides for the crib
Buying or sewing protective crib bumpers for your baby is a decision of individual parents for their baby. This children's household item provides protection from injuries and drafts, but can cause allergies to dust if not properly cared for, make it difficult for fresh air to enter the crib, and prevent the baby from seeing the world.
Proper combination of high and low sides, as well as their timely use, will make the baby’s life as comfortable and safe as possible.
Calculation of the required amount of material
To facilitate work on the sides, some recommendations are provided on the amount of material used to create one protective element. These recommendations will be especially useful for beginning needlewomen.
The classic version of protective products involves the use of four elements for each wall of the arena. To determine the dimensions, you only need to know the length and width of the sides of the crib.
The amount of material required for work directly depends on the dimensions of the bed and sleeping area. It is necessary to take all the necessary measurements in advance, and only then develop the elements of the protective structure.
After measuring the perimeter of the crib, you need to determine the height of the side. Flat elements are usually created with a height of 30 to 40 cm. For round cribs, a side with a height of 40 cm is used.
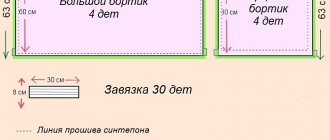
The perimeter of a 120x60 cm crib is 360 cm. Be sure to add about 10 cm in width and height to account for shrinkage and seams. For a border 35 cm high with a fabric width of 150-160 cm, we will need 1.35 m (for three strips of 45 cm each).
Immediately before work, any fabric must be steamed, soaked in warm water, ironed and dried. This way you can avoid problems with deformation of the finished product during washing.
Pillow sides can be filled with weight filler such as synthetic ball or comb. One standard pillow with dimensions of 30x30 cm will require about 150-200 g of material. Thus, for 10 crib pillows you will need about 1.5 - 2 kg. When using very soft fillers, consumption can increase to 220 - 300 g per pillow.
Also, the protective elements can be filled with a so-called “sandwich”, which consists of two sheets of rolled padding polyester and a weight filler between them. The consumption of filler material in this case depends on the size of the specific pillow.
The amount of roll filler is calculated based on the dimensions of each side separately. The number of layers is selected individually depending on the required degree of protection.
Separately, it is worth providing satin ribbons or scraps of fabric to create ruffles or other decorative elements. Their number and location are determined by the user himself.
The cushions are attached to the walls of the arena using special fasteners or Velcro. There should be enough of them so that the child, even with very active movements in the crib, does not tear off the protection from the hard wall.
Photo: cot bumpers
You can share or save for yourself:
There are no comments yet, but you can write your opinion or ask a question.
Briefly about the main thing
- Babies need bumpers in their cribs after 2 months of birth.
- Recommended fabric for protective bumpers: satin, flannel, flannel, calico, thick cotton.
- Sintepon, holofiber, periotek, polyester, holkon, foam rubber, and buckwheat husks are recommended as fillers. DO NOT use fluff or cotton wool.
- The sides should be washed and aired weekly.
As you already understand, you can sew soft bumpers for a crib yourself. The main thing is to prepare all the necessary materials and tools, strictly measure the parts according to the given values and strictly follow the instructions. It is better to use bumpers with removable covers that can be easily removed and washed in the washing machine.
Types of fillers
Constipation in a 6 month old baby - types and causes
The following fillers are used in modern products:
- Foam rubber. It retains moisture well. It must be dried thoroughly, otherwise microorganisms will develop in it.
- Sintepon. It is cheap, flexible, washes well and dries just as well. It does not harbor parasitic organisms.
- Holofiber is a filler with the latest characteristics. It is not harmful to a newborn, dries in a short time and does not lose its previous structure. Resistant to wear.
Holofiber
- Periotec is an innovative wear-resistant fiber.
- Hollocon is a filler that retains heat well.
- Polyester is famous for the fact that it does not bunch up and maintains its structure.
Which models are suitable for home sewing?
There are removable sides for the crib, which are mounted in the form of a dense rectangular piece on the side. The work requires reliable material, which is not always easy to find. In addition, it is worth taking care of fixation - this may require complex structural elements or rare fittings
In general, vertical removable parts for sidewalls are more convenient, but they are not so easy to make at home.
Borders for a newborn's crib
Non-removable sides are ideal for DIY sewing. They are either placed in the crib as an insert, or tied to it with ribbons, fastened with buttons, etc. Sewing a non-removable buffer is easier, since it is based on a filler and a cover. Such models are universal and do not require special materials, complex tools or skills. They can be decorated to your taste. A huge selection of fabrics and decorative elements, the ability to use several types of covers for the interior - all this gives room for imagination and creates a unique, inimitable atmosphere in the nursery.
Sewing bumpers for a baby crib is usually not difficult. They do not require intricate cutting. The parts are cut out according to the standard, or based on the dimensions of the crib, if its dimensions are far from those presented in the store.
Which crib bumpers are best?
If you decide to make your own protection for your child’s crib, then you should definitely know about the positive and negative properties of each type. So, focusing on the pros and cons, you will decide which crib bumpers are better and which are worse.
- The high side of the crib has a clear advantage, as it effectively protects from drafts and prevents the baby from hitting a hard part. However, it blocks the entire view and the child is forced to observe only the inner area of the crib
- The low side opens up a wide view, giving the baby the opportunity to observe everything that is happening around, but does not prevent injury
- Protections made with fastenings in the form of locks, ties and especially Velcro can tear in situations when the baby reaches to stand up and pulls back the side. Therefore, the option with fasteners is the most reliable. If the side has locks, it will not allow itself to come off and hit the baby against the bars
- If you want to make a bumper with pockets, then a prerequisite is their presence on the outside of the crib. The internal arrangement will constantly attract the baby
- The material used is just as important. Synthetic materials can irritate the skin, so only natural fabrics are recommended. They will allow the product to withstand washing, dry quickly and not lose its shape.
Types of filler for baby bed sides
Today, a large number of fillers have been developed that have their own advantages. Namely:
- Foam rubber is a microfiller that requires special conditions.
This is, first of all, meticulous and high-quality drying. This base has the ability to retain water well, which promotes the formation of microorganisms inside.
Foam rubber has good wear resistance, which is important for frequent washing.
- Sintepon is the best microfiller.
This material is not expensive, simple, quite flexible, washes well and dries instantly. Its qualities prevent the formation of fungus.
The most important thing when making a border with your own hands is to quilt the fabric so that the filling does not roll off.
- Holofiber is the latest filler, superior in quality to padding polyester.
It is absolutely non-toxic, does not retain moisture, and dries instantly without changing its original configuration. Due to the spiral texture, the filler is very wear-resistant.
It does not cause allergic reactions, which is very important for babies.
- Periotec is an innovative fiber.
Its main advantage is hypoallergenicity. This is a very flexible artificial material that washes well.
It also dries quickly and holds its shape well.
- Hallcon is an artificial filler.
Has fantastic heat resistant features. Absolutely non-allergenic, flexible and wear-resistant.
Indispensable for cool and ventilated rooms.
- Polyester is a hollow fiber.
Has anti-allergenic qualities. Does not lose its original configuration. Does not absorb water or odor.
The child feels very comfortable in such a crib.
How to sew bumpers for a crib in 1 day
The side is made according to the following step-by-step scheme:
- Make 4 blanks of 43*63 cm, 43*123 cm (standard).
- Strips 1.80 m long and 7 cm wide are cut out like frills.
- Cut off as much filler as required for the guards.
- Create bends in the parts, insert a frill and sew a couple of blanks on three sides.
- Place padding polyester and sew up the bumper.
- Sew ties to the bumper parts.
Finished handmade product