Anyone who wants to add originality to their bedroom can make a canopy over their bed with their own hands. Usually people try to install the most comfortable and cozy bed in their bedroom, which can have a different style.
However, a special atmosphere in the room is created by various decorative elements, one of which is the canopy. This product is very popular; designers use it when decorating rooms for both adults and children. The design of the canopy is simple, and you can make it yourself, following the instructions.
DIY canopy over the bed
What is a canopy for?
The canopy is an unusual canopy surrounding the bed. It consists of a frame and a textile part that is installed on it.
This unusual interior decoration has been used since ancient times. The canopy first appeared in the East, and was used to limit one’s personal space. In addition, these curtains provided the best protection from drafts.
This product has not lost its popularity even now. After all, this is not only decoration, but also a functional piece of furniture:
- creates a feeling of security and comfort;
- protects against mosquitoes and other insects;
- allows you to retain cool air in the summer;
- in the morning it protects from the penetration of sunlight;
- allows you to zone the sleeping area.
The presence of a canopy in the bedroom allows you to create a unique atmosphere of comfort
Disadvantages of using canopies
Despite the fact that the canopy is a decorative and functional product, it has some disadvantages:
- Dust constantly collects on the fabric, so it will have to be washed regularly. If you are not ready for this, then it is better to abandon this idea altogether, because any pollution is an environment for the development of pathogenic microorganisms. In addition, it is very dangerous for people with an allergic reaction to dust.
- Many people consider the process of caring for a canopy to be too difficult, because they have to monitor the cleanliness of not only the fabric part, but also the frame, and not everyone wants to wipe off dust from the ceiling.
- Such a decorative element visually conceals the space, so it is definitely not suitable for miniature rooms.
- Since the material will have to be washed frequently, for some time only the frame will remain above the bed, which will stand out against the background of the ceiling (the problem is solved by a replaceable fabric part).
Dust constantly collects in the folds of the material, so canopies, especially for children, need to be washed regularly
Important! Above we have listed the features of canopies that are worth thinking about. There is no need to rush into installing a canopy - first you have to evaluate all the advantages and disadvantages.
Making a Crib Cover
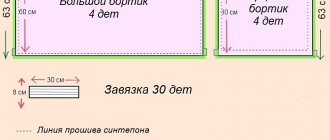
A step-by-step guide on how to make a canopy involves the following steps:
Choosing a suitable pattern. Those who are familiar with sewing can come up with a design on their own; beginners can find pattern templates on the Internet or children's magazines. Edging the edges of the fabric. Using a thin ribbon and a small needle, carefully sew around the edges of the fabric. But before you stitch the tape, it needs to be edged with an overlocker. Sewing on frill or lace. The choice of materials for decorating the bottom of the canopy depends on the gender of the child. For girls, choose lace elements, for boys - a frill made of fabric of a different color. After this, you can start sewing decorations. These can be appliqués of flowers, cars or animals, beads, beads, embroidery, etc. The edges of the cape are connected with a large bow, which should be made and trimmed with ribbon in advance. Install the holder and put a cape on it
It is important to secure the structure well so that it does not fall. The fabric is stretched along the wire along the entire perimeter, and then beautiful ruffles are formed
Varieties of canopy frames and combination with the interior
There are several basic forms of structural frames on which the fabric is attached. In order to make the right choice, we will look at each of them in more detail, because not all of them can be combined with the overall interior of the room.
Table No. 1. Shapes of canopies
| Frame, illustration | Description |
| Frame "Crown" | The frame in the form of a ring with fabric is mainly installed under the ceiling. Thus, there is a kind of crown above the head. This canopy will best fit into a classic bedroom interior or in the Provence style, because this design creates a truly romantic atmosphere. |
| Frame "Arc" | The frame is a type of arc that is installed directly above the head of the bed. This design is also best suited to classic interior design. |
| Racks | This is a very stable frame with four posts. This canopy can be installed in a room with a modern design. The main advantage of this design is its strength, because it can withstand even heavy material. |
The frame is constructed from various materials. Let's consider the most famous options:
- Cornice made of metal profile. It is sometimes used instead of the standard version; it is fixed to the ceiling around the perimeter of the bed.
- Tube (metal). Fixed to the ceiling with dowels.
- Stands made of plastic, metal and wood. If the bed is made of solid wood, then it is not necessary to purchase the same supports, because they can be either plastic or metal.
You can purchase a ready-made version of the canopy, which only remains to be secured above the bed
Places of purchase and cost of fastenings
Purchasing fasteners for a crib is not that difficult. All you have to do is go to a children's goods store. Online stores can also offer a large selection of holders. The average price ranges from 300-500 rubles. for a regular bracket. It depends on the material, country of manufacture, shape and size of the holder. Forged products for a wall or ceiling will cost at least 2,500 rubles. You can choose alternatives made of plastic.
Sources
- https://berkem.ru/drugoe/kak-krepit-baldaxin-na-detskuyu-krovatku/
- https://steshka.ru/derzhatel-dlya-baldaxina-na-detskuyu-krovatku
- https://komnatarebenka.ru/sovety/kak-ukrasit-komnatu/kak-odet-zakrepit-povesit-baldahin-na-detskuyu-krovatku-derzhatel-stenu-potolok-instruktsiya/
- https://bezkovrov.com/detskaja/vidy-derzhatelej.html
[collapse]
How to attach a canopy to a bed?
Here, too, there are several common mounting options. Since the frames are different, the fasteners are different.
Table No. 2. Types of fastenings
| Type, illustration | Description |
| Loops | Typically, Velcro is sewn onto such strips, so that the fabric part can be easily removed and washed. They are usually used on narrow, long frames. |
| Eyelets | They are fastenings in the form of metal rings. They are attached to the edges of the fabric part of the canopy. They are mainly used when hanging heavy, dense material. |
| Braid | A ribbon with loops is sewn onto the edge of the fabric, and hooks are attached to the frame itself, onto which the loops are fixed. |
Assembly Tips
If you buy a holder separately, choose universal models that fit all cribs. When purchasing, look carefully at the fasteners: it is better if they are metal.
If the fastening is broken, you should not try to fasten it again, since such a design will not be reliable. When you install the holder in the middle of the playpen, you need to check that it is located exactly in the middle: the thick fabric canopy should be distributed evenly if you do not want everything to fall on the baby.
What textile to choose for making a canopy?
Regardless of what material the canopy is made of, it must be combined with the overall interior of the room. Therefore, the fabric must be selected taking into account the following criteria:
- heavy materials such as jacquard and tapestry are best suited for a classic bedroom interior, they look expensive, thanks to which you can create a real royal bed;
- silk and satin are perfect for decorating a baroque room;
- for an oriental interior, you can make various colored tassels on the canopy;
- for a room in a modern style, the frame should not be made heavier - it should be a weightless structure with transparent curtains.
Color palette in the interior
In addition, it is necessary to take into account other nuances when choosing textiles:
- The desired effect can be achieved not only due to the structure of the material, but also patterns. They can be combined with other textile interior elements.
- The color of the material is of no small importance. For a laconic interior, it is necessary to select discreet, plain fabrics. If you prefer a romantic style, then it is better to buy material in pink or red.
To make such an interior item, materials of different structures are used.
Nuances to consider
You should definitely consider how the canopy will be installed. For example, it can be located at the head or in the middle of the side wall. If you choose to install it at the head, you can completely enclose the child's bed.
There is also a more complex fastening. It is performed around the perimeter of the crib. This option is called “royal”. It requires additional design. It consists of four holders that are installed in the four corners of the crib. There is a frame on top, which is necessary to hold the fabric.
It is also worth considering the length of the curtains. The standard option is that the curtains only reach the middle of the mattress. Curtains of short length will only decorate the crib. They won't be able to protect you well. If the length is long, then such options will interfere.
You can attach a fun carousel with toys under the canopy. This will bring joy to the baby.
We hope that you understand how easy it is to sew a canopy for a baby’s crib with your own hands. This does not require any special skills. You just need to be patient and have some free time. If you want to provide your child with real comfort and coziness, you must succeed.
Making canopies with your own hands
In principle, it is enough to look at photographs of canopies to choose the desired option and understand how to make it. Below we offer step-by-step instructions that will allow you to make different designs without errors.
Hanging option: step-by-step instructions
This is the most primitive design, which is suspended above the berth.
In the process, we will need the following:
- measuring tape or tape measure (depending on what you are used to working with);
- screwdriver;
- sewing machine;
- dowels and screws with hooks;
Special hooks will be used as fasteners - a simple pencil;
- braid – 400 centimeters;
- any painted wood planks - 2 pieces, 100 centimeters each;
You can pre-paint the shovel handle using a spray can. - canopy material.
Step 1. First of all, you need to make markings above the sleeping place. To do this, we need to know the length of the wooden planks. On the ceiling itself we place marks on the places where the screws will be inserted - they should be parallel. This means that you will need to secure 2 screws on each side. There should be space between the rows of screws, on average it is about 50-70 centimeters. However, the exact size will vary depending on the width of the bed. For example, if the width of the bed is 150 centimeters, then the distance between the slats will be 70 centimeters. For a two-meter bed, this distance can be increased to 100 centimeters - here you need to take into account your personal preferences.
We put markings on the ceiling
Step 2. Now you should drill holes along these marks and attach the screws there. Next, we tie ribbons to these fasteners so that we get loops.
We tie the loops
Important point! The length of these loops can vary significantly depending on the height of the room. If the ceiling has a standard height of 280 centimeters, then the length of the loops should be about 40 centimeters. If the ceilings are higher, then the loops will be longer.
Step 3. Now you need to take the textile with the processed edges and place it on a flat surface. Next, you should take exactly a whole piece of fabric two rooms high, and plus another 20-30 centimeters. In the middle of this cut it is necessary to select a section of fabric, the width of which will be equal to the distance between the screws. Now you should add a few more centimeters to the resulting value so that the canopy sags over the sleeping area (usually at least 40 centimeters).
During the measurement process, it is necessary to use strips
Step 4. Now you will need to sew the material along these marks. To do this, it is better to use a sewing machine, otherwise you will have to spend too much time on such work. This will give us a hole for the slats. There will be only two pieces of wood in the textile cut.
We sew the fabric
Step 5. As a result, we will have a canopy that will be quite easy to attach to the hinges. It is necessary to put caps on the extreme parts of the cornices, which have a decorative appearance, and thanks to them the fabric will not fly off the cornice during use.
We fasten the canopy to the prepared hinges
Step 6. Now you should distribute the material on different sides of the bed so that it hangs down beautifully.
At this stage, the manufacture of the canopy is completed. You can see that even such a simple bed has acquired an unusual look.
Using the same principle, you can make a canopy in the form of a ring. To do this you will need a regular metal hoop.
Important point! At night, a person can unnoticedly pull the fabric, which is why you should consider a strong fastening, especially if it is a canopy for a children's bed.
On four racks: step-by-step instructions
In this case, the textile part of the structure will be supported on a wooden frame in the form of racks. Of course, it will take more time to make such a product, but the result will definitely please you.
Canopy on four posts
In the process we will need the following:
- Wooden stands. Their diameter will be 5.8x5.8 centimeters. It is advisable to buy ready-made material that will have grooves in it to assemble the frame. A total of four racks will be used.
- Four frames. At the same time, 2 of them must fully correspond to the parameters of the bed (length, width). The remaining frames should only match in length. In this case, it is also better to buy blanks with factory-made holes for connections.
- Construction glue.
- Fasteners.
- Plugs – 4 pieces.
- Wooden chops.
- Finishing varnish.
- Textile. On average, it will take about ten meters (this amount must be distributed on both sides).
The process of creating such a canopy is based on making a frame for attaching the fabric. It can be made from any material, including plastic and metal. In our case, wood will be used.
Step 1. First, we need to connect the vertical and transverse elements using the tongue-and-groove principle. To make the frame reliable, we make additional fastenings with self-tapping screws. The structure should be level, which should be checked upon completion of assembly.
Method of connecting parts tongue and groove
Step 2. Now this frame should be varnished. In total, you need to apply it in 3-4 layers, drying each one. If the bed itself is dark in color, then the frame can be painted with stain, and only then with varnish. Potassium permanganate is also suitable for such purposes - mix a strong solution to get a dark cherry wood color.
We coat the frame with wood varnish
Step 3. Now you need to install this frame so that its corners rest against the bed.
Installing the frame
Step 4. Finally, you need to attach textiles to the resulting frame. Here you can show your creativity and make unusual drapery options.
This is what the finished structure will look like
Video - Making a canopy
An easy way to make a decorative canopy for a children's bed
This design can even be made from scrap materials. In the process we will need the following:
- Basket. You can take an old one that you no longer plan to use.
- Decor. Here you can take any artificial flowers, brooches of your choice, or toys.
- Brush. Any hair with stiff bristles will do.
- Dye. Since the canopy will be installed on a children's bed, it is necessary to use the safest possible paint that is not toxic.
- Glue. Any will do, but it's better to take a glue gun.
- Lightweight material.
Step-by-step instruction
Step 1. First of all, we need to remove all the unnecessary elements from our basket, including the bottom and handle. Just do this carefully so as not to damage the frame itself.
Removing unnecessary parts of the basket
Step 2. Now you need to go over this base with a brush to remove all kinds of dirt.
Remove possible dirt with a brush
Step 3. Next you need to start decorating our frame. For this we use artificial flowers. They're bright for now, but we'll paint them later. It is necessary to thread the flowers into the holes and fix them with a glue gun.
We decorate the basket with flowers, which can be arranged in any order at your discretion
Step 4. Now we have to paint the frame. It is better to do this outdoors using spray paint.
It is necessary to paint all the details of our frame, after which it should be left until completely dry
Step 5. We will attach decorative ruffles along the top edge.
Light ruffles were used to match the entire design
Step 6. Next you will need to attach Velcro to the inside of the basket. Here you also need to use a glue gun. The last step is to attach a fine mesh to these Velcro strips.
The result should be a canopy like this, which will look best over a child’s bed
Video - Canopy for a children's bed
Holder
To the crib
There are enough holders for children's canopies on sale (bottom left in the figure), and they are convenient because they do not require construction work for installation, because... Attached to the crib with clips. But everything is medicine, and everything is poison. You can get scratched on the sharp corners and screws of the clamps, and get your finger stuck in them while poking around with a curious contraption. Then there will be no roar, although it is clearly inappropriate for the damage received. Therefore, it is better to make a holder for the canopy of a crib with your own hands.
Purchased and homemade canopy holders
The design of a homemade canopy holder is elementary, pos. 1-5. It is also suitable for an adult royal canopy; in this case, the antennae of the supporting frame are bent back and inserted into blind holes in the wall. The material is a couple of pieces of propylene water pipe (not even a strong adult can break it) and a steel rod with a diameter of 4-6 mm, covered with a heat-shrinkable tube (HERE). You can also hang a canopy canopy from 1 piece on this holder if you make a cutout in its drawstring (sleeve) for hanging.
As for the canopy holder specifically for children, then, firstly, pay attention to the bend of the vertical rod (shown by the red arrow). It is necessary for a children's canopy
What if your beloved child decides to pull the canopy off the holder no matter what, then if it has a bend of 10-15 degrees, the prankster will be able to do it without driving himself into hysterics. If the rod is straight, then the canopy will probably catch on the frame and get stuck.
Secondly, it is possible to get by with one section of the supporting pipe, and make the nests for the frame mustaches from waste metal-plastic pipes. Everything comes together and is attached to the crib in any way you like: with steel self-tapping screws flush (the heads need to be covered), or just tightly wrapped with tape.
To the ceiling
If a permanent space is allocated for a baby crib, you can do without a canopy holder altogether by making it a tent and hanging it from the ceiling, as shown in the photo on the left. Suspension – threaded hook for chandelier M6-M8; the socket for it in the ceiling is a steel collet holder. Such a pendant can withstand even a hefty fat man, and the hole in the ceiling is almost invisible when the hook is turned out. In extreme cases - a smear of putty, and it is not visible at all.
Attaching the canopy to the ceiling
The supporting frame of the canopy is best made from a plywood embroidery hoop in the center. There is no need to attach a screw tie to it - a knob, as in purchased frames for tent canopies. At home you can do it easier and cheaper:
- The hoop ring is carefully sawed anywhere;
- On each side of the cut, pierce with an awl or drill 2-3 holes with a diameter of 1.5-2 mm;
- The sewn panel(s) of the canopy are put on a ring, moved (collected) to the side opposite to the cut and temporarily tied together with thread or ribbon so that they do not unravel;
- The ends of the cut are lubricated with PVA;
- Pull 1-2 stitches of coarse thread or 2-4 stitches of sewing thread No. 10 into pairs of holes with a sewing needle;
- The stitches are pulled together tightly, the ends of the thread are tied and the stitches are impregnated with PVA;
- A day later, the binding is removed from the panel and the canopy is hung where it should be.
An even simpler option is a canopy drawstring, stitched from the inside with calico braid, previously soaked in PVA diluted in half with water and dried. In this case, a cord is pulled through the drawstring, on which a completely frameless canopy is hung. Such a suspension looks no worse than a ring one (photo on the right), and it is also reliable against mosquitoes penetrating from above.
How to decorate a canopy?
If we are talking about a bedroom for adults, then it is recommended to use satin ribbons of various widths or thick laces with tassels as decor. To create a bright accent, you can use several colored cuts to form one canopy.
Sometimes the canopy is decorated with a voluminous bow, which is best installed in the middle of the hanging structure. It should be made only from durable fabric that holds its shape well. You can attach it using pins.
You can make a voluminous bow as a decorative element.
If this is a crib, then some mothers prefer to make unusual mobiles that are installed in the center of the canopy. They are usually made of felt in the form of cartoon characters and various animals. The canopy can be decorated with all kinds of garlands and balls. Such decorations look especially original on transparent fabric.
With your own hands you can make not only a canopy and mobiles, but also the crib itself. Detailed step-by-step instructions for making a wooden crib can be found in our article.
Everything you need for work
The canopy is considered not only a beautiful accessory for the bed, first of all it performs a practical function. Such a device can protect the bed from prying eyes, and also add special comfort to the bedroom. To make a canopy yourself, you must first decide on its design.
Before you start work, you need to prepare all materials and tools. Below is a list of materials needed to create a classic canopy:
- textiles - it is better to choose a not very heavy, transparent fabric. The best choice is organza or veil. For a children's bed, you can purchase silk, linen or chintz;
- frame materials. Hollow metal pipes are often used for this. Previously, the base for the canopy was made of wood; today this design is less popular;
- fasteners - you should use only high-quality steel bolts, which will allow the structure to support the weight of the fabric and maintain stability above the bed.
Tools that will be useful are a drill, a screwdriver, screwdrivers, a tape measure, a simple pencil, and a grinder for working with metal. To sew the cape itself you will need a sewing machine, threads, needles, and frill.
Useful tips for beginners
Beginners may find the following recommendations useful in the process:
- When choosing textiles for a canopy, it is necessary to take into account that it should be approximately 20 centimeters more than indicated in the calculations. All these centimeters will be spent on hems and fastenings.
- It will be much easier to install the frame on the ceiling using hangers. The system is installed on the wall using dowels.
- It is not necessary to make a full-fledged canopy; you can install a simplified version. To do this, first, rods are fixed above the sleeping place, and ordinary curtains are already hung on them.
- Instead of solid loops, you can use fabric ribbons to match the material of the canopy.
It is better to purchase material with a reserve
Mounting methods
When deciding how to attach a canopy to a crib, you must take into account the location of the crib in the space of the room in relation to the walls, doors, and other furniture. This is what should determine the method of attachment. And here we will use a new term - holder.
For reference. The holder is the load-bearing part of the overall structure.
So, the lightweight material is attached to a holder, which in turn can be fixed as follows:
- on the side wall;
- on the past;
- at the head of the crib;
- to the wall of the room itself;
- on the floor;
- on the ceiling.
The canopy consists of a fabric canopy and a structure holding it.
The canopy holder is a sealed or detachable metal ring, a tripod and attachments to it.
Buy or make it yourself?
Of course, any product can be purchased in a store. It should be borne in mind that ready-made options are not always suitable if you have a non-standard bed. In addition, you will have to spend more money.
It is also worth noting that a canopy is not a very popular piece of furniture, so it will be difficult to find a store that offers a wide variety of similar products.
Making your own structure is a great opportunity to save money. Here you will have the opportunity to purchase fabric and any accessories to your taste. However, this option is not suitable for people who do not have free time, because you will have to tinker with some types of canopies.
Only by making a canopy with your own hands can you get a unique product
Making a canopy with your own hands is not difficult, especially since there are quite simple options that even a beginner can handle. Otherwise, this is a great opportunity to decorate your bedroom, make it cozy and unusual.
Location options
The choice of the future location of the canopy above the crib depends purely on your aesthetic tastes and ideas of beauty. When choosing a location, you choose exactly how the fabric will fall from the holder and how folds will form on it.
- In the middle above the crib.
At the same time, the cascading waves resemble a sharp roof over a small house. Traditionally, this is the “boy” option.
- Position at the head.
The fabric falls slopingly to the “bullet” at the feet. This option is suitable for girls and older children.
- Along the entire perimeter.
A special frame is mounted, which can be either an independent structure or an extension of the crib, being fixed to it. The canopy forms a kind of separate room, four smooth woven walls and a ceiling. This arrangement is universal, it is suitable for both boys and girls. The color scheme becomes decisive. By the way, this is the type of canopy arrangement that is most popular today for adult large beds.
The baby will often have to be taken out of the cradle and put back, if the fabric constantly gets in the way, then soon you will get tired of this device, you will remove it and put it away.
The principle of hanging the canopy depends on the type of ring.