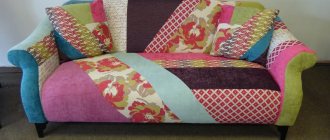
A handmade patchwork quilt will be an excellent decoration for a child's room or an original gift
. Nowadays, there are a huge number of techniques for needlework. Recently, the patchwork technique has been increasingly used. Products made using the patchwork method look very unusual, but at the same time elegant. A patchwork blanket is perfect for decorating a boy's or girl's nursery. You can make such a product yourself. All you need is a specific fabric pattern and a little patience.
Making a baby patchwork blanket with your own hands
Before starting work, you must decide on the choice of fabric. The choice of material will depend on the style of the room. It is desirable that the color of the pattern and furniture be the same.
Experts advise giving preference to cotton. This material does not shrink after washing and retains its color for a long time.
To make your own quilt, you will need a ruler, scissors, a sewing machine and a cutter. It is worth noting that you need to take fabrics of different colors. White and yellow materials go well together.
When making a baby patchwork blanket, follow the following algorithm:
- First, cut the white and yellow fabric into squares. The side of the workpiece should be 20-25 cm. Do not forget to trim the edges of the fabric and ensure the symmetry of the parts.
- After this, take a square of white and yellow fabric and place them right side together. Pin the workpiece together.
- Sew the resulting product using a sewing machine. If you still decide to give preference to cotton, use thick needles.
- Then take the workpiece and cut it diagonally.
- As a result, you should have 4 triangles. Iron each piece with an iron. This will help avoid shrinkage in the future.
- Next, you need to loosen the seam and press down the colored side of the seam allowance. Cut off the “ears” that appear using scissors.
- Fold 4 squares and sew them. It is very important to monitor the position of the corners. They need to be perfectly even.
- Once you have made one quilt block, make the rest in the same way.
- Sew all the blocks using a sewing machine.
- Sew insulation with padding made of padding polyester to the wrong side of the blanket. This can be done using a sewing machine or by hand.
- Sew the edges of the resulting blanket. This can be done using a sewing machine. If you don't have one, do it manually.
We sew a hut block - a well using the patchwork technique
Patchwork using the well technique is considered one of the simplest. Its basis is a square, which is covered with strips of fabric. In the classic version, if the central square is red, then the block is called a “hut”, if it is blue, then the block is called a “well”.
Choose the colors of fabrics for stripes to your liking. All the strips with which you will cover the square are the same width. The length of the strips must be measured each time before sewing the parts together.
The following describes in detail the patchwork technique for beginners step by step, following which you will sew a finished block:
Cut out a template 6×6 cm from cardboard. Using it, cut out a square from fabric, leaving seam allowances of 0.5–0.6 cm (which corresponds to the width from the needle to the edge of the foot when sewing).
Using the template, cut out a rectangle, but from beige fabric, and stitch it to the left to the red square. Align the edges if necessary and measure the long side of the resulting rectangle.
Cut a 10 x 6 cm rectangle from the fabric of the following color and sew it on as shown in the photo. Press all seams carefully.
If you follow the patchwork technique, you will get a rectangle 10 x 12 cm.
- Along the right edge of the block, attach a strip 6 cm wide and equal to the right side of the resulting fragment (10 cm), made of fabric of the fourth color. Pin it perpendicular to the seam and stitch. Then carefully press the seam.
- Take the next strip of fabric of a different color, also 6 cm wide (5th color in our block), attach it to the bottom edge, cut it, pin it.
- Stitch, remove the pins and press the seam to one side. Smooth out all edges with a rotary cutter or scissors.
- Proceed to the second round. Attach a strip of beige fabric 6 cm wide to the left side of the square, pin it, stitch and iron it. This is the 6th color in our block.
- Similarly, sew a 6 cm wide strip of a different shade of beige to the top of the block.
You can stop at this option, or you can continue sewing strips clockwise until you are satisfied with the size of the block. For example, if you want to sew a pillow 40 x 40 cm, then you need to continue sewing strips to the desired size.
Please note that on the right side of the block I have pink fabrics, and on the left - beige. You can make a block in different ways, for example, place dark stripes of different colors on the right, and light stripes on the left (about the same as shown in the photo)
Finish the block with a red stripe 6 cm wide. In total, you get 3 circles of stripes that do not touch each other anywhere in the pattern.
DIY patchwork quilt for a newborn: step-by-step instructions
You can sew a patchwork quilt for a newborn at home. To sew in a patchwork style, you will need thread No. 45, a square template made of cardboard or plastic, pins, needles, chalk, measuring tape, scissors.
Pay special attention to the choice of fabric. If you are sewing a blanket for newborn babies, use cotton materials. Chintz, linen or calico will do.
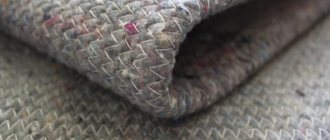
In addition, before you start sewing, decide on the material for the insulation. Experts recommend giving preference to batting or padding polyester. These materials cannot harm the health of the child.
A blanket for children should be sewn in the following order:
- First, cut the fabric into individual pieces using a template. It is advisable to number all pieces of fabric.
- Sew all the square pieces into strips and then connect them together. Iron the flaps before sewing them together.
- Pin two pieces of fabric together and stitch them together.
- Place the lining face down on the surface. The dimensions of this blank should be at least 5 cm larger than the shreds.
- Place a layer of batting or padding polyester on the lining. Place the facing material (shreds) on top.
- Pin the blanket together.
- Stitch the blanket using a special darning foot.
- The final stage of making a blanket for children is edging. To carry out this operation you will need 4 strips. The length and width of the strips should be a couple of centimeters larger than the dimensions of the blanket.
- Sew the strips to the edges of the blanket.
- Finally, hand stitch using strong threads.
Blankets and bedspreads using the patchwork technique add coziness to the home. Read more about patchwork and its advantages in the material:
Materials and tools for paintings
There is something attractive in exclusive works of masters, regardless of the technique used. Homemade bedspreads, bags, panels or hand-made children's blankets can look like real works of art. In fact, this is how it is if a real master gets down to business.
Looking at some paintings made from scraps of fabric, it seems that this cannot be repeated. Indeed, each image is exclusive, but first you should master the basics of patchwork or patchwork mosaic techniques.
The most popular techniques for creating flat and three-dimensional “paintings” from textile scraps:
- patchwork;
- quilting;
- osie;
- kinusaiga;
- “wet cloth” technique;
- panels made of lace, felt, leather and denim.
To implement an interesting idea, you don’t need to spend a lot of money, and fabric scraps can be found in any home. Some consumables are easy to pick up during a seasonal audit - leather and suede, accessories from bags and boots, trimmings of unnecessary things with a beautiful pattern.
Ready-made fabric paintings will help bring sparkles and stones, buttons and beads to life.
The image you like needs to be printed or transferred to tracing paper. For those who have the gift of an artist, you can start with a sketch on paper. Next, for each fragment of the future picture, select a piece of a suitable color and begin to create the composition.
A set of fixtures and tools (many interchangeable):
- a set of needles;
- sewing threads, yarn, fishing line;
- glue (PVA, liquid nails, glue gun);
- wooden frame or plywood;
- sheet of foam plastic (cardboard, thick paper);
- cutter's scissors and small pointed scissors;
- pencil and long ruler;
- colored rag of different densities;
- paints (gouache, watercolor, acrylic);
- stapler;
- steam iron;
- decor
The textile panels are somewhat reminiscent of stained glass, batik and traditional silk painting practiced in Japan. Many techniques are borrowed from different techniques, complementing each other. Therefore, some processes are performed in the same way (the description is repeated).
The passion for traditional art, which originated in Asia, gradually captured the hearts of craftsmen from other continents, and each country made its contribution to fabric appliqué. Today, master classes on making patchwork from fabric are freely available.
Baby Quilts: Sewing Techniques
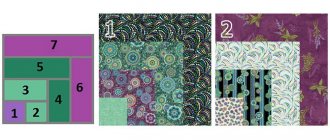
The most common patterns for sewing patchwork quilts are “Honeycomb”, “Arable”, “American Square” and “Checker”. Typically, a baby blanket is sewn using the Honeycomb technique. A product made using this technology looks very attractive and fits harmoniously into the interior of a children's room. This technique involves making one decorative element from 7 hexagons, which have different colors.
The “Arable land” technique is the simplest and is perfect for beginners. To make a blanket using this technique, you will need pieces of fabric that will be cut into separate strips.
The sewing pattern for the “Arable land” type is as follows:
- The blanket area is divided into 3 identical sections, the boundaries of each should be located at right angles to each other.
- Then each section is divided into parallel strips.
- All stripes are numbered.
- Stripes with the same number must be the same color.
The American Square pattern uses a sewing technique in which all the colored stripes are sewn in a spiral around a small square. Typically, this technology is used in the manufacture of contrasting products. “Chess” is also a common technique. It involves sewing strips of fabric from squares of different colors.
Bon Bon
Making a bonbon blanket with your own hands is also possible, although it is a more difficult task. Bonbon is a sewing technique that produces fluffy and soft products that, in addition, look good in the interior.
You will need: three pieces of cotton fabric (can be the same color or different), filler (holofiber is the best option), thread to match the color of the fabric, needle, pins, scissors, ruler.
The working process:
First, a diagram is drawn that represents the layout of the future blanket: a grid of identical squares, each of which corresponds to the future square on the finished product. The shape of the pattern should match the desired shape of the blanket.
According to the diagram, it is tedious to divide the fabric into the same number of squares and arrange them the way they will be sewn. Sew horizontally to create stripes.
- DIY photo frames are popular ways to create from scrap materials. 110 photo frame ideas: wooden frame with buttons, decor with stones and shells, salt dough frame, collages, decoupage
- How to make a picture frame with your own hands? Choice of design and sizes. Instructions for making from scrap materials: cardboard, plinth, newspapers, buttons
- Do-it-yourself drawings on T-shirts - step-by-step instructions, necessary materials, advice from craftswomen. 120 photo ideas on how to make a print on a T-shirt
Then you need to draw out the base fabric into smaller squares, which will be sewn into the middle. You should leave some space for firmware.
In the end, all that remains is to sew all the seams clean (preferably on a machine) and, if desired, edge the edges of the product.
This way you can make a blanket with your own hands, even for a newborn baby, which will be warm and soft. But in this case, you cannot use synthetics or filler, which can serve as an allergen.
Thus, creating a patchwork quilt with your own hands is not technically difficult, but it takes a lot of time and requires concentration and concentration.
- DIY gift baskets are a universal gift for any occasion! 80 photo ideas for decorating baskets: romantic, formal, children's, Italian, Brazilian, for movie fans
- A DIY gift for your loved one: for Birthday, New Year, Valentine's Day, anniversary. 110 photo ideas for original and fun gifts that will surprise your loved one
- Do-it-yourself lambrequins - manufacturing instructions with patterns. Types of lambrequins, choice of variety. Preparation of material and tools. Step-by-step manufacturing guide
Nevertheless, the result is pleasing to the eye and turns out to be useful in everyday life, and can also serve as a good gift for loved ones on any occasion.
For sewing enthusiasts, the task will be interesting, and later, having adapted to the technique, you can create more complex patterns that are unique in their kind.
Caring for a Quilt
In order to maintain the good appearance of a patchwork product, you need to follow some rules. First of all, a patchwork blanket needs to be washed properly. Experts do not recommend washing too often. It is recommended to wash such items by hand in soapy water.
To avoid damage to the fabric, it is important to iron the blanket correctly. If you used padding polyester as a filler, ironing is prohibited. Otherwise, the blanket will lose its texture.
You should also adhere to the following recommendations:
- If you need to hide the blanket for a while, do not fold it. It is better to roll the product.
- If you decide to machine wash your blanket, use the most gentle setting. The optimal water temperature for washing a quilt is 35-40 degrees. Spin must be turned off.
- Using bleach to wash a quilt is strictly prohibited.
How to become an owner?
You can buy a handmade patchwork quilt, or you can make it yourself. Many stores for needlewomen have ready-made patchwork kits containing templates and other necessary things.
Making a blanket doesn't take long. First you need to draw a sketch of the product. It will be in the form of a diagram. Then, based on the diagram, you need to cut out parts of one shape or another from the selected material. After this, the pieces of fabric need to be sewn together, thereby collecting the front part of the blanket. If you plan to sew a double-sided blanket, you will need twice as many scraps.
When the top and bottom of the blanket are ready, you need to trim their edges and then sew them together, adding filling. You should not leave raw edges - such a product will look sloppy. When joining the edges of the top and bottom of a quilt, it is common to use binding as a border.
Patchwork blanket for babies (video)
Making a quilt for a child is quite simple. To do this, you do not need to go to any master class. Just stick to the basic rules of patchwork. It is very important to maintain the symmetry of the squares when working. Otherwise, the blanket will turn out ugly, and the baby is unlikely to like it. When choosing fabrics, pay attention to the fabric. Give preference to natural cotton fabrics, because they are non-toxic and not harmful to the child’s health.
Read more about patchwork techniques in the article:
Second step
The filler is taken in a size slightly larger than the patchwork fabric. Folding the edges of the patchwork fabric by 1.5 cm, it is sewn on top of the filler. It is advisable to baste everything in advance.
On the back side of the filling, the base of the blanket is sewn using the same principle, which will actually be its bottom.
The edges of the product are framed with trim.