A bouquet of flowers always pleases the eye and complements the comfort of any interior. Moreover, carnations are a symbol of love, freedom and greatness, which will never “go out of fashion.” It can’t always be found in flower shops; it’s better to make a bouquet of carnations from napkins with your own hands, which will never fade and will warm your eyes for a long time.
Carnations are wonderful decorative flowers.
The most common varieties: large, mini and dwarf.
Necessary materials
Important! Whatever is created and from what material, you always need to first prepare everything necessary for work.
Paper flowers are a great opportunity to decorate your home or holiday.
Create an original card or get creative with your children, because even a child can make a carnation from napkins.
To make carnations from paper napkins you will need the following:
- paper napkins of a suitable color to choose from (pink, red, white, burgundy, yellow, orange);
- green corrugated paper;
- colored markers or felt-tip pens;
- a compass or lid of the required size (any round material of the correct shape, even a glass);
- wooden sticks or wire;
- scissors;
- pencil;
- large paper clips;
- glue;
- stapler or plasticine;
- You may also need a needle and thread.
What you need to make carnations.
To make your own napkin carnations beautiful, we recommend studying master classes.
Study detailed instructions and step-by-step photos.
All materials are very affordable and do not require large expenses.
If you decide to make carnations from napkins with your own hands, the step-by-step master class begins with choosing the shape of the product.
How to make carnations from napkins with your own hands? Let's look at several simple ways to make carnations from paper napkins with your own hands step by step.
Step-by-step photos from masters of paper crafts will help you make these carnations from napkins.
Rose
You can make a napkin rose in several ways. The easiest way is to make it from a circle.
- Cut a circle with a diameter of 15 cm from a napkin of the selected color.
- From the edge of the circle to the center you need to make an even cut with scissors.
- Lubricate the toothpick at the end with a glue stick and attach the workpiece with the bottom of the cut and the center to the base.
- Begin to twist a circle around the toothpick, forming a bud.
- The end of the circle is secured with glue.
- Cut a circle with a diameter of 3 cm from a green napkin.
- Teeth are cut along the edge of the circle.
- The circle is pierced in the center with a toothpick and placed on the stem of the flower.
- Then glue the circle to the base of the bud in the shape of sepals.
- Cut a strip 2 cm wide and 10 cm long from a green napkin.
- The strip is glued at the base of the bud and screwed onto a toothpick, covering it completely.
- The edge of the green strip is folded inward and glued.
- From a green napkin you need to cut out several leaves in the shape of drops and trim them with small cloves or curly scissors.
- The leaves are glued to the stem. All that remains is to bend the petals and give the bud its shape.
Openwork roses are made using a simple pencil and a single-layer napkin.
- To do this, you need to take 2 napkins and cut them along the folds into 4 squares.
- Each square is wound tightly from one side of the square to the middle on a pencil. The pencil is carefully removed.
- The first petal is twisted into a spiral and secured with thread.
- Other petals are applied to it one at a time and screwed to the base with threads, forming a flower. For a lush rose, 5-6 petals will be enough.
- 3 large rose leaves are cut out from a green napkin according to the template.
- Then the veins are drawn on the leaves with a simple pencil.
- The base of each leaf is smeared with a glue stick and glued to the base of the bud on three sides, covering the bottom of the flower.
- At the end, the rose petals need to be straightened.
First way
- Place several napkins one on top of the other.
- Secure one side with a paper clip to keep it in place. Place a round lid on top or draw a circle with a compass, cut out round shapes for the flower. Secure the other edge of the workpieces.
- Cut out the stapled circles.
- You can make the product plain or with a highlighted edge by drawing it with a marker of the desired color.
- Sew or fasten the middle of the future bud with the end of the wire.
- Start forming the buds of the future bouquet. Remove the top layer, crush it, pressing it towards the center. Do the same with all subsequent layers.
DIY napkin carnations created this way look very natural.
This craft takes a minimum of time and effort.
Note! When forming a flower, do not crush all layers equally, but chaotically. This will add splendor and more reality to the bud.
- We wrap the wire or wooden stick with green corrugated paper (or any green paper that is available). In some cases, green electrical tape is used for this purpose.
- Add leaves to the stem by cutting them out of paper and gluing them.
Even such a miracle of nature can be repeated from paper napkins.
If the stem is made of a wooden skewer, then you can, having previously shaped it, attach it to the bud with plasticine.
Carnations made from colored napkins look very interesting.
Step-by-step instructions for the middle group
At the age of 4–5, children actively master the skill of working with scissors, but they learn to cut with a straight movement, therefore, if a craft requires cutting out round elements, you need to build on the children’s skill level. But usually blanks of this shape are made by adults.
Carnations from napkins
For strength, the “accordion” can be grabbed with a stapler
Materials and tools:
- red table napkins;
- scissors.
Instructions:
- Cut a thin strip from one edge of the folded napkin.
- Trim the remaining edges so that all sides are without folds.
- We fold the workpiece like an accordion.
- In the middle we tie the accordion with the strip that we cut off at the beginning.
- We unfold the edges, fluff them up so as to hide the junction and make the flower lush.
A quick way to make a flower
There is no need to cut out individual elements of the flower for this craft, so it will take a little time to make.
To prevent the flower from falling apart, you need to check the strength of the workpiece with wire.
Materials and tools:
- colored paper;
- chenille wire (special “fluffy” wire, also used in floristry);
- scissors.
Instructions:
- We fold the paper in several layers and form an accordion.
- We grab it in the middle with chenille wire, twisting its edge around the “stem”.
- Trim the edges of the paper blank in the shape of a triangle.
- We unfold the “petals”. We cut the double parts where necessary to give the flower shape and fullness.
Carnation with a fluffy bud
These flowers can be used to decorate a performance at a matinee.
Materials and tools:
- corrugated paper or crepe paper in red and green colors;
- scissors;
- green tape or tape (the difference between these materials is that the latter does not have an adhesive layer);
- wooden stick (skewer or manicure stick).
Instructions:
- Cut the red paper into squares (on average 4 x 4 cm).
Crepe paper makes flowers denser - Fold the squares in half, then in half again.
We give the free edges the shape of a semicircle. The more such blanks, the more magnificent the flower - We make cuts and unfold the workpieces.
In the middle group, children can make fringes themselves - We wrap a small ribbon of red paper around the edge of the stick - this is the middle of the flower.
Wrap the bottom edge of the center with green tape. The center of the flower must be tightly wound onto the stem stick. - We apply the blank circles to the middle, pressing them tightly around.
To strengthen it, you can coat the winding area with glue. - We wrap the attachment point and the stem with tape, inserting leaves into the coils.
Instead of tape, you can use green tape
Second way
We make a gorgeous carnation, very similar to the real thing.
- Step-by-step production begins with cutting off a part from the edge of the napkin, no more than 1 cm, which will be useful later.
- Unfold the workpiece and fold it into an accordion shape. Tie in the middle with a previously torn strip. It turns out to be a butterfly.
- Alternately, on the top of the bow, separate each layer of the napkin and fluff it up, forming the petals of a bud. Secure in the middle with a stapler.
Making paper napkin carnations with step by step photos is easier than any other paper flower.
Flower origami for beginners
How to make a flower from napkins using the origami technique, and how to make a bouquet from ready-made flowers, will be suggested by the tips contained later in the article.
- To make a flower, you can choose white or colored single-layer or double-layer napkins. 2 napkins need to be cut into squares along the lines. The side of the square must be at least 10 cm long.
- One square is placed on a flat surface and folded diagonally.
- The resulting triangle is laid with the long side down.
- The two side corners are folded diagonally upward to form a square.
- Each of the resulting triangles is folded in half in the opposite direction. These will be the petals of the flower.
- Each of the triangles must be unfolded and flattened so that the fold line runs along the side of the square.
- The corners of each of the petals are bent down so that the line of the square and petals becomes even.
- The petal on each side needs to be folded in half.
- Apply a glue stick to the outside of the petals and glue the two halves of the petal together, pressing them together.
- The finished flower petal needs to be put aside and made 5 more pieces. such blanks.
- Then glue is applied to one petal along the vertical glued cut from the outside and pressed to the 2nd petal on the opposite side.
- The same is done with the remaining petals, collecting the flower.
- Using PVA glue, glue a toothpick to the center of the flower on the back side, which can be wrapped with green tape or a strip of napkin.
- 3-5 finished flowers are connected together, fastened with thread and decorated with a bright satin ribbon, large beads or sparkles.
Third way
The instructions for making paper carnations differ from the previous ones in that the petals need to be cut out separately and then joined together.
Choose brighter paper, use your imagination, and let's create carnations from napkins with your own hands.
Let's take a closer look at the step-by-step implementation.
- Fold the napkin in half until you get a small square.
- Then fold it diagonally to form a triangle.
- Cut one edge for the center of the carnation.
- Round the opposite side with scissors, making the petals into teeth, like a real flower.
- Do the same steps with the next 4-5 napkins.
- Place the finished pieces on a wooden stick one after another, gluing them together so that the finished flower does not fall apart.
- Cut out the leaves and thread them with a thin wire.
- Wrap the stem with corrugated paper and attach leaves to it.
Photos of finished works are inspiring!
The masterpiece is ready. You can decorate the edges of the carnations in the 4th stage, as indicated in the first manufacturing method.
If you make several of these flowers and put them in a vase, you will get a beautiful bouquet of carnations.
We work with corrugated paper
Roses made from special corrugated paper are very beautiful and elegant.
To make a beautiful carnation, you need to take:
- corrugated paper (red, white and green shades);
- green ribbon;
- wooden skewers;
- wire;
- glue;
- sharp scissors.
Cut four squares with sides 10 centimeters from red corrugated paper. Fold it in half twice. Bend the resulting square 5x5 cm diagonally. Next, lift the bottom right edge and trim off the excess paper at the top to create a triangle. Make teeth on the top side of the triangle with scissors. Then unfold it in some places and make cuts to the middle. In this way, make three more petals for the carnation.
Now take a skewer and cover one end with red paper. Make a hole in each of the petals and put it on a skewer and seal it. Next, straighten the leaves and lift them up, fixing the bud as in the photo. For the flower stem, wrap the skewer with green ribbon.
It's time to start making carnation leaves. To do this, take a green leaf and cut four strips: two 10 cm each and two 5 cm each, 3 centimeters wide.
Next, take each strip and fold it in half to trim the edge of the paper. The results were beautiful leaves. Then cut the wire to the length of the leaves with extra space for attaching to the stem. Place it on a piece of paper and glue a small piece of white paper. Fold all the leaves and attach them to the stem: small at the top, large at the bottom. This carnation will wonderfully decorate your apartment!
Carnations from a napkin for a postcard
To make paper napkin carnations for a card, you can use any of the previously suggested methods. But for children there is a simpler technique that can be clearly illustrated by a senior paper craftsman.
A DIY carnation made from a napkin is a very beautiful and cute product that can decorate your interior and add new colors to your home.
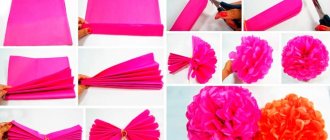
- Cut the prepared paper material into four parts (if it is standard 12 cm, if larger - into 6 parts).
- Place them on top of each other so that the edges match, and fasten them in the middle with a stapler.
- Cut off the corners to make a round shape.
- Using scissors, we cut the petals in a circle, without cutting too far to the edge, so as not to completely cut off part of the bud.
- Fluff the finished petals, randomly lifting and pressing them to the top.
- Simply cut out the stems from green paper in the form of stripes. You can use the method of making it with wire or a wooden skewer.
- Cut out the leaves of the future product.
- Prepare the base on which you need to glue the flowers, all the necessary components (buds, stems, leaves) and start gluing. First glue the stems, buds, then the leaves. You can add any elements cut out of paper to the composition: a country flag, an airplane, a tank, a ship, even a parachutist with a parachute.
A fairly simple craft that even a novice needlewoman can handle.
This version of carnations can also be used for appliqués.
You can make a romantic composition by decorating it with appropriate paraphernalia.
Using glue, you can attach flowers to any surface, paper, cardboard or fabric.
Depending on the napkin you choose, you will get a beautiful flower or a whole composition.
Using the methods discussed for creating a carnation flower from a paper napkin with your own hands, you can easily create any colorful composition that will always look original.
Handmade crafts will become a valuable gift and original interior decoration.
Use your imagination, then you will be able to make interesting crafts even from the simplest materials.
Creating flowers and floral arrangements
Stunning bright bouquets and single flowers made from napkins will decorate any event and make an excellent gift. The only drawback of paper decor, the lack of natural aroma, can be easily corrected by dripping essential oil on it. A paper flower created using the simplest technique will remain attractive for a long time.
You need to start creating right now. The choice of pattern and plant itself will depend on the number of napkins available and their color. It’s very simple to create a unique homemade decor; you just need to move step by step towards your intended goal, using the following master classes as a guide.
Rose
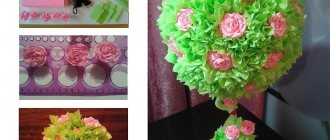
There are several ways to make a paper flower queen. The easiest way is to twist it from one napkin without using scissors or glue. We straighten the material and lay it out on the table. Grab one edge with your index and middle fingers and roll it into a tube. Visually measure 2/3 and crumple the napkin, forming a bud. We bend the upper part arbitrarily, simulating opening petals. We make a stem from the bottom of the tube - we twist the napkin into a spiral.
A beautiful rose can be made from a dense three-layer blank. This elegant white product will decorate a glass on any table. Straighten out a large napkin. We bend one corner by 1-2 cm and fold it, pressing it to the very end. We twist the resulting strip. Holding it from below, unbend the upper petals and place them in a glass or glass.
Peony
You can make a lush peony from a multi-layer napkin of any color. You can make the product more realistic by tearing off one strip of folded paper at the bends. To quickly create several elements for a lush craft, the following step-by-step master class is presented:
- We lay out the napkin in one movement, we get a two-layer rectangle;
- We fold the workpiece like an accordion, tie it with a torn piece of paper or thread in the middle;
- Fluff the pliable folds on both sides from the center;
- We roll up a wire leg or prepare several multi-colored blanks for other crafts.
Carnation
Original carnations on the stem will be made from a thin bright napkin. The blanks will be square elements according to the size of the planned flower. Fold them in half and diagonally. Carefully cut off the edge of the triangle. The small hole will be the center of the flower. On the opposite side of the workpiece we make an arched cut and form a fence around the edge.
Using the same scheme, you need to make at least 5 blanks. The more elements there are, the more magnificent the carnation will be. Now we move on to forming the flower head. As a base you can use stiff wire, a long fireplace match, or a pencil. We string each shaped piece and glue it together in the central part. We straighten each petal. The stem can be wrapped with green tape, colored corrugated paper, or foil.
Topiary made from napkins
Topiary made from any decorative material looks stylish and original. But it’s much easier to make a beautiful tree from napkins. It can be a craft in the form of a circle, star, heart. The constituent elements may also differ. Paper roses, dandelions, peonies, and asters are most often used. It’s enough to start preparing materials and original ideas will come to mind.
Ready-made topiary made from napkins is an excellent gift for any celebration or just a memorable accessory. To make an extraordinary craft, you will need the following materials:
- Flowerpot, flower pot;
- Newspapers, napkins;
- Several tree branches;
- Threads, stapler;
- Scotch tape, glue;
- A mixture of cement and sand.
We prepare a beautiful flowerpot and pour sand and cement into it. Add some water and make a solution. We install the densest branch in the center and decorate the base of the improvised trunk with small pebbles or glass. If desired, the composition can be modified and the central piece of wood can be entwined with flexible rods. We fix small elements with transparent tape.
While the solution in the pot dries, we begin to form the center of the topiary. To do this, we crumple up several newspapers, wrap the resulting ball in a solid printed edition, and secure it with threads. Let's move on to making flowers. Fold the napkin in half twice and secure it with a stapler. Straighten the edges of each layer. Using this principle, we make the required number of flowers. All that remains is to glue them to the newspaper ball and decorate with beads.
A bouquet of flowers in the form of carnations for dad on February 23
Of course, how could we not congratulate our men on this day? They are like children, they are also waiting for gifts, and we will definitely give them them. And we will surprise you with luxurious flowers that are beautiful, even if they are made from improvised materials. Watch the video and learn:
Well, in conclusion, I would also like to show the diagrams and work steps that I managed to find on the Internet, I hope they will become your helpers. Create for your health.
Master class on making carnations for children (step-by-step diagrams and templates)
To build a carnation, it is not necessary, as many people think, to have any outstanding abilities, but you just need to want to create such a flower. And then they can decorate a postcard or give it to dad or grandfather. Schoolchildren and preschool children, as well as their parents, love to make paper crafts. Together you can imagine such a miracle.
Take a pink sheet, preferably office paper or double-sided colored paper.
Place it in front of you, and then fold it in half along the long side.
Then fold this rectangle in half.
Using any round object, trace an outline on paper. You can take, for example, tape or a glass.
Cut along the marked line. Then fold the circle in half and make two cuts along this line on both sides. Then bend the circle in half again and make the cuts again.
Then use scissors to cut out the petals.
Next, wind each resulting blank onto a simple pencil.
Insert a wire into the center of the carnation and add a drop of PVA glue to fix it.
Then put another piece on the wire, again a drop of glue, and so on.
Also decorate the wire with green office or colored paper.
All that remains is to cut out the leaves from the paper and finish the craft. The carnation is ready, it turned out very tender and beautiful.
Source https://www.youtube.com/watch?v=96dyoBzW7eAThe next type will be using the modular origami technique, have you heard of this? If not, then start this activity right now, because it is so exciting that you will not resist. I suggest you look at all the stages of work in these pictures:
Use the resulting carnations to decorate any congratulatory letter or card. Or just give these masterpieces to those you care about.
This is the creation I saw in the Country of Masters.
Craft templates
To simplify the process of creating carnations for the children, it is necessary to prepare templates in advance. Templates are like a short guide to creating patterns, which greatly simplifies the work. Template manufacturing options:
- Lightweight contour patterns made of stiff paper, whatman paper or cardboard. Using them, children will simply trace the details for later cutting.
- Stencils. These templates may have slots inside. They are suitable for complex details and compositions. For example, these could be designs of wreaths, baskets or bouquets of carnations for windows.
- On sheets of white paper with a black thick outline. The drawings can be printed many times and given to children new ones each time. Children will be able to transfer such patterns onto transparent paper.
For younger children, it is better to offer templates with the least amount of small details. For older people, on the contrary, it will be interesting to cut through every detail in detail.