Today there is a wide field of activity for needlewomen. Handmade products are experiencing a rebirth and are gaining increasing popularity. Among the techniques that have appeared relatively recently, Paper Art (paper art), originally called “Napkin plastic”, is of interest.
Paper napkins are sold in any store at more than affordable prices.
This activity will be useful for children.
Using it, you can make interesting paintings that can be used to decorate the interior without spending a lot of money on purchasing materials.
An additional advantage of napkin appliqué is that even small children can master it.
Napkin appliqué is an essential component of a child’s creative development.
Excellent paper crafts develop imagination and imagination.
What is special about applications for children?
Children take an active part in making crafts using napkins. This technique is most common among younger children – three-year-olds.
This is due to the fact that the manufacturing technology is so simple that they happily get to work and learn to make crafts with their own hands.
During the creative process, the children develop the inclinations for creativity, develop fine motor skills, and learn to work with the material necessary to create an applique (scissors, glue, napkins, etc.).
Due to the fact that children of primary preschool age begin to engage in this craft, the designs for appliqués are chosen to be simple in both form and complexity of design.
Star
Progress:
- Lay out a paper napkin of any color, and then fold it so that the two edges meet in the center.
- Turn the workpiece 900 and bend the remaining 2 free sides again so that they meet along the middle line.
- Bend the resulting rectangle along the central border, a dense long strip should come out.
- Unfold the paper completely.
- Fold the pulp along the visible crease lines like an accordion.
- Straighten the craft again and fold it like an accordion only in the opposite direction.
- Fix the created workpiece with wire in the middle.
- Bend all corners of the product (4 from each edge) at an angle of 450 inwards.
- Connect the ends of the accordion on both sides to form a lush origami star.
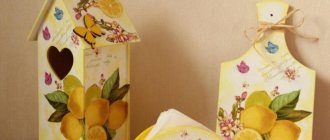
Affordable and wonderful crafts from napkins
Napkins are an easily accessible and inexpensive material that everyone definitely has in their home.
Using your imagination, it is easy to create quite interesting and attractive products from them, using only scissors and glue.
Crafts made from napkins differ from others in their volume and texture. They are original and unusual, not like classic appliqués made using colored paper using templates.
Children will definitely like these crafts, because this process is a very addictive and delightful pastime.
Openwork products
If desired, thin napkins can be used to create delicate crafts with an openwork pattern. A similar technique is used to create not only snowflakes, but also flower arrangements, as well as airy Christmas angels.
To create an angel, a white napkin is cut along the edge with sharp scissors in accordance with a pre-designed pattern. A small paper ball is placed in the middle and wrapped with thread, forming a head.
The workpiece is folded into a cone, the edge is glued, and dried.
Wings in the shape of triangles are made from the second napkin. They are also decorated with carved patterns.
Glue the wings on the angel and decorate the product with a ribbon.
Rowan branch
Here, for example, is a very easy craft for young children - from three to five years old. For it you will need:
- Multi-colored cardboard for the base.
- Green colored paper.
- Napkins of the same shade.
- PVA glue.
- Scissors.
- Pencils.
Operating procedure:
- First of all, the outlines of the future branch are outlined on a piece of cardboard.
- For convenience, you can use ready-made drawings or photos of rowan applications made from napkins. Or you can do it yourself.
- The kids will definitely like the next stage - berries are formed from a napkin. To do this, you need to cut them into squares with a side of about five centimeters.
- Each such instance will form one ball. The work must be done only with dry hands.
- When all the berries are rolled, you need to stick each one onto a branch using PVA. Here you should use a glue brush.
- The final part is cutting out and gluing green leaves onto the branch. After this, the application can be considered complete.
In a similar way, it is possible to create a bunch of different products, which are not at all difficult to come up with.
How to make a rose
Depending on the size of the finished flower, the napkins need to be cut into squares of different sizes (or not cut at all if the rose is large). Wind each square halfway onto a knitting needle, then squeeze it from the edges and remove the knitting needle. Make 6-10 such blanks.
Wind all the petals one by one onto the wire, opening them more and more as the flower grows. Secure the workpiece with a strip of green paper. Wrap it around the entire length of the wire, imitating a stem. If desired, weave several sheets. The rose is ready.
Application "Cherry"
The next way to use napkins as a craft material is twisted flagella. Children of senior preschool age will be able to start creating a beautiful applique with the help of them, due to the fact that this method will be a little more difficult than the previous one.
For the child to start working, he will need three napkins, all of different colors - green, dark red or cherry, and any color that is not a single color.
- To begin with, take a green napkin and cut it into equal squares, each of which is then cut into three rectangles.
- After this, you need to take the resulting figure and twist it so that you get a thin rope; to do this, a piece of the product is held on one side, and on the other, at the same time, the sheet is twisted in the opposite direction. The action is repeated with each rectangular piece of napkin.
- Once all the green rectangles are twisted, you can take on other colors and the whole technology is repeated again.
- Having prepared all the parts, you need to start laying them out using prepared multi-colored strands.
- Multi-colored flagella are taken first, and the edging of the future craft is laid out - leaves, berries.
- Then the leaves are filled with green ones, and the cherries with red ones.
- All parts should be attached to a sheet of paper using scattered glue. Once all the parts are glued on, take a colored marker and trace the edge of the image.
- After this, the volumetric part of the design is carefully cut out and, using glue, pasted onto a previously prepared sheet of velvet colored paper, carefully pressed with a suitable object and removed until the product is completely dry.
After which the applique is used to decorate the room.
Water lily assembly diagram
These crafts are created from paper napkins like this:
- Unfold the napkin in one layer, bend and straighten it diagonally.
- Fold all corners of the figure towards the center.
- Fold the resulting corners towards the center again.
- Repeat this action again (for the third time).
- Turn the workpiece over and bend all corners to the center.
- Turn the workpiece over. For convenience of further work, place it on an inverted cup.
- Bend all corners sequentially from the center to the edges.
- Remove the flower from the glass and, if necessary, straighten the petals further.
- The water lily is ready.
Application “Tree” using quilling technique
The next fascinating and unique method is quilling, which children in the middle preschool group can master. During creative work using this technology, you will need the following materials:
- Paper of different colors;
- Napkins of either one color or several, preferably consisting of three layers;
- Scissors;
- PVA glue;
- Glue brushes;
- Toothpicks.
Operating procedure:
- The procedure for making an applique for children four to five years old should begin with preparing the background, which is made using colored paper (gluing sheets together).
- A napkin of a non-uniform shade must be cut into identical strips four centimeters wide, which should then be folded, and this must be done more than once.
- When all the parts are ready, take toothpicks and screw bent pieces of napkin onto them. Then they are released, and thus a spiral is obtained - the future leaves of the autumn tree.
- As soon as the blanks for the crown are ready, you can begin making branches and the tree trunk itself. To do this, you need to take a brown napkin and cut it into strips, then glue it from the inside, creating something like a flagellum.
- Then, using the resulting bundles, a tree trunk is assembled, to which branches with autumn leaves are glued.
There are many more interesting and similar napkin applications that can be found by consulting the relevant sources.
After studying them, you can choose what you like most, take the necessary material and start creating.
Master class decoration for children's birthday
No1 Balls
- Fold a large napkin like an accordion.
- Using scissors, cut out the shape of the petal, not reaching the center 5 cm.
- Place the three pieces together and tie them with a strong thread in the middle.
- Fluff the parts, forming a light, weightless ball.
No2 Digit by year number
Make a number out of cardboard using patterns online, or cut out a flat piece.
Cut the napkin into strips 5 cm wide. Make a fringe on one side with scissors and roll it into a roll, securing it in several places with PVA glue. Fluff the dandelion. How many of these blanks you will need depends on the size of the figure frame.
Glue the parts onto the workpiece as close to each other as possible.