When purchasing cabinet furniture, you probably pay attention to how the parts of the product are fastened together. In some cases, manufacturers use nails, in others - self-tapping screws. But perhaps the most reliable method of fastening is an eccentric furniture tie. We will talk about what it is and in what cases this type of fastening is used in this article.
Eccentric furniture coupler
About the eccentric coupler
An eccentric coupler, or, in other words, rastex or minifix, is one of the most practical, durable and convenient types of fastening furniture elements together. The use of such fasteners allows you to disassemble and reassemble furniture without damaging the material from which the furniture is made.
With the help of a minifix, you can easily assemble T-shaped and L-shaped elements when it is not possible to make grooves in them. Often this option for connecting parts is used when assembling tabletops on dining tables and computer tables, the top and bottom parts of cabinets, chests of drawers, and cabinets.
This type of fastener is hidden, and as a result, it can be used without fear that the appearance of the structure will be damaged.
An eccentric connection is a hidden type of fastener, and therefore it is invisible, but, nevertheless, it gives strength to the structure and is not afraid of reuse.
Making a passage for the rod
When the holes for the fasteners are made, begin preparing the passage for the rod. It is performed on the surface of the workpiece where the eccentric is located. The passage for the rod should be located on the end side. To perform this step you will need an 8mm drill bit. It is important that the passage is centered relative to the eccentric groove.
Therefore, at this stage, use a ruler, tape measure or template. If this recommendation is neglected, the prepared grooves may not match. As a result, the furniture will be assembled crookedly.
What is this type of fastening?
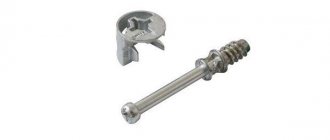
Minifix is a fastener consisting of several components:
- eccentric;
- stand or rod;
- futorka;
- dowel;
- sleeve made of plastic or metal;
- stub;
The parts are sold in different configurations and may differ from each other in length, diameter, type of fitting and method of fastening, which can be a screw or self-tapping screw.
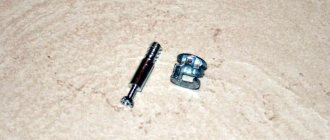
Components of an eccentric coupler
Final stage
Now you can connect the parts of the furniture structure. For this purpose, attach the workpieces so that the rod is in the passage. How to tighten eccentrics? This is quite easy to do. First, insert the eccentric into the groove, and then carefully tighten it using a Phillips screwdriver.
As a result, the furniture elements will be securely fastened to each other.
Advantages and disadvantages
Like any type of fastener, an eccentric connection has its positive and negative sides. Let's look at them using a table as an example.
Table 1. Advantages and disadvantages of an eccentric coupler
| Advantages | Flaws |
| 1. Furniture can be assembled and disassembled quickly and effortlessly. 2. Possibility of repeated assembly and disassembly of products. 3. The most reliable and durable mounting option. 4. Does not spoil the appearance of the product. 5. Possibility of fastening products at different angles. | 1. High price of fasteners. This increases the cost of the product as a whole. 2. The installation technology is quite complex. 3. The need for perfectly accurate calculations for marking locations for fastenings. |
What does an eccentric coupler look like when it's in place?
Types and sizes
The eccentric coupler comes in plastic and metal. Depending on the material of manufacture, it is used in one field or another. For example, small pieces of furniture can be secured with plastic fasteners, but for large items, such as cabinets or kitchen units, it is advisable to use metal fasteners.
The dimensions of the parts also vary, for example, the length of the stand can vary from 38 to 58 cm, the diameter of the minifix can be of three sizes:
- 12 mm;
- 15 mm;
- 25 mm;
The most commonly used fastener is 15 mm in diameter.
The dimensions of the eccentric coupler parts may also vary.
Instructions for creating holes for an eccentric tie
Step No. 1 – mark the drilling locations. Before you begin installing the hitch, you must accurately mark the places where the necessary holes will be drilled. You can mark manually using a ruler or template, or you can use a special device - a jig. We'll talk about it below.
First of all, you need to mark the places for attaching the screed using a ruler or template.
Step No. 2 - drill a place for the rod. Next, in one of the two parts to be connected, we drill a groove for the rod. It is important that it does not go through, so use a stopper. We screw in the rod, leaving it to protrude 6 mm above the blade.
Next, you need to drill grooves in the material, into which the rod will be inserted later
Step No. 3 - make a groove for the eccentric. The next step is to drill a hole for the eccentric. This is done using a Forstner cutter. And here the depth is important, on average 15 mm will be enough. The groove should not be through, the eccentric should fit into it to its full height and be flush with the surface of the workpiece. On the product, using a template or ruler, measure a distance of 33.5-34 mm from the bottom edge and 5 cm from the side end. The intersection point will be the center of the hole.
The hole for the eccentric segment of the connection is drilled using a special cutter
Step No. 4 - drill a passage for the rod. And the final stage in preparing places for fastening will be drilling a passage for the rod in the same element in which we will place the eccentric, only from the end side of the part. It is done with an 8 mm drill and should be located exactly relative to the center of the niche for the eccentric and exactly in the middle of the end part of the part itself. When working, it is important to use a ruler, tape measure, or, if you have a special jig, a template. Otherwise, misalignment of the grooves may result in you not being able to assemble the furniture neatly and evenly.
Next you need to drill a passage for the rod
The holes are ready and all that remains is to connect the parts of the future structure. To do this, we apply one workpiece to another so that the rod enters the passage. We insert the eccentric into the groove and use a Phillips screwdriver to tighten the minifix, thereby firmly and securely fastening the furniture elements together.
Provided that you followed the instructions carefully, the furniture connection will be installed without problems
With correct and accurate calculations and following all instructions, your furniture pieces should fit perfectly into a single plane, without protrusions or distortions.
Where to begin
First of all, you need to do the marking. Using a ruler and a pencil or a template, clearly define the places where the holes will be. Check again whether you have marked them correctly, since further assembly and the final result depend on accuracy. To reliably and efficiently tighten the eccentric, you next need to do the following:
- Carefully drill a hole for the groove in which the rod will be located. To avoid damaging the workpiece, use a limiter at this stage.
- When the hole is ready, insert the rod. It is desirable that it protrudes above the canvas by about 0.6 cm.
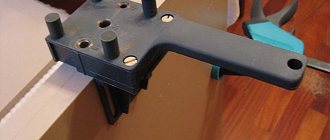
What is a furniture jig and how to use it
If you have a furniture jig, this will make it much easier for you to mark and drill holes for any type of fastener. A jig is essentially the same template, which is a special device or bar on which holes of different diameters and at different distances are applied. With their help, you can make perfectly accurate markings and drill passages of the size you need. Various materials are used to make this assistant:
- metal;
- plastic;
- tree;
- wood boards.
The product is a solid base with many holes at different distances required from each other. Additionally, it can be equipped with a mechanism for fixing and adjusting the distance between the holes.
Use a special drilling jig to help you hold the drill at the right angle.
Thanks to the device, you will install the drill exactly at a right angle to the blade, without deviations. This is a great help when working on narrow surfaces, such as the ends of chipboards. After all, if the groove is not located at an angle of 90 degrees, assembling the body elements into a single whole may become impossible.
Types of conductors
Depending on the functions performed and design features, templates can be of several types:
- Invoices. This type of device serves as an assistant for drilling holes on flat elements by placing it on the workpiece. The device is not attached, but only held by hand. Suitable for use on chipboard or fibreboard surfaces.
- Rotary. The rotating device allows you to move it vertically or horizontally and rotate it at different angles. This device is convenient to use provided that the part that needs to be drilled has a complex shape.
- Tiltable. Tiltable assistants are convenient for working with elements that are located in planes that are different from each other.
- Universal. The devices are convenient because they can be customized for the production of furniture of various configurations.
All types of templates can have a sliding or fixed type of fit to the surface. The sliding type allows you to move the product along the surface of the workpiece. Fixed option - firmly fixed in the desired position and does not move.
The conductor is the furniture maker’s best assistant, without him it would not have been possible to connect furniture so beautifully
What to look for when choosing a conductor
When choosing a furniture jig in a store, you should carefully examine the product and pay attention to the material from which it is made. For example, stainless steel products will be high-quality and reliable.
The manufacturer matters too. World-famous brands, as a rule, produce high-quality tools with a long service life and a warranty from the manufacturer.
The more famous the brand, the higher the quality - a rule that works flawlessly in the case of construction tools
When purchasing such an assistant, take an interest in the additional equipment that comes with the kit. The versatility of the device will make your work easier. The more tools included in the package, the more cases you will be able to use it. For example, a set may include
- various bushings;
- drills of various diameters with stops;
- Forstner cutter, for holes for minifixes;
- keys.
There are a significant number of advantages in using this device.
By using a template in the manufacture and assembly of cases, you will save yourself from many inconveniences. For example, you don't need to mark places with a ruler and pencil. The jig allows you to fix the distance and drill several absolutely identical holes at the same distance from each other. There is no inaccuracy here.
But a factory-made conductor also has a drawback - its rather high price.
Therefore, craftsmen are quite capable of making such an assistant with their own hands. Our instructions will help you with this.
Instructions for making a furniture jig
Step No. 1 – prepare tools and materials:
- square metal block, section 1x1 cm;
- Bulgarian;
- file;
- calipers;
- awl or thick needle;
- drills with a diameter of 5 mm;
- metal plate for stop measuring 1x25 mm;
- a sheet of sandpaper.
First, let's collect all the tools and materials necessary for the work.
Step No. 2 - make the base and markings. Using a grinder, cut off a piece of the required length from the block. Sand any burrs with a file. Mark the locations for future holes. The generally accepted dimensions are the distance between the grooves is 32 mm, the distance from the centers of the slots to the side edge is 8 mm. To make the markings accurate, use a caliper. It is convenient if you mark the centers of future grooves using an awl or needle.
Make the markings, you can first do it on paper, then transfer it to the material itself that requires connection
Step No. 3 – install the tool. Next, we drill passages in the required quantity. Then we take a metal plate and grind it with sandpaper if necessary. Clamping it with a vice, we bend our plate at a right angle. Align the resulting parts and clamp them with a clamp. Fasten the parts with screws, having previously cut the thread to the desired size. Thus, you can create a very convenient tool for yourself.
Next we drill the holes
installation of minifix using an example, photos and diagrams
An eccentric fastener (rastexes, minifixes, eccentric clamp - whoever calls it that) is one of the most common types of furniture fasteners.
Minifixes are good because parts fastened with their help can be disassembled and reassembled many times, without loss of rigidity, which would not happen when using confirmats, where with each assembly/disassembly the fastening will lose rigidity.
There is only one drawback to minifix furniture - it is painstaking work to install it. If you do not have expensive filler equipment, to install it yourself, you need to very carefully mark and accurately drill three different holes in three different planes, which usually takes a lot of effort and time.
This work does not tolerate mistakes in marking. After all, you won’t be able to adjust the connection in the end.
Also, its cost cannot be called completely cheap. The price of a minifix is usually 3-4 times more expensive than a confirmation.
Therefore, it should be used in the most necessary cases.
Where is it used?
An eccentric clamp is used in places where parts are fastened (T- or L-shaped), the connection of which must be hidden from prying eyes. For example, they fasten:
- Table tops for computer and other tables made of chipboard
- Dresser tops
- The bottom and roofs of sliding wardrobes and other parts where it is not possible to drill holes on the front part of the part.
The installed minifix rod of the eccentric clamp is completely hidden in the body of the chipboard, and only the eccentric remains visible, which is installed on the inside of the product.
Types of eccentric couplers
Depending on the manufacturer, there are several modifications of the minifix, which includes:
- Rod (rastex)
- Eccentric (minifix)
- Plastic or metal bushing (depending on manufacturer)
- Minifix stub (optional)
There are also corner (hinged) and double-sided couplers. But to use them you need to be a complete pervert, and also think carefully about where they can be used. Nowadays, they have practically ceased to be used due to their uselessness.
Today, the eccentric clamp remains popular, the rod of which comes with a thread for chipboard, without a plastic sleeve. That is, it consists of only two parts: the rod and the eccentric.
But, just in case, in this article we will analyze the installation of two types of this fastener - both with and without a bushing.
Installation instructions for eccentric coupler (without bushing)
Required tool:
- Screwdriver
- Forstner cutter 15 mm
- Drill 7 mm (for rod body)
- Drill 5 mm or confirmat (for screwing in the rod)
- Ruler, awl, pencil
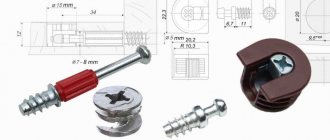
The standard thickness of the tie rod body is 6 mm, and the length is 44 mm. The eccentric diameter is 15 mm and its depth is 12.5 mm. Photo of eccentric and rod:
As mentioned above, to install a minifix, three holes of different diameters need to be made in the parts to be joined.
So let's start assembling.
For high-quality assembly, so that the eccentric grips the rod head, it should protrude 6 mm:
To screw the rod into the chipboard, a hole is made with a 5 mm drill (or a confirmed one); if it is a sidewall, its center should be located at a distance of 8 mm from the edge, 10-11 mm deep (the rod should be screwed in tightly and to the very end, this can be seen from the mark on the picture).
In another part, markings are made for two holes.
The first is at a center distance of 34 mm from the edge, under the hole with a Forstner cutter with a diameter of 15 mm. Its depth must be equal to the thickness of the eccentric (about 12 mm) so that the eccentric fits flush into the part.
The second hole is made at the end of the part, strictly in the center, with a 7 mm drill (1 mm larger than the rod body).
Next, the eccentric rod is screwed into the 5 mm hole, the second part is mounted on it, and the structure is clamped with a minifix.
Installing a tie with a plastic sleeve
The principle of assembling a minifix with a bushing is exactly the same as when installing a metal minifix, with the only difference being that you need a different hole for the rod.
This is done with a 10 mm drill, then a plastic sleeve is attached to the hole using PVA glue, and all other steps are repeated.
Other options for furniture ties: a brief overview
As we have already found out from the above, the eccentric coupler is one of the most durable fasteners. But it is not always advisable to use this type of connection. Let's look at what other fastenings are used by cabinet furniture manufacturers.
Confirmat
Confirmat is one of the most popular and easy-to-install connection options. Fastening the body parts using confirmations is not difficult or difficult. This type of fastening can only connect elements at right angles.
Confirmat - another detail of furniture fasteners
To install furniture parts using a confirmat, you will need to drill a groove along the diameter of the fastener head in one of the workpieces, the second hole must be made in the end part of the other workpiece, but the diameter will be smaller - usually two drills of 5 and 6 mm are used. Although, you can also use a combination type drill - this is convenient, since you will work with only one tool, and there will be no need for constant replacement.
For greater reliability, confirmations are recommended to be used together with a small wooden rod - a dowel. Such a rod will prevent the workpieces from moving when secured with a confirmat.
This type of coupling, unlike the eccentric one, does not allow parts of the product to be fastened several times
But when using this type of hitch, you should know that chipboard products should be fastened once. Due to the high hollowness of chipboard, re-joining with confirmat does not guarantee a strong screed.
Confirmat is a connection that, unlike an eccentric coupler, is visible on the surface of the product. Therefore, to hide it, you can use decorative stickers or plugs that match the color of the body surface.
Intersectional screed
This fastening method is used when it is necessary to connect modules to each other, for example, cabinets or mezzanines. The coupler consists of two parts - a nut (bushing) and a screw. Since the chipboard used to make the cabinets has different thicknesses, the intersection screed can also be of different sizes.
Intersectional screed
To fasten two modules with this type of connection, it is necessary to align the elements being fastened and drill matching through holes in the two walls of the housing. Insert a bushing on one side, a screw on the other side and tighten with a screwdriver. Sections are fastened.
Furniture corners
This type of fastening has long been known to everyone. They are made of metal and plastic, and are mounted using self-tapping screws. It is not recommended to use corners in those parts of the furniture that are expected to be loaded.
Furniture corners
Table top screed
This type of hitch is used in the production of kitchen sets. It consists of a screw and a pair of stops. Holes for such a screed are made using a Forstner cutter of the required diameter, and a channel for the screw is cut out with a jigsaw.
Holes for such fastening are also made using a Forstner cutter
A short overview of the minifix and its installation - Let's make furniture ourselves
Hello.
Today we will talk about interesting fasteners, for which you do not need to make through holes (as in the case of confirmat).
Minifix (also called an eccentric coupler) is a fastening system designed to connect two parts together.
With its help, two parts can be pulled together both at right angles and at other angles (for example, there are eccentric ties of different types that allow parts to be pulled together at different angles, but since they are used quite rarely, we will not consider them).
We will look at the most common type of eccentric tie - tie between two perpendicularly located parts.
The eccentric coupler consists of three elements:
- Plastic coupling into which the eccentric rod is screwed
- The eccentric rod, which, in fact, is the fastening element itself
- A metal eccentric that secures the rod
Connecting using minifixes has both its advantages and disadvantages.
The advantages include the following:
- Fastening with an eccentric tie is invisible (unlike fastening with a confirmat, where the confirmat’s cap is always visible, which has to be covered with a plastic plug).
- This fastening provides for repeated assembly and disassembly of the structure, without loss of connection quality, and with minimal time costs (for this reason, it is often used in the manufacture of serial furniture).
The disadvantages of this type of fastening of parts include:
- Quite high (compared to confirmed ones) cost of fastening
- Difficulties with marking and drilling parts for this fastener
Minifix is installed in different ways.
The simplest is manual installation.
For installation you need:
- Drill
- Drills (7 and 5 mm diameter)
- Forstner drill, 15 mm diameter.
- Square
- Ruler
- Screwdriver
- Pencil
- Roulette
At the very beginning, you need to make a visual mark (limiter) on the drill
Next, you need to make all the necessary holes (instructions for eccentric couplers are usually included, so it will indicate where and what holes to drill).
After everything, we screw in the ties and connect the parts (by the way, the parts can be connected with an eccentric tie, together with dowels, which will act as guides, and the strength of the connection will increase).
But, in such an installation (as shown above), there is one drawback.
Even with minor errors, the connection will not be perfect, that is, the edges of the parts will be offset from each other. This, by the way, is a very significant drawback of this type of connection.
But it is quite easy to eliminate it by using it to mark and drill holes in the parts of the jig (template).
As a rule, such conductors are made at home, but even in this case, the quality of the connection itself (or, to be more precise, accuracy) will be higher, and the time spent on this whole thing will be much less.
Of course, after reading this article, you will think about the advisability of using rather expensive fasteners with such a difficult installation (although, in some cases, you simply cannot do without an eccentric coupler).
Personally, I have never used such ties, and in cases where the visible side of the part cannot be drilled for confirmations, I use ordinary corners.
I'll end here, see you later.