Types and features of lining
Nowadays, lining is often used for interior work. But decorating the space is done with different types of materials. They are:
- Quarter paneling. Each element is equipped with protrusions on the sides, which allows them to be overlapped.
- Simple. It is characterized by the presence of tongue-and-groove fastenings.
- With tongue and groove. The material is intended for mounting on walls and ceilings. It looks like a regular tongue and groove board, only smaller in size. The material is intended primarily for office premises.
- Eurolining. It resembles an edged board. On each side the fragments are processed with high quality. The tongue-and-groove system is used for connection. In the production of such lining, coniferous wood is used. Fungus or mold does not grow on this material, since there is a sample on the back of it that provides air removal.
- "American". This type of lining is characterized by an irregular rectangular shape. There is a groove in the widest part of the fragment, thanks to which you can achieve the effect of laying the parts overlapping.
- “Finka.” All elements have an oval shape.
- Block house. With its help, you can create an imitation of a rounded log from inside the room. To fasten the lining, sheathing is required. The material improves the heat and sound insulation of rooms.
You can use lining in a bathhouse, sauna, living rooms, and in the country. But if you are already tired of the natural color, then you can choose different paint options for decorating the surface. There are also substances that help protect wood and increase its service life.
Lining profiles
The appearance of the boards and the recesses for connecting them to each other determine the profile of the lining.
The most popular are:
- Eurolining. It looks like a long, narrow board with a groove and tongue on both sides. On the inside it has small gutters for ventilation. Panel width - from 10 cm, length - from 2 m, thickness - 1.2 cm.
- Blockhouse. Under this name lies a lining that imitates round logs; for this purpose, its outer side is made in the form of a semicircle. The profile has the following parameters: length from 2 to 5 meters, thickness - 3.6 cm, width depends on the thickness (9-19 cm). Coniferous trees are used to make boards.
- American. It looks like a wooden beam. The profile is made in the form of a rectangular trapezoid. The thick part, where the thickness is from 2.2 to 4 cm, has a groove, in the narrow part (from 1.4 to 2.8 cm) there is a tongue.
How is coloring done?
How to paint lining so that the effect is long and impressive? For such an event you will need a set of tools:
- Set of brushes and roller. If possible, then a spray gun.
- Tray. To make it easier to pick up paint.
- Protective and decorative compounds.
- Sandpaper, stiff brush.
- It is better to have a stable stepladder and glasses to protect your eyes.
Using a spray gun allows you to quickly complete the work of painting the lining.
Painting consists of several stages. It is much more difficult when work is carried out on an old coating. Then it becomes necessary to remove the old decorative layer and clean the surface well.
Stage one - preparation
Purchased products are checked for possible damage and deformation. It often happens that materials are purchased that belong to a lower class. They require a long preparation - they are processed with sandpaper, and the cracks are covered with wood putty. If there are dark spots on the surface, then bleaching is performed.
If the material has defects in the form of cracks, they are eliminated using putty
Stage two - primer
It is necessary to cover the front side of the lining with priming compounds. This will reduce the consumption of other solutions, increase adhesion, and will also prevent the elements from being subject to deformation
In this case, special attention is paid to the knots; they are literally impregnated to eliminate the possibility of falling out if drying occurs
The primer improves adhesion when painting lining
Stage three - impregnation
Now protective impregnations are applied. These are fire retardants and antiseptics. Impregnation is carried out over the entire surface. Do not allow unpainted areas to remain
It is important to consider that such products should not have any foreign (pungent) odors or change the color of the wood.
When applying protective impregnation, it is necessary to ensure that no untreated areas are left.
Stage four - coloring
How to paint lining inside a house? This procedure begins only after the material has dried well from previous manipulations. The process is:
- The paint is prepared in advance. The solution must be well placed, because at the bottom there may be sediment, which includes the main components.
- A small part of the composition is poured into the tray if a roller is used. It is better to provide a container for the brush that is easy to carry. Using a spray gun makes the work better, and the paint is poured into a special container.
- It should be taken into account that movements are performed along the fibers of the material. You can’t stay in one place, the coating should be uniform.
- Several layers are applied, this will provide an excellent decorative effect.
To obtain a good decorative effect, the paint should be applied in several layers.
Still, how to cover the lining? This question is quite complex, the answer to it depends on many factors that are calculated purely individually. But it must be taken into account that if the composition is used over large areas, then it must ensure the “breathing” of the material.
The most common and famous natural coloring materials
The most accessible forms of extracting dyes from biological material are decoctions. There is extensive historical experience in the use of various dyes from source materials common in nature:
- Light wood is turned red-brown by a decoction of onion skins.
- The black tint can be given by willow or alder bark.
- Poplar branches can give the wood a yellow or orange color.
- Using a decoction of buckwheat, barberry and larch bark, you can tint the lining blue.
- The combination of oak bark and poplar branches in the decoction will give the treated wooden surface a greenish tint.
- Tea contains the component theanine, which perfectly colors the wood in various shades, which is influenced by the concentration of the brew.
- Theanine contained in tea colors the wood in shades proportional to the concentration of the tea leaves.
Clean nails soaked for a week in acetic acid in a glass container will give a red tint to the lining treated with this solution.
A decoction of a mixture of ground coffee and baking soda can give the wood different colors.
Vinegar mixed with a strong concentration of oak bark decoction can turn alder or ash into ebony.
All-natural paints for interior decoration of residential buildings are produced by specialized companies. Their products usually meet environmental standards and are positioned as harmless and safe for humans. The only disadvantage of such products is the excessively inflated price.
Therefore, there is a reason to try to follow the traditional path and make at least some of the paints for decorating your home yourself. This approach can be combined with the task of creating a unique interior in a folk style, where lining in combination with natural dyes is appropriate.
Preparing for painting
Before covering the lining with varnish or acrylic, it should be cleaned of dirt and degreased with an alkali-based solution, and then sanded with a flat pumice stone or a grinding wheel. This will require the following tools:
- sponge and brush to remove dirt from the surface;
- roller, brush or spray for applying restoring and brightening agents.
This operation leads to the loss of all the protective characteristics of the wood. To restore them, treatment with a disinfectant composition is necessary. It will not only protect the wood, but also improve the quality of the varnish coating.
How to paint lining correctly
Using regular oil paint to renew the surface gives it an artificial shine and hides the natural grain of the wood. In addition, such coating is short-lived and will soon require modernization. When using acrylic varnish on wood panels:
- the original pattern is preserved;
- ensures attractive appearance;
- creates lasting protection from moisture and weather changes;
- the service life of the cladding is extended (up to 8-10 years).
Depending on the degree of darkening, you can use the concentration of the solution as prepared or dilute it with water in a 1:1 ratio. To avoid differences in the tone of the coating, it is necessary to apply a test stroke in an inconspicuous place. After this, the paint color is selected.
The recovery procedure consists of step-by-step operations:
- surface cleaning;
- drying wood;
- antiseptic treatment;
- testing and selection of shade;
- applying acrylic paint.
The final finishing with clapboard is quite often used in the repair of balconies and cottages. In order for the cladding to maintain a beautiful natural appearance for a long time, you need to follow the rules for using wood material and know how to lighten it. To ensure high-quality restoration of darkened panels, you should choose the right bleaching method. For this purpose, it is advisable to consult with specialists or read the instructions.
Painting lining to look like bleached oak
Many people prefer lighter shades, but at the same time they want the structure of the wood to remain noticeable. They call this method the bleached oak effect. This effect can be achieved using the following methods:
- Take a tint that has the appropriate name. Some manufacturers call it “frost” or “bleached oak,” and there may also be other names, but the essence does not change. In this case, you should read the instructions for use, strictly following the recommendations on the method of application. If you add more composition and make the layer thicker, then over time the surface will begin to peel off. Therefore, each layer must have a minimum thickness.
- Pay attention to the composition of the oil with wax of the corresponding name. The application technique allows you to achieve varying degrees of transparency. Typically, this is achieved through the number of layers applied.
- A pigmented polyurethane primer that may be called "white" or "bleached". Depending on the desired result, this primer is diluted with a solvent before use. The disadvantage of this primer is that the surface darkens over time.
- Pigmented acrylic primer, which also needs to be diluted with a solvent. This primer is of higher quality compared to polyurethane, but at the same time, it is more expensive.
Naturally, the choice is always up to the owner. To evaluate the quality of the coating, it is necessary to experiment, taking into account both the quality of the protective materials and the quality of the wood. Therefore, reviews are always different, although, on the other hand, there is not always time and desire to experiment. In addition, few people have all the information regarding the quality and characteristics of certain compounds.
How to properly paint the inside of the lining: technology
To paint lining in “dry” rooms inside the house, you can use any type of paint. Here you simply decide on the requirements for the decorative appearance of the surface. If the lining is dry, it can not be impregnated with protective compounds, or you can choose paint/varnish/wax with appropriate additives. You can paint it only on one side, leaving the back side untreated.
Paint each panel of the lining separately
If the lining will be used in damp or unheated rooms, on a balcony, it must first be thoroughly impregnated with protective compounds on all sides, maybe twice. Only after the impregnation has dried can it be painted, varnished, or, in general, given decorative properties. Another point: when installing the lining on a wall or ceiling, it has to be cut into pieces. Places of cuts in damp rooms must also be coated with the composition. It is not necessary to wait until it dries, but it is necessary to process it.
There is one very important nuance that many amateur decorators overlook. If you want to get a professional-level painting of the lining, you need to process each board separately: sand, paint, dry, and only then assemble the surface from the already painted lining. That is, mount already fully processed boards on the wall or ceiling. Only with this approach will the surface of the lining have the same color from any point.
It’s difficult to paint the entire surface of a clapboard wall well
If you paint an already assembled surface, unpainted areas remain in the grooves and recesses, making it difficult to sand large areas. You definitely won't get a perfectly flat surface. The quality of finishing in this option is not above average. It is permissible to paint a finished surface if you are renewing the paint job. This must be done at different intervals, depending on the operating conditions and the properties of the paintwork material.
Correctly, the painting technology looks like this.
- The lining is checked and sorted. All bent, bent or cracked boards are rejected. They can be used to test color, select color, number of layers, practice technique and painting sequence.
- Boards that have been sorted are sanded until completely smooth. It is most effective to work with a sanding machine, but you can also use a block with sandpaper attached to the surface. Sandpaper grit - 250-280. When grinding, circular movements pass through the face, tenon and groove. The back part of the lining can be left without treatment. It is more convenient to work with a grinding machine
- Apply the composition with a roller or brush. Each type of coating has its own points and features - they are written on the can or in the accompanying instructions. In general, the rules are simple: take a little paint and apply it in single strokes along the entire length of the lining. Then rub thoroughly and shade until a uniform color is obtained.
- Having achieved uniform coloring, leave to dry.
- After drying, sand again if necessary. This step is often necessary when working with opaque paints and varnishes. The first layer of paintwork raises the pile of the wood, which is why it becomes rough in places. This pile is removed by repeated sanding.
- The second layer of paintwork is applied. Drying.
There can be many layers: it depends on the hiding power of the paint and on what effect you want to get. But in any case, one rule remains: there should be little composition on the brush. The exception is impregnation or primer. They are applied with a well-moistened brush, but only those without pigment. When applying pigmented protective compositions, the rules for paints apply - the minimum required amount of the composition is well shaded.
Sometimes, even with careful rubbing of the paint, stains are clearly visible. This is not a bad paint, but the properties of wood: in some places the pores absorb better, in others worse. In order to achieve an even color in this case, the surface is first primed. You can use any wood primer or colorless matte varnish (can be water-based). After drying, the surface is sanded (yep, again) and then the required number of layers of paint are applied. Only in this case, after the first layer of paintwork, grinding is rarely required, and if necessary, then in some places, more often on a tenon or groove.
Watch the video to see how to evenly apply glaze, oil or wax.
If furniture quality painting is required, there are even more layers: first a stain is applied, then two layers of primer. After drying, the surface is sanded until the surface is completely matte, first with grain 280, then 320, after removing the dust, a finishing layer is applied - varnish. An example of such work is in the video.
How to preserve wood texture when painting
By using glaze, pigmented oil or wax, you can achieve preservation of the pronounced texture of the wood. Such compositions lie quite tightly on the surface of the wood, but do not completely paint over the pattern of wood fibers. They can be applied to the surface either with a brush or with a roller.
Here it is very important to master the application technology, which consists of the following: take a minimum amount of the composition on a brush or roller, after which the composition is applied in fragments over the entire surface of the lining, and then using the same brush or roller it is spread in a thin, uniform layer. After this, the surface is left for several minutes so that the composition is absorbed into the fibers. Finally, a soft, lint-free cloth is taken and the remaining composition is removed from the surface, which allows the design to appear more clearly due to the fact that more of this composition always remains in the grooves than on the surface. This technique is called texturing (brushing) of wooden surfaces. Such wood surfaces look good in various interiors, both on walls and ceilings.
In the following video you can see the whole process. In this case, 3 samples were painted: two with oil with pigment, and one without pigment. After 5 minutes, one workpiece with pigment was wiped with a rag until a pattern appeared. After the surface has completely dried, it is covered with two layers of colorless oil, glaze or wax. In some cases, you can complete the painting with a layer of clear varnish for greater resistance to mechanical stress.
14. We paint with our own hands! Pine with aging effect
Secrets of decorative wood staining: techniques and tricks
City dwellers want to preserve the natural color of wood as much as possible. For those for whom wood in the house is a boring everyday thing, paint the interior lining in some unusual color. Modern paintwork materials allow you to achieve different effects. For example, textured or brushed lining, but in two colors. This technique is often used in loft style interiors.
Brushed lining in two colors is an excellent choice for decorating walls
The trick is to apply two layers of different colors. The first layer is a dark color, the second is a light or brighter color. After playing with colors and the order of their application, you can create your own version. Watch the video - how to get lining brushed in two colors.
Painting in two colors may not be the same. You can make the recesses a darker color, and only slightly tint the face (front part) or do everything exactly the opposite. The result is a striped wall made of clapboard - the effect of a slatted wall.
Using wall paintings in the interior
The advantage of wall painting is its versatility of application. Drawings, well-chosen by theme, will be a worthy addition to the interior of any room in the house.
For a children's room, images of cartoon characters or fairy-tale characters would be an excellent design option.
A marine theme is appropriate in the bathroom interior, both landscapes and individual details in the form of funny dolphins or stylized jellyfish.
In the kitchen, wall paintings with an appetizing theme will be very appropriate. Beautiful still lifes or individual pictures on a kitchen theme will lift your spirits and allow you to make the interior of the room unique in design.
The main condition for success is the correct selection of the pattern. It must be in harmony with the design of the room and correspond to the style of the decor.
The use of wall paintings allows you to make your living space especially cozy and unique in design.
How to properly prepare wood?
Before applying paint and varnish composition to wood, it must be prepared.
Drying the panel
On raw wood, the maximum service life of paint and varnish coatings rarely exceeds 2 years, and more often it is even less than 1 year. Therefore, the lamellas must be kept outdoors or indoors, the humidity of which is more than 15% for up to 30-40 days. It is advisable to avoid direct sunlight, which will lead to uneven drying.
Deep penetration antiseptics significantly speed up drying.
You can check the humidity level like this:
- cut a square of 0.4x0.4 m from polyethylene;
- wrap the panel and secure it tightly with tape;
- maintain in this state for a day in room conditions;
- measure the moisture content of polyethylene from the inside.
An oilcloth that is wet to the touch indicates that the panels have not dried sufficiently.
Processing of lamellas
If materials are category B, then they must be sanded. To do this, use a power tool or regular wood sandpaper. In this case, the last stage should be carried out with finishing fine-grained sandpaper. This is done to level the surface of the lining in the area of knots, various inclusions, and differences.
Tip You can process the wood after attaching it to the wall with a sander or an abrasive nylon brush.
here
Applying primer
The essence of treatment with this composition is the creation of a dense layer on the surface of the wood, which binds dust, eliminates small specks after sanding, and reduces the porosity of the material. Adhesion increases, and paints and varnishes gain stronger adhesion.
An additional advantage will be the fact that after such surface treatment, paint consumption is significantly reduced. Therefore, you can purchase more expensive and high-quality compounds.
The following types of wood primers are used:
- based on epoxy resin;
- based on silicone and acrylic;
- acrylic.
You only need to choose a special composition for interior decoration; for this you need to make sure that the packaging has the appropriate markings.
general description
Textured paint is a thick, white or colored mass with various functional fillers. The purpose of fillers is to create a relief texture of the design.
The coloring mass is able to hold the relief until the layer hardens. The hardening time is short, but sufficient for application and possible corrections of the design or pattern. The thickness of the possible paint layer allows you to hide all surface defects.
When using textured paint to decorate lining, the operation of puttingtying the seams between the boards is eliminated. The average paint consumption per square meter of surface is one kilogram.
The material is expensive, so before painting it is advisable to accurately calculate the expected volume of work.
Advantages of textured paints for lining:
- The layers are resistant to cracking;
- They have dust-repellent properties;
- Do not absorb odors;
- They are resistant to the destructive effects of ultraviolet radiation;
- The harmless components of the paint allow it to be used in bedrooms and children's rooms.
Materials for interior painting
When selecting the necessary tool, it is necessary to take into account that before painting the surface must be treated with anti-rot compounds. With this in mind, you should stock up on the following materials:
- Coarse sandpaper to clean the surface from dirt and foreign matter. This is especially necessary for lower grade linings, the technical conditions for which require the presence of resin pockets - if they are not cleaned out, the painting will not be of high quality.
- Set of painting tools. In addition to the traditional flat brush, you also need a wool roller, a bucket, and a spray gun/spray gun. For tall rooms, a stepladder may also be required.
- Safety glasses and a gauze bandage - if it is impossible to work in a well-ventilated area.
- For priming and antiseptic treatment, it is better to have a separate set of painting supplies, since it is not known in advance how dissimilar coatings will interact with each other.
What is painting work
Painting structural elements in a room with compositions to create a decorative protective film is called painting work. Materials for this type of work include:
- Construction paints and varnishes;
- Pigments and binders;
- Dryers, thinners and solvents;
- Primers, putties, mastics, lubricants;
- Plasticizers, thickeners, hardeners and other additives.
Chemical cleaning
The simplest and most reliable way to remove contaminants is to use liquid chemical compounds. They are evenly applied to the surface to be treated according to the instructions, and after a while they are washed off along with the dirt. Highly concentrated preparations contain alkaline components that promote rapid removal of soot from surfaces without damaging the wood structure.
To quickly clean walls and floors, you can use a mop with a telescopic handle.
No less effective in the fight against soot are chemical sponges impregnated with deep penetration substances. They contribute to the quick and safe removal of the smallest particles of soot and soot that have penetrated the wood structure.
The principle of working with sponges is quite simple: holding the sponge with one hand, clean the surface from top to bottom.
Finally, it is recommended to wash the cleaned surface with clean water and wipe dry with a soft cloth. This is done as follows: the floor is covered with film or oilcloth to protect the surface from further contamination.
Next, clean water is poured into the container, to which a detergent composition, for example, for washing dishes, or any other degreasing agent is added. The soot is washed off with smooth movements using a soft sponge.
A few final words
Vegetable oil will help remove paint from your hands. Just soak a piece of cloth in it and rub the dirty area. Keep it on without rinsing for five minutes. After the required period, you will need to wash your hands using regular washing powder.
If paint gets on the glass surface, a paste made from chalk and concentrated soda will help get rid of it. The composition is applied to the stained area and left for a while, after which the problem will be solved.
Some useful tips
If we are talking about painting the lining inside the house, then it would be useful to read some useful tips that will definitely help during the work.
In order to ensure uniform distribution of color on the surface of the lining, it is necessary to thoroughly mix the paint before work. This can be done using a metal rod or a wooden stick. The main thing is that the material is clean.
In order to be sure that the paint is really chosen correctly, before starting work it is worth making a preliminary touch on the surface. Only after this can the main body of work begin.
The most convenient way to apply paint to the lining is with a brush; this will help paint the surface more evenly.
It is best to paint the lining not with a spray gun or roller, but with an ordinary brush. At the same time, apply paint to the surface evenly.
The primer should be the same color as the paintwork. You can make it this way by adding a bit of paint to it before priming.
If the room is too hot, painting is not recommended. In this case, the paint will dry too quickly. This cannot be allowed. It will not adhere too well to the surface of the wood. When it comes to painting, it is better to create optimal conditions for this process. The room temperature should be between 20 and 25°C.
You need to carefully approach the processing of the ends of the lining. To do this, it is necessary to apply a primer on them in several layers, and also apply a paint coating in several layers.
If there is a lot of paint left on the edges of the can, it needs to be collected using a scraper. If it is not there, then you can use an ordinary sheet of iron folded in half.
The paint must be applied with a brush in several layers. The layers should be thin. It is best if there are three layers on the surface. In this case, the lining will be well saturated with paints and varnishes.
Advantages and disadvantages of painting
Original painting on the walls of premises is a functional art direction that allows the owner to express his individuality.
The purpose of the image is to place color and stylistic accents.
Decorative painting of walls in the house has a number of advantages.
- It gives the interior a special artistic expressiveness.
- Drawings help to visually highlight different zones in the room and hide defects on the surface of the walls.
- A unique artistic decorative element allows you to emphasize the style of the room and correctly place color accents.
Artistic painting allows you to make the interior stylish and memorable, helping the owner to express his individuality.
The disadvantages of wall painting include:
- the difficulty of implementing the idea,
- the duration of the process itself,
- strict requirements for surface quality,
- special requirements for the style and theme of the image.
The theme of the painting and its color scheme should fit organically into the interior. The surface of the wall on which the painting will be applied must not have any defects. You must be prepared for the fact that the painting process itself may take some time.
Choosing a topic is a complex creative process. You can come up with ideas for interior decor using wall painting yourself or take photos of wall paintings published on thematic websites as a basis.
Types of painting materials
How to paint the lining? Answering this question can be quite difficult. The fact is that there are many compositions that differ in their characteristics. Their correct use can transform the room or, conversely, ruin the entire appearance.
Protective compounds
These solutions act as protectors, but can provide a certain decorative effect.
Fire retardants
It is necessary to coat products with such a composition that are located in places where fire may occur. Of course, it is better to impregnate all wooden materials used in finishing work.
Antiseptics
Substances that eliminate the threat of various types of bacteria that contribute to rotting and destruction. This solution is perfect when you want to leave the material unchanged. The composition will protect the product for a long time, so it will not require additional painting.
Antiseptic protects the lining from various bacteria
Lucky
In fact, varnishes are already closer to paint compositions, but they have a good protective function. Painting the lining inside the house can be done with different materials:
Acrylic lacquer. Great for all interior spaces. It can be transparent or translucent. If necessary, the substances can be tinted.
Synthetic materials
This option requires caution. At dachas they cover the rooms that are located at the entrance to the house.
It is quite easy to work with varnish compositions, you just need to take into account that to achieve a better result you need to apply them in several layers.
Varnish allows you to protect the lining from rotting, damage and destruction
Decorative options
Paint for lining is the best way to transform a surface that has already served for a considerable period of time. That is, if over time the product began to darken, cracks appeared in places. In this case, it is best to apply paint. As a result, you can completely renovate the interior of your country house and bring to life ideas that will help with this.
Painting the lining is one of the best protection options, which also performs a decorative function.
How to cover the lining? It should be taken into account that different types of material can be used for work.
Oil paint
It is considered one of the most popular substances. This option has been used for many decades. This is because the solution has excellent characteristics. They consist in the fact that the composition penetrates deep enough into the upper layers of wood, ensuring its long-term preservation. The coating retains its properties for 7-10 years.
Some disadvantages cannot be excluded:
- The material has a rich chemical smell that takes a very long time to dissipate.
- The first point leads to limiting the dyeing time. That is, it is not possible to work in winter, because thorough ventilation is required, which can defrost the entire country house.
- The protective property of paint is fraught with another drawback - the material firmly clogs the pores of the wood, it stops breathing. This means that the microclimate, which is especially valuable when using lining, will be spoiled.
Therefore, this composition is used extremely rarely for interior work.
Acrylate paint
It should be immediately noted that this type is very similar to acrylic compositions, but has a lower price and the necessary characteristics.
This coloring option has the following properties:
There is no unpleasant odor that requires long-term ventilation. The coating is much more elastic, which increases service life. It more successfully withstands aggressive external environments
This is very important, because many country houses are left without heating during the winter. The surface remains breathable, which allows you to maintain exactly the atmosphere that is inherent in wooden structures. The work is done much faster and easier.
Acrylate paint allows you to create an elastic, breathable coating
Of course, such material costs a little more than oil paint, but the result exceeds all expectations.
Acrylate paint for woodwork
Construction of houses
0 votes
+
Vote for!
—
Vote against!
The irrefutable advantages of wood have made it one of the most popular finishing materials even in the era of “construction paradise”, when every master can choose a material to suit every taste. It is thanks to low thermal conductivity and other positive qualities, such as ease of fastening, the ability to hide surface defects, as well as environmental safety, that wooden eurolining has ensured stable popularity over time. The lining is a thin finishing panel made of selected wood, intended for external and internal decoration of premises and performing several functions, among which a special place is given to cosmetic, decorative and soundproofing. Despite the fact that there are several types of lining - wooden and plastic, experienced specialists prefer the first option, due to its significant advantages. In most cases, clapboard is used to cover the outside of the house, as well as verandas, loggias and balconies. After finishing the walls with clapboard, which hides their unevenness and other imperfections, they acquire an aesthetically attractive appearance. The use of wooden lining helps to distribute humidity evenly and retain heat in the room, which, after finishing with this material, is filled with a pleasant woody smell. The ideal option for interior decoration is pine, which nature has endowed with a pleasant golden hue that darkens over time. Despite the fact that, theoretically, lining is a durable material, like any other, it requires proper care to extend its service life. The main component of proper care is painting the lining, which will protect the material from drying out, dust and damage by insects, as well as from changes in temperature and humidity. Due to the relevance of this issue, in this article we will answer the question: “How and with what to paint the lining inside the house?”
Content
- Painting lining: relevance of the issue
- How to paint the lining: choosing a paint and varnish composition
- Technology for painting lining: step-by-step instructions
- What are the preparatory activities: preparing the lining for painting
- Lining painting technology
- Some useful tips from the experts
- How to paint the lining: choosing a color scheme
Painting lining: relevance of the issue
We can talk for a long time about the advantages of wood as a finishing material. It is characterized by the ability to heat and sound insulate, and the ability to visually hide unevenness of the surface being finished, and ease of installation, and, of course, durability. Thus, lining is characterized by all the advantages inherent in wood. However, wood also has its own disadvantages, such as a tendency to catch fire, rot, and be susceptible to damage by insects and fungi. In this regard, despite the fact that lining is a durable material, over time it loses its original characteristics. To avoid this, wooden finishing materials must be properly maintained, one of the stages of which is painting the wooden lining.
Important! Painting the lining is the final stage of finishing activities, however, it, as well as the implementation of other stages, must be approached with due responsibility. The service life of the lining and its ability to maintain its original performance characteristics depend on the selection of the most effective paint and varnish composition.
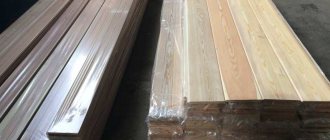
Lining photo
How to paint the lining: choosing a paint and varnish composition
The most susceptible to destruction and aging is the lining that was used to cover the facades of buildings. This is due to the fact that it is constantly influenced by negative environmental factors, such as microorganisms present in the environment that cause wood to rot, ultraviolet radiation, as well as sudden changes in temperature and humidity, leading to the growth of mold. In this regard, for exterior finishing, experts recommend using lining made from softwood, which contains a resin that has antiseptic properties and prevents the development of mold and mildew. However, it also needs to be treated with special compounds to extend its performance characteristics. Functional and decorative compounds are used to process wooden lining. The first group includes:
- Fire retardants are functional compounds used to reduce the flammability of a material. Due to the fact that wooden lining is a fire hazardous material, treatment with fire retardants is a mandatory measure;
Important! According to experts, the most effective is the industrial treatment of wooden lining with fire retardants, which involves applying a protective composition under high pressure. Applying fire retardants yourself is considered a less effective measure.
- Bactericidal and antiseptic compounds that penetrate the wood structure to a depth of several millimeters and prevent its destruction under the influence of aggressive environmental factors, such as ultraviolet radiation, precipitation, mold and rot. To process wooden lining inside the house, they use compounds that indicate their purpose for interior work;
- Drying oil is a composition that provides reliable protection of wood from rotting, and also gives it water-repellent characteristics. However, the disadvantages of drying oil, such as the unpleasant odor and the long drying time of each layer, significantly limit its use;
- Acrylic varnishes are paint and varnish compositions that have not only functional, but also decorative characteristics. They are used for finishing the lining and are applied in two stages: the first layer involves the application of a transparent varnish, and the second - a varnish with the addition of a tinting compound. Choosing water-based acrylic varnish is an ideal option for those who want to preserve the original texture of the material;
- Yacht varnish forms a reliable and durable coating for wooden lining, protecting the material from moisture, mold and mildew, as well as ultraviolet radiation. Due to the presence of solvents in the varnish, it is characterized by an unpleasant but quickly disappearing odor. There are matte, semi-matte and glossy varnishes. The disadvantage of yacht varnish is its high cost, but it fully corresponds to the quality of the composition. In this regard, painting the lining with varnish may be significantly limited;
- Synthetic varnishes - unlike water-based acrylic varnishes, are more toxic, but during the application process they provide the lining with a rich shine and smooth surface. Due to the fact that synthetic varnishes contain xylene and toluene, it can only be used for outdoor use;
- Wax-based compositions , which provide the lining with a semi-matte shine, are considered an advantageous alternative to varnishes However, the limiting point in its use is the difficulty of application.
If the first group of products is focused on protecting the lining from operational factors and extending the life of its use, then the use of the second group - decorative compositions - is relevant if you plan to radically change the design of the room.
Decorative compositions for painting lining:
- Oil paints that penetrate deeply into the structure of wood and effectively increase its resistance to negative environmental influences, including moisture. However, they are characterized by a fairly long drying time, as well as a gradual loss of color during use. In addition, the peculiarities of the composition of oil paints contribute to the fact that the air permeability of wood is reduced, and therefore they can only be used for painting individual elements indoors;
- Acrylate paints are superior in their performance characteristics to oil-based compositions, which guarantees greater preservation of the color and shine of wooden lining. They are characterized by high elasticity, and therefore they do not crack even with significant temperature changes and deformations, and painting the lining with paint can be used for both external and internal work;
- Alkyd-based enamels allow you to paint lining in a wide range of colors both indoors and outdoors. After painting wooden lining with alkyd-based enamel, a glossy surface is formed on the surface of the material, which may fade over time, which leads to the need for re-painting;
- Water-based paints do not hide the wood texture, giving it a matte surface. They are characterized by the absence of an unpleasant odor and quick drying time, but are inferior in reliability to varnishes. The construction market offers a wide variety of water-based paints and varnishes, including façade, waterproof, washable, and enamels intended for interior use.
Important! To paint wooden lining in a bathhouse or sauna, professionals recommend choosing special impregnations or varnishes that reliably protect the decorative coating from moisture and dirt, and do not emit harmful volatile components when heated.
Technology for painting lining: step-by-step instructions
Regardless of what paint you choose, painting a house in which lining is the main finishing material requires compliance with the technology for applying paint for lining. An important role in this process is given to preparatory activities.
What are the preparatory activities: preparing the lining for painting
- First of all, you need to clean the lining from the old paint. If the layer of paint and varnish material is held firmly enough, the painted lining must be cleaned with a 2% soda solution, which will help effectively remove the layer of old paint. If there are still fragments of paint left on the surface of the lining, they do not need to be removed, as they make it possible to give the lining a new, original texture;
- After cleaning the lining, it is necessary to grind it, for which it is recommended to use not a specialized grinding machine, but traditional sandpaper or even pumice;
- After sanding, treat the lining with drying oil;
Important! To improve the result of processing lining with drying oil, add 50 grams of turpentine and dry pigment, which can be red lead or ocher;
- The final stage of preparatory work is priming, for which primer compositions for wood or compositions that will be used for further painting are used.
Important! Experts recommend replacing the traditional primer with an antiseptic primer, which will greatly enhance the protective characteristics of the treated wooden lining. Despite the fact that this preparatory stage is not mandatory, experienced specialists do not recommend neglecting it, explaining this by the fact that certain types of wood in the area of cut knots have specific formations - “resin pockets”, from which resin is released from time to time, reducing protective properties of paint or antiseptic. Currently, manufacturers offer many varieties of primer compositions: both for exterior and interior use, as well as specialized antifungal and anti-mold primers that significantly extend the service life of paint and varnish coatings.
Lining painting technology
- Painting the lining, video instructions for which are attached below, is a process that is not difficult and can be carried out even by a beginner. But, despite this, experts recommend following some tips, which can also be found in this article.
- The paint must be applied in a thin layer, making continuous movements along the wooden panel. It is important that during the process of painting the lining, only the tips of the bristles of the brush pass over its surface, but not its base;
- Even if the paint or varnish does not completely cover the surface of the lining, it is not recommended to apply too thick a layer of paint and varnish composition, since several thin layers will provide a more durable coating than one thick layer;
- To effectively paint the lining in hard-to-reach places, as well as in the area of skirting boards and platbands, experts recommend using a thinner brush, the diameter of which does not exceed 5 cm;
- The following advice will help you avoid the appearance of marks on the surface of the newly painted lining. To do this, the finishing coat of paint must be applied from top to bottom, which will allow the surface of the freshly painted lining to be smoothed as efficiently as possible.
Important! In the process of painting vertical surfaces for which wooden lining was used, a layer of paint must be applied continuously. However, it is not recommended to paint the same place more than two or three times, as this will lead to the painted surface not being strong enough and acquiring a sloppy appearance. In addition, after applying each layer, you must wait until it dries before applying the next layer of paint.
Some useful tips from the experts
- To improve the quality of your painting, follow the advice of our specialists.
- Before painting, as well as during the work process, it is necessary to thoroughly mix the paint, which will ensure uniform color and gloss;
- To make sure that the color is selected correctly, do a test paint, which involves applying paint to a small area of an unused board;
- To avoid unevenness in color and gloss, experts do not recommend applying too thick a layer of paint and varnish compounds, replacing it with several thinner layers;
- The following fact may seem surprising to some, but sometimes, when painting lining, cross-linked gloves may be required. Experts explain this by the fact that sometimes wooden lining can alternate with metal pipes and other metal elements that are quite difficult to paint, which is explained by the fact that one side is on the ground. To make the painting process easier, just turn the mitten with the fur outward, put it on your hand and, after dipping it in the paint, use it instead of a brush. This method significantly speeds up the painting process and allows you to paint up to 5 meters of pipe in 1 minute;
- Experts recommend tinting the primer in a color that most closely matches the color of the paint coating subsequently used;
- It is not recommended to carry out paintwork in sunny weather or under the influence of direct sunlight, which can excessively speed up the drying time of the paintwork material. To avoid this, do not carry out such activities in hot sunny weather, or on days of precipitation. The most optimal weather for painting and varnishing activities is warm, cloudy and calm weather;
- The weakest point in this case is the ends of the boards, through which water is absorbed at the highest speed, causing damage to the wood. This determines the most careful approach to their processing, including the application of several layers of primer and paint materials;
- An interesting fact is that in the process of repainting the facade of a building (if there are no gross structural defects on it), you can use the same or a different shade. However, it is important to follow the rule according to which it is necessary to use the same paint and varnish material that was used previously.
- Determining the types of paint coating can be done visually. For example, acrylate paint typically cracks along the grain and has a leathery surface. At the same time, it can be torn off and even rolled into a tube, which will not affect its integrity in any way. As for the antiseptic, it is characterized by a glossy surface. A surface previously painted with an antiseptic can be painted with the same or with oil paints.
Some tips for choosing paints and varnishes:
- Due to the fact that oil paints change their color somewhat during the drying process, when choosing the tone of the paint and varnish composition, give preference to a darker one;
- As for acrylic paints, they do not change their color during use and do not crack;
- Water-based paints are environmentally friendly, however, more expensive materials. Having given preference to them, you will be surprised at the vastness of the choice of color palette;
- Using Aqualak, pre-paint the lining with water-repellent and anti-slip compounds, and also treat the lining with an antiseptic and impregnation, which will increase the fire safety of the treated wood;
- If you or members of your family have allergies, give preference to scuba tanks, which are the safest material;
- If you are using lining made from valuable wood species and want to emphasize its texture and naturalness, give preference to transparent polyurethane varnishes;
- To paint wooden lining in the dressing room, use urethane-alkyd varnish or antiseptic paint, the service life of which exceeds a decade. They will reliably protect the wood from rot, mold and mildew, and also increase its water- and dirt-repellent characteristics.
- Due to the fact that oil paints reduce the breathability of wood, to create an optimal microclimate in the room, use a primer and acrylic aqualac, which will reliably protect the wood from dirt and dust and emphasize its natural beauty.
- Also remember that after applying varnish, a translucent film is formed on the surface of the lining, paint contributes to the formation of a durable film, and impregnations are not visible at all on the surface of the wood.
How to paint the lining: choosing a color scheme
As for the question: “What color should I paint the lining?” , then we can safely say that there is no definite answer to it, and the choice of colors depends only on your preferences.
But, despite this, at one or another stage of design development, certain trends dominate, and at the moment they lie in the “leadership” of white, which contributes not only to the visual expansion of the interior space, but also to improving the mood of the residents.
Choosing paint for painting
In most cases, we are talking about painting internal surfaces, and the type of paint is selected accordingly - acrylic, water-based or oil-based (white).
The advantage of acrylic paints is their environmental friendliness and comparative cheapness. Oil paints dry faster, but at the same time they emit a specific odor that is not always acceptable to others. Water-based paint, for all its non-toxicity, is still inferior to the other two types in terms of coating durability. Therefore, the use of a certain type of paint is determined by the specific conditions of its use.
Recently, scuba paints have been actively used for painting linings, previously used mainly for painting ceilings. The advantage of scuba tanks is that, while forming the color of the surface, they also form a dirt-repellent layer. Therefore, caring for the white panels, which were decided to be painted with aqualac, will be much less labor-intensive. The downside of scuba gear is its high cost.
Painting safety
Highly toxic substances can speed up painting work, but you should not use benzene and ethylbenzene as a solvent due to possible severe poisoning, or turpentine, which causes allergies.
It is even more undesirable to use solvents and paints of unknown origin without carrying out the necessary tests.