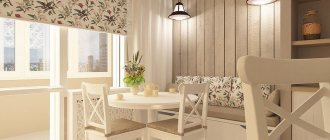
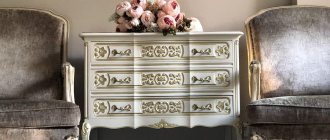
Chalk paint is a godsend for the modern designer; it can be used to create the recently fashionable scuff marks on the surface of furniture, which look so colorful in romantic interiors in the Provence and shabby chic styles.
It has been known for many years and was previously used to paint walls and ceilings. Today, the popularity of such products has returned, however, their character and fate are completely different.
Nowadays, people increasingly want to buy chalk paints for furniture. They represent a new generation of products with a very wide range of applications. Most often they are used for furniture restoration, decorating fabrics and upholstery.
DIY redesign: how to repaint a cabinet in an hour
Have you ever experienced this itch in your hands and a strong desire to create something with that old wardrobe or chairs that you inherited and are an eyesore with their imperfections?
Or do you just understand that you want changes, but you’re not ready to invest in a complete replacement of the interior?
There is a solution: take a close look at the items you want to update, come up with a concept and go to the store.
Because it’s very easy to take and paint furniture that you’re tired of!
Tags
homemade chalk paintabout chalk paintessence of chalk painthomemade chalk paint.by chalk paintabout chalk paintcreation of chalk paintoriginal chalk paintchalk paint chalk paint verychalk paint had paint.chalk paint had paint forsmelling paints to paintacrylic paint peels off.chalk paint yachalk paint belongs to chalk paint.Latex paint yalatex paint for clumping paint dilute chalk paint Chalky Paint Chalk Paint Chalk Paint.Chalk Paint.
paintfinishsource
how to paint furniture
Repainting old and worn-out furniture can solve several problems at once:
- refresh the interior (which is logical);
- combine disparate objects into a single ensemble (for example, if you are a young family, and the only furniture you have is what you inherited, or else, in your dacha, individual objects from different eras often accumulate that need to be somehow made to work together);
- give vent to your creative energy (the most important thing, I think).
Well, if you do everything right, then no drama will happen, even if you don’t like the result - you’ll just choose a new shade and can paint the furniture again when you have a couple of hours of free time again.
How to make a slate board for writing and drawing with chalk
Almost all young children love to draw, often using the floor, walls and pieces of furniture as a “canvas”. Taking into account the needs of their child, resourceful parents make certain adjustments to the home interior, using special paint, which is easy to apply and just as easy to remove. chalk. In this case, it is not at all necessary to paint an entire wall or cabinet.
A small chalk board, which can also be useful for adult family members, if you use it, for example, for notes and reminders about important matters, is quite capable of satisfying a child’s creativity.
Color selection
Look carefully at the item and think about where exactly you want to fit it - the choice of color depends on this.
You can choose a shade that contrasts with the main color scheme (for example, in a room with a beige-warm palette, you can put a table painted bright blue - it will enliven the interior with a color accent), or neutral (for example, you can paint an old table and chairs in white color, and place a beautiful vase with bright flowers on it).
Application of glaze in decoupage
Glazing is a technique of applying transparent layers to an already prepared surface; this technique allows you to obtain a variety of shades of the base color, and it also allows you to obtain deeper and more saturated colors.
You can do glaze not only with ordinary paints, but also using oil paints; this also allows for deep translucency of the paint layers, which allows you to get even more saturated and bright colors.
Hard brushes are not suitable for applying glaze in decoupage
If this technique is used in decoupage, a number of requirements should be met for the best effect.
Namely:
- Before applying the next layer, it is necessary to thoroughly dry the previous layer; if glazing is done with oil paints, the drying time can reach 2-3 days or even more. To prevent debris and dust from sticking to the paint, it should be covered with a rag.
- When using watercolor paints, they also need time to dry, and before applying subsequent layers, it is enough to dilute the watercolor paint with water.
- When applying glaze, it is necessary to use soft brushes, it is best to use core brushes.
In order to check whether the brushes are suitable for glazing, you should use an ordinary sheet of paper, apply paint on it, using different brushes, layer by layer, after each layer has dried, check how this or that brush works.
Paint selection
Go to the largest hardware store nearby, catch the manager and explain the task - you need a universal paint that is suitable for painting wood, plastic and varnished surfaces (such exist).
You can choose the shade right on the spot if you have a rough idea of what you want. Although you can paint furniture with different colors, you will need the help of a specialist to understand what is best for you:
- Latex paints (they are the easiest to find, many different shades and relatively inexpensive), the downside is that before application you will need to spend time preparing the surface (clean it properly using solvents and sandpaper), which in itself eats up a lot of time.
- Chalk paints are a real hit in furniture painting; they do not require special preparation, apply well even if you are a neophyte, and mask application flaws and surface unevenness. Most of the pictures you see on Pinterest are painted with these paints, but they are harder to find (although you can buy anything online with delivery). Chalk paint adheres well and spreads out without leaving brush marks.
- Acrylic paints are the oldest and most proven way to repaint something. They apply well and the brush mark spreads out as the paint dries. But at the same time, they give a slight shine and the effect of “painted wood”, while chalk paints look more organic.
In addition to paint, you'll need brushes, tape to protect areas you don't want to paint, plastic wrap to protect the surrounding interior, sandpaper to prep surfaces, and wax to polish furniture that's already been painted.
Varieties of CM
Chalk paint was first used in 1990 by a British designer. It went on sale under the Chalk Paint brand. The recipe remained secret. Therefore, specimens have been developed that contain different constituent elements. They are all water based and differ in additives. The name of chalk paint depends on them.
- Natural and synthetic resins are found in resin dyes.
- Silicates are mineral constituents.
- If casein is added, then it is milk paint.
- Flax oil is contained in the oil composition.
Painting creates a smooth or embossed layer. On the first one you can draw. The core of textured or slate CM is acrylic, silicone, latex emulsion.
In order for the slate coating to have the properties of a magnet, metal particles are introduced into the latex composition. Magnetic dye interacts with any material.
The chalkboard effect is created by emulsions of dark shades. In this case, chalk patterns are visible on the surface. Manufacturers have developed colorless formulations. The pigment of the desired color is introduced and converted into a colored slate board.
Mother-of-pearl composition is used to decorate walls and interior items. The ceiling is painted white. You can use the ready-made whitewash composition or prepare it yourself.
The base that comes into contact with fire is coated with fire-resistant paint. To secure the decor, the product is fired with fire. In both situations, chalk compounds are used that can withstand prolonged temperature exposure. They belong to heat-resistant materials. This group includes stained glass paints for painting glass and ceramics.
COLORING
If you choose tinted paint, shake the can well before opening it - sometimes the pigment settles to the bottom. Give yourself time to take your time and really get to grips with how to apply the paint.
If you have chosen a paint that requires surface preparation before application, then do not skip this step. You can clean the surface using sandpaper (take 220 grit, it is universal).
If you've never painted anything before, practice on some old stool first, or buy something cheap and practice on it before you mess up your closet. You will always have time to paint the furniture; it’s better to get your hands on it first.
If you do not have experience, then you should not start with painting shelves - it is difficult, because you need to paint all surfaces (and the corners - this is the most unpleasant) evenly. Leave them for last, when you have a repainted chest of drawers and a couple of chairs behind you.
Never start painting an item from the main surface, always start painting from the back wall or lower surfaces to give yourself the opportunity to “shoot in” and stop if you absolutely don’t like the shade.
Use flat, wide brushes rather than rollers - on uneven surfaces with texture (wood), a brush works better, as it paints all the depressions and cracks.
Most paints require reapplication - after the first coat has dried, apply a second one, so brush marks will become invisible and the color will be more even. Chalk paints are quite dense, and sometimes one layer is enough, look at the result.
When you paint one side of an object, periodically check to see if drops of paint have fallen on other sides. For example, you are painting the side of a cabinet, and droplets of paint may fly away and settle on the already painted doors. Your goal is to prevent them from drying out, so just periodically inspect other surfaces. If you see telltale drops, just brush over them; when the paint dries, there will be no traces left.
And don’t forget about the final stage – polishing with special waxes for furniture. Wax will not only give things a new glossy look, but also protect surfaces from stains and scratches.
Middle Earth Map
Hey guys! There was a case, I decided to try to make a map of Middle-earth. I came across photos of the process and decided to show them.
Manufacturing. 1.) First, I found the map itself on the Internet. A large format is needed so that, if necessary, small details can be clearly seen. Then I lined the downloaded map into squares in . Or I just applied a grid, I don’t remember, but the point is to create small, identical sectors. Then I took an A3 sheet of paper and lined it into the same number of squares. It turned out something like this:
It’s hard to see because the lines weren’t pressed in; they shouldn’t be noticeable at the final stage.
2.) Then everything is simple - sector by sector I began to transfer the image from the source to paper. This task is quite painstaking and somewhat tedious, and the pencil also makes your fingers numb. =)
There is a difference in the colors of the photos because there is no flash on the phone and I didn’t think to get an additional lamp. What can you do? You can’t rewind time, so things turned out the way they did.
This took me a couple of evenings. I couldn’t sit much, but I spent an hour or two.
3.) Next we needed to add colors. I didn’t think for long and decided to use tea. First, I tried it on a separate piece of scrap paper, applied layers, and then finished it off with a clean copy.
Apply five layers using a cotton swab. The tea is very strong, almost 1 to 1 brewing with water. In those areas where the water (sea, lakes) made tea with mulberries separately, it gave a bluish tint.
Of course, I had to work with the edges of the sushi using brushes and cotton swabs. After each application, it is important to dry the sheet very well, otherwise there is a chance of tearing off the layer of paper with cotton wool. This also took a couple of days. =)
4.) The most difficult and time-consuming part for me was the stage of drawing the pencil sketch. I took a helium pen and quietly, again square by square, mountain by mountain, began to draw the details. There are no photographs of the process left, but this procedure dragged on for four days, I don’t remember exactly. =) And as a final step, I took an eraser and erased all traces of the pencil. I must say, after all the manipulations, most of it was erased. Well, as a result.
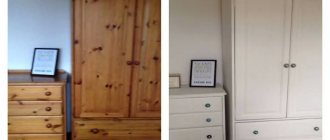
Painting a dressing room cabinet with chalk paint Paint
There was an old wardrobe bought by the Minister of Culture in 197, then transferred to a friend, from a friend (my uncle), to my aunt, and then this wardrobe came to me almost forty years later)))
The label has been preserved. You can understand from it that this utility cabinet was purchased for 27 rubles in 197.
He came to me little old and shabby. The old handles were torn down, although new ones have not yet been purchased, but this is a matter of time. They washed and sanded, although without trying, because... We decided to paint it with chalk paint. I made the paint according to the recipe of the wonderful craftswoman of our site Oksana Panina: 1 part acrylic paint, 1/3 part chalk, 1/3 part water. And be sure to strain the paint.
We tried to paint with a brush (we couldn’t find a bristle brush, as Oksana P. advised). Stains remain, even if the paint was diluted thinner. So the rest was painted using a roller. Judging by the photo, even after the first layer of paint, all this unsightly beauty was hidden, because... The hiding power of this paint is strong.
Technique for applying chalk dye
The painting tool chosen for the job depends on the expected effect. The slate layer is applied on a small area with a brush. A roller is used to cover a large area.
Textured CMs are applied: with figured and simple spatulas, a hard brush, a roller with a structured roller, and sponges with stencils.
The base is cleaned of old facing material.
- Under slate paint, the surface is sanded with sandpaper and irregularities are removed.
- Under textured CM, large defects are eliminated. Primer is applied.
- Slate and structural dyes are thoroughly mixed before application. then the coverage will be uniform.
- Painting begins from hard-to-reach areas, moving to the central part of the surface.
- The second coating is performed after the first layer has dried.
Painting is carried out at an air temperature of at least 10 o C, humidity - no more than 85%.
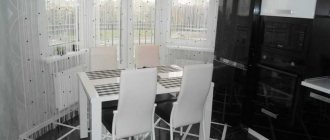
Method 1: Painting the kitchen with chalk paint
Do you want to update your kitchen set beyond recognition with your own hands? The best way to do this is to repaint the facades with chalk (mineral) paint. Why chalk?
- The fact is that this type of paint has a thicker consistency and increased adhesive properties, due to which it fits perfectly on any surface - even on laminated chipboard/MDF. Moreover, chalk paints eliminate the need for tedious sanding and sometimes even without primer.
Chalk paints are also good because they give the painted surface a texture similar to that obtained when painting a wooden surface. Therefore, even the most ordinary kitchen with film facades will look much more noble after such an “update”.
- In Russia and the CIS countries, you can buy chalk paints from designer Daria Geiler, foreign manufacturer Annie Sloan, Kazakh Vernenskaya Manufactory, etc. You can also make chalk paints yourself using recipes that are easy to find on the Internet.
Here are some photo examples of kitchens before and after restoration.
Photo of a kitchen with film facades before and after painting with Daria Geiler paint. Here the author of the alteration restored the peeling film on the facade near the stove, and then painted the furniture without removing or sanding the film
What to paint under the slate
Chalkboard paints can be used throughout the home:
- In the nursery. If you install a large board here or paint over an entire wall with chalkboard, children will have a place to create and learn. And the rest of the walls in the house will be completely safe.
- In the kitchen.
Individual slate boards, kitchen aprons, and painted kitchen cabinet doors look very nice here. You can write down recipes, menus, reminders, shopping lists, and just declarations of love for each other on them. Important! Some paints become discolored by hot grease, so they should not be applied near a stove. - In the hall. It is convenient to leave messages at the front door for family members about what they need to do or take when leaving the house. And next to the landline telephone, a slate panel will replace a notebook.
- For decorating individual items. Slate kitchen trays, cutting boards, large dishes, tags on jars of cereals and flowerpots with seedlings, etc. look great.
A variety of materials can be painted to look like lead:
- wood, chipboard, MDF, fiberboard;
- metal;
- plaster;
- drywall;
- brick;
- glass;
- ceramics.
Slate paints have found their application not only in school classrooms, but also in apartments, cafes and other public institutions. All slate paints are intended for interior work. They do not tolerate low temperatures.
The best paints and varnishes for decoupage
Beginning decoupage enthusiasts often have questions about what materials are needed for this technique, and what is best to choose for decoupage. The paints used for decoupage are, first of all, acrylic, as well as water-based paints, gouache, watercolor, and building enamel is also used for large surfaces. It is difficult to answer the question of which paint will be the best, since it all depends on the type of material on which you plan to apply the paint.
Varnish using the decoupage technique must be applied in several layers to obtain a smooth surface at the end of the work.
In addition to paints for decoupage, you will also need other materials:
- Varnish is necessary for applying coatings; they mainly use acrylic varnish (spray varnish can be used), which is applied to the finished surface and protects the image.
- There is a type of decorative varnish called craquelure; it is also widely used in decoupage; it looks like a cracked layer of paint. It can also be applied to any surface and used, for example, when decoupaging bottles. Stained glass paint is also suitable for decorating bottles.