Before starting repairs, the question may arise whether it is possible to paint with water-based paint over the previous whitewash and what the consequences of this are. The instructions do not always cover this issue thoroughly. Therefore, find out how to apply, in how many layers, how to pre-prepare the surface of walls and ceilings, and what you should buy additionally. Videos and photos of the work of masters and common mistakes will help you carry out painting work correctly.
Preparation
Water-based paint is a modern, convenient material for decorative decoration of walls and ceilings. In the process of renovation work, they often look for a middle ground between practicality and beauty. The material meets these requirements. It is easy to work with, it does not cause an allergic reaction, and the product line has a wide color palette.
Before applying water-based paint over whitewash, assess the condition of the surfaces. If the whitewash layer is thick and the lime is already crumbling, then clean the coating first. Level the base for painting with defects in the form of “patches”. Otherwise, the result of the work done will turn out to be unaesthetic.
Water-based emulsion is a mixture of water-based polymers, so it is not necessary to pre-treat the surface with a primer. A water-based coloring emulsion itself will do an excellent job of this role and hold together the particles of spreading lime. If, during the process of painting a whitewashed ceiling, the chalk coating does not adhere to the roller or brush. As a result, you will get an even coating without defects. If you still use a primer before painting, then the consumption of water-based emulsion is significantly reduced.
Water-based paint on chalk whitewash – is it worth applying?
When painting walls, we must take care to create the highest quality adhesion of the paint coating to the surface. Therefore, whitewash, which clearly does not contribute to such adhesion, according to the rules, must be removed.
Experts do not recommend this type of painting, since the whitewash will simply peel off the wall and remain on the roller. The only exception is that the whitewash layer is very thin and adheres very firmly.
Stripping Tools
The choice of products and tools depends on the thickness of the whitewash layer and the degree of surface contamination:
- To remove a wide layer of limestone, use a sharp trowel. Moisten the wall or ceiling with water from a spray bottle in advance. Then use a spatula to scrape off the whitewash. To work, put on old clothes, tie up your hair and take a respirator, because lime gets dirty when wet.
- With a medium thickness of whitewash, use a roller with wet, tenacious bristles.
- To remove a thin layer of lime coating, purchase a grinding machine. With its help, you can clean the surface much faster.
Important! Protect your respiratory tract in advance with a respirator or gauze bandage, because the process is dusty. Lime particles enter the nasopharynx and larynx. This may cause allergies or respiratory problems. In particularly severe cases, pollution can even damage the lungs and cause pneumonia.
What can replace whitewash?
Lime can be replaced
ground chalk, adding wood glue (50-100 g per 10 l), clay or cow dung to the solution for stickiness.
By the way, a solution with paste can
only be used on old trees.
The bark of young trees is thin and does not breathe well through such whitewash
.
Interesting materials:
What can you snack on in the evening while on a diet? What can you give a guy for his 15th birthday inexpensively? What can you put in Slime? What can you watch on 12 plus? What can you watch for family viewing? What can you watch from the films of 11 years? What movies can you watch at home in the evening? What can you watch from fantasy adventure films? What family films can you watch? What can you watch from comedies 12?
Stain treatment and primer
Grease stains and smudges on a whitewashed surface will certainly appear, even through several painted layers. Before applying water-based emulsion to the whitewash, pay attention to the stains. If the contamination is not removed, then the painted layer at this location will differ in shade. Over time, the stains will completely appear through the applied water-based emulsion.
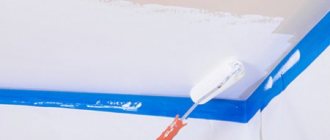
After cleaning the surface, putty the walls and ceiling. Then apply the acrylic primer with a roller or wide soft bristled brush. Leave to dry for a day. The water-based emulsion will lie more evenly on the primed base. Use masking tape to cover the boundaries of the water-based emulsion application so as not to go beyond the limits, and start painting.
How to paint a ceiling with water-based emulsion with your own hands
Each of the water-based paints has instructions for use on the can. The operating procedure is described there. Some compositions just need to be stirred well before use: undissolved polymers may settle at the bottom of the jar. Some formulations require dilution. The amount of water added is also specified in the instructions and depends on the application method. For spray guns, the dilution is stronger; when using a roller, thicker formulations are required.
Paint tray makes the job easier
When diluting the emulsion with water, add it in small portions. Stir thoroughly and try on a surface area. If the paint goes on evenly and almost completely covers the base, you can paint.
It is more convenient to pour the paint into a special container with a tray and a ribbed platform. You can use a regular basin and a clean piece of oilcloth spread nearby. It's not as convenient, but less expensive.
Which roller to choose
A roller for painting the ceiling with water-based emulsion is needed with dense short pile. You need to examine him carefully. The pile should “sit” firmly and under no circumstances should it “climb out”, even if you pull on it. Then inspect how the seam is made. Under no circumstances should he stand out. It must be difficult to find. It is best if it is made obliquely.
Rollers for painting the ceiling with water-based emulsion
Pay maximum attention to choosing a roller: the quality of painting - the absence of stripes on the ceiling - largely depends on how good a tool you have chosen. It is more convenient to whiten the ceiling with water-based emulsion not from a stepladder, but from the floor. To do this, the roller is placed on a long handle and secured well.
How to paint without streaks
To avoid streaks on the ceiling, painting the ceiling with water-based paint should be completed no later than in 20 minutes. Immediately after application, water begins to actively absorb/evaporate and stripes appear at the junction of the dried and “fresh” paint. Therefore, it is advisable to prepare the room. It is necessary to turn off (wrap up) the heating radiators and prevent a draft. It is also advisable to wash the floor immediately before whitewashing; even if you work during the day, turn on the lighting, this will allow you to better control the quality of the paint. Afterwards you can start working.
Ready-to-use water-based paint is poured into a container, a roller is dipped into it, then rolled well over the site, achieving uniform distribution over the entire surface. When the roller has a uniform color, they begin to paint.
The corners are painted first with a brush. After applying a little paint, take a small roller and roll it out well. Then they begin to paint the main surface. The first layer is applied parallel to the window, the second - perpendicular.
You need to stand so that you look at the area to be painted at an angle. This will give you a good look at how evenly the paint has spread, as well as where you have already painted and where you haven't. Move systematically, without jumping from one piece to another.
It is more convenient to paint from the floor, and to do this, the roller must be attached to a long but light handle
The width of the strip painted at a time is slightly larger than the width of the roller. After wetting the roller, place it approximately in the middle of the strip. Quickly roll the paint in both directions from one wall to the other. Don't waste a lot of time: you don't have much of it. On average, the water emulsion dries in 10-20 seconds. If you didn’t have time to apply the strip next to it before, the border will be clearly visible, which you won’t get rid of. Having distributed the paint more or less evenly over the strip, dip the roller into the paint and roll it out again from the middle of the ceiling. At the same time, go beyond the already painted strip by about 10 cm. All this at a good pace without stops and smoke breaks. The edges of the painted strip should not dry out. In general, these are all the rules.
After applying the first coat of paint, some areas may not be painted as well. You need to wait for it to dry completely and paint it a second time. This should already be enough to obtain a flat surface. If even after the third layer of water-based paint you still have streaks and stains on the ceiling, you will have to redo it again. It is necessary to level the surface with sandpaper, prime it again and paint again.
What color
The easiest way to achieve perfect evenness is to use “snow-white” paint. All pigments clearly highlight even small irregularities, so the process of puttying the ceiling should be given maximum attention or use an acrylic or silicone-based water-based emulsion.
Painting tools
Before painting, prepare:
- water-based paint;
- roller or spray gun;
- a tray for pouring paint, it is also convenient to squeeze out excess from the roller;
- small brushes for touching up corners and hard-to-reach places;
- masking tape;
- pigment of the desired color if white paint is purchased;
On a note! Before painting, remove light furniture from the room where you are renovating. Cover a large one with oilcloth, which is securely secured with an elastic band or rope so that it does not slip at the wrong moment.
Materials
The main rule is not to buy anything on the market. In addition to the risk of purchasing counterfeit products of low quality, materials in such places are stored incorrectly. Water-based compositions freeze at low temperatures, and after defrosting they lose their quality.
To choose the right water emulsion, you need to pay attention to the following:
Drying time. This indicator ranges from 2 to 24 hours
But it is important to remember that drying time depends on the humidity and temperature in the room. Optimal indicators: 18–20 degrees Celsius and air humidity not higher than 65%.
Viscosity
This parameter reflects the degree of dilution of the material with water. If you plan to paint with water-based paint using a roller, then this indicator should be no more than 45. If the work will be carried out with a spray gun, then no higher than 25.
Material consumption. Indicated in liters per square meter. Most manufacturers indicate consumption without taking into account surface absorbency, so it is recommended to add 10% when calculating.
Shelf life. This indicator is important if repairs are still planned, but the purchase of materials has already begun. Typically, the shelf life of water-based emulsions does not exceed two years.
Covering power. This indicator reflects how well the composition covers the color of the base. If it is low, you will have to paint the walls in several layers.
You will also need consumables:
- Primer. Provides a high level of paint adhesion to the wall. In addition, thanks to the use of a primer, smudges will not appear on the walls. It must be made on the same basis as the paint. That is, for acrylic paint you need an acrylic primer, for silicate paint - a silicate one.
- Sandpaper. Required for grinding the surface before work.
- Putty. If there are a large number of defects, starting and finishing putty will be required. If there are few defects, then only the finishing coat is sufficient.
- Polyethylene film. It can be used to cover the floor and bulky furniture that is difficult to remove from the room to protect it from the composition.
- Masking tape. Serves to limit areas for painting and secure the film.
Some consumables, such as polyethylene or masking tape, are not required for painting, but it will be difficult to work without them
Work technology
Stages of work:
- To begin, mix the water emulsion thoroughly. If the composition is thick, add water. Bring the mixture to a creamy consistency.
- Add pigment, then mix thoroughly. To do this, take a construction mixer or improvised means, for example, a wooden stick of suitable length.
- If you paint with a roller, first paint all the corners and joints with a brush. Then treat the rest of the surface. If using a paint sprayer, skip this step.
- Pour the water emulsion into the tray and roll it out with a roller along the embossed side.
- Apply water-based paint to the whitewash, roll the roller with forward and backward movements. It is important to ensure that the paint is applied in a thin layer and no smudges form. Therefore, carefully stretch the water coating along the wall or ceiling.
- For a high-quality result, paint the wall twice. Each painted layer must dry well, so apply the second layer the next day.
- After completing the work, install the ceiling plinth.
Frequent mistakes of inexperienced craftsmen:
- Painting unprepared walls. The old coating and unevenness will make themselves felt by poor-quality results and repetition of the first stage of work.
- Uneven distribution of the emulsion over the surface. To avoid this, use a long-nap roller. Dip its surface completely into the paint, squeeze out the excess using the relief surface of the pallet.
- Stripes when covering. To fix it, roll the roller an equal number of times in one direction.
- When painting the ceiling over whitewash, be sure to bring the water emulsion until it is as thick as kefir. Then the applied layer will not be thick.
On a note! Water-based paint is a quick-drying paint. Therefore, from time to time it is worth stepping aside to see shortcomings in the work and correct them in a timely manner.
Do I need a primer?
If you want to get a strong and durable coating, you should not skip this step. Moreover, the primer is inexpensive. Its main purpose is to strengthen the base and improve the adhesion of paint to the wall. After treatment with a similar composition, a loose wall turns into a monolithic and durable coating.
The primer is able to fill the smallest pores, and the surface after its application looks smoother. The fact is that such compositions form a thin, durable film that prevents moisture from being absorbed from the paint. As a result, it lies flatter. Therefore, before applying water-based paint to lime, be sure to prime the surface.
Since it is sold in concentrated form, dilute it with water according to the instructions on the package. If the composition is too thick, streaks may form on the walls. It is better to add a little more liquid and treat the surface twice.
You can replace the primer with regular PVA glue. It is added to the water emulsion in a ratio of 1:10. The result is a waterproof composition, similar in properties to acrylic. A wall covered with this paint can even be washed.
Useful tips
Without the proper experience and specialized education of a plasterer-painter, it is rarely possible to carry out the first painting efficiently. But a number of tips will help:
- If there are small defects on the surface, then it is better to use a matte water-based emulsion. Glossy painting will only emphasize unevenness and roughness.
- Wear protective equipment: glasses and a respirator.
- Select the composition of the water-based emulsion, taking into account the purpose of the surface to be painted:
- acrylic water-based paint is not afraid of either ultraviolet radiation or high humidity, a universal option for building facades and interior spaces;
- silicone water emulsion is an excellent option for the bathroom and kitchen, it has high vapor permeability;
- a cheap but not durable paint based on lime and cement, but is rarely used due to unreliability.
Materials
- Chalk is the most popular option. The advantages of whitewashing with this material are low price and a perfectly white coating. The downside is its fragility: if you whitewash the ceiling with chalk, soon after the repair a nuisance may occur such as it falling off.
- Lime whitewash will mask minor irregularities well. Unlike chalk, this type of coating will last much longer. Lime can allow water to pass through itself, which is necessary in rooms with high humidity.
- Painting with water-based paint will cost more; the material is not used as economically as if painted with lime or chalk. There is no need to prepare the solution yourself - this material is sold ready-made. A wide range of shades allows you to realize any design ideas.
Renovation starts from the ceiling
The first thing we start any renovation with is finishing the ceiling. It is no coincidence that one starts with this area; this allows one to subsequently avoid contamination of the fresh floor covering and calmly carry out painting without fear of staining or ruining something. However, at this stage many people have a choice between lime and staining, since each of these finishing options has its pros and cons.
Many, when carrying out repair work with their own hands, prefer to update the whitewashed ceiling with lime, because they do not know that it can be painted. In fact, decorating with paint is not at all difficult if you have a perfectly flat surface at your disposal, without scratches, depressions or chips.