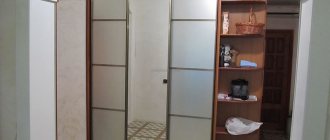
Problems often arise with storage space for household chemicals. All sorts of powders, cleaners, rinses... There are more and more of them, but there is usually nowhere to store them. The bathroom is too humid, the kitchen is not very pleasant, as they can spread extraneous aromas, which do not combine well with cooking, or rather, do not combine at all. However, there is a way out - a closet in the toilet. Although the toilet is usually a small room, you can still find free space in it - above or behind the toilet. This is where you can hang/install the toilet cabinet.
What are the doors made of?
If you decide to make a closet for the toilet yourself, making shelves is usually not a problem: two parallel planks are placed on the walls, and shelves are laid on them. Instead of slats, you can install furniture shelf holders - they come in different sizes and shapes and are easy to install. A hole is drilled in the wall into which the extended part of the holder is inserted. This is one type. The second is brackets that are attached to the wall. In general, there are usually no problems in this part.
It's not as complicated as it seems
But there may be questions about what and how to make the doors. The easiest way is to order a façade of the required size from a furniture shop. It is better to order together with the strips to which these doors will be attached. You can also ask for hinges to be cut in. Then installing them will be simple: screw them to the wall and that’s it. Possible facade materials: chipboard, LMDF, plastic, aluminum + glass or aluminum + plastic.
There is an option - to make the doors from sheet material and cover them with the same tiles that were placed on the walls. This is in case you don't want the cabinet to stand out. You can also stick on a mosaic of a suitable shade, use flexible tiles (plastic sheets under the tiles), stick on washable wallpaper, paintable glass wallpaper, etc. There are actually a lot of options.
If you are going to make a toilet cabinet “in place” and with walls
Options for finishing doors for closets in the toilet
To make it more convenient...
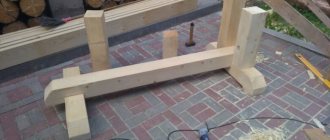
Closet for the toilet in the process of manufacturing
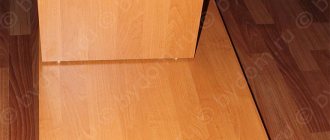
You can install corners under the slats - if a large load is expected
You can also not make doors, but hang ordinary horizontal blinds, use roller blinds of a suitable color and size. This is one of the simplest and most budget options. To access the shelves, you will need to lift the blinds or roller blinds.
A more serious and durable option is to close the shelves in the toilet with a roller shutter. It is more serious in terms of cost and complexity of installation. You will need to install guides and secure the drum at the top.
Materials
In addition to moisture resistance, there are other requirements for materials for the manufacture of bathroom furniture:
- resistance to mechanical stress;
- ease;
- aesthetics;
- environmental friendliness.
Natural wood is one of the most attractive and durable materials. In addition, they love it for its uniqueness - there is not a single repeating cabinet from the array, each one is at least a little different from the rest. MDF and chipboard are more budget options and, accordingly, less durable than wood. They are easy to process, making cabinets made from these materials very diverse in style, design, and available in a wide range of colors. Sometimes plywood, which is resistant to deformation and moisture, is chosen as the basis for the frame and facades. The thickness of the sheets must be more than 14 mm. The main advantage of plywood is its lightness, which ensures minimal load on the walls.
Functionality of cabinet partitions, furniture placement options
Like chipboard, OSB is a material made from wood panels, but chips of a special shape and orientation are used to make it. Due to this, it is 1.5–3 times stronger than chipboard. But what’s more important is that OSB can withstand being in even a very humid room.
The cladding options also differ. If you want to keep the cabinet in the toilet as a separate stylistic element, you can choose a model with mirrored facades, paintings, and 3D images. But sometimes it is more important to disguise the product as much as possible, to make it almost invisible in the room. In this case, models decorated with tiles that repeat the pattern of the walls are more suitable. Washable wallpaper is used for the same purpose.
The closet in the toilet is used as furniture for storage, masking counters and communications, as well as leveling the space - for example, in the presence of niches or awkward protrusions. This abundance of tasks corresponds to a variety of models in shape, design, type of doors, and materials used. False walls allow you to install a closet behind the toilet in the toilet, wall-mounted structures allow you to use the space above it, and corner walls cover the joints of the walls
When choosing, it is important to focus on the moisture resistance of the material and design - a cabinet can become both a bright and the most inconspicuous detail of the interior
Natural wood
MDF
Chipboard
Mirror
Glass
Tile
Wooden shelves
Wooden shelves are not at all difficult to make. The main thing is to use good, even and fresh material. The photo shows shelves in the toilet made of solid wood covered with stain. The boards must be free of stains, knots and deformations. Before starting construction, treat all lumber. You can go through it several times with an electric planer or sanding machine. Achieve a perfectly smooth surface.
Treat the boards with an antiseptic and coat them with several layers of varnish. If you do not want the surface to be glossy, you can use a special matte varnish. To give the wood an elite shade, we use stain. It will be absorbed into the wood, but will leave the texture and pattern of the cut visible.
To give the wood an aging effect, you can use a gas burner. The fire will highlight the cut rings in a dark color. After firing, the surface must be cleaned.
When the wood is prepared, you can begin installing the shelves. It is more convenient to attach them to furniture corners or wooden corners.
Chipboard shelves
Chipboard is the most popular material for furniture production in Russia. The reason for this popularity is that chipboard sheets are relatively cheap, and thanks to the laminated surface, you can use any color and texture when making furniture.
To make your own shelves from chipboard, you will need the sheets themselves, which have a laminated surface on both sides. The side cuts of the parts are processed with an edge; it can be glued using a regular iron. The cut is made with a circular saw. The cuts are even and smooth.
Euroscrews or self-tapping screws are used as fastenings. The method of fastening depends on the type of shelf construction. If you plan to connect two sheets of chipboard at an angle, then we use Euroscrews. To attach the shelf supports we use self-tapping screws.
Chipboard shelves look neat. This material will last a long time if the humidity in the toilet is low. For shelves, you can use sheets 1.5 cm thick.
Shelf lighting
Spot lighting can be used as illumination. Small round lampshades are easily mounted in chipboard, OSB or plasterboard. A small border is made above the very top shelf. Behind it you can hide the wiring that will extend from the lamps.
An interesting lighting option is obtained by using LED strips. To connect them, you must use a special converter - a 12 or 24 W power supply. The choice of power supply depends on the type of tape. Nowadays there are LED strips that even connect to AC power from an outlet.
The tape pieces are attached with their sticky side to the bottom surface of the shelves and connected to each other by wires. The LED lighting switch can be placed in a location convenient for you. If you use a motion sensor, then the light in the toilet will turn on automatically when someone enters. All these interesting little things are impressive when they are arranged in a room such as a toilet.
Cabinet in the toilet behind the toilet (30 examples with photos)
A cabinet in the toilet is necessary for proper organization of space, for functional and aesthetic purposes. In small bathrooms it is most often installed behind the toilet, this way it will be possible to fill the area as comfortably as possible. In this article we will tell you what types of cabinets there are and give examples of real interiors.
Freestanding models
The design mainly consists of open shelves. The advantage of this option is convenient access to things and the ability to hide some items behind the facades. The downside is that you need to constantly maintain order.
The cabinet takes into account the shape and dimensions of the toilet. This model can be found in showrooms or made to order. Or do it yourself: all you need is furniture panels, timber and fasteners.
Neoclassical-style furniture fills the entire wall space and forms a spacious storage area in the toilet.
The metal rack is compact; for such a design, the model of the toilet is unimportant. Decor and household items are stored on glass shelves.
The cabinet does not take up much space, but is quite spacious - ideal for a small bathroom. Frosted glass fronts hide the contents of the shelves.
Wall cabinets
A universal option that is presented in any store. The dimensions allow the module to fit even into a miniature space and hang it behind the toilet at the desired height.
Mirrored doors create a deceptive effect of extending the room. However, fingerprints remain on the surface, which must be constantly removed - the main disadvantage of this model.
The matte surface perfectly camouflages objects. During operation, you will not have to clean the inside of the cabinet every day.
The lighting and black tint make the cabinet weightless, its outline literally disappears into the room.
Bright toilet interior. Color accents include red painted roller shutters, plumbing boxes and photo frames.
Open niches
In this case, the niche performs a decorative function. The relief of the uneven surface and the contour of the recess are emphasized by spot lighting.
Diversity in a monochrome interior is achieved through the play of light. Volumetric decor fills the recess in the wall and casts interesting shadows.
An open niche laconically complements the minimalism in space.
Niches covered by a facade
Toilet interior in vintage style. The color of the doors is in harmony with the shade of the tiles.
The façade material is painted white. The doors are fixed flush with the installation box.
The built-in wardrobe looks compact and provides access to communications. This, by the way, can be done very cheaply with your own hands.
White roller shutters do not stand out against the background of white walls. Despite the color division, the interior is perceived as one.
The wood texture of the floor, cabinets and doors goes well with green ceramics.
The wenge door hides access to communications.
Ceramic finishing of the inspection hatch. In the closed position, the contour of the niche is almost invisible.
Built-in wardrobe, which is closed by furniture roller shutters.
Access to the water heater through the inspection hatch.
Other options
Wicker baskets are suitable not only for towels: your cat will appreciate such a house. If in principle it doesn’t bother you that she will watch you.
The geometry of the room gives ideas for design. In this case, open shelves are not only useful for household purposes, they also visually straighten the wall behind the toilet (suitable for crooked walls!).
Combined option - open and closed shelves.
A mirror-cabinet allows you to use the wall space to the maximum functionally.
Exquisite bathroom decoration with ceramic mosaics
Delicate interior of the toilet 2.5 sq.m. in mint tones refreshes the room and creates a feeling of comfort. The successful arrangement of furniture and plumbing fixtures made maximum use of the space:
- a functional white glossy toilet took the main place in the center of the far wall;
- a spacious wall cabinet with glossy white doors is located above it;
- a small sink with a bedside table was placed in the side niche, and above it there was a rectangular mirror without a frame.
Exquisite large tiles with a smooth mint-colored surface were used to decorate the walls. It is beautifully complemented by a horizontal pattern with small mosaic elements. For the floor, matte gray tiles were chosen to match one of the colors of the mosaic. The fittings and decorative elements are selected in a modern style - they all have a chrome surface.
Types of cabinets in the toilet
The problem with sanitary facilities is that the space is cramped, but despite the small area, it is necessary to hide detergents, toilet paper, etc. in such a room. A locker placed in the toilet will solve this problem. There are several types of such lockers.
Standing separately
A freestanding cabinet is the simplest solution in terms of installation.
The easiest piece of furniture to install. This is a simple U-shaped design. It is simply installed on the floor. Inside the furniture there are shelves (open and closed) or drawers. This design requires a fairly spacious room. After all, it must be installed on the floor, taking into account that the doors can be opened conveniently.
Mounted
Wall cabinet - the most popular type of furniture for toilet rooms
A wall cabinet in the toilet is most suitable even in the most cramped spaces. The cabinet can be mounted above the toilet, thus saving free space. When fixing such a cabinet above the toilet, it is necessary to leave empty space above the cistern or toilet for the convenience of visiting such a necessary room.
Built-in
A universal solution is a built-in wardrobe.
Such a wardrobe in the toilet is also functional and ergonomic. It is located in a niche. You can hide communications (valves, pipes), tools and household cleaning products in it. A built-in wardrobe looks harmonious in any design; it does not overload the space of a small room. The issue of placement of this variety is approached carefully.
It is necessary to make accurate measurements of the free space and the proposed cabinet.
The material from which it is made also plays a role, because such a design is placed near pipes where condensation accumulates, and even the slightest leak in a pipe can cause damage to furniture. Therefore, the cabinet material must be moisture resistant.
Criterias of choice
The toilet cabinet is selected in accordance with the design of the room and the required dimensions. When choosing a model, you need to consider the following:
First you need to decide on the shape of the structure. If the room has a niche, then it is best to purchase a custom built-in wardrobe. You can buy the cheapest ready-made products; It is first necessary to measure the space so as not to make a mistake with the dimensions of the structure. In addition, you also need to measure the dimensions of the pipes, which should be completely hidden in the closet
Before going to the store, it is best to draw a diagram of their location; you need to choose the appropriate color and design of furniture so that it harmoniously complements the toilet; before purchasing, you must familiarize yourself with the quality certificate for the design, which will guarantee the long service life of the product, its reliability, and the good quality of the materials used; It is very important to inspect the available components and fastening elements. If there are no hardware or brackets, you must separately purchase the missing mechanisms for attaching the product to the wall surface.
It is also important to check the availability of fasteners and other components. Cabinets for the toilet should be harmoniously combined with the renovation in the toilet room, giving the room completeness and aesthetics! The toilet cabinet can be additionally equipped with a lock, mirrors, and lighting
The products are equipped with shelves and drawers to accommodate various items.
Installation
At the first stage of planning a cabinet at home, it is necessary to make a preliminary design of the future design. Initially, you should decide on the type of cabinet, whether it will be wall-mounted or built-in, then on the dimensions of the structure itself, and if there are shelves in it, determine the distance between them.
The standard distance is recommended 25-35 cm, but it is worth choosing individually at your own discretion.
After choosing a model, when all the necessary materials have been purchased, you need to build a frame for the future cabinet.
- If the size of the cabinet allows, then you can install shelves inside, attached to pre-prepared corners/beams. The type of shelves is selected according to the expected weight so that they do not sag. And also they should not come into contact with pipes and not interfere with free access to communications.
- And at the end of the installation we install the facade.
Built-in
There are two ways to make such a piece of furniture:
- lay out the installation niche with the same tiles as the walls, as a result of which the cabinet parts will not stand out visually;
- cover the entire structure with wooden panels, this option looks more stylish and modern.
Before starting work you should prepare:
- wood or plasterboard for the frame;
- decorative panels for the facade;
- knife saw and jigsaw;
- grinding machine;
- shelf holders and fittings for opening cabinet doors;
- screwdriver with a set of screws;
- wood glue.
Work order
The first step is to create a drawing based on the parameters of the niche and the desired configuration of the interior space of the cabinet. After this, you can get down to the main work:
- Mark boards or drywall for the sides and back wall. If these places on the wall are already tiled, there is no need to build an additional box.
- Calculate the dimensions of the shelves and doors, mark their contours on sheets of wood and cut them out with a jigsaw.
- Sand all parts that require it.
- Assemble the box and secure it to the wall using self-tapping screws. If necessary, pre-drill holes in brick or concrete and hammer in dowels.
- Install the shelf supports and hang the doors.
- Cover the front of the cabinet and niches with decorative panels.
You can leave an open shelf between the niche and the cabinet or make a drawer in its place.
It should be remembered that the installation system requires inspection hatches, so decorative cladding should not impede access to communications.
Thanks to the variety of models, you can install such a cabinet in any toilet room. And making it yourself will help you save money and get a product that meets all the wishes of the apartment owners.
Types of cabinets
To make it convenient to use such items as shelves in the toilet, you need to understand the varieties. Here are the criteria by which cabinets differ.
By type of location. There are wall-mounted and floor-mounted.
Depending on the location, the cabinet can be wall-mounted or floor-mounted.
According to the material of manufacture. Can be made from wood, plastic, wood boards or plywood.
The choice of materials for the cabinet is quite diverse.
With and without doors.
Lockers can be made with or without doors.
The type you choose depends on what you are going to make the item for. For example, open shelves are not suitable for household chemicals, as the appearance will be ruined. But if you want to place flower pots, clay vases and ceramic dishes for decorative purposes behind the white throne, you are welcome. An open view will be very useful.
It is better to keep household chemicals behind closed doors, but books look great on open shelves.
It is also worth considering where you plan to install it. In new apartments, toilets are often combined with bathtubs, forming a single bathroom. In this case, the choice of location for the cabinet is not immediately obvious. It can be placed on the side wall, or directly behind the toilet.
In a combined bathroom, the location of the closet may vary.
But in single bathrooms the choice is obvious. Installation directly behind the toilet barrel. This option is especially convenient for those who are thinking about how to close the plumbing cabinet in the toilet. Installing an option with doors will allow you to hide bulky sewer pipes and a water heater, giving the restroom a finished look.
As a rule, the cabinet is installed immediately above the toilet cistern.
The choice of material is also influenced by the existing design of the room.
The material is selected depending on the design of the room.
Wood is perfect for almost any decorating style.
Wood fits almost any style.
Plastic panels, although they have a long service life, do not look as beautiful.
Plastic is more practical, but less aesthetic.
But laminated boards, made from wood shavings and sawdust, will fit perfectly into a bathroom of any size.
Laminated boards will fit into any interior.
Material
Having decided on the type, location and additional functions of the cabinet, you need to select the material from which it will be made. This issue must be approached very responsibly. There are several options for cabinets depending on the materials from which they are made:
Wooden
Wood is a classic material for making furniture. Many connoisseurs of natural materials will undoubtedly appreciate furniture made from solid wood. But, unfortunately, it has a fairly high cost, so it will not be available to everyone.
Such furniture must be covered with a protective coating, such as varnish or paint, to protect it from environmental influences.
From pressed slabs
They are made of chipboard or MDF. It is necessary to take into account that this material does not tolerate moisture very well, but it has a much lower cost compared to wood. In addition, at high temperatures, these materials release substances harmful to the human body. They are most often covered with paint and varnish coatings, which gives them an aesthetic appearance and protects them from external influences. Despite all the disadvantages, this option is very popular due to its availability and low cost.
Plastic
Nowadays, plastic is a very common material. It is very convenient for the bathroom, as it tolerates humidity and temperature differences well, besides, it is lightweight and does not require additional care. Plastic products are the cheapest option. Cabinets made of plastic can have a wide variety of shapes, colors and surface options.
Metal
Metal does not like contact with water. In this case, it begins to oxidize and rust. Therefore, this material is not very popular for placement in the bathroom. The only option for such a material that is convenient to place in bathrooms is forging. Forged products look very beautiful and add chic to any room. But since most often they are open, they serve more as decoration. Beautiful tubes, towels or decorative figures look great on them.
Glass
This material tolerates high humidity well. Cabinets made from tempered glass are very durable. They have rounded corners, which helps reduce injuries.
This option is great for small rooms, as it visually gives it more space. Perhaps the only drawback is that all content is not hidden from prying eyes. But this can also be avoided if you purchase models made of frosted or tinted glass.
From plasterboard
This type of material is used for built-in cabinet models, which can be made with your own hands and covered, for example, with paint or even ceramic tiles.
The choice of material is of great importance for the bathroom, since it has special environmental conditions that negatively affect the products. Therefore, you need to approach the issue of choosing material for a bathroom cabinet with great responsibility.
Dimensions
The sizes of bathroom cabinets can be completely different. Therefore, it is always possible to choose a suitable cabinet for any room.
Wall cabinets can be small, up to 15 cm deep. This option, of course, is not particularly spacious, but is excellent for the necessary hygiene products for everyday use.
When it comes to cabinets, they most often have a narrow design, their width is 20 cm or more. Many people like to place them in pairs on both sides of the washbasin.
There are no size restrictions for a wardrobe. The main thing is that it does not take up too much space in the bathroom, which will create significant inconvenience.
Colors
The choice of color for bathroom furniture is limited only by the imagination of the homeowner, because on the modern furniture market you can find everything you want. It is better, of course, to follow the color scheme of the decoration and furniture, then the interior will look more attractive.
Some people prefer bright and catchy furniture or even noble dark shades.
If the exact color you need is not in stock, you can always order the desired product. Of course, it will take some time to make, but it will have an individual design and will fully meet your requirements.
Plastic doors for sanitary cabinets
Plastic doors for a toilet cabinet are the easiest to install and, importantly, will fit seamlessly into any interior. Another important advantage of plastic products is moisture resistance and resistance to other types of influence.
Plastic doors come in a wide variety of designs, which allows you to choose a model for any style solution
A wide color palette provides plastic products with enviable popularity
Such doors are easy to clean; a simple damp cloth is enough, and in case of heavy contamination, you can use various cleaning agents without fear of harming the material.
Choosing a color scheme
Traditionally, neutral shades close to pastel colors are preferred in the bathroom and toilet. However, modern materials allow you to choose absolutely any color scheme. The plumbing cabinet in the toilet must comply with the same rules.
Light plastic doors, successfully matched to the color of the ceramic tiles
Dark doors in contrast to the finish of the plumbing unit
The main thing is not to forget about the rules of combination when choosing shades for your design:
- Combine warm shades with warm, cold with cold.
- Use 1 main color and 2-3 shades of it.
- Maintain balance in color combinations. If you choose bright colors, balance them with discreet elements.
- To avoid making a mistake when choosing a color scheme, use the color combination table.
The technique of combining contrasting colors is relevant. In a light-colored toilet, doors can become a bright accent. Or, on the contrary, to decorate the doors you can use the same color scheme as in the entire toilet, so as not to attract attention to the cabinet and make it invisible.
Louvered swing doors with beige tiles
Construction technology
Placing the structure behind the toilet
Before you make a closet in the toilet with your own hands, decide on some nuances: will you cut out all the parts yourself or will you make them to order. The second option is simpler, since all that remains is to mount everything.
Start making a closet in the toilet with measurements. Choose the place where it will be placed and measure the height, width and length of the future furniture. Most often it is located behind the toilet or in a special niche made of plasterboard.
It is convenient if the structure takes up the entire wall, especially when the room is narrow, as in a Khrushchev-era building. If the bathroom is square and the wall behind the toilet is quite wide, it is still more convenient to install a solid cabinet. It can be continued by placing additional drawers on the side of the toilet.
Mounted
Making a wall cabinet in the toilet behind the toilet with your own hands is as easy as making a floor cabinet. It will fit perfectly into the interior of a small room.
List of tools and materials:
- natural lumber or laminated boards;
- wood glue;
- screwdriver and electric drill;
- knife saw or jigsaw;
- Grinder;
- screws;
- shelf holders (it is possible to do without them by simply placing the shelves on glue);
- furniture hinges and handles or hidden aluminum profile;
- primer, paint, varnish or self-adhesive film;
- wall mounts.
Process description
Since the dimensions of the toilet, ceiling height and amount of free space are different for each apartment owner, you need to determine all the parameters of the cabinet yourself. After this, they begin to create the drawing.
This cabinet model can be used both in a toilet with pipes hidden in the wall, and where communications are located outside. In the second case, you will have to provide slots in the bottom and make segmented shelves inside, and for aesthetic reasons, abandon the open space under the doors.
The work is performed in this order:
- Mark the dimensions of the parts on the boards and cut them along the marked lines. Since there are many paired pieces in this design, they can be cut at the same time by placing two boards together.
- If necessary, make openings for pipes, having previously made a pattern from cardboard and tried it on.
- They pass along the cuts and surfaces of the workpieces with a grinding machine. This operation is carried out until the wood becomes completely smooth and stops scratching the palm.
- All elements are primed and painted, and if desired, varnished. The easiest way is to cover the parts with a special film, which is available in a large assortment: single-color and multi-color colors, imitating wood, marble, granite and other materials.
- The frame is assembled, the doors are installed on the appropriate fittings and the shelves are secured.
- Screw the wall mounts.
Open shelves
Stylish storage in the toilet.
Open shelves can transform and complement any interior. They are especially relevant in tight spaces. Such storage systems do not clutter up the space, give a feeling of lightness, and can visually change the interior for the better. For example, in a cramped room they should be installed on a narrow wall, this way you can visually stretch it out, thereby expanding the space.
Homemade storage system in the toilet.
Neat open shelves in the toilet.
Open shelves in the toilet.
Storage in the toilet on open shelves.
Storage in a small closet.
Stylish design of a small toilet.
Special racks
Complete toilet storage system.
So that owners of small apartments do not feel discomfort and do not rack their brains about how to organize storage in the toilet, modern furniture brands have developed many convenient multifunctional storage systems. Today you can find many original toilet sets in a variety of styles. For example, an elegant metal shelving unit would be suitable for a classic-style toilet, a laconic white set would easily fit into a Scandinavian setting, and stylized wooden models would be appropriate for a rustic style.
Stylish model of a toilet cabinet.
Just what you need for a small toilet.
Neat storage in the toilet.
Open shelves
Stylish storage in the toilet.
Open shelves can transform and complement any interior. They are especially relevant in tight spaces. Such storage systems do not clutter up the space, give a feeling of lightness, and can visually change the interior for the better. For example, in a cramped room they should be installed on a narrow wall, this way you can visually stretch it out, thereby expanding the space.
Homemade storage system in the toilet.
Neat open shelves in the toilet.
Open shelves in the toilet.
Storage in the toilet on open shelves.
Storage in a small closet.
Stylish design of a small toilet.
Functions
The functional role of such a cabinet in the toilet room can be varied.
Masking of communication elements, i.e. various pipes that can run along the walls in the toilet. At the same time, the cabinet does not restrict access to these pipes, but simply hides them from view. Such products extend the service life of some equipment: ball valves, water meters, flexible hoses
Thanks to the design of the cabinet, these parts are protected from humidity, as well as condensation and dust, due to which they will perform their functions in the apartment longer. The storage function that such cabinets perform is also important. They become an ideal place for storing household chemicals and various household utensils
Thanks to the ability to put such things away in a compact dressing room, the surrounding space is not overloaded, and it becomes easier to maintain order. In some rooms, such a cabinet also plays a decorative role.
Layout
When deciding to hang shelves in the toilet, you need to think about how to do it correctly. When installing shelves behind the toilet cistern, take into account that they should not be bulky or bulky. Bathrooms and toilets are rooms with high humidity, so this feature must be taken into account when choosing shelf material.
When choosing a place for shelves or a cabinet, you should remember that it should not interfere with quick access to valves, meters or boilers, that is, those items that can be used urgently. Access to these items should be easy and quick.
When planning the design, you should pay attention to the option where the cabinet is placed around the riser. Such cabinets are usually made independently, since store options do not always offer models in the required size or design. In addition, products made independently will cost less than the purchased option.
If you make shelves or a cabinet yourself, you should first draw a picture, and then make a drawing based on the sketch, taking into account all the details
In addition, products made independently will cost less than the purchased option. If you make shelves or a cabinet yourself, you should first draw a picture, and then make a drawing based on the sketch, taking into account all the details.
Freestanding models
The design mainly consists of open shelves. The advantage of this option is convenient access to things and the ability to hide some items behind the facades. The downside is that you need to constantly maintain order.
The cabinet takes into account the shape and dimensions of the toilet. This model can be found in showrooms or made to order. Or do it yourself: all you need is furniture panels, timber and fasteners.
Neoclassical-style furniture fills the entire wall space and forms a spacious storage area in the toilet.
The metal rack is compact; for such a design, the model of the toilet is unimportant. Decor and household items are stored on glass shelves.
The cabinet does not take up much space, but is quite spacious - ideal for a small bathroom. Frosted glass fronts hide the contents of the shelves.
Assembly and installation
Begin installation by installing support bars, guides and internal horizontal partitions. Be sure to use a level to attach all cabinet pieces as level as possible.
You need to drill holes carefully.
When drilling holes in walls, floors and ceilings, try to do it more carefully
It is important that the diameter of the resulting holes is equal to the diameter of the purchased dowels
The shelves need to be attached as evenly as possible.
Also pre-drill holes in wooden blocks, chipboards, MDF with a thin wood or metal drill. This is necessary so that when screwing self-tapping screws into workpieces, the latter do not crack due to expansion and internal pressure. The diameter of the hole must be less than the diameter of the screw. If this condition is not met, the reliability of the connection will be at risk.
If you are installing a plumbing cabinet that hides the piping, heating boiler, water heater, floor heating pipe system or other plumbing fixtures from view, installation will be easier. Here, the need to install internal horizontal shelves is partially or completely eliminated.
It is much easier to make a cabinet that simply hides communications.
Drawing
Let's draw a future closet on a piece of paper. In the figure we indicate the hatch door. The bottom of the hatch should not be lower than the height of the barrel so that it can be opened. If the barrel is planned with a vertical drain mechanism, with a lever, you need to take into account the height of the drain handle.
Note: the dimensions of the hatch door are standard and can be viewed on any seller’s website.
Together with the cabinet drawing, we will draw a frame diagram. The frame of the sanitary cabinet between the walls of the toilet is not complicated. Vertical racks near the walls and in the places where the hatch is installed. Horizontal racks on the ceiling and floor, as well as reinforcing racks along the bottom and top of the hatch installation. Around the installed hatch, a kind of frame should be formed from profiles for drywall, and the profiles themselves must be reinforced with a wooden beam in order to be able to secure the hatch door.
How and from what materials you can make a cabinet in the toilet behind the toilet with your own hands
First you need to decide what items you will store in the closet. If
they will be heavy, then take chipboard. If these are powders and household chemicals, then it is better to go with plywood; its thickness is enough for 1 cm.
To make the structure look good, take chipboard; it can be covered with film or decorated in some way.
Before you start making the cabinet, correctly calculate all the dimensions. Sketch a drawing of your design, taking into account your desires and capabilities. Do not forget that the closet should be closed with all the pipes and accommodate everything that you want to put in it. At the same time, meters and valves should be easily accessible.
Prepare materials and tools in advance. Among the materials you need to take:
- furniture magnets;
- corners;
- aluminum corner profiles to attach shelves;
- self-tapping screws;
- furniture hinges;
- beams for the frame;
- dowels
Take the following tools:
- screwdriver, screwdrivers;
- roulette;
- drill;
- building level;
- marker.
To install the frame you need to take beams of size 30x30 mm.
Markings should be made using a level and tape measure. Markings are made where the cabinet will be located. Using corners and self-tapping screws, assemble a frame from bars. Then secure the frame to the wall. This will be the backbone of the future cabinet. Don't forget to treat the bars with stain, varnish and paint. Make blanks for the shelves, making all the measurements and markings on the boards in advance. Metal corners will serve as the base of the shelves. Since shelves are needed not only for storing household chemicals and other things, but also for hiding pipes, so make a slot where the pipe will pass. Place shelves on the corners. If you want to be able to remove the shelves or change them, you can simply put them on the corners or fasten them so that they hold firmly. If the goal is only to hide the pipes for aesthetic reasons, then it is best to opt for dense plastic panels. After all, the main thing here is strength,
so that the blow does not break the integrity. A quick way to check the quality of the plastic is to squeeze a corner of it: if it wrinkles, then it’s not a suitable option. Choose better quality and more expensive ones.
Such panels are secured with clamps. The structure must be disassembled, because easy access to the risers is needed. Make an L-shaped profile along the wall to start. The valves will be located behind a plastic hatch that can be installed with plastic pipe sealant. Ventilation grilles must be installed at the top and bottom to prevent the pipes from rusting due to excess moisture in such places.
It is clear that this is just a list of options for how to make shelves and cabinets in the toilet. Show your imagination by comparing it with your capabilities and desires. This design will help make the free space functional.
Variety of materials
The shelves should be durable and wear-resistant and not afraid of washing. Popular materials are as follows.
Drywall. The universal material allows you to create structures of any kind. Usually mounted on a metal profile for strength. When making it yourself, you first need to prepare the frame, and then attach sheets of drywall of the appropriate size. The surface is leveled with putty, then you can start decorating.
Tree. Only high-quality material is used, boards without stains or deformations. Before making wooden shelves, you must carefully sand the surface. Be sure to varnish the boards so that they do not suffer from external influences. The stain will allow you to change the shade of the wood, and the burner will give the effect of antiquity.
OSB. The sheets are much stronger than the previous version. It will not be possible to decorate products with carved monograms; the material crumbles. OSB boards have an interesting pattern, so you can not paint them, but simply varnish them or use stain, as is the case with wood.
Metal and glass. The fastenings are made from the first material, and the shelves themselves are made from the second. It is worth choosing glass at least 6 mm thick. Otherwise, the structure will not withstand the load and will quickly break. Fastenings can be purchased at a hardware store, and glass of the required size can be ordered at a workshop.
It is important to space the supports evenly. Metal shelving can be used without glass
It is convenient if they are equipped with wheels and can be moved at will. Cleaning the structure is very easy. The only drawback is the heavy weight.
Plywood. Shelves can be made from material 6-10 mm thick. It is noteworthy that plywood bends and allows you to create intricate shapes. You can make a shelf for your phone or magazines from plywood 4 mm thick. Self-tapping screws of suitable size are used for fastening.
Plastic. You won’t be able to make such a shelf yourself, however, stores offer a wide range of different sizes and designs. You can additionally decorate with paint or self-adhesive paper. A fairly budget option that is not afraid of high humidity.
Ideas for creating a cabinet in the toilet behind the toilet with your own hands (20 photos)
To reduce renovation costs, you can make a closet in the toilet yourself. The location behind the toilet is the best option, which takes up minimal space. In our article we will tell you what materials are used when creating a cabinet with your own hands.
Tree
We come up with a design for the future structure, buy bars, and install the frame. To increase service life, we treat the surface with protective impregnation.
We use a niche to create an open closet. We paint the shelves in the required tone. In this case, the acid green color repeats the shade of the ceramics on the walls.
We measure the dimensions of the recess, calculate and create a wooden structure, and install drawers.
We decide on the dimensions of the wall-mounted model and assemble the cabinet for the toilet.
Such a door can be purchased at a kitchen showroom. We first close the communications using sheets of plasterboard, cover the surface with ceramics, leaving an inspection hatch, and finally install a wooden facade.
Plastic
We create the frame and internal shelves. We purchase plastic facades with glass ready-made or to order, and install them to the base ourselves.
Material: chipboard, top layer – plastic. Taking into account the exact dimensions, we order cabinet doors, create shelves, and then hang the fronts.
Ceramics
Using metal profiles and sheets of plasterboard, we close the correctly selected installation, then we mount an open niche for decoration. We lay tiles on top of the gypsum board.
We fix the metal guides, cover the gypsum board structure, putty and decorate the surface.
Doors with lathing
First we create the base of the cabinet, cover the walls with tiles, and fix the finished doors last.
PVC or wood is used for the facade. Installation is quite simple; the day before you only need to prepare the block frames, special fastenings for the lock and hinges. For protection, it is recommended to coat the material with stain or varnish.
Guides and drywall are at the base; we lay ceramics on top, leaving a niche for inspection. We close the opening with doors.
We cover the wall with the installation with plasterboard, install an inspection hatch, and close the niche with contrasting roller shutters.
Roller shutters
An economical option that is easy to install yourself. Roller shutters help hide communications, and use the rest for storing items.
Glass
We fill the recess in the wall with shelves and hang a glass facade.
We close the niche above the installation using mirrors.
The inside of the glass has a matte finish.
Combined options
Glass blocks are inserted into the MDF sheet.
Sliding opening system. The door leaf consists of laminated chipboard and frosted glass.
Furniture blinds
Another option to achieve the same result is a sanitary cabinet in the toilet with furniture roller shutters. Blinds are relatively expensive, but they are one of the most convenient and visually attractive ways to hide water pipes. Plumbing roller shutters can be made of aluminum, plastic or wood. They can be painted in any color, applied with a drawing or photo print. Plastic tolerates high humidity and contact with aggressive household chemicals better than other materials. Another advantage of blinds is the ability to control them from a remote control, which ensures hygiene. Horizontal and vertical sanitary blinds can be ordered to suit your size.
Furniture blinds for toilet
Dimensions and design
There are several options for such lockers:
- A cabinet from ceiling to floor is good in terms of maximum access to communications; additional removable shelves can also be installed inside it;
- Small hatch - designed to hide meters; if you still think about using it for communications, you need to check the condition of the pipelines;
- Medium size (example: 50x70 cm) – provides access to the counter, makes it possible to install several shelves;
- Under tiles - the size depends on the tile itself.
ceiling to floor wardrobe
small hatch
the average size
under tiles
Purpose
The toilet is a very important part of the home, the further ease of its use depends on its proper arrangement. For better ergonomics, a so-called plumbing cabinet is used here, often acting as a hatch in the wall. Let's consider the main purposes of its use:
- hiding communications is the main task of this product. Hiding all the pipes by installing them in a specially designated piece of furniture is very convenient and practical. Exposed communications rarely fit into existing designs, so it's easier to hide them. They lead to most apartments in a special niche, which can easily be converted into storage;
- arranging additional space for storing household chemicals and other cleaning accessories will not be superfluous. Dividing the space into zones for pipes and shelves will help save a lot of space, which is so necessary in cramped bathrooms or separate toilets;
- access to meters should always be free, so placing them in an accessible place, hidden by furniture doors, will allow you to easily check water consumption in the house;
- Pipeline breakdowns that may occur during the life of the house are easier to repair in easily accessible places than in niches walled up with tiles or clapboard. The cabinet simultaneously hides the pipes from the residents of the house and allows the plumber to get to the pipes if a leak occurs.
Development of a design drawing
Any design, even the simplest one, needs detailed elaboration. Creating a drawing will allow you not to be distracted by calculations and correcting errors during work.
Detailed design drawing
First, you should draw several sketches, choosing the location of the cabinet, its interior space, and the design of the facade. Then it is necessary to measure the height of the room and the width of the free space behind the toilet so that it becomes clear what dimensions of the structure are acceptable in the existing conditions. The drawing shows the location of pipes and other communications, linking their position to the corner of the room.
Sketch drawing
Taking into account the data space obtained during the measurement, a detailed drawing is developed, which shows the location of the cabinet, communications and access to them, frame features, top and bottom covers, shelves, doors, places and methods of fastening individual elements.
The principle of fastening the frame and shelves
The width of a typical toilet varies between 820 – 850 mm, so the installation of shelves with cutouts for pipes (about 250 mm) occurs across the entire width of the room.
There are several door design options:
- Traditional swing doors require free space for opening.
- The sliding sash does not require free space.
- Roller shutters can be used as a shutter, the blade of which moves up and down along the side guides.
- The interior space can be closed with blinds or curtains.
Mirror swing doors
Accessories
The service life of the entire structure, including doors, largely depends not only on the mode of use of the cabinet, the raw materials from which the products are made, but also on the quality and strength of the fittings used to fasten the elements and provide quick access to the interior of the cabinet.
Most often, the following additional elements are purchased to equip plumbing cabinets.
- Hinges for fastening the doors are the main part that holds the entire mass of the door. Such fittings regulate the issues of opening and closing. Since condensation can often accumulate on the pipes inside the cabinet, the hinges should be made of stainless alloys, which will extend their service life;
- Closers that provide fixation and smooth closing of doors. This fittings are installed in cabinet models with hinged doors;
- When installing roller shutters as structural doors, it is worth selecting models with an internal frame that will be attached inside the structure. The laconicism of the entire structure in the interior depends on this nuance;
- Secret-type doors are equipped with locks and various latches; you should carefully select such fittings, since the possibility of uninterrupted access to communications located in the cabinet will depend on its serviceability;
- To increase the tightness of the shutter closures, they are sometimes additionally equipped with furniture magnets.