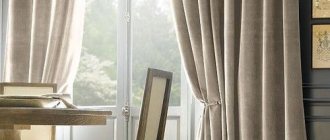
The final stage of renovation work in a house or apartment is usually the purchase of window textiles - curtains, curtains and drapes. But in order for these decorations to harmoniously complement the design, they need to be secured to the wall with something.
Window cornice is an important element of interior decor
Before hanging a curtain rod on the wall, you need to accurately mark the surface and take into account all significant dimensions. Each type of cornice has its own installation method, non-compliance with which can lead to damage to the wall or window textiles. The rest of the article describes in detail how to hang a curtain in accordance with all the rules and regulations.
How to hang a curtain rod on the wall?
The cornice must be chosen such a length that the completely open curtains open the entire window opening
At first glance, the question of how to attach a curtain to a wall does not pose any difficulties. What could be easier: drill the wall and that’s it. But in reality everything is much more complicated. It is necessary to take into account the geometric parameters of the room, which are very often far from ideal. Also an important role is played by the material of the surface on which the fasteners are planned, as well as the side of the world on which the windows face.
Calculate the correct height at which the cornice will hang
So, let's summarize. What influences the suspension installation process?
- Dimensions of the room and its geometric parameters.
- Type of cornice.
- Mounting surface material.
- Type of window textiles, its weight and quantity.
- The side of the world that the room's windows face.
- The presence of a window sill and the size of its protrusion relative to the window.
- The presence of a heating radiator.
Important! Before you begin installing a hanging structure for curtains, find out the material of the surface to which you plan to attach. The choice of fasteners, as well as their quantity, will depend on this.
Basic parameters for determining where to attach the cornice
The first step is to decide on the gap between the outermost tulle and the window opening. Here attention is drawn to the most protruding surface. Usually this is a windowsill or a heating radiator. When renovating a room, carried out in compliance with all building rules and requirements, the width of the window sill should be greater than the edge of the open window, and the heating radiator should be installed exactly under the slope. Therefore, the indentation is made from the window sill.
Not all apartments have window geometry made according to GOST standards. Moreover, modern construction in our country is determined by European trends. This is also where construction standards come from, which clearly differ from those adopted in our country. Therefore, when determining the gap between the outermost (usually tulle) curtain and part of the window, immediately take into account these three distances:
- from the windowsill;
- from battery;
- from an open window.
The minimum gap value is 7-10 cm.
At the next stage, you need to pay attention to the geometry of the wall and ceiling. The curtain crossbar should be positioned strictly parallel to the ceiling joint with the window. With this placement, the visual qualities of the room will be properly respected.
Taking measurements when choosing cornices and curtains
Advice. Be sure to place the suspension or its brackets parallel to the ceiling.
To do this, step back the same distance from the ceiling for each bracket and make a mark for the holes.
We mark on the wall the places where the holes will be made
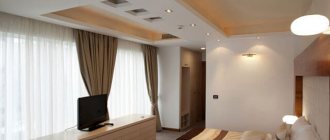
The height of the indentation depends on the brightness in the room. If the bedroom windows face south, then there will be a lot of sun during the day: in this case, it is better to hang the curtain almost right up to the ceiling (a 5 cm gap will be enough). If the room is located north, the indentation can be increased to 15 centimeters.
Making holes for the brackets using a drill
Types of cornices and their features
There are different designs of curtain rods. They all have their own advantages and disadvantages. Initially, the type of design was determined by the material of manufacture, but the development of technology has practically eliminated the difference and made it possible to manufacture samples of any shape and size. Today, the choice of design is determined by the features of the interior and the structure of the ceiling or walls of the room. Let's look at the types of curtain rods.
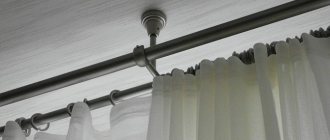
String
Such structures consist of two rigidly fixed brackets, between which a steel wire is stretched. A special feature of these products is the ability to adjust the length to the size of the room with an accuracy of millimeters. Typically, string cornices are attached to the ceiling slab. This somewhat limits their use due to the widespread fashion for suspended or suspended ceilings. The tension force of the string requires a strong and very rigid supporting plane, otherwise it will be deformed or completely destroyed.
The appearance of string cornices leaves much to be desired, so they are usually covered with decorative panels or hidden under the ledge of a suspended ceiling, plasterboard structure or other masking element. The cost of such products is the lowest, they will suit almost any interior, which has made string samples the most common of all alternative varieties.
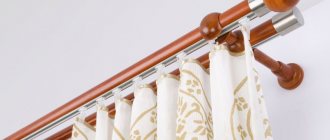
Tubular or rod
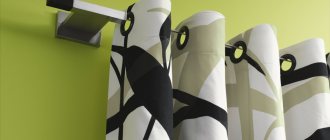
This design is a tube supported by two (for longer lengths, three are used) brackets. A special feature of this type is the open placement of the tube, so it should look attractive. There are metal, wooden or plastic products of rod construction. To attach curtains, rings with hooks (hooks, clothespins or “crocodiles”) are strung onto the tube.
There are tubular curtain rods for plastic windows without drilling, which are a telescopic type structure. They form a spacer installed between the frame slopes. This is a type of mini cornice, sometimes called a "cafe". A good option for rooms that do not allow attaching conventional types - with suspended (suspended) ceilings or plasterboard walls.
Tire
These are flat slats with longitudinal channels in which curtain hooks are installed. They are mounted only on the ceiling, which somewhat limits their use in high rooms
The advantage of such structures is that they are compact, neat, and do not attract attention. Suitable for any interior, although in rooms with expensive furniture sets made of natural wood it is better to look for other options
The disadvantage of tire kits is the difficulty of replacing hooks, which often break. For installation, holes are made in the strip and sockets are drilled for dowels in the ceiling slab. If a suspended ceiling is installed, it is necessary to pre-attach support platforms at the level of the tension web. The tires are attached to them through the film. The method is rather dubious, since any damage to the canvas is fraught with its destruction. This must be kept in mind when planning the installation of a cornice.
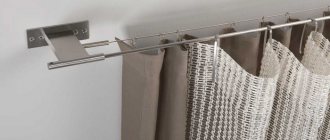
Profile
This is a type of rail curtain rod designed for installation on a wall. It is a durable aluminum profile that is mounted on brackets. The advantage of this design is that any height of the cornice from the ceiling is allowed. Disadvantage - can only be used for light curtains or curtains made of tulle. The reason for this is that the distance of the profile strip from the wall is about 20 cm. This creates a lever that, with great force, is capable of tearing the cornice away from the load-bearing plane.
Sometimes profile and tire types are confused with each other. It is easy to distinguish them - the profile is attached to the wall on brackets, and the bus can only be screwed to the ceiling.
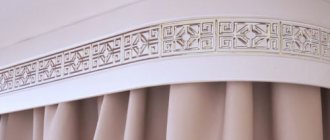
Baguette
Stylish, visually attractive option. It is a strip of baguette covering a string, profile or bus support structure for curtains. You can use a single-row or double-row system. It is noteworthy that the baguette itself performs only a decorative function, being, in fact, only a decoration.
Its advantages are:
- wide choice of sizes, materials and colors of baguette profiles.
- the ability to combine an unattractive system with any interior, furniture, wall decoration style or curtain material.
The use of baguette cornices makes it possible to correct installation defects, hide unattractive curtain hangers, and decorate the supporting system. This made baguette designs popular and in demand.
Assembling the curtain before installation
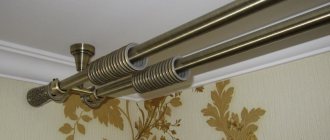
Installation instructions for metal cornice with decorative elements
Before hanging the curtain rod on the wall, it must be completely assembled on the floor. The most common design is a direct suspension, consisting of:
- metal guide (crossbar);
- brackets;
- rings or clothespins for securing curtains;
- stubs;
- decorative body kits;
- fasteners
Rings and clothespins may be missing. Instead, loops are sewn onto each curtain, tulle or lambrequin through which the crossbar is threaded.
First, rings (if any) are put on the crossbar. Then the brackets are attached. The location of the latter depends on the manufacturer of the product. Some companies include compatible grooves in the brackets and crossbars, allowing you to easily attach the two elements together. Other models are fixed in an arbitrary place. In both cases, fastening is carried out using special bolts.
After installing the bracket, they proceed to installing the plugs and decorative components of the suspension. Most often, decorations are made in the form of metal forging and wood carving. For ease of installation, they are combined with plugs.
We fix the brackets in the selected places
Advice. When choosing forged metal products, pay attention to the finishing of the surfaces. In order for the curtain to maintain its beautiful appearance for a long time, it must be treated with a primer or special resistant paint. It is worth noting that it is difficult to repaint forged twisted parts yourself.
After fixing the plugs, as well as marking the wall, you can proceed to drilling holes for fastening the suspension.
Cornice mounted on special brackets
Color solutions
The color of the metal curtain rod is selected:
- Match the shade of the wall covering. The bar can match in color or act as a contrasting accent.
- For ceiling decoration. A bar in the color of the ceiling allows you to visually increase the height of the room.
- Depending on the types of curtains. Curtains and cornices should create a single stylistic ensemble.
- Under furniture or lighting fixtures. Forged elements that replicate the decor of a chandelier or the shape of furniture handles look interesting.
The metal bar looks great in its “natural” form. The noble shine and specific texture do not require painting.
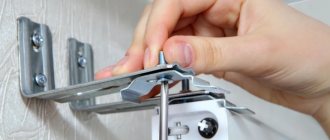
How to attach the bracket to the wall?
Schemes for installing a profile cornice to the wall
The procedure for attaching to the wall (as well as to the ceiling) is the same in all cases. The only difference is the choice of fastening elements, which in turn depends on the wall material.
Installation of profile cornices to the ceiling
This is what material the wall can be made of.
- Brick.
- Cinder blocks.
- Gas silicate blocks.
- Reinforced concrete slabs.
- Wooden beam.
- Plasterboard cladding.
- Layer of plaster.
The last two points, of course, cannot be present in the apartment as an independent wall material. But as a finishing layer - easily. When installing a hanger for window textiles on a wall, the best base for mounting is wood, concrete or its derivatives. In the presence of drywall or an impressive layer of plaster, the inexperienced layman has to be puzzled.
For mounting brackets to a brick or concrete base, ordinary dowel-nails are suitable. The diameter of the fastener, as well as its quantity, is selected based on the weight of the product and the textiles on it. Accordingly, the higher the weight, the larger the diameter of the dowels you will have to buy. For “particularly severe cases” you may even need anchor bolts. They are made of metal, so they carry high loads.
Installing a ceiling cornice to a concrete ceiling
Anchors must be installed for large curtain formats. For example, Japanese sliding structures for panoramic windows have an impressive weight due to their steel base, as well as an automatic sliding drive. In this case, you cannot do without high-quality fasteners.
But ordinary dowels are not suitable for plasterboard sheets. Here you will have to buy special drop-down fasteners. A butterfly dowel works great. Thanks to the increased fixation plane, the gypsum board does not deform under significant loads. But for heavy objects you will still have to use the same anchors. In this case, the order of work is as follows:
- a sheet of drywall is drilled with a wood or metal drill to the base of the wall;
- after a complete passage of the drywall, the main wall is drilled with a drill in stone or concrete to the size of the anchor;
- the entire structure is secured through a bracket into a metal dowel.
Be sure to keep in mind that the anchor must extend into the concrete wall to its full possible length. With this method, the reliability of the structure will be high.
The most unpleasant case is the presence of a thick layer of old plaster, which also crumbles at the touch of a finger. It is very problematic to secure anything in such a wall, not to mention a heavy curtain. Here you have two options.
- Use an anchor in the base of the wall.
- Strengthen the plaster layer with special compounds.
If you are going to hang one light tulle in the kitchen, there is no need to drill the wall to the brick. Do the following:
- drill a hole of a larger diameter for the dowel (2-3 mm);
- insert the dowel, filling the voids with liquid nails;
- let the mixture harden;
- attach the bracket.
This is a very reliable method of fixing the suspension in a loose layer of plaster.
But if we are talking about the full design of a window opening (lambrequin, curtain, etc.), then only anchors will help here. The procedure is the same as for installation in drywall. Upon completion of installation, gaps in the plaster must be filled with cement mortar or tile adhesive.
Scheme for attaching a cornice to a suspended ceiling
If the ceiling is suspended or suspended: what to do?
Recently, suspended and suspended ceilings, which are not intended for additional loads, have begun to “appear” in people’s homes. In this case, you can use two options, such as:
- During the installation of such ceilings, it is necessary to take care of the installation of mortgages, to which, subsequently, either brackets or ceiling cornices will be attached.
Mortgages under suspended ceilings - During the installation of such ceilings, it is necessary to provide special niches so that it is possible to attach the products directly to the primary ceiling.
Second way
Both options are often used because they actually solve the problem. In the second case, you get a hidden cornice, which often looks more modern and mysterious.
When installing mortgages, there are 2 options: installing a solid block of wood or installing small sections. Naturally, installing a solid block will help save some time on fastening, and also makes the fastening more reliable, unlike separate bars. When installing individual bars, you need to remember the distance between them, knowing in advance which cornice will be installed.
Due to the curvature of the ceilings, when installing suspended or suspended ceilings, they have to be lowered by more than 5 centimeters, so installing mortgages becomes more complicated. In this case, the mortgages will have to be attached to metal corners. It should be calculated so that the lower surface of the mortgage is at the level of the ceiling frame.
If you need to lower it lower
If the ceiling is mounted from plasterboard, then the profile can be used as a mortgage, securely fastening it to the ceiling. To secure the cornice, you will have to use metal screws. This fastening is quite sufficient for reliable fastening of the cornice.
Hidden niche for a cornice on a suspended ceiling. Installing a niche under the cornice from Asta M
Attaching curtains to two windows
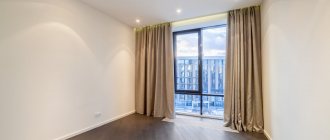
Very often people ask: “If there are 2 windows in a room, how can I hang a curtain on 1 cornice?” There is no particular difference when installing the suspension on two adjacent window openings instead of one. Here it is worth paying attention to the size of the room. If the room is smaller and you want to visually enlarge it, then it is better to install a separate cornice for each window opening.
But for large rooms, especially if there are high ceilings, installing one solid pendant will give the room a frantic grandeur.
The installation process is the same as for one opening. Maintain all significant gaps. If you plan to install one solid cornice, consider the number of brackets per crossbar length. There should be 2 brackets for every two meters. That is, if the length of the crossbar is 3 meters, then there should be three fastenings to the wall.
Self-installation of a tubular cornice
How are curtains attached to the cornice?
Curtains are placed on a metal cornice due to:
- Kryuchkov. Inexpensive holders, easy to remove and hang, universal.
- Curtain tape. The tape is sewn onto the fabric to form folds. Attached to the cornice with plastic loop holders.
- Eyelets. They ensure the sliding of matter, look stylish, and are suitable for rooms in any style.
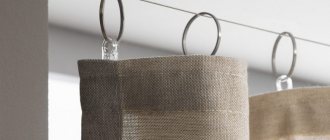
- Rings. A simple mount that gives the window design an interesting look. Provides effortless opening and closing of curtains.
- Kuliski. A pocket formed from the top of curtains. Minimizes friction, prolongs the service life of curtain rods, and ensures silent movement of the curtain. Option for thin materials.
- Loop. They do not damage the bar, move gently, do not create excessive friction, and do not scratch the profile.
- Alligator clips. They can ruin the canvas and sometimes look old-fashioned. Suitable for vintage and classic curtains.
Dismantling rules
If you need to remove an old curtain hanger, there are a few rules to follow.
- First, remove the curtain from the rings, clothespins, or hooks.
- Next, carefully unscrew the screws, being careful not to touch the facing part of the brackets.
- After the last screw is unscrewed, the suspension can be freely removed.
The dismantling process is best done by two people. This way you are guaranteed to save the product.
If you are hanging a new cornice, you need to drill out the old dowels from the holes and seal the wall with cement mortar.
Check out the selection of photos below that show different methods of attaching curtains to walls.
The mounting of curtain hangers on walls can be determined by different cases. The presence of suspended ceilings that do not allow the brackets to be fixed without damaging the integrity of the coating, incorrect ordering of window textiles according to the length - all these shortcomings are easily eliminated by installing them on the wall.
Accessories
Metal curtain rod consists of:
- Basics. The bar is round, flat, ornate in shape, designed to accommodate the mechanism.
- Bracket. An element used to attach a rod to walls or ceilings.
- Fleronov. These are end caps that are placed along the edges of the curtain rails. They can perform an exclusively practical function and be part of a decorative design.
In addition to the cornice, curtain hooks, rings, and clips are purchased. To decorate the visor of the rod, hoods are placed.
Metal curtain rods are suitable for any room: living rooms, bedrooms, kitchens, bathrooms. The resistance of many types of metal to temperature and corrosion allows us to recommend strips for decoration without restrictions. It is important to avoid scratching the surface and not to use aggressive cleaning agents.
Safety precautions
- When fixing ceiling cornices or wall structures, do not forget about the safety rules:
- Before starting drilling, put on a respirator and safety glasses.
- Please note that working with a hammer drill involves the formation of a large amount of dust, so it is recommended to use a professional power tool with an industrial vacuum cleaner included.
- Only use stable stools or stepladders.
- Make sure that there are no wires in the drilling area that could cause an electric shock if you touch them.
If you doubt your abilities, it is better to call a master who will quickly and efficiently do all the work for you.