The classic design of a window opening will require hanging a cornice - a structure consisting of 2 or more brackets, a crossbar or rod and tips. Using rings, clothespins, ties and other devices, curtains and (or) curtains are hung on the base. The decorative system is selected to match the interior design of each room in the house. But even a carefully chosen style and color does not guarantee that it will fit neatly into the space. It will complement it, decorate it. To ensure the perfect look of the window, you need not only to choose curtains wisely, but also to hang the curtain rod correctly on the wall or ceiling. Knowing a few secrets, it won’t be difficult to do it yourself.
Which cornice is better: ceiling or wall
The main advantage of a ceiling cornice is the ability to use long curtains, from the ceiling surface itself, to decorate a window. Thanks to this, it is possible to visually make the room much higher than it actually is. By using the ceiling version of the cornice in rooms with low ceilings, you can completely solve the problem of a small space.
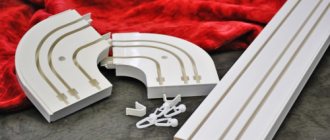
In addition, ceiling structures can be used almost everywhere, in niches too. Most often, a string cornice is installed in rooms, consisting of two support brackets and metal strings stretched between them. Its advantage is its low cost and ease of installation. The only disadvantage of such a ceiling cornice is the sagging of the strings, which require periodic tightening. It is only permissible to hang curtains made of lightweight material on it; it will not withstand heavy loads. Ceiling structures are especially relevant for decorating windows of non-standard shape.
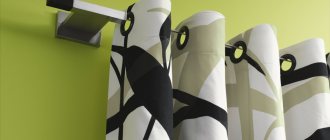
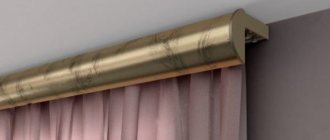
If there is no need to increase the height of the room, then a wall-mounted cornice would be an acceptable option. Its undeniable advantage is its huge assortment, where you can choose a design in country, retro or classic style. So, for rooms in a classic style with wooden panels, a wooden wall cornice would be a good solution. But metal fixtures with decorative elements such as forged parts and curlicues are best used for modern or avant-garde interiors. Plastic cornice is a universal design that fits perfectly into the design of any room.
When selecting a cornice, it is important to consider the size of the room, especially the height. You need to try to find an option that will most effectively emphasize all its best sides, and mask its disadvantages.
What not to do with curtains if you have a room with a ceiling below 2.5 m
To get the most out of the available space, you simply cannot make a number of mistakes with the textile design of the interior of the room. These techniques conceal the already limited space and visually reduce the height of the ceilings, and when they are below 2.5 meters, the difference becomes really noticeable.
Mistake #1: Using decorative cornices
Decorative cornices are an extremely popular purchase for the home, however, in rooms with low ceilings they have a number of disadvantages, namely: the cornice is usually installed below the ceiling plinth, which means that the curtains need to be selected not from “ceiling to floor”, but “from cornice to floor”, which visually significantly reduces the height of the ceilings.
The solution will be to install a ceiling cornice, which will allow you to hang the curtain to the ceiling itself and thereby visually extend the space of a room with a ceiling of less than 2.5 meters.
Mistake #2: Short curtains
Deliberately chosen short curtains, or incorrectly chosen length of the curtains themselves, “eat up” the real height of the room. If such curtains were installed on a decorative cornice, then you can immediately say: the ceilings will seem many times lower than they actually are.
Mistake No. 3: inappropriate curtain model
For example, a curtain picked up by a decorative tie involuntarily makes the room even lower. It is better if the fabrics fall in straight and concise lines to the floor.
Mistake #4: Horizontal two-tone curtains
This technique takes place in rooms with high ceilings, but not in a typical apartment. Edges at the top or bottom will only further emphasize the flaw in height.
Mistake #5: Over-decorating
We really like loops, ties, and ruffles, however, in a room with a low ceiling it can look awkward.
Adding additional decor to curtains in a room with a low ceiling is an unforgivably wrong move.
Mistake #6: Wrong proportions
Of course, we cannot change the height of the ceiling, but there is no need to lower it either. The proportions of the window and the shape of the curtains can change our perception of the room. When the shape of the curtains expands and approaches a square, the window visually lowers and appears heavier. On the contrary, vertically flowing curtains maximize space and visually increase the height of the ceiling.
Mistake No. 7: curtains that contrast with the color of the room
Dark or contrasting curtains take all the attention and, as you know, reduce the space.
Using curtains that are similar in shade to the color of the room visually allows us to feel the room as a single space, which expands the room and does not hide the height of the ceiling even in a small, low room.
Mistake #8: Focus on the window
If you have tulle glued to the window or any other way of drawing attention to the window, and the ceiling height is low, then you will get the feeling that the ceiling in the room is very, very low. On the contrary, try to distract attention from the window by any means: choose curtains to match the walls, and install contrasting decor on the walls themselves, use bright decorative pillows, etc. In addition, with this technique, as a bonus, you will get bright accents in the interior .
Mistake #9: Large pattern on curtains
The pattern should match the interior of the room. A discrepancy between the scale of the room and the scale of the pattern will negate all attempts to maintain the existing height. It is better to choose a plain curtain or a curtain with a small pattern.
For more information about mistakes with curtains in rooms with low ceilings, see the video below:
How to choose wall curtain rods
The determining factors for choosing a wall cornice are:
- Load. The structure must support the weight of the curtains. You should not use massive structures for light curtains (veils, organza), and vice versa. There must be a golden mean in everything.
- Curtain fastenings. They should be selected taking into account the material; when using them there should be no obstacles, unpleasant sounds, or “stuckness”.
- Mounting type. When using lightweight fabric, both ceiling and wall options are suitable. But for heavy curtains, it is optimal to use a ceiling mount.
- Availability of radiators and heating systems. The curtain should hang freely; if there are batteries, then they should be taken into account when installing the curtain rod.
In addition, the following points must be taken into account:
- to decorate a narrow window, a long cornice looks more harmonious, where the curtains will cover part of the wall;
- For low ceilings, it is preferable to use structures with a ceiling type of fastening.
To decorate a very large window, you need to select structures that are similar in width.
Selecting wall brackets for curtain rods
There are several types of brackets - holders. This structural element is attached to the wall; it must be made of the same material as the cornice itself. It is thanks to a good connection that the reliability of the entire mechanism is ensured. Holders available:
- L-shaped, which are attached to metal structures, they do not create difficulties during installation work or difficulties in determining the hole for fasteners;
- round in shape, collapsible - they are 1.5-4.5 cm in diameter, they are made from metal, plastic or wood, they are used for mounting both on the wall and on the ceiling surface;
- solid ones, which have holes for installing fasteners, they are more often used for wooden structures.
If we compare the degree of installation complexity among the above types of brackets, it is most difficult to work with round collapsible holders.
If the ceiling is plasterboard
If it was decided to install a ceiling cornice at the renovation stage, most likely there is a special niche in which it is installed. In this case, it is attached to the ceiling, and how to attach the ceiling cornice to concrete and wooden floors is described above. It will be a little more difficult, since freedom of action is limited, but not critical.
Attaching the cornice in a niche is a little more inconvenient
There may be a second option - without a niche. A wooden beam is fixed at the place where the cornice is installed. It is located between the drywall and the main floor. In this case, the ceiling cornice is attached to the beam through plasterboard. You need to use wood screws of sufficient length so that the body of the beam contains at least 2/3 of the length (preferably more).
But if you decide to replace the cornice with a ceiling one after the repair, you will have to look for special fasteners. These are the so-called butterfly and snail dowels. Both are characterized by an increased contact area with the material, due to which the load is distributed over a larger surface. But it’s still better not to use heavy fabrics.
Using special fasteners for drywall
Both types of drywall fasteners - butterfly dowel and snail dowel - come in plastic and metal. Stronger, obviously metal. But the trick is that most likely it is not the dowel that will withstand the high load, but the drywall. To prevent this from happening, reduce the fastener installation step. For example, you can make it 40-45 cm. This will increase labor intensity, but will give at least some hope that the structure will not collapse.
How to hang wall-mounted curtain rods
In order for the curtain to look impressive in the room, it is necessary to correctly install the wall structure.
Assembling a wall cornice
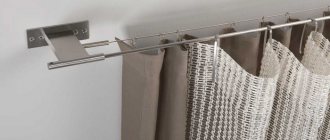
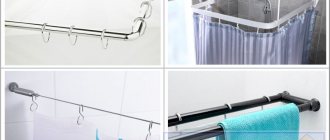
Depending on the model of the curtain rod being installed, the assembly process may vary. If it is a solid sheet of metal, then this step is skipped. There are modifications that can be equipped with brackets. To fix them, you need to tighten the bolts to form a solid structure. For example, a cornice in the form of a tire is a simplified version of this design.
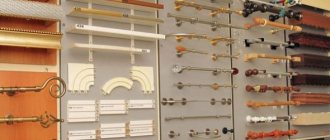
Wall cornices: photos in the interior
There are many models of wall structures on the market, each of which is distinguished by its originality and reliability. To make the process of choosing a cornice easier, you can view photos of the most popular options.
How to hang curtain rods correctly
Hanging a curtain rod generally takes fifteen minutes, but this is only if a master is working. But if a person has never done this, difficulties may arise. There are two types of cornices of this format: wall and ceiling. There are almost no differences in installation, except that wall-mounted ones are hung on the wall, ceiling ones are hung on the ceiling.
After purchasing everything you need, the question arises: at what height can you hang the curtain rod? The height can be changed, but it is best to attach it so that it is as close to the ceiling as possible, then the curtains will look much more beautiful. The most optimal distance from the ceiling to the cornice is 5-10 cm. You must pay attention to how the curtains will be attached.
At what distance from the wall to mount
The first question that arises when you start installing a cornice above a window is at what distance from the corner it should be attached. Close? Stepping back 10 cm? 20 cm?
The curtain rod should be placed so that it hangs freely without touching the window sill or heating radiators.
In fact, the distance can be from 8 to 15-20 cm. It is determined depending on the location of the heating radiators and/or window sill. The cornice must be placed so that the tulle and curtains hang freely, without touching either one or the other. Firstly, this way the drapery lies perfectly, secondly, it is better for the fabrics, and thirdly, there is better air circulation, which is important during the heating season.
Which is better: cornices on the ceiling or on the walls?
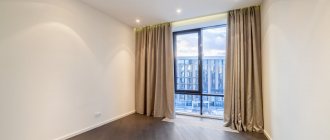
When choosing a design, you need to consider not only the type of curtains, but also your personal taste. It is important to consider the place where it will be installed. The installation height of the cornice above the window should be taken into account taking into account the aesthetic component. In this case, ceiling products look nicer in appearance than wall products, and all because when mounted to the ceiling, the curtains completely cover the window opening and all the way to the floor. The good thing is that the ceiling cornice well hides the entire curtain fastening system, which cannot be said about the wall-mounted version.
Three options for mounting the cornice to the ceiling
At what height can you hang a curtain rod? There are three design solutions:
- option - this method will visually shorten the room and reduce the window. Typically, it is used to brightly decorate trim around windows. Decorative and rich windows should always be on show, which means hanging curtains at the borders of the window so that the architectural features of the window opening are visible.
- This option allows you to properly hang a curtain rod over a window in a traditional style without adding visual interest to the room. This type is the most popular and practical.
- Option - installing a cornice in this form will make the window visually larger and taller, creating a feeling of freshness and modernity. That’s right, the walls visually appear higher, making the room look larger. In small spaces this option works very well.
Window appearance
The architectural features of your room will also help you decide on the type of mounting for the cornice. Carefully examine the window opening and decide whether it fits into the overall style of the room. If windows don't match the decor of the space, or you simply find them unattractive, hanging curtains from the ceiling is one way to effectively hide them. It often becomes necessary to install such a cornice in order to disguise unevenness on the wall, a defect in the wallpaper, or communications coming out from the ceiling.
However, if the ceiling is decorated with carved molding, by hanging the console you run the risk of hiding a detail that attracts attention and adds individual character to the design of the room. Or the opening itself may have a beautiful shape and decorative finish. In this case, consider installing Roman blinds.
How to calculate the length of the cornice?
The cornice must be chosen such a length that completely open curtains open the entire window opening. Visually it will be like this: the width of the window opening needs to be increased by one meter, i.e. half a meter on each side for assembled curtains.
Are you wondering how to properly hang a curtain rod over a window? Then imagine that on average the length of the structure reaches two meters, then for installation you can use only two fasteners. If ideally the length is longer, then an additional bracket should be made in the middle.
The length and dimensions of the brackets should also be taken into account. Curtains should not lie on window sills or heating radiators, because they usually protrude far beyond the wall.
The distance of the cornice from the ceiling should take into account the fact that the fasteners are usually mounted in a reinforced concrete lintel above the window. There is a reinforcement cage inside it, which means that a drill should not get into this rod, because it will not be possible to drill the required size of the recess.
We have already found out the distance at which the cornice is attached from the ceiling; now it remains to determine how the cornices should be installed from the walls. Typically, the brackets are located no closer than 15-20 cm from the walls. In order for the cornice to hang evenly, an equal number of centimeters should be measured from the ceiling on both sides of the brackets. This can be done using a special horizontal level. Important: walls are not always level, so be sure to visually ensure that you don’t get into trouble.
The sequence of installing a plastic cornice with your own hands
Hanging a ceiling cornice is not difficult, but it is important to do everything correctly, in a certain sequence
- We decide on the location of the cornice. To do this, sketch out an approximate diagram on which the length of the main element will depend. For rotating elements, if any, it is necessary to take into account the required distance from the wall.
- If the cornice should be attached in a straight line along the window, everything is simple here - we saw off the profile of the required length with a hacksaw according to the diagram. If it is necessary to hang the curtain not near the window, but in the middle of the room and the cornice line will have turns and bends, then we draw up a diagram. Using it we cut individual elements to the required length, and then install each separately.
- To attach to the ceiling, we drill holes in the profile using a drill so that the screws firmly hold the profile together with the curtain. Sometimes the profile already has mounting holes for fastening. After complete installation of the product, these holes will become invisible, so do not make them too infrequently. The average distance between them is 0.5 m.
Accessories for ceiling plastic cornices
We apply the profile to the place of future fastening and mark with a marker the places that need to be drilled for screwing in the screws. We make holes in the ceiling in the marked places using an electric drill, insert plastic dowels inside. Next, we put the plastic profile back on the mounting location and screw in all the screws one by one. The profile is quite flexible, but it is better not to lower it suddenly during installation, holding it with your hand so that it does not burst or break. After fastening the main profile to the ceiling, the rotating elements are similarly attached, if they are provided for in the diagram. We pass hooks for future curtains through the internal holders, limiting their movement if necessary with special stops and plugs. We cover the plastic cornice with decorative tape, which can be made in any color to match the interior of the room. After installing the cornice, we hang the curtains to check whether everything is done correctly. Blinds and curtains are quite easily attached to the hooks of the ceiling cornice. The sliding of curtains should be smooth and easy.
Plastic cornice with bends and turns
How to attach a ceiling cornice to a wall?
Mounting on brackets to the wall
It is impossible to attach such a cornice to suspended plasterboard or suspended ceilings, so it is attached to the wall.
Manufacturers foresaw this problem and equipped the cornice with special brackets, which are also attached with screws and dowels, but to the wall.
The upper strips of the brackets can be of different lengths (10-30 cm), which allows you to adjust the distance of the cornice from the wall.
The cornice is attached to the top bar of the bracket with special plastic plates. The brackets are mounted at a distance of 1-1.5 m, and 0.5 m from each other if the cornice is two- or three-row with large massive curtains.
Plastic cornices are even easier to install on a wooden ceiling. Here you need to mark everything correctly and secure the structure with self-tapping screws. In wide cornices, the holes must be made in two rows.
If you plan to attach light curtains or curtains to a plasterboard ceiling, there will be no problems. But if you are hanging multi-layer, massive curtains, for reliability they are fastened to the wall using brackets, or you need to construct wooden anchors. Fix the timber embeds to the base ceiling at the location where the future cornice will be attached.
So, it is not difficult to hang the cornice correctly, following the necessary installation steps. A decorated plastic cornice along with matching curtains will decorate the entire room.
Useful tips
Before purchasing a cornice, take measurements of the window opening or other place where it will be mounted.
The main advantage of plastic curtain rods is their versatility
The fastening to the wall should not interfere with the opening of the windows, so we place it above 5 cm from the window opening. The removal of the cornice should be such that the curtains do not touch the ledge of the window sill, window handles, or radiators. Choose the length of the cornices so that the windows open completely and freely. The recommended distance from the window opening to the ends of the cornice is 30-40 cm. This value should be clarified depending on the density and width of the curtains and the location of the window. For heavy curtains, use durable plastic curtain rods secured through holes in the rail. The heavier the blade, the smaller the pitch between the mounting holes becomes.
More information on the topic: https://dachaprosto.com
The process of attaching the cornice
You can also secure the curtain rod with your own hands. First, you need to drill out the required socket for the bracket using a hammer drill. A dowel is initially inserted into it; it should not protrude beyond the plane of the wall. Next, you need to attach a special fastening element and secure it with screws, wrapping them in a plastic dowel.
After the supporting elements are secured, you should begin installing the cornice, according to the instructions for the cornice.
When all the walls are painted and the furniture is in place, the only thing left to do in the apartment is to hang the curtains and enjoy the warm stay inside. But in order for expensive tulle with curtains to show off in the right place, you need to know how to properly hang curtain rods in relation to the window. There is nothing difficult here, but some nuances are still present. Read our review and learn all the features of installing curtains.
The cornice is an indispensable element of the interior, without which it is impossible to hang curtains
Installation procedure
After the holes have been made, you need to take the cornice, center it on the window, level it and make marks. Next, you need to mark on the ceiling with any writing object the points where the holes will be drilled.
If several people take part in the process, the work will be somewhat easier - while some are holding, the other is marking. If there is no one to help, you can perform this procedure alone.
To do this you will need double-sided tape. You need to cut three or four 5cm pieces and attach them to the back of the tire facing the ceiling. Two at the edges and in the middle - this is enough for a 4-5 m plank.
Now you need to remove the protective covering and secure the cornice according to the marks made. Double-sided tape holds the device quite securely, which means you can continue without fear. If necessary, it is worth adjusting the position by tearing off the adhesive tape.
Types of cornices
For each special room design, construction stores always have several different types of cornices in stock. They differ in:
- type of material of manufacture;
- method of fastening and type of fastener;
- the shape of the supporting beam.
When choosing a cornice, it is important to take into account the style and weight of the curtains, the shape of the window and the style of the room.
Wood, metal and plastic are used as materials for making fastenings for window textiles. Each material is successfully used for various interior styles. Plastic products are especially popular due to their low cost, availability, but most importantly, a huge selection of different colors, shapes and designs.
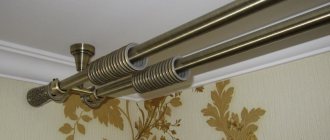
Metal and wood are expensive curtains. They are purchased for luxurious interiors, decorated with elements of wood or chrome. These products can withstand heavy loads, so curtains made from thick fabrics, richly decorated with glass beads, decorative clamps and all sorts of ruffles are suitable here.
Different types of fasteners are used for different repairs. Typically this is mounted on:
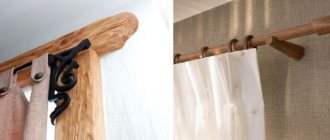
Wall-mounted models are equipped with brackets, most often these are L-shaped hangers, the design of which is made in the style of a cornice
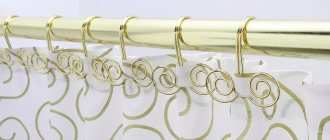
To secure curtains with lambrequins, there are special curtain rods with adhesive tape.
Ceiling systems are usually profile products that have several grooves for attaching hooks. But it happens that telescopic or tubular curtains are attached to the ceiling. Oh yes, there are also different types of cornices. This:
Crossbars and cables are usually mounted on the wall, and profile ones on the ceiling. But there are exceptions: some are installed on the ceiling, and others on the wall.
The aluminum rail of such a cornice can be mounted both on the wall and on the ceiling
How to properly hang a cornice on a wall: step-by-step instructions
To learn how to properly hang a curtain on a wall, read the following tips:
- The first step is to mark the wall. This is an important stage, since the final result depends on its correct implementation. What could go wrong? Are you sure that the wall and ceiling meet at a perfect 90 degrees? This is usually not the case, so be sure to measure the mounting points from the ceiling.
When marking, you should not focus on the ceiling; to accurately determine the horizontal line of the cornice suspension, it is better to use a level
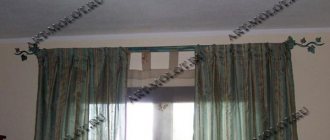
A wall cornice is usually hung at 1/3 of the distance from the ceiling to the window opening
How much to leave for curtains?
The standard extension of the cornice is 15-18 cm. Therefore, do not forget to leave at least 20-25 cm of free space from the wall for curtains. If you need to hang blackouts or special curtains on the windows that do not let in sunlight, then do not forget to add a third row of the cornice.
Interesting materials:
What does Wi-Fi mean on TV? What does a 1 mean in the military registration and enlistment office? What does v mean vendetta mean? What does majestic oak mean? What do freckles mean? What does inner core mean? What does money mean in a dream? What does a rotten apple mean in a dream? What does washing dishes mean in a dream? What does it mean to lose a gold ring in a dream?
How to hang a ceiling curtain correctly
The procedure for installing a curtain hanger on a ceiling space is no different from mounting it on a wall. But there are still some nuances here. And the main one is the material from which the ceiling is made. Drywall and tension structures are very common in residential apartments. And such materials are not capable of holding a large load.
You can attach a light curtain to a plasterboard ceiling
There are special fasteners for drywall. These are the same dowels with screws, but only of a special design. Each of them is designed for a certain load, above which the element cannot be loaded.
Butterfly dowel for fastening in drywall
How to use a butterfly dowel when attaching a cornice to a plasterboard ceiling
This cannot be done without preliminary analysis. A significant role is played by the type of cornice, the material of its manufacture, the number of crossbars or grooves for curtains, as well as the type and density of the fabric. These parameters determine the mass of the entire product. After all, it is known that drywall is a fragile composition. Its edges can easily crack, and the cornice will simply jump out onto the floor.
Curtains of any type can be attached to a suspended ceiling.
There are no special fasteners for suspended ceilings. If it was planned to attach the curtains to the ceiling system, then it is necessary to provide wooden (metal) bars under the base. In this case, installing window textiles on ceiling fasteners will not be difficult.
Scheme of fastening a wooden block to a stretch ceiling
And this is what it looks like in reality
It is important to know at what distance to hang the curtain from the ceiling. The determining parameter is the gap between the curtains, the window and the heating radiator (battery). It is best to visually try on where the curtain goes by attaching a curtain. This way you will achieve an accurate result.
When determining the location for attaching the ceiling cornice, the width of the protruding part of the window sill and the presence of folds on the curtain are taken into account
The order of work is as follows:
- Marking the ceiling space.
- Drilling holes for dowels with screws.
- Fastening brackets and crossbars.
If you are installing a plastic (aluminum) profile-type cornice, then there is no need to attach brackets. The product is attached directly to the ceiling surface using dowels. Additionally, this solution is decorated with a decorative baguette.
When installing a stretch ceiling, curtains can be fixed in a niche, then the design of the cornice will not matter at all
Work on mistakes
What to do if mistakes were made when choosing or calculating the mounting locations for the cornice? The main thing is not to rush to despair and get upset. Let's look at two of the most common mistakes made by beginners.
The problem of a cornice that is too long can be solved with the help of a hacksaw; the only limitation is the presence of decorative elements; there is a high probability that the cornice will lose its visual appeal.
If the cornice turns out to be too small or the standard models are not suitable for a long wall, you will have to go in search of special connecting elements that will easily allow the main length to join the additional one without disturbing the movement of the hook-runners.
How to attach a curtain to a loose wall
People often face the problem of installing curtain rods in loose walls. A thick layer of old plaster tends to crumble when installed in the drilled holes of plastic dowels. Naturally, nothing serious will be held in such a wall. You'd better forget about beautiful Italian curtains.
Loose material will not be able to hold a heavy curtain
To get rid of this problem it is not at all necessary to do a major overhaul. It is enough to drill holes of a larger diameter than the dowels purchased. The holes are sealed with tile adhesive or wooden “chops” with liquid nails. After complete hardening and drying, all you have to do is screw the screws into the wood.
Well-dried birch is best suited for making wooden cork.
The best solution would be to install a long anchor bolt, which will be fixed deep into the wall
Thanks to various types of fasteners and cornices, you can hang beautiful curtains in any room, with any of its shortcomings.