Depending on the design of the stretch ceiling, the method of installing the cornice changes. Naturally, it is physically impossible to attach a cornice to a thin film, and attaching it to a wall in a modern interior is not always justified. Therefore, this article discusses two types of fastening curtains under suspended ceilings.
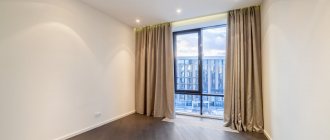
In addition to the traditional fastening of curtain rods to a wall or ceiling, another original option is available with a suspended ceiling - a hidden curtain.
This arrangement opens up new design possibilities and makes the room appear higher since the bar is not visible.
Important! It is necessary in advance (before installing the stretch ceiling) to decide on the type of fastening of the cornice. For example, installing a cornice on mortgages will become impossible after the ceiling repair is completed.
Features of installing cornices under mortgages
The main difference between installing a cornice under a suspended ceiling is the need for reliable support for its fastening. In the future, it will “hide” behind the hanging structure, so that only the cornice will remain visible. The support function is performed by mortgages - a metal profile or wooden beams attached to the concrete ceiling.
This way, the curtain mount will be invisible, since the crossbar is recessed into the interceiling space.
You will need to make a suspended ceiling with a niche in which the cornice will be hidden.
Note! If wooden embeds are used in repair work, then before installation they must be treated with a special antiseptic, which will protect the wood not only from fungal attack, but also from insect pests.
If the installation of a stretch ceiling is carried out by a repair team, then all the nuances of installing the cornice should be discussed in advance. Most likely, professionals will recommend pre-strengthening the canvas at the places where the cornice is attached to the beams.
Before purchasing, it is advisable to decide on the approximate design of the curtains.
For light curtains, a plastic crossbar is sufficient, but for heavy curtains you will need a durable aluminum or metal curtain rod.
Innovative solution
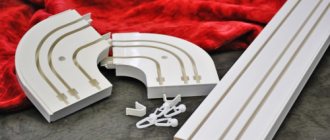
Another way to create a hidden cornice is a new system of cornices built directly into the ceiling. Today, design solutions require minimalism and simplicity, both during installation and in appearance. Therefore, KRAAB-SYSTEMS successfully implements these requirements.
@kraab-systems.com
The company implements most solutions using a damper, gapless system, which visually makes the structure more aesthetically pleasing and makes installation more convenient. It is worth paying special attention to the fact that such a cornice system is an innovative solution in the field of suspended ceilings: thanks to it, it became possible to embed a cornice in the ceiling without the use of additional profile and installation of niches. Among other things, the cornice can be supplemented with an electric drive and the movement of the curtains can be controlled using a key, remote control or smartphone, since the “smart home” system is now gaining popularity all over the world and is becoming an indispensable attribute in every room
Paying attention to the design, it is worth noting that the engine itself is hidden behind the curtain and does not spoil the appearance of the structure, and the silent mechanism does not irritate or interfere. Another absolute advantage is that the engines are selected according to the client’s needs. If we talk about appearance, the cornice looks like a thin strip of black or white. But when choosing a cornice, a person is often faced with the question of the number of cornice lines. The classic quantity is three lines: for thick curtains, for tulle and for lambrequins. If we return, again, to minimalism and practicality, then the optimal solution today is a one-line solution - for blackout curtains.
The process of installing a ceiling cornice on mortgages
You can install the embeds yourself - this will give an advantage over taking measurements, as it will allow you to immediately mark the location on the drawing. It is difficult to install a cornice in this way without professional skills, but it is quite possible if you carefully follow the instructions.
You can install both ceiling and wall models in a niche, but it is better to give preference to the first option.
The installation process is as follows.
- The first step is to beat off the ceiling level, and then install a wall molding along the marked line - an aluminum profile on which the ceiling will be attached (harpoon system).
- Next, in place of the future cornice, mortgages are installed along the window or the entire wall. Regardless of the chosen material (metal or wood), the support can have a different design - either a solid platform or consisting of several individual elements. If the first option usually uses a long wooden beam or a metal profile, then the latter can use small wooden beams placed in a parallel chain at the points of attachment to the future cornice.
- After stretching the ceiling, the mortgage will disappear from view, but will remain a reliable basis for attaching the cornice. You need to make markings on the ceiling canvas by attaching the cornice to the already hidden mortgage and make marks through the holes for the fastening. Installing reinforcing rings made of plastic around the marks will help prevent the fabric from stretching and spreading in places where it is fastened with screws.
Depending on the number of curtains, you need to purchase one, two, three or four-row curtain rods.
That's all! Having secured the ceiling cornice to the suspended ceiling, all that remains is to choose the “decoration” for the windows. A pastel curtain or a bright curtain – it all depends on your interior preferences. Since the cornice is placed a little lower, the hand can easily reach the hooks.
If you hang a ceiling rail across the entire width of the room, the curtains can be pulled apart on both sides of the window.
This will allow more light to enter the room.
Additional Information! After installing the hanging structure, the ceiling height in the room dropped slightly. If the curtains have already been purchased, their size will need to be shortened.
Problems of choice
Ceiling surfaces and recommended curtains
According to the methods of designing the ceiling space, it is usually divided into several types:
- reinforced concrete ceilings;
- tension systems;
- rack structures;
- suspended and mirror surfaces;
- false ceilings;
- raster or cassette coverings.
When choosing ceiling curtains, be sure to take into account the type of ceiling in the room. If you have reinforced concrete foundations that are standard for apartments, installing a cornice of any weight to the ceiling will not be difficult
But with tension or suspended plasterboard structures the situation is different. You will have to focus not only on the fasteners that come with the curtain rod, but also on the types of ceiling materials, because the curtain is attached not to the wall, but to the ceiling above the window
Types of designs and materials
Ceiling curtains help out when the window sill protrudes significantly into the room.
According to the type of material from which the cornice can be made, the following types of products are distinguished:
string curtains fit light curtains. Their design is represented by a string stretched between two fasteners. Under the weight of the textile, the cornice will begin to sag. Therefore, a hanging string curtain is suitable for a kitchen with a weightless curtain or a children's room.
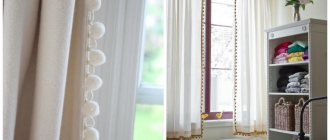
wooden cornices will highlight styles such as Provence, classic, country, and rustic. The main advantages are the environmental friendliness of the material and the ability to withstand maximum loads.
profile systems are simple and democratic. However, it is with them that most design ideas can be solved. The design of the curtain is represented by a long aluminum or plastic profile with several rows. This feature allows you to hang tulle, curtains on one product and complement the design with lambrequins.
The profile is equipped with elements that round corners and connect its individual parts.
metal curtain rods are the most durable and can easily withstand multi-layer compositions and heavy printed curtains. This is an excellent solution for high-tech and minimalist styles.
Dimensions
When choosing curtain rods, the question always arises as to what size the curtains should be. If we talk about optimal parameters, then for a spacious room in which the windows are located along a long wall, you need to purchase curtains 50-60 cm wider than the window opening. It is necessary to cover a section of the wall surface to prevent oblique sun rays from entering the room.
For a narrow room, the dimensions of the cornice should be slightly narrower than the window wall.
Features of a hidden niche under the cornice
If you have some experience in carrying out repair work, creating a niche will not be difficult. But, having absolutely no knowledge and skills in this matter, difficulties may arise. Fortunately, having understood some of the nuances, it is possible to assemble a niche yourself relatively easily and quickly.
For a lightweight design designed for tulle and thin curtains, a width of a few centimeters is sufficient.
Typically, a room with a ready-made suspended ceiling has a special gap (10-25 cm) between the window and the hanging structure, intended for installing curtain rods. The niche for curtains in a suspended ceiling can be of different lengths.
When determining the width, take into account the dimensions of the window sill and the position of the battery. In order for the curtains to hang evenly, they should not touch the radiator.
- Correspond to the width of the window opening, a margin of 40 - 50 cm is possible (an additional 20 cm to the left and right of the window is necessary for comfortable pulling back the curtains).
- Place along the window wall (this option is often used by designers in narrow rooms, where the wall with a window opening is visually expanded due to curtains placed along the entire perimeter of the cornice).
- Placed along all walls (this design is used in a room with corner windows or windows placed on two or more walls. This helps to implement various design solutions, for example, installing additional lighting).
The length most often coincides with the length of the wall.
The minimum size is slightly wider than the window, at least 10-15 cm on each side, while the curtains should cover the edges of the window sill.
Exclusive design options
Installing a niche in a
bay window Niches for curtains are often installed in attic rooms, in the sloping part of the room, for which installing baguettes in the traditional way is not suitable.
If you have free funds, you can illuminate the structure from the inside and outside in an original way. This technique focuses attention on the window area and allows you to use the window sill separately. For example, as a desk or a place for reading.
Design solution for illuminating the box above the bed
Very often in interior design, a hidden box is placed above the bed, creating a kind of canopy. The appearance of the room becomes more cozy and aesthetic, and the lighting mounted in the niche adds romance to the room.
Ceiling cornice in the interior: types, tips for choosing.
Installation of a hidden niche and installation of a ceiling cornice
You should take into account the presence of a balcony outside the window, which also affects the design of the niche. Heading from the balcony back to the room, you will definitely want to take a look at the brand new ceiling. The first thing in sight will be the cornice niche in the ceiling for curtains, and here an unpleasant oversight may appear - the open back side, through which the “insides” of the stretch ceiling can be seen.
Additionally, it is necessary to take into account the dimensions of the cornice, hooks and curtain tape; they must be completely hidden behind the canvas.
Important! To prevent this from happening, you need to take into account the design features in advance and install a two-level ceiling. The point is that installing additional fasteners helps to tension the fabric into the inside of the niche.
It is important to provide additional space if you plan to install a hidden lighting system.
Instructions for creating a ceiling niche and attaching a cornice.
- It is necessary to install a mounting molding along the perimeter of the room (except for the wall with a window). To do this, you need to decide in advance on the height of the ceiling. The main thing is not to overdo it with the size of the gap, otherwise the low ceiling will visually conceal the room.
- Next, you can begin the ceiling work: an aluminum profile or wooden beam is mounted along the window at the same level with the baguette. The distance for the niche is selected individually - depending on the width of the cornice (one-, two-, three- or four-row) and the presence of lighting. For light curtains and tulles, 5 cm is enough, heavy curtains need about 15 cm, and for multi-layer drapery it is better to allocate up to 25 cm.
In a niche that is too deep (for example, in two-level structures, the indentation can reach 40-50 cm) it is inconvenient to attach the crossbar and hang curtains.
- The bottom of the curtain niche will either have to be plastered or drywall installed. This is done to ensure that all corners are perfectly straight, which will allow you to fix the edge of the canvas by attaching it to a wedge profile or glazing beads.
- A baguette is attached to a fixed wooden beam, after which you can proceed directly to stretching the canvas. In this option, the suspended ceiling does not reach the end of the wall, leaving the cornice hidden behind a niche.
To install a hidden cornice, use a plasterboard box, a timber frame or a special profile for suspended ceilings.
Additional Information! In order to glue the ceiling plinth in front of the niche, it is necessary to attach a sheet of plasterboard to its inner wall, extending from the edge of the ceiling exactly at the distance of the plinth itself.
Marking
At the initial stage, markings are made:
- The distance from the box to the most prominent element of the window opening should be at least 16 cm. It is laid on both walls and connected by a line on the ceiling. This line will be the boundary of the niche. It is convenient to use painting thread for drawing.
- Parallel to the line, draw another one, which is the inner boundary of the box. The width between them corresponds to the width of the structure.
- Verticals are lowered on the walls, limiting the height of the frame.
USEFUL INFORMATION: Using moisture-resistant drywall in the bathroom
The following diagram shows a variant of a niche, which is provided in the design of a suspended ceiling.
Advantages of hidden cornice placement
Not only does installing a niche not take much time and effort, but the option with a hidden cornice has a number of advantages.
The advantage of a plasterboard box is that when hanging curtains there is no contact with the suspended ceiling.
When successfully used in the interior, ceiling cornices successfully complement suspended ceilings.
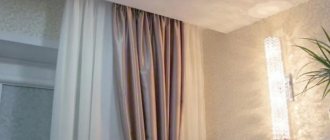
- Flowing fabric from the ceiling itself creates an illusion called “floating curtains,” which visually enlarges the space and significantly refreshes the interior.
Flowing curtains have a special aesthetic magic and are capable of creating a small design revolution even in the drab interior.
- The niche for the cornice can be made to any length, width and height. This is very convenient if the walls in the room are too high (the suspended ceiling can be lowered to an acceptable height), there are wide window sills or a huge radiator (a wide niche allows you to place the cornice at a convenient distance from the window).
If you decide that it is best to make curtain rods for suspended ceilings in a hidden manner, then take a good look at the various options that have already been successfully tested in modern interiors.
- If the cornice was previously attached to the ceiling, there is no point in removing it. Before carrying out repair work, simply remove the curtains to prevent contamination.
You should first of all start from what you ultimately want to see in your apartment or house.
- The illumination of the niche for the cornice looks very nice, which enhances the already present effect of air curtains. An LED strip of any color you like is inserted into a special groove - it all depends on your imagination.
This creates the impression of a higher room.
- A stretch ceiling box will help you implement bold design solutions. Since the cornice is hidden from prying eyes, you can create the illusion of a visual unification of the ceiling and curtains. Stretch fabric in dark colors made of satin or suede will fit perfectly into a room with similar curtains. The interweaving of motifs looks original - the pattern from the ceiling can smoothly transition to the curtains.
The stretched fabric opens up wide design possibilities.
How to make lighting in a niche with the effect of floating curtains
To illuminate the curtains, an LED strip is glued into the niche on the side of the room. If you choose the option with a profile for two-level ceilings, purchase a baguette with special recesses.
This creates the impression of a higher room. The LED strip can be mounted independently or combined with hidden lighting around the perimeter of the entire ceiling.
Some tips:
- Tapes are available in different colors and even with the ability to change lighting, the latter option allows you to give the interior of your home a different mood;
- for curtain lighting, it is better to mount a separate switch;
- Tapes with a remote control are available for sale, which allows you not only to conveniently turn the light on and off, but also to change the color of the lighting.
Preparatory work
In this article, you can learn the method of installing a regular ceiling box, in which you can effectively hide the ceiling cornice. To obtain the desired design option as a result, when assembling a niche, you should be guided by the following sequence of actions. You need to start by purchasing and preparing materials.
To build a niche you will need to purchase:
- Drywall sheets;
- Profiles – ceiling PP 27x60 and guide PN 28x27;
- Tape to hide joints;
- Self-tapping screws;
- Putty.
You also need to prepare special tools - a screwdriver, a hammer drill, a spatula, a knife, a painting cord, a pencil and a tape measure. After this, you can proceed directly to the work itself.
Detailed instructions: Installation of a stretch ceiling
At the final stage of installation, the lamps are attached.
Please note that space for lampshades should be provided in advance.
At the same time, it is recommended to do the fastening of lamps without haste.
All that remains is to mount the plugs (masking tape) in the gaps between the wall and the profile.
One option is to install the film directly into the resulting gap.
If you don’t want to make a plug, then an alternative option is installing a plinth
But here it is important to act carefully so as not to damage the canvas or wallpaper. If fabric rather than film is used as ceilings, then there is no need to solder different fabrics, and you can do without a heat gun