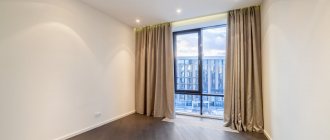
In addition to the traditional fastening of curtain rods to a wall or ceiling, another original option is available with a suspended ceiling - a hidden curtain. This arrangement opens up new design possibilities and makes the room appear higher since the bar is not visible. To do this, you will need to make a suspended ceiling with a niche in which the cornice will be hidden. This way, the curtain mount will be invisible, since the crossbar is recessed into the interceiling space. In this article we will look at how to choose the right cornice and calculate the dimensions of the structure. We will also examine in detail five ways to create a hidden niche in a suspended ceiling.
Recommendations for choosing a cornice
Before purchasing, it is advisable to decide on the approximate design of the curtains. For light curtains, a plastic crossbar is sufficient, but for heavy curtains you will need a durable aluminum or metal curtain rod.
Let’s immediately say that both ceiling and wall models can be installed in a niche, but it is better to give preference to the first option. Such cornices are much more compact and easier to hide behind the tension fabric. Otherwise, you will need to lower the ceiling lower, which will reduce the height of the room.
Curtains are hung in several rows: just tulle, with curtains, or additionally decorated with lambrequins. Depending on the number of curtains, you need to purchase one, two, three or four-row curtain rods. It’s also better to think through this point in advance.
Read more: How to choose the right ceiling curtain rod
Advice! If you hang a ceiling rail across the entire width of the room, the curtains can be pulled apart on both sides of the window. This will allow more light to enter the room.
Installing a plasterboard box
To install such a structure you must purchase:
- metal ceiling profile measuring 27x60x3000 centimeters;
- guide profiles for curtains on the ceiling, preferably made of aluminum, but you can also use wooden products measuring 28x27x3000 centimeters;
- plasterboard sheets;
- screwdriver or drill;
- screws or staples.
The sequence of actions when creating a niche for a hidden cornice is as follows:
- First, measure the distance from the wall in which the window opening is located to the edge of the window sill or heating radiator in the case where the battery protrudes beyond the window sill. Next, 10 centimeters are added to the resulting value, which is the size of the allowance that is necessary for the curtains to move freely in the niche space. Most often, you need this distance to be at least 15 centimeters, since this will make it easier to install the cornice in the future, but it should not exceed 20 centimeters.
- Then, using a paint cord, mark a line and draw it parallel to the wall, which will become the edge of the niche.
- Using a screwdriver or drill, guide profiles are attached according to the drawn line so that the gap between the dowels is at least 60 centimeters.
- To assemble the side parts of the box, pre-cut plasterboard strips are screwed to the guide profiles. In this case, the fixation step must be at least 15 centimeters.
- The perimeter is marked on the end sides of the future box and the structure is similarly secured with self-tapping screws. The profile must be placed in the direction of the walls.
- Using a hacksaw, strips of drywall are cut relative to the profile, which simultaneously become the sides of the niche.
- Perform end processing using a plane.
- Using the ceiling profile, they begin to assemble the sheathing at intervals of at least 40 centimeters.
Drywall is cut according to the width of the niche and the bottom of the box is sewn with this material. The side walls can be made of transparent plastic or glass. Designers suggest making the edges of the box not only smooth, but also curly, looking like waves or all kinds of geometric shapes. As for such a parameter as the width of the box, it can be different, depending on the height and size of the room.
Dimensions and depth of niches for curtains
First of all, the dimensions depend on the chosen cornice and its location in the room. For a lightweight design designed for tulle and thin curtains, a width of a few centimeters is sufficient. For a wider one, on which two or three types of fabric of different weights are hung, you will need at least 10 cm.
Other factors also influence the parameters of a niche for a curtain in a suspended ceiling:
- When determining the width, take into account the dimensions of the window sill and the position of the battery. In order for the curtains to hang evenly, they should not touch the radiator. But too much indentation reduces the usable area of the room. As a rule, the optimal width is 20-25 cm.
- The length most often coincides with the length of the wall. But it may decrease depending on the layout of the room, for example, when the window is located in the corner of the room. The minimum size is slightly wider than the window, at least 10-15 cm on each side, while the curtains should cover the edges of the window sill.
- The depth of the eaves niche depends on the installation method and frame parameters. The minimum distance from the rough ceiling to the suspended ceiling is 5-7 cm. Additionally, it is necessary to take into account the dimensions of the cornice, hooks and curtain tape; they must be completely hidden behind the canvas. In addition, about 8 cm should be added to compensate for the viewing angle, since we are looking at the niche from bottom to top. Thus, the optimal depth is 15-20 cm. It is also important to provide additional space if you plan to install a hidden lighting system.
Note! In a niche that is too deep (for example, in two-level structures, the indentation can reach 40-50 cm) it is inconvenient to attach the crossbar and hang curtains.
Advantages
The niche is part of the design project; it is made in advance during the renovation.
If it is difficult to decide on such an opening in your ceiling, you should familiarize yourself with the advantages of this design:
- all the fastenings on which the curtain is held and all the mechanisms with whose help it moves are hidden in the ceiling;
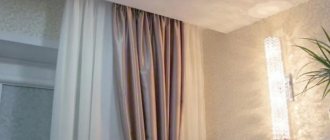
- the appearance of curtains flowing from above without any visible support is magnificent;
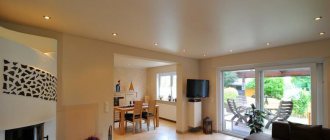
- if the room has a glossy ceiling, flowing curtains look twice as long and seem to stretch the room, making it visually taller;
- the niche will suit any style, you just need to choose the right textiles for the windows;
- such types of curtains as roller, Roman, Austrian, Japanese; screens, when lowered, become flush with the wall and create the impression of a single whole;
- In the niche you can hide LED lighting, thanks to which the curtains will acquire a fabulous charm.
Preparing the ceiling for a hidden cornice
The surface must be cleaned of any remaining paint or plaster. To do this, take a spatula. You can lightly moisten the ceiling, so the whitewash will come off faster. If cracks are found, they are sealed.
Advice! In cases where it is not planned to stretch the canvas in a niche, it is better to putty the concrete and cover it with white paint. The pocket will look more aesthetically pleasing.
Methods for creating a niche in a suspended ceiling
The shape of the structure can be the entire length of the wall or the size of a window with straight or rounded corners. There are several ways to make a niche for curtains in a suspended ceiling. They differ in design, manufacturing complexity, appearance and installation technology. To install a hidden cornice, use a plasterboard box, a timber frame or a special profile for suspended ceilings. Let's consider each method in detail.
Plasterboard box
A box is erected along the wall made of gypsum plasterboard and a metal profile, which separates the place where the cornice is attached from the rest of the room. A suspended ceiling is subsequently attached to it. This design allows you to install spotlights and decorate the ledge with a decorative baguette.
Box dimensions:
- length corresponds to the dimensions of the room;
- width - 5-10 cm; to install spotlights, you will need at least 30 cm;
- depth - slightly below the level at which the canvas will be stretched.
Installation is carried out as follows:
- Mark where the box should be located.
- At this point, a guide profile for plasterboard is screwed to the ceiling.
- Bends are made to the walls along the depth of the structure.
- A horizontal jumper with attachment points in the partitions is mounted to them.
- The guides are fixed together with vertical sections of the ceiling profile in increments of about 60 cm.
- At the level of the future stretch ceiling, the box is reinforced. To do this, an additional guide profile is mounted between the vertical jumpers. A baguette for the stretch ceiling will be attached to it in the future.
- Sew up the frame with plasterboard, starting from the vertical sides.
- Seal the seams with putty, then paint. After this, they begin to stretch the fabric.
If spotlights need to be built into the box, a wider structure will be required (approximately 30-50 cm). In this case, the assembly of the frame becomes more complicated. To increase the strength of the structure, additional horizontal jumpers are installed from the ceiling profile, which connect the lower guides. The fastening step is approximately 60 cm. The lintels are additionally fixed to the floor slab using direct hangers or sections of the ceiling profile. There is still room inside to place lights and wires.
Features: if the niche is narrow (20-30 cm), installing drywall in it will be inconvenient. Then the order of work changes. First, they assemble the wall on the floor from the window side, then attach it to the ceiling. The remaining part of the frame is attached to it and sheathed.
The advantage of a plasterboard box is that when hanging curtains there is no contact with the suspended ceiling. That is, the possibility of accidentally damaging the canvas is eliminated. But there are also disadvantages. The big disadvantage of a plasterboard box is that its assembly takes a lot of time, after which it still requires finishing in the form of putty and painting. In addition, you have to wait for the paint to dry before you start stretching the canvas.
Timber mortgage
This method of installing a hidden niche has two options. Let's look at a simpler one first.
The first step is to install the embedded beam. To do this, take a wooden beam that is the same length as the wall or slightly shorter. Usually a section of 30x30, 40x40 or 50x50 cm is suitable. The timber is attached to the rough floor strictly horizontally. A level or a thread stretched from one wall to another will help with this. A ceiling or wall molding is screwed to the bottom edge, into which PVC film is subsequently tucked. The beam itself should be located 5-10 mm above the level of the stretch ceiling. The gap is closed with an F-shaped decorative insert.
To install the mortgage, it is convenient to use reinforced metal corners. Then the tree can be located either close to the ceiling or at some distance. The mortgage will be on the same level, even if the floors are uneven. In addition, the resulting gap will serve to ventilate the space under the ceiling. Mold will not appear there, and the film will not be retracted when opening and closing the doors. But if the surface of the ceiling is flat, you can fasten it with long self-tapping screws through the mortgage directly to the floor slab.
Attention! It is better to use laminated veneer lumber; it practically does not deform from moisture, and over time the structure will not “lead.”
This method of installing a hidden cornice in a suspended ceiling is easy to implement. From the side of the room, the structure looks flawless. But it is not without its drawbacks. The fact is that on the reverse side there is a visible gap, mortgage and fastenings. They rarely look at them on purpose, raising their heads up near the window. But if the apartment has a balcony or loggia, then this drawback will be visible.
To hide the “wrong side”, choose a more complex option with a bend in the fabric. To do this, a fender profile is attached to the bottom of the beam, and a ceiling molding is attached to the vertical plane on the side of the window. The gap for mounting the canvas should be located flat against the ceiling. Then, when stretching, the PVC film is bent over the bumper and tucked into the baguette.
Thus, the canvas hides all structural elements and the niche looks aesthetically pleasing from any angle. In fact, it turns out to be a two-level ceiling, in which the lower tier occupies almost the entire room. But making such a design is more difficult and longer than the previous version.
If a hidden pocket is required not for the entire wall, but only for the size of the window, a U-shaped embed is assembled from timber.
Note! It is important that there are no burrs, damage or noticeable joints at the bend. When stretching the fabric, it is necessary to avoid wrinkles or folds. It is recommended to start installation from this area.
Special profile for cornices
In the finished version, the curtain pocket looks the same as with a fold and fold of the fabric; the structural elements are not visible and are completely covered by the stretch ceiling. But instead of timber, a special metal profile BP-40 is used.
It is a square aluminum pipe with a gap for inserting the blade. Available in a length of 2.5 m and a size of 40x40 mm, the bend height is 3 cm. Unlike timber, an aluminum profile makes it easy to create a niche with rounded corners. To do this, cuts are made in the bending areas every 5-10 mm.
Installation is similar to the method with timber, but takes less time, since there is no need to screw on additional baguettes. This option of creating a niche for a cornice in a suspended ceiling is somewhat more expensive. But many choose it because of the simplicity and greater reliability of metal compared to wood.
Niche profile
The previous methods are not designed to cover a hidden pocket with a suspended ceiling; the surface of the recess will have to be painted. A special baguette, “Nisha Plus,” will help you avoid this. The profile has a width sufficient to install a cornice on it. There are gaps on both sides for fixing the canvas, one of which is lowered below to hide the structure.
Profile length - 2.5 meters. This is enough for small rooms; in wider rooms the baguettes will have to be joined. It is important to ensure that there are no gaps or differences in level at the joints.
Installation is quite simple: metal corners are screwed to the ceiling, then a profile is mounted to them (with the low part towards the room). Subsequently, a ceiling cornice is attached to this structure, and the niche is covered with a piece of tension fabric. The material can be the same as in the rest of the room or simpler and cheaper.
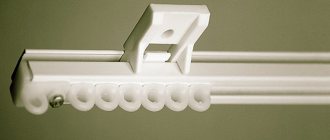
Curtain profile
This is another way to cover the top of a curtain niche with a stretch fabric. The method is even simpler, since a baguette with built-in fastenings for curtains is used - curtain profile PK-5.
The product is a white-painted aluminum tire with three rows of roller hooks. There is no need to additionally attach the cornice. On both sides of the profile there are grooves for fixing the tension fabric and one elongated edge to hide the niche. The standard size is 3.2 m, the height of the bumper is 5.5 cm. Installation is similar to the previous option.
How to hide hangers with a ceiling plinth: photos, examples
You can cover some shortcomings in wall decoration and hide the suspension using a regular ceiling plinth. However, this requires basic skills in installing skirting boards on the ceiling. First you need to choose the baseboard itself. It should be wide and have a flat surface on top so that it can be fixed to the ceiling.
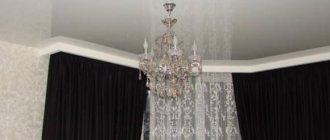
If the curtains are suspended from a ceiling cornice, it is quite easy to create the illusion of a hidden cornice using an ordinary baseboard
Products made from polyurethane foam, polystyrene foam or duropolymer are suitable for this purpose.
Note! Ceiling plinth plays an important decorative role in the interior. Its design, color, and ornament must be in harmony with the overall style of the room.
In order for the baseboard to hold securely, you will need to install a vertical base in the form of a plank.
The design must completely hide the curtain fastening elements
Next, you should purchase glue for attaching polyurethane products. It must be applied to the baseboard and the canvas pressed tightly against the ceiling. The glue sets quickly enough to securely fix the product. The plinth is attached at a short distance from the cornice. The same skirting boards should be placed around the entire perimeter of the room. Then its design will look solid and harmonious.
You can see photo examples of such methods of masking suspensions below.
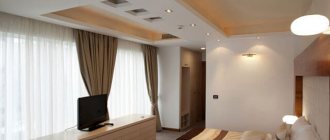
How to make lighting in a niche with the effect of floating curtains
To illuminate the curtains, an LED strip is glued into the niche on the side of the room. If you choose the option with a profile for two-level ceilings, purchase a baguette with special recesses.
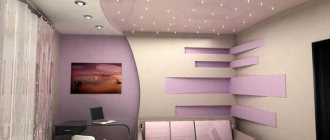
This creates the impression of a higher room. The LED strip can be mounted independently or combined with hidden lighting around the perimeter of the entire ceiling.
Some tips:
- Tapes are available in different colors and even with the ability to change lighting, the latter option allows you to give the interior of your home a different mood;
- for curtain lighting, it is better to mount a separate switch;
- Tapes with a remote control are available for sale, which allows you not only to conveniently turn the light on and off, but also to change the color of the lighting.
Design disadvantages
If you decide to use a special niche to hide the cornice, the cost of its manufacture will be added to the total costs. They can be minimized if all the work is done by hand. Replacing a cornice is considered more difficult than removing a classic curtain - in some cases, after dismantling it will be necessary to repair the ceiling.
Important! A hidden cornice is suitable for all interior styles, and yet in some styles it is better to use standard curtains or baguettes.
Curtains for curtains in Provence style
Photos of curtains in the ceiling niche
The stretched fabric opens up wide design possibilities. And this applies not only to the surface of the ceiling itself. A new way of designing a window opening is emerging. The curtain rod can not only be screwed to the wall or ceiling, but also hidden in a special niche. Then only the curtains will be open to view. The implementation is simple. You can mount the structure yourself using various materials. An easier way is to install special profiles: a niche or curtain.
Positive aspects of the products
The main advantage of this type of cornices is increased aesthetics. “Floating” curtains and curtains going directly from above the room look much more attractive.
There are other advantages to installing hidden curtain rods:
- the ability to hide an ugly section of the wall, as well as the side parts of the window;
- Suitable for any curtains, including very heavy ones;
- applicability for all types of ceilings;
- profitability - hidden cornices made of the same material are cheaper than conventional ones;
- versatility, suitability for all rooms in the house;
- advantageously emphasizing the texture of the fabric, focusing on the additional decor of the curtains;
- eliminating the problem of choosing a cornice with a specific design;
- the possibility of additional arrangement of hidden wiring, Internet cables, lighting, ventilation;
- suitability for windows of non-standard shapes, including U-shaped and semicircular;
- doing the work yourself.
Among other advantages, hidden cornices will be an ideal solution for windows with a wide window sill, because the depth of the niche can be adjusted independently.