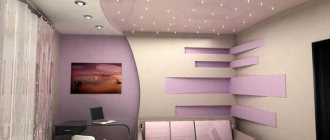
Stretch ceiling remains the most popular finishing option; it is valued for its practicality and budget, and is used for all rooms. One of the installation options is to install a niche for curtains in a suspended ceiling. It is suitable if you need to hide the ceiling mount of curtains. Let’s figure out what advantages this solution has and how different types of eaves niches differ.
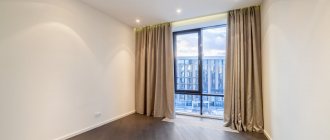
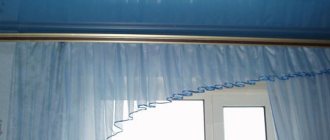
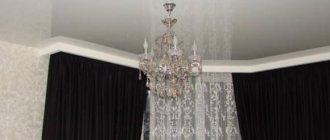
Curtains behind a suspended ceiling Source m-files-new.cdnvideo.ru
What is a hidden cornice
A modern hidden cornice is a structure for attaching curtains and tulle above a window or any openings or niches, which is hidden from view. In this case, we are talking about cornices hidden in suspended ceilings.
In addition to the traditional mounting of curtain rods, another original option is available - a hidden curtain.
This is done using a created niche in which a regular cornice for curtains and tulle will be hidden.
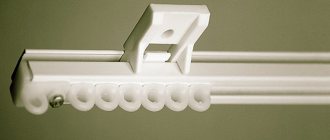
Today there are several types of curtain rods known by material that are suitable for such an installation:
- Wooden.
- Steel, for very heavy curtains.
- Plastic.
- Aluminum.
- Combined, often plastic + aluminum.
Each of the materials has its own pros and cons, and the choice must be made together with the master, based on the characteristics of the curtains and the design of the ceilings.
A pre-planned visual solution is a strict necessity, since it determines how the installation work will proceed.
Note! Curtain rods can also be electrically driven; such designs are commercially available.
In modern interiors, niches can also be wall-mounted. Such design decisions are made not to install cornices and curtains, but to design a secret light source around the perimeter of the room, including along the cornices.
About the backlight
As noted above, you can embellish the interior by creating colorful lighting using LED lamps. To do this, use a special profile for PVC suspended ceilings. For D-Premium fabric stretch ceilings, such profiles do not exist; you cannot do without the help of a specialist.
Successful repairs, your navigator in suspended ceilings, NICOMAX COMPANY!
Advantages and disadvantages of niches for curtains in a suspended ceiling
Hidden cornices have many advantages:
- The design is applicable for different types of curtains, ceiling heights, room sizes, layout and interior style.
- Visually increase the height of the wall, which is especially good for low ceilings.
- There are no unnecessary details, curtains and tulle fall from the ceiling itself, which allows you to achieve an airy effect.
- The number of curtain design options is not limited.
- The cornices themselves will cost less than their decorative visible counterparts.
- It is possible to install cornices of different shapes - round, S- or U-shaped, solving problems of different levels of complexity.
- You can also hide electrical cables, wiring, lighting, and various sensors in a niche.
- A hidden cornice can be an excellent solution for zoning a room - you can attach, for example, vertical thread curtains or Japanese sliding screen curtains to it.
A stretch ceiling is quite a delicate thing, so an ordinary cornice with heavy curtains cannot be attached to it; the canvas simply will not support the weight.
There are few disadvantages of invisible curtain rods:
- Installation is more complicated than installing hanging curtain rods on the wall under the ceiling.
- Installing a stretch ceiling with a niche will ultimately be more expensive.
- This minus relates, rather, to the suspended ceiling itself - it “takes away” a little from the height of the room, up to 10 cm.
This arrangement opens up new design possibilities and makes the room appear higher since the bar is not visible.
Features and Benefits
Often, the desire to hide the cornice arises among owners of suspended ceilings, when they do not want their eyes to cling to the metal pipe above the window instead of a smooth coating and shiny fabric. At the same time, in a well-thought-out interior, at first glance it remains unclear how the curtains falling from the ceiling are attached.
The main advantage of built-in curtain rods is the ability to be used in non-standard rooms with an unusual window shape. At the same time, the design itself can be adjusted to any features and repeat a U-shaped, curved and semicircular line.
Why choose a hidden cornice? For low ceilings, the use of a regular rough cornice is unacceptable. One element can visually steal most of the room. For such apartments, a hidden curtain rod is perhaps the only preferable option that can make the room more spacious and wider:
- Thick curtains across the entire width of the wall look very laconic, beautiful and modern.
- Hidden designs are great for rooms with suspended ceilings. The proximity of a hidden cornice and a vulnerable ceiling covering is absolutely safe and will not cause damage to the film.
- Vertical folds of curtains flowing down without any support look incredibly beautiful and expand the space of the room.
- For owners of wide window sills, built-in cornices are an excellent way out. With such a feature of the window, choosing a suitable option is quite difficult. And with a hidden design, you can hang any curtains, regardless of the window sill.
- Installing a built-in cornice yourself is no more difficult than a regular one.
An invisible cornice fits perfectly into any interior and is a practical and universal solution:
- In an additional ceiling niche in front of the wall, you can hide wires, install an Internet line, provide ventilation, or decorate the structure with additional lighting.
- Color, texture, elegance of fabric and decor take first place in the interior of the room.
- Expands the field of work for design ideas and solutions.
- Hidden curtain rods are cheaper than standard open-form models.
Preparing the ceiling for a hidden cornice
Installing a suspended ceiling with a cornice is not so difficult, but you must remember that preparing the ceiling is an important part of the work that cannot be ignored or performed formally.
Stretch ceilings provide great scope for a creative approach to interior design.
The surface for fastening structures must be perfectly flat and durable, and therefore it must first be thoroughly cleaned of layers of old whitewash, paint, glue, and plaster. If cracks are found, they must be sealed in accordance with all construction regulations.
Irregularities on the ceiling, where cornices or suspended ceiling structures will be installed, are eliminated using putty or applying a special bandage made of construction reinforced mesh. Before installing ceilings, it is necessary to dry all treated surfaces thoroughly.
Depending on the number of curtains, you need to purchase one, two, three or four-row curtain rods.
If you plan to have an open niche without covering it with ceiling film, and also not very deep, the surface of its walls must be puttied and painted/whitened so that no untreated concrete remains.
Dimensions and depth of niches for curtains
For good visual hiding of devices for fastening curtains and tulle, with an abundance of folds and the presence of molds, swags, lambrequins, etc., you will need at least 10 cm of niche depth. Ideal is 15-20 cm, but this cannot be achieved in all rooms.
To calculate the width of the niche, take into account the width of the window sill and its protrusion towards the room, the presence of radiators, pipes, and additional structures that may prevent the curtains from falling freely to the floor. Usually the width of the niche is 20-25 cm.
The choice of curtain rod depends both on the type of curtains and on the design as a whole.
Keep in mind! In very deep or very narrow niches it will be inconvenient to attach ceiling cornices and hang curtains.
In its shape, the niche can be the entire length of the wall, or just above the window or opening where curtains or tulle are supposed to be fixed. If a short niche is planned according to the size of the window, then the length of the niche should be 15-20 cm longer on both sides of the window.
When successfully used in the interior, ceiling cornices successfully complement suspended ceilings.
Advice from the experts
The niche for curtains in the ceiling will last a long time.
But after the decorative ceiling covering is installed, it will no longer be possible to change its parameters. To avoid various problems, professionals recommend taking your time and doing the following:
Carefully consider the design of the box. It is better to make a drawing indicating all the required dimensions. Choose a cornice design
It is important that after attaching the curtains to it, the curtains hang freely and do not touch the window sill or heating radiators. You can place the structure along the entire wall with windows - this will help visually expand the room
When purchasing, you should give preference to curtain rods with ceiling mounting. Ensure functionality of elements. Lifting mechanisms, hinges, runners and other elements must move freely and silently.
Methods for making a niche in a suspended ceiling
Hidden ceiling curtain rods are installed on a suspended ceiling in three ways:
- Installation of a plasterboard box. It also allows you to install a strip of spotlights along the curtains.
- Fastening a mortgage from a wooden beam.
- Installation of a special profile for ceilings. The most optimal and popular option.
When choosing a suitable design, you should also think about the practicality of choosing curtains.
Plasterboard box
A plasterboard ceiling ledge is usually made along the entire length of the wall. First, a box is made on a frame made of a metal profile, which is attached to the ceiling - it limits the space for a niche from the ceiling of the room.
You can make a plasterboard box yourself at home.
During installation, spotlights can be built into the box. This complicates the installation, since when installing lamps it is necessary to think about laying the electrical cable to them. The box in this version should be wider.
The ceiling structure, decorative baguettes, etc. are then attached to the box. The niche itself and the ledge need final finishing - putty and painting.
Timber mortgage
In this option, a wooden beam (preferably from a laminated wood profile) is fixed to the ceiling in a strictly horizontal position. The beam can have a cross section of 300\300, 400\400, 500\500 mm.
A ceiling frame is then attached to the beam, onto which the ceiling sheet is later attached.
If it is possible to fix the beam on the “legs”, forming a small gap near the ceiling, then this solves the problem of possible mold formation in a closed ceiling space. This method is well suited for rooms in which there is a risk of the ceiling getting wet - the gap between the timber and the ceiling, provided it is mounted suspended, allows you to ventilate the space between the film and the concrete.
The mortgage can be located under a suspended ceiling and be invisible.
There are also disadvantages to the design on a timber frame - it is noticeable from the side of the balcony, or when viewed from below. To avoid this, they attach a more complex structure with a bumper, which extends into a niche, hiding the beam and fastenings with film.
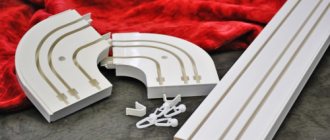
Special profile for cornices
The best option is to use a special aluminum profile for suspended ceilings, which hides a niche like a timber embed.
The profile is standard, marked BP-40. Length 2.5 m, sides of square base 4x4 cm.
This device allows you to make a niche not only of a standard shape, but also with rounded corners - for this, cuts are made on the canvas every 0.5-1 cm, which allow you to bend it and make it round.
Profile curtain rods are very strong and durable.
The undoubted advantage of this method is the use of metal material, since it is more durable and strong and is not affected by moisture.
Niche profile
This installation installation option is convenient because the niche does not need to be decorated or painted; it will be covered by a part of the stretch ceiling hidden in the depths of the niche. Curtain rods are fixed to the profile itself, and the niche takes on an aesthetic appearance.
Special niche profile for installing niches in suspended ceilings.
The “niche plus” profile is also standard, made of aluminum and has a length of 2.5 m.
Curtain profile
The design also allows you to hide the niche with a stretch ceiling, and there is already a curtain for curtains on the cornice itself.
The cornice is standard, marked PK-5, made of aluminum.
The original profile design allows you to install fashionable LED lighting along with the curtain.
Stage two: fastening profiles
Next, we take the metal mounting plates and bend them at a right angle. The length should be selected 5-10 mm less than the height from the main ceiling to the level at the attachment point. It is allowed to use various models of steel corners, furniture consoles, and “boots” made of plasterboard profiles instead of plates. In our example, the distance from the line along which the baguette is fixed to the main ceiling to the corners is 30 mm: 10 mm aluminum baguette and 20 mm thickness of the block.
The next step is to attach the timber to the corners. The block should also pass 5-10 mm above the level of the stretch ceiling. It’s okay if the block does not reach a few centimeters to the corner, the rigidity of the structure will be sufficient and will not move the niche in the future when stretched. It is best to use laminated veneer lumber; it is less susceptible to deformation from moisture and will not deteriorate over time.
And the most crucial moment is the installation of the aluminum baguette. It will act as a bumper through which the film bends. The profile should not have burrs, dents, traces of tape or other damage, and it should not be bent. The evenness and clarity of the inflection line depends on its quality. Use a laser level (for example, Bosch GLL 2-15) to more accurately align the bump stop. If there is no level, a tightly stretched marking cord will do.
Installation of hidden cornice
- First, measurements are taken - the length of the cornice, the projection of the window sill, radiators, pipes, and other structures, and the width and length of the future niche are calculated.
- According to the calculated dimensions, a line is drawn on the ceiling parallel to the wall - this is the boundary between the niche and the rest of the ceiling of the room.
- The structure and profiles are installed based on the chosen type of niche formation.
- If the option with an open niche is chosen, then all its surfaces are puttied and painted.
- The ceiling in the room is stretched.
- Cornices for attaching curtains are fixed into the niche. If the length of the niche is longer than the standard profile length of 250 cm, neat joints are made to allow curtain fasteners to slide freely into them. As a rule, curtain rods are fixed in the center of the width of the niche, but there may be other solutions, depending on the type of curtains and curtain rods.
The advantage of this type of design is that installation and dismantling in case of breakdown is not difficult.
link to the CATALOG OF CORNICES, production time for custom cornices is from 2 days and reasonable prices!
MISTAKE 1: purchased and installed with great difficulty - a cornice with rings. Cornice with rings (wall or ceiling NOT INTENDED for installation in a ceiling niche). MISTAKE 2: the cornice is a plastic rail, the cornice will be visible even after installing the curtains. The best option for this ceiling is a profile cornice that could be completely covered with a curtain, but a plastic rail does not have this option. MISTAKE 3: a niche covers the entire wall, and then they decided to make curtains only along the window. or there is even a completely unsuccessful option - a niche that covers the entire wall and a cornice that covers the entire wall, but they decided not to make curtains that span the entire wall. An empty cornice will look very strange. MISTAKE 4: insufficient niche length. In the photo, the niche ended immediately at the window opening. The cornice will have to be made with a sidewall and in the sidewall area, the curtain will be motionless, and if you step back a little, there will be a gap between the wall and the curtain. The curtain will cover a significant part of the window. MISTAKE 5: furniture elements extending into the eaves niche area
ERROR 6: in the photo on the left: the niche is so narrow that it did not even allow installing a 2-row cornice and the client cut out part of the cornice. in the photo in the center: there is no niche, although it would look great with this type of ceiling decoration. A lamp is placed in the area where the cornice is attached. The cornice will have to be placed in front of the lamp and the backlight will not be used. in the photo on the right: a narrow and deep niche. The only option in this case was to attach a cornice for Japanese panels.
MISTAKE 7: Incorrect selection of cornice. In the photo on the left: In the plastic rail curtain rods there is a corner element that allows you to maintain the mobility of the curtains in the corners. But the best choice for a corner and bay window would be an aluminum profile bent to the desired angle. In the photo on the right: the length of the cornice and the size of the sidewall are incorrectly calculated. The distance from the walls of the niche should be at least 2 cm if the curtains are stationary and 5 cm if the curtains are moved. The sidewall plug should rest against the wall, and in this case the sidewall is 7 cm shorter.
MISTAKE 8: There is little space left in front of the cornice - 2 cm, as a result the curtains do not move. The client was forced to lower the curtain using clamps. For some unknown reason, an anodized silver cornice was chosen. The anodized, slightly rough texture of the curtain rod made the movement of the curtains even more difficult. When ordering new curtains, we selected similar but white curtain rods and placed them according to the recommendations. MISTAKE 9: the size of the niche will not allow you to install a cornice that will cover the length of the pipes. What needs to be covered will remain in plain sight. MISTAKE 10: The design provides for large niches for a three-row cornice. Subsequently, the planning solution changed and it was decided to hang only Roman blinds. To disguise the free space in the niche, tulle was additionally placed. (see photo in PORTFOLIO) The inside of the niche is trimmed with molding, which is completely unnecessary.
How to hang curtains correctly
Having determined which curtains are best for curtain rods for suspended ceilings in a given room, you need to choose the right method for forming a niche. For heavy curtains and multi-layer installations, lambrequins, it is better to use a steel frame.
Note! When fastening curtains, you should avoid exposing the ceiling to avoid damaging it.
If the width and depth of the niche are calculated optimally, there will be no problems with attaching curtains and tulle to the cornices. Curtains can be hung on rollers, loops or hooks; plugs are installed on the sides to prevent them from slipping.
To secure complex installations, it is better to seek help from curtain specialists.
Keep in mind! The best curtains for a niche are made of plain thick fabric or satin. Not the best solution is lambrequins and additional decoration that is not intended for a hidden niche - it will look like scraps of fabric carelessly sticking out from the ceiling.
Creating a floating curtain effect
A constructive solution for installing a cornice in a niche allows you to achieve the effect of a floating curtain in a room. A greater “airiness” effect is given by the use of a special metal profile - with a curtain or like a mortgage.
If the canvas for the stretch ceiling is chosen to be of a glossy type, the effect will be greatly enhanced, the curtains will float in the air. In addition, glossy ceilings visually increase the height of the room.
Installing a stretch ceiling with the formation of a niche for curtains and tulle will undoubtedly complicate the work and will take more time. But such installations look more interesting than wall cornices under the ceiling and allow you to solve various design problems in the room, which makes the choice in their favor reasonable and correct. A room with floating curtains looks neat, stylish and beautiful.
Details
Preparatory stage of the ceiling under a hidden cornice
The surface must be cleaned of paint and varnish material or even plaster. To do this, you need to take a spatula, and you can wet the ceiling a little, and then the whitewash will come off much faster. If you find any cracks, they will be sealed.
Helpful advice! In cases where you do not plan to stretch the ceiling in a niche, the concrete will be plastered and covered with a snow-white paint and varnish material. In this case, the pocket will look more aesthetically pleasing.