Interior decoration is the final stage of renovation or change of decor. Of course, exclusive decorations are valued above all else, but they are very expensive and do not always suit the decoration of the room. But many beautiful and modern things can be made with your own hands. For example, such a fashionable and unusual decoration as three-dimensional paintings. They can be made from a variety of materials: paper, cardboard, leather, wool, beads, putty. Undoubtedly, in every home there will be unnecessary leftovers from some kind of work, and the missing ones can easily be bought in craft stores.
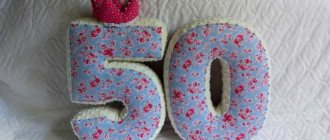
Three-dimensional paintings “Ballerinas”
Volumetric paintings made of paper
Paper cutting: technique, master classes
This handicraft comes in several types:
- Outline.
When curled pieces of paper are used to frame a drawing along a previously drawn contour. This technique is sometimes used in conjunction with scrapbooking. - On a plane.
This is a facing technique in which the workpieces are placed next to each other, filling the entire surface with them. - When trimming in layers,
parts are glued into each other. At the same time, the combination of elements of different shades helps create interesting effects. - Volumetric trimming
is most often done on a plasticine base. Twisted parts are attached to the molded blank, which allows you to make complex compositions.
Let's look at a simple example so that you understand how to work in this technique. To make such a violet, take:
- corrugated paper;
- sheet of cardboard;
- a simple pencil;
- scissors;
- a bottle of glue with a spout.
Redraw the presented image onto light cardboard.
From corrugated paper you need to cut squares with a side of 1 cm. To fold the paper elements you need to use a special stick for trimming. If you don’t have one, you can replace it with a pen body sharpened with a pencil.
- Using one of these tools, press a small piece of paper in the center and wrap it around the stick.
- Roll with your fingers without removing from this tool. Lubricate a small area of the contour with glue, place the twisted piece here directly on the stick, and carefully remove this tool.
- Create the second element in the same way, glue it next to the first. Having completed the contours, proceed to filling the inside of the petal.
- When the blanks are glued to all the petals, roll the same elements from squares of yellow corrugated paper. Glue them to the center of the flower.
If you wish, you can draw only the outlines of the plant, then the work will be completed faster. If, on the contrary, you want to prolong the pleasure of creativity, then cut out the same squares from light paper, twist them, fill in the background, or proceed to the next work. See how napkin trimming is done. To make this work, take:
- bright napkins;
- scissors;
- sheet of cardboard;
- gouache;
- trimming stick.
Cut strips 1 cm wide from napkins and chop them into squares with the same side.
Draw the outline of a tree on a white piece of cardboard. Apply glue to a small area so that it does not have time to dry. At this time, take a square from a napkin, screw it onto the tip of a trimming stick, and glue it to the smeared outline. Then glue another one and others. Take napkins of different colors to make the tree bright and cheerful. Fill the entire crown, sketch the trunk with brown gouache. Since you made the foliage of the tree from elements of different colors, make the picture frame from napkins of the same color. Use blue napkins to create a background. Elements for this are also created using the trimming technique. You will get a wonderful picture that will surprise and delight everyone who sees it. Using this technique, children and adults can do many other amazing projects using either flat or contour cutting. For this, corrugated paper in yellow, orange, lilac, green, white and blue was used. First, glue a sheet of blue paper onto white cardboard, then draw the outlines of a fish and algae. After this, roll up blanks for trimming from yellow squares and fill the tail of the fish with them. Make her body from orange and her head from lilac. And white and blue will create the eye of the fish. All that remains is to fill the seaweed with similar elements and admire the wonderful work.
See how you can make interesting crafts using another cutting technique.
Quilling
The beauty of voluminous paper products created using the quilling technique is undeniable. This craft is a composition of twisted ribbons of colored paper. The strips are prepared in advance, rolled into peculiar curls and given the shape of petals, droplets, and hearts.
Typically, this papercrafting method is used to embody scenes on a natural theme. For example, you can make flowers and, using them on a cardboard base, create a flower meadow, complementing the picture with the sun and clouds.
Templates for three-dimensional crafts made from paper and plasticine
Trimming will also help create such flowering cacti. For these crafts take:
- well sharpened pencil;
- plasticine;
- corrugated paper;
- toothpick;
- packing tape or satin tape;
- a pin with a bead;
- colored cardboard.
Let the child make three blanks from plasticine.
The large oval one will turn into a cactus, the small round one will become a flower, and the square one will become a pot for an artificial plant. Cut triangles from green corrugated paper, and from yellow paper - shapes of the same type, but only with an acute angle. You need to cut petals from lilac paper. Insert a toothpick into the cactus and the other end into the pot. Attach the flower base to the cactus. Fill his body with beautiful voluminous blanks. To do this, place a pencil in the center of the paper triangle, wrap it around the rod, and stick it into the plasticine base. Complete the first row, placing the elements close together, then move on to the second and the next.
To get the petal the desired shape, leave its tip free, twist only the part that you will attach to the plasticine.
To decorate a flower, you need to make 1-2 such petals, then fill its middle with triangular blanks made of orange paper. Look how the pot is decorated. It needs to be wrapped in a strip of colored cardboard or wrapping paper and tied with ribbon. A cactus made using corrugated paper cutting has been created. Look at the process of making another work using volumetric techniques. It will help your child develop creative thinking, fine motor skills, and imagination. Children show interest in working with paper, as a result of which such wonderful models appear. Prepare the following:
- corrugated paper;
- scissors;
- album sheet;
- pencil.
Cut paper into small squares.
Place the blanks of each color in separate containers. If the child is not very small, let him draw an apple on half a sheet of album paper. If he cannot do this on his own, adults will help. Coating small areas with glue, let him attach the squares here to make a fabulous rejuvenating apple. You can draw a twig or glue a thin strip of brown paper instead. You can glue one piece of a different color into an already attached one, thereby getting the effect of trimming in layers. The next two works are devoted to this technique.
Costume elements
Children's matinees and role-playing games, which are fashionable today, contribute to the development of the art of creating paper crafts. Various types of paper and cardboard are used. Using a headdress, you can make a real fairy-tale hero out of your child. For you need:
- Make a base from wide Whatman paper.
- Wrap the blank around the baby's head. Please note that the accessory should not cause discomfort to the child.
- Sew the ends together with thread or glue them together.
- Decorate the “hat” to your liking. You can use artificial hair yarn to make a figured crown, animal ears, a snowflake or a mustache.
Schemes for cutting corrugated paper in layers
New Year is just around the corner. Children and their parents will certainly prepare for this holiday. They will be able to make a postcard by placing a Christmas tree on its front side.
Prepare with your children:
- corrugated paper;
- Christmas tree drawing;
- glue and a brush for it;
- pencil;
- thick sheet of paper.
The work begins with drawing a Christmas tree on a sheet of paper.
You can use a template for this. Cut squares from green paper, as well as from sheets of other colors. First, the child will fill in the contours of the Christmas tree with green squares wrapped around a pencil. Then, in some places you need to glue blanks of other colors on top of them. They will become a decoration for the Christmas tree.
But you can do not trim in layers, but along a plane. Then you will need to first glue colored squares, which will become toys, and then fill the surface with green ones.
You can give your mother or grandmother a souvenir scarf. They will certainly be happy, especially since their beloved child did such a job. To make a scarf, you need to take:
- a sheet of red cardboard;
- corrugated paper of different colors or napkins;
- glue together with a brush;
- scissors;
- pencil;
- drawing template.
If the gift is made by March 8, then have dad or grandpa transfer the pattern template onto cardboard.
You will need a triangular part of the base. To do this, draw a square on cardboard, then cut it diagonally. Starting with small areas, have your child fill in the design with squares of different colors. You will need a lot of them. If your child doesn't have the patience to turn the crosscuts, help him with this so as not to reduce his interest in the work. The result is such a wonderful scarf. The next work was done by his mother and the child. A great example to follow. The result will be mushrooms and autumn leaves, made using trimming layers.
To create an autumn forest, take corrugated paper in red, orange, yellow. You can also make inclusions using brown and green.
For the craft, take:
- colored paper, cut into squares with a side of 2 cm;
- templates for application;
- trimming stick or pencil;
- glue;
- scissors.
It is convenient for children to glue using a brush or taking a glue stick.
Provide them with these materials and help them cut paper into squares. You can take your favorite mushroom and leaf templates from the Internet or use the ones presented. You can draw them yourself on thick cardboard and cut them out. The most painstaking work is cutting out squares and forming twisted blanks. To create the desired shape, place a square of paper on your left index finger. Hold it with your thumb. Place a pencil in the center of the workpiece and twist it. As you can see, this is another option for forming parts. We will also glue it in another way so that you can choose the one that is most suitable for you.
Pour glue into a bowl. Dipping the trim piece here, attach it to the leaf template. Having glued the red one, attach the yellow one directly onto it using PVA. The result will be an interesting effect. The yellow one is also glued to the orange blank; use green and brown squares as a base.
To make mushrooms, line the stem with white ends and the cap with brown, yellow or red.
Basic auxiliary materials
In order to make a handmade decorative painting, you need to prepare a frame, stretcher and material, paints, glue with which the image will be created.
There are many ways to create an artistic and unusual work from simple objects. Several proven creative techniques are offered, but the world of human imagination may turn out to be much wider than these examples.
Children's paintings made of corrugated paper
The trimming technique will also help you make them.
Such children's paintings turn out to be very cute and touching; they will remain for a long time and will decorate any corner of the house. If the child can, let him draw a round lake, reeds along its shores, and ducklings swimming. He will depict where the birch tree will be, a rainbow, and draw a horizon line. If this is difficult for a child, then adults will help.
For this work you will need squares of corrugated paper with a side of 1.5 cm.
The larger the size of the paper blanks for trimming, the higher the pile of the finished work.
Having cut them, you need to start gluing. In this case, it is most advisable to fill the space on the left side. First, cover the rainbow with multi-colored stripes, then make grass around it, and glue green trims. Also decorate the sky on this side, filling it with twisted blue squares. Leave some space for the clouds; glue the white blanks here. Also on the left side, start gluing brown parts in the form of reeds, make the chickens yellow, and lay out the lake blue.
Gradually moving to the right, decorate the white birch trunk with black splashes, rolled from paper of this color. Fill the entire space with voluminous blanks, after which you can enjoy the view of the colorful painting. This craft would be ideal for a kindergarten. Having brought it there, the child will certainly take first place in the competition.
But there are also more complex works that schoolchildren can do.
These violas were created by students in grades 1–8. This kind of joint work brings the guys together.
On a sheet of whatman paper you need to draw a viola with a pencil or transfer another image here. Then each of the guys will fill the flower with twisted trims of a certain color.
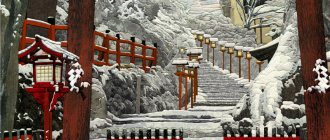
You can make winter paintings for the New Year.
If you draw well, draw the future art on cardboard with a pencil; if not, then just redraw it. A good template is embroidery patterns. They are transferred to a sheet and decorated with rolled paper pieces of a certain color.
Please note that the outlines of the Christmas trees are made of blue elements. This technique allows them to keep their shape and look fluffy and snowy.
Finally, look at how to make a New Year's garland, which can also be created using the trimming technique. For it, on whatman paper or white cardboard, draw the letters of the future inscription and cut them out. Now each one needs to be framed first with white trim, and red ones glued inside.
For the base, take a satin ribbon. Using a glue gun, letters are attached to it to create an inscription. Remember to maintain space between individual words.
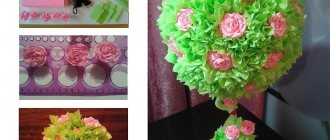
That's how many interesting and necessary things trimming can help you do. But this is not all that can be made using this technique. If you want to create a three-dimensional snowflake, watch this visual master class.
Another will teach you how to make a heart-shaped topiary using the same technique. This is what you would give to your loved one for his birthday or Valentine's Day.
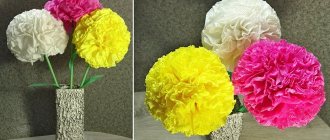
And today we will talk about how to make a paper painting with your own hands. Such a picture can look not only like an appliqué, but also like a three-dimensional sculpture.
To make a three-dimensional picture from paper you will need the following materials:
- colored paper
- scissors
- Napkins
- Double-sided tape or stapler
- Basis for the painting
- small carnations about three centimeters long
- hammer
Stripes
The essence of another type of volumetric modeling is gluing together multi-colored paper strips. This technology is used to create applications, panels, and to decorate works made by other methods. Here are the instructions:
- Form loops from the strips by gluing the ends of the blanks.
- Use them to designate flower petals, peacock or swan feathers.
If you glue strips in the form of a three-dimensional hemisphere to cardboard, you can create a turtle, a balloon, an apple, or an entire underwater world.
By gluing many strips crosswise in the middle and lifting the free ends with a thread inserted into the holes made in them, you can get a pear.
Note!
- DIY paper crafts: TOP-200 photos of exclusive ideas and craft options
DIY paper origami craft step by step: ready-made diagrams for creating beautiful origami at home (90 photo ideas)
- Crafts from paper and glue for children: step-by-step instructions for creating interesting crafts with your own hands (90 photo ideas)
Christmas balls woven from paper ribbons look attractive.
Master class video:
3. Cutting out thin parts.
Cutting grass, feathers, hairs or fur is not difficult, try to cut in the direction of hair growth, otherwise it will “puff up”. Paint over the white edges with a pencil of a lighter shade than the drawing itself.
And when cutting out the stems, you don’t have to paint over the white edges so as not to add unnecessary thickness.
4.
Shaping.
Imagine what the object you want to depict looks like in real life, look at it layer by layer. This will help to correctly recreate the volume from paper.
As a backing, use an eraser, sponge or rubber mat (a computer mouse pad will do).
5.
Installation and gluing.
6.
Background.
The choice of background is very important. The appearance of the finished work largely depends on the color and texture of the material. If the painting is light, then a dark background will create the impression of depth and emphasize the image.
Choose a background that complements the image, rather than being an independent part of the picture.
If you are going to frame a picture, don't add decorations.
But in a postcard, correctly selected decor will only add charm. Step-by-step instructions:
1. Select a pattern for the entire composition and for the base layer. 2. Thin paper for the base layer must be compacted. 3. Cut out individual elements of the design for the second layer. The elements are cut out completely, repeating the pattern of the base layer. 4. Glue the elements of the second layer to the base using double-sided tape. The tape can be used in 1-2 folds (at this stage you can make your own changes to the drawing). 5. Cut out individual elements and form subsequent layers of the design. Before finally gluing the part, make sure it is in the correct position. 6. Finalize the work into a frame. When making cards, you can additionally decorate them with ribbons, sparkles, beads, etc.
Incredible and fantastic paintings from pieces of paper by an amazing non-professional French artist, sculptor and photographer Nathalie Boutté inspired me. I wanted to tell you how to make such a picture out of paper. The enormous possibilities of this ordinary and at the same time unique material are revealed in her wonderful colors in multi-layered paintings.
Nathalie began creative searches and experiments with various types and textures by studying the various properties and well-known techniques for working with paper. Her experiments with origami and work with three-dimensional compositions led her to the creation of an interesting technique of three-dimensional applique from strips and pieces of paper.
The possibilities of the material and this technique allow you to create very original works. Portraits made from many layers of paper turn out surprisingly alive and spiritual.
How to do it yourself
You can make a modular painting yourself from a beautiful photograph. Your photo or one found on the Internet will do. For a good image, the photo must be high resolution and clear. The specific resolution depends on the desired size and printing method.
For a good image you need high resolution. DPI (dots per inch) - number of dots per inch
For example, to print a meter-long photograph with water-based ink, the resolution must be at least 1440 dpi. The same size with pigment ink requires at least 2400 dpi. Ultraviolet, solvent and latex printer inks are not used for printing images with a resolution higher than 1400 dpi. This doesn't mean lower quality photos can't be used. If they are clear, then you can. But to avoid graininess being visible, the picture will be small in size.
It is better to print modules for paintings on canvas. Canvas type is the cheapest. It is unlikely that you will be able to print large formats on photo paper, and stretching them will be problematic.
Dividing the picture into modules and printing
It is unlikely that you have a large-format color printer at home. Therefore, you will have to order printing of the modules from one of the copy centers, a photo studio or an advertising agency. Some may even break it for you themselves (for a fee, of course). But if you work at least a little with graphic editors (CorelDraw or Photosop), you can do it yourself. And bring ready-made files for printing.
The first video uses the CorelDRAW Graphics Suite software package for working with graphic information.
In the video below, the layout is created in the well-known Photoshop (Adobe Photoshop).
What's good about splitting an image in a graphics editor is that you can play with different options and choose the one that is most advantageous or the most suitable in size.
Frog
Adults who are passionate about kirigami crafts often wonder how to make kirigami for children. There are simple patterns on the Internet with cute characters. The little frog will not leave anyone indifferent. This simple pattern will use applique, and the only three-dimensional detail of the design will be the frog's mouth.
- Fold the green paper in half with the colored side facing inward.
- Draw a frog.
- Cut out the resulting outline.
- Add a horizontal section of the mouth.
- Bend the corners of the mouth in opposite directions.
- Straighten the workpiece.
- Turn out the corners of the mouth, making them voluminous.
- Glue or draw eyes, glue a tongue.
- Choose the background of the composition.
- Glue the frog onto the base, connecting the center lines of the workpiece and the base.
Ladder
The staircase template seems quite simple, but will require special care and precision. Carving a kirigami staircase is considered a more painstaking task than carving the previous designs.
- Make vertical cuts. A ruler will help make all the lines straight.
- Bend all broken lines in the desired direction. It will be more convenient to do this using a spatula.
Tips for beginners
These recommendations will help beginners at first:
- It is more convenient to cut out diagrams with a large number of small parts from the center.
- The template can be redrawn from the computer screen.
- The template can be secured to the work surface with tape or clamps.
- If possible, purchase special blades for paper.
If you really want to, you can quickly master the skill of kirigami. For many people, this becomes a part of life, and they find inspiration for new crafts in the world around them.
3) Diana Beltran Herrera
Paper sculptor Diana Beltran Herrera from Colombia uses her incredible talent to create colorful 3-dimensional paper birds.
Herrera can accurately reproduce every detail, from the long beaks of hummingbirds to the bright orange bellies of manakin fruit eaters. Moreover, the artist also conveys the anatomical features of birds.
Flower
Kirigami flowers are a popular subject for paper crafts. Below is a diagram that will turn into a wonderful card for any holiday.
- First you need to make 9 colors.
- Take a landscape colored sheet, fold it in half vertically and in half again horizontally.
- Fold the bottom left edge up.
- Bend the top layer of the corner down to form an isosceles triangle.
- Round the corners at the base of the triangle and cut out the petal.
- Unfold the blank, the flower is ready.
- Apply glue to the middle of one flower and its petals one at a time, and glue the flower to the base.
- Glue the next 7 flowers on top of the previous one, alternating each layer of petals, which are glued to the previous flower.
- Cut the last flower in half. On the left half, distribute glue over 2 and 4 petals, and on the right half, over 1 and 3 petals. Apply glue on top of the same petals.
- Close the card, put it under the press and let the glue dry.
Cake
Kirigami cards made especially for the birthday boy will be remembered by the hero of the occasion for a long time. This unusual craft will most likely take place on a shelf in the apartment of the person who receives such a postcard as a gift.
- Take a colored sheet, one side of which should be white.
- Draw the outline of the dessert.
- Cut through the solid black lines.
- Moving from the center of the picture, bend the blue lines outward and the red lines inward.
- Sign the card and decorate it.
Using different techniques when creating volumetric products
Having chosen an interesting idea, it is easy to use old newspapers or magazines, advertising flyers and even packaging materials to implement it, using different techniques:
- origami allows you to create three-dimensional paper crafts without gluing; the products are distinguished by their simplicity of shape and to make them, the stages of bending the blanks and assembling the finished product must be clearly reproduced;
- papier-mâché is a more complex technique; the creative process involves covering the base with small pieces of paper; the finished product requires additional coloring and decoration;
- quilling, to create crafts, thin and long paper strips are used, twisted according to a certain pattern, they help to produce openwork and the most aesthetic products;
- applique, this technique is suitable not only for babies and preschool children; thanks to its use, you can create unique decorative products, characterized by multi-layered and interesting designs.
Using colored paper for crafts will help you create a masterpiece of design art that will decorate your home or take a prize at an exhibition.
5) Anya Markievich
Anya Markiewicz is an artist from Germany who uses the Japanese art of paper folding - origami. However, her work differs from the work of other origami artists in its size. Most figures need to be viewed with a magnifying glass to see all the details.
Tiny Markievich figures called “nano-origami”
, are made from squares of paper no larger than 9 millimeters in size, resulting in amazing sculptures that fit on the tip of a finger.
Spruce
During the New Year holidays, many people want to decorate their home in an original way. A DIY kirigami Christmas tree will be a wonderful decoration for your interior or holiday table.
- Transfer the image of the Christmas tree onto paper.
- Cut entire lines of the template.
- Cut the shape of the Christmas tree according to the outline.
- Fold the figure along the dotted lines.
- The outer part of the figure will be the support for the Christmas tree.
- Fasten the Christmas trees together with hooks.
- Decorate with beads and rhinestones.
6) Simon Schubert
Artist Simon Schubert uses paper as both canvas and brushes, bending the delicate material to reveal incredibly realistic images.
Focusing primarily on architectural landscapes, Schubert achieves the perspective of spiral staircases and arched windows, and depicts endless geometric details by carefully folding the sheet.
Photography on canvas
How to turn a photograph into a painting on canvas without knowing how to draw or paint. There is a simple method for which you will need a black and white photo, canvas, acrylic paint, a hair dryer for heating and a spray bottle of water.
On canvas (thick fabric) you need to apply a layer of acrylic paint of the same color and immediately, before it dries, press the photo face down. When everything dries well, you need to additionally warm it up with hot air.
Then follows a process that requires a little patience, since you will have to gradually wet the paper from a spray bottle and peel off the top layer, which softens and rolls off from moisture. Dried acrylic paint does not dissolve in water, and all the black color from the sheet is imprinted on the canvas.
Snowflake
Photos of kirigami snowflakes are familiar to everyone from childhood. Below is a diagram for creating a six-pointed snowflake.
- Fold a rectangular sheet into a square, then fold it diagonally to form a triangle. Cut off the unnecessary part of the sheet.
- Combine the sharp corners of the figure to create a smaller triangle.
- Fold the workpiece again in the same way.
- Carefully smooth out the workpiece.
- Draw a snowflake pattern to suit your taste.
- Cut out the design along the outline.
- Unfold the craft and use it in interior decor.
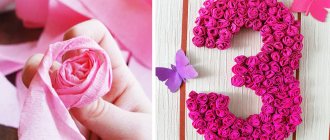
Butterfly
A simple but very beautiful volumetric kirigami butterfly can be made in a short period of time.
- Print the butterfly template.
- Make cuts along solid lines so that the butterfly holds onto the paper only with its body.
- Cut out the pattern on the wings.
- Fold the picture along the marked lines.
- Fold the cardboard sheet in half. Attach the body of the butterfly to the center. When the glue dries, insert the wings into the slots.
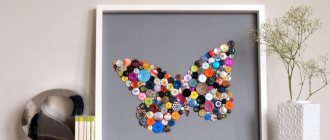
Using sparkles and sequins
Making such a painting takes little time, but it looks very impressive. You need to cut out a piece of fabric with sequins sewn on it, stretch it onto a piece of cardboard and insert it into a frame.
Note!
Macrame: diagrams, interesting projects and detailed descriptions of making crafts
- Crochet amigurumi - examples of how to make a beautiful toy with your own hands (75 photos)
Coffee topiary: step-by-step master class on how to make a small decorative tree from coffee beans
Using a uniform layer of sequins, you can create a pattern of glued sparkles. You can also make a separate picture from sparkles by gluing them according to a template design, in combination with scraps of fabric, knitwear, bundles of thread and any other suitable materials.